Imagine joining a video conference without downloading any additional software, playing a multiplayer game directly in your browser, or building a live streaming application with minimal latency. These powerful use cases are all possible thanks to WebRTC.
Web Real-Time Communication (WebRTC) is a revolutionary technology that enables direct peer-to-peer communication between browsers without requiring plugins or additional software. Despite its incredible potential, many developers find WebRTC intimidating due to its complex architecture and various moving parts.
In this comprehensive tutorial, we'll demystify WebRTC by exploring its core concepts, walking through the connection setup process, implementing data channels, and discussing advanced features. By the end, you'll have the knowledge to start building your own real-time applications.
What is WebRTC?
WebRTC (Web Real-Time Communication) is an open-source project and collection of APIs that enables real-time communication directly between browsers without requiring plugins, extensions, or additional software. Created by Google in 2011 and standardized through the W3C and IETF, WebRTC has become the foundation for many modern communication applications.
Key features of WebRTC include:
- Audio and video streaming: Capturing and transmitting media streams from devices
- Data exchange: Sending arbitrary data between peers
- Peer-to-peer communication: Direct connections without requiring server intermediaries (in ideal cases)
The major benefits of WebRTC include:
- No plugins required: Works natively in modern browsers
- Open-source: Free to use and adapt
- Cross-platform compatibility: Functions across desktop and mobile browsers
- Low latency: Optimized for real-time communication
At a high level, WebRTC works by establishing a peer connection through a process called signaling, which helps peers exchange the metadata needed to find and connect to each other.
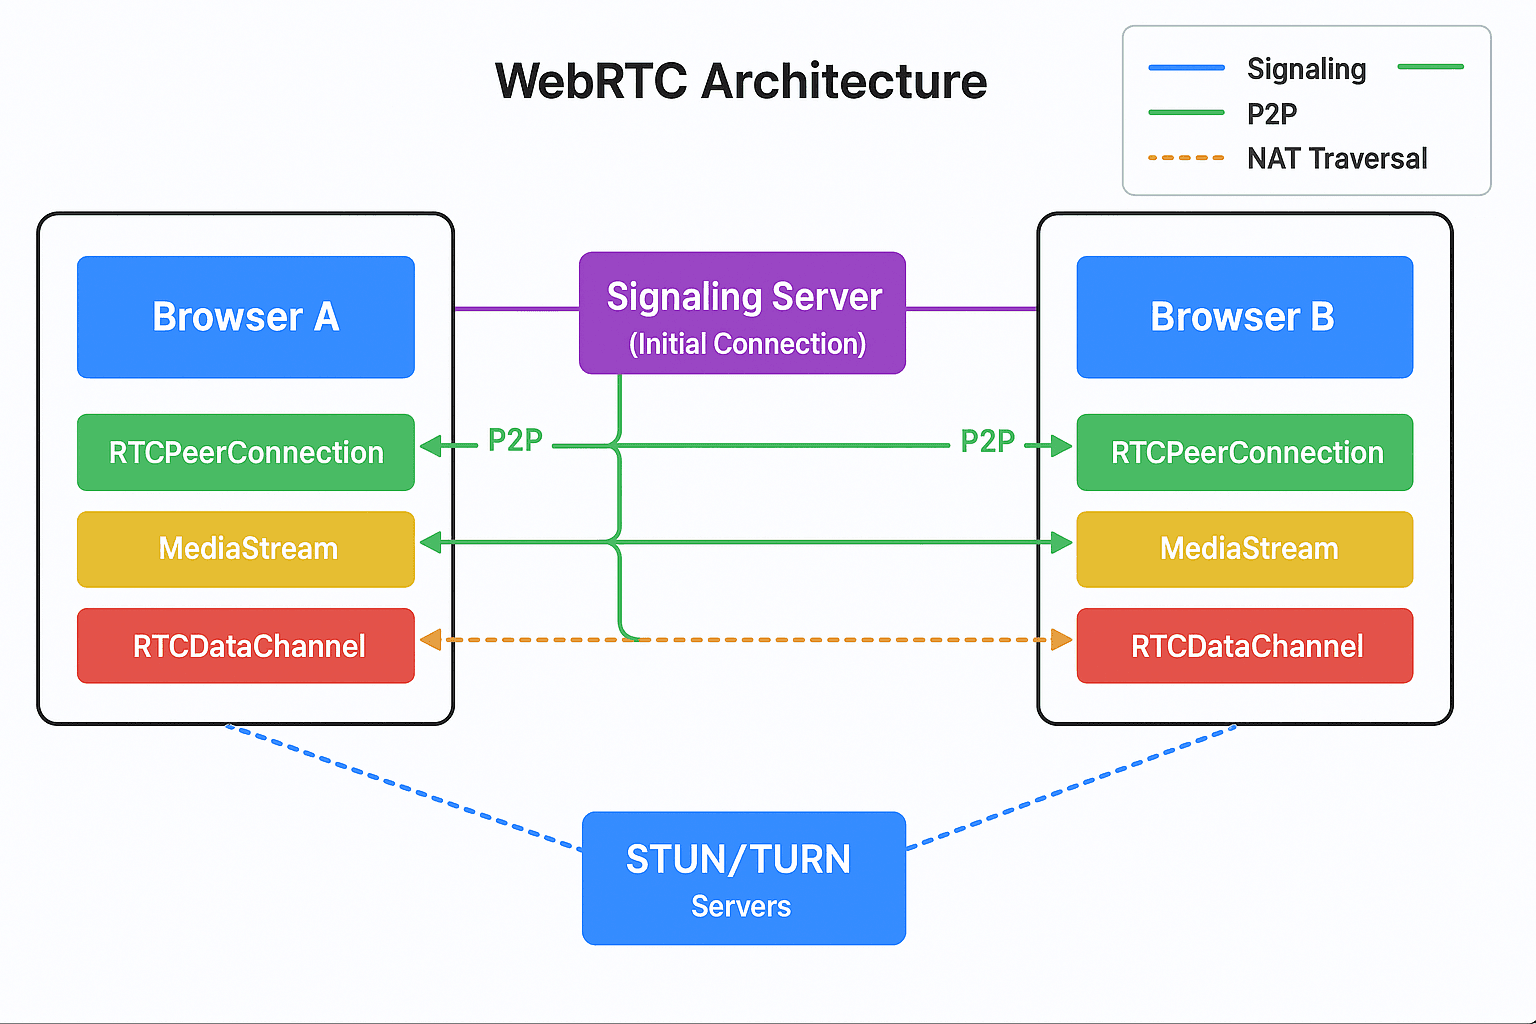
WebRTC Architecture and Key Components
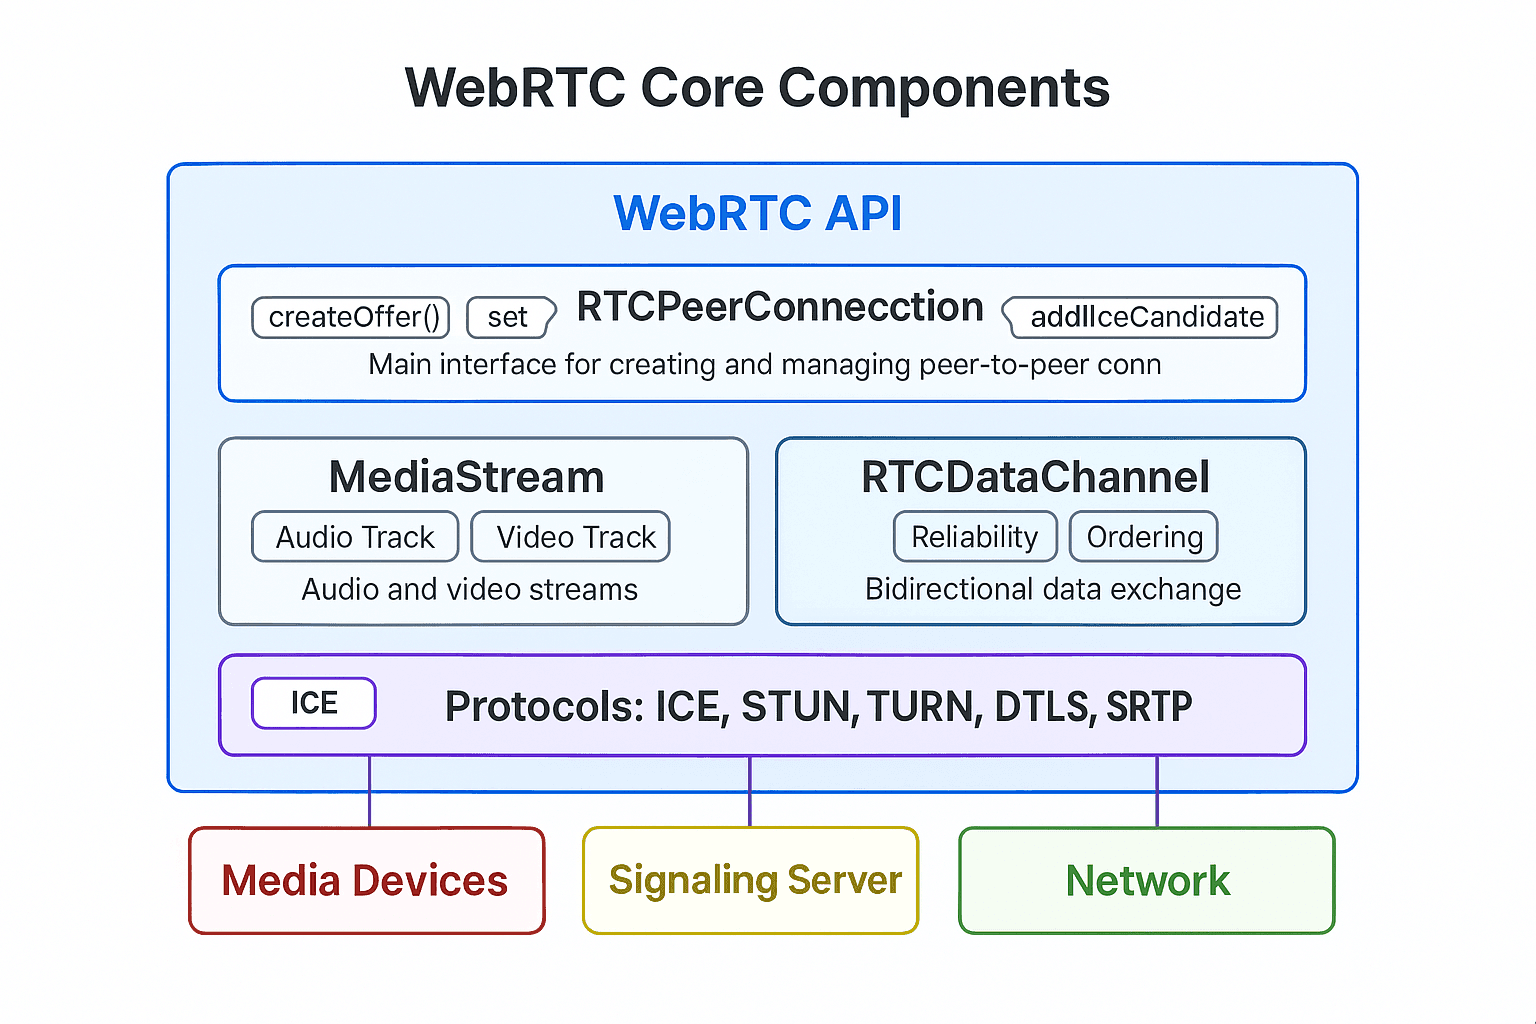
Understanding WebRTC's architecture is essential for implementing it effectively. Here are the fundamental components:
RTCPeerConnection
This is the central interface for establishing and managing a peer-to-peer connection. It handles all the complex processes of connecting two peers, including codec negotiation, bandwidth management, and encryption.
1const peerConnection = new RTCPeerConnection(configuration);
2
MediaStream
The MediaStream interface represents streams of audio and video data. Each MediaStream can contain multiple MediaStreamTracks, which represent a single audio or video track.
1navigator.mediaDevices.getUserMedia({ audio: true, video: true })
2  .then(stream => {
3    // stream is a MediaStream object
4  });
5
RTCDataChannel
This component enables arbitrary data transfer between peers, similar to WebSockets but with lower latency and direct peer-to-peer communication.
1const dataChannel = peerConnection.createDataChannel("myChannel");
2
Signaling Server
WebRTC requires a signaling mechanism to coordinate communication and set up a connection. The signaling server helps peers exchange session descriptions and network information. Importantly, WebRTC itself doesn't define a specific signaling protocol, giving developers flexibility in implementation.
ICE (Interactive Connectivity Establishment)
ICE is a framework that helps establish connections through NATs (Network Address Translators) and firewalls. It utilizes:
- STUN (Session Traversal Utilities for NAT) servers: Help discover your public IP address
- TURN (Traversal Using Relays around NAT) servers: Relay traffic when direct peer-to-peer connection fails
Without ICE, WebRTC connections would often fail in real-world network conditions.
Setting Up a WebRTC Connection: A Step-by-Step Tutorial
Let's walk through the process of establishing a WebRTC connection between two peers.
1. Gathering Media Streams
First, we need to access the user's camera and microphone using the
getUserMedia() API:1async function getLocalMediaStream() {
2 try {
3 const stream = await navigator.mediaDevices.getUserMedia({
4 audio: true,
5 video: true
6 });
7
8 // Display local video
9 document.getElementById('localVideo').srcObject = stream;
10 return stream;
11 } catch (error) {
12 console.error('Error accessing media devices:', error);
13 }
14}
152. Creating an RTCPeerConnection
Next, we create the peer connection with STUN/TURN server configuration:
1function createPeerConnection() {
2 const configuration = {
3 iceServers: [
4 { urls: 'stun:stun.l.google.com:19302' },
5 {
6 urls: 'turn:your-turn-server.com',
7 username: 'username',
8 credential: 'credential'
9 }
10 ]
11 };
12
13 return new RTCPeerConnection(configuration);
14}
15
16const peerConnection = createPeerConnection();
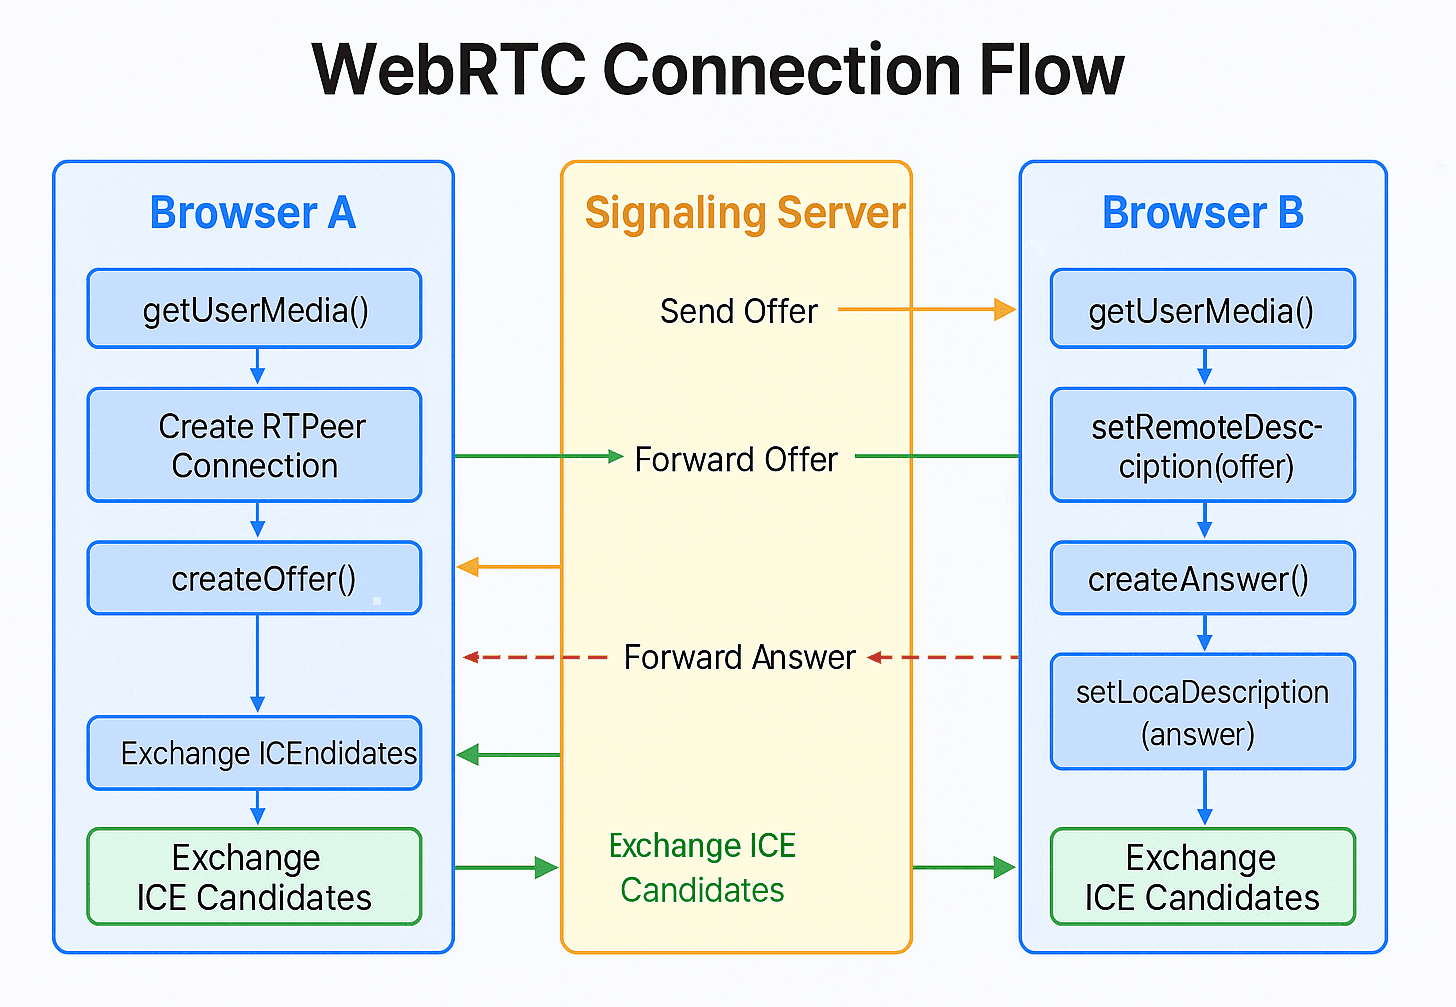
173. Signaling Process: Offer and Answer
The signaling process is crucial for establishing the connection. Here's how it works:
1// Caller: Create an offer
2async function createOffer() {
3  try {
4    // Add local tracks to the connection
5    localStream.getTracks().forEach(track => {
6      peerConnection.addTrack(track, localStream);
7    });
8
9    // Create an offer
10    const offer = await peerConnection.createOffer();
11
12    // Set local description
13    await peerConnection.setLocalDescription(offer);
14
15    // Send the offer to the remote peer via signaling server
16    sendToSignalingServer({
17      type: 'offer',
18      offer: peerConnection.localDescription
19    });
20  } catch (error) {
21    console.error('Error creating offer:', error);
22  }
23}
24
25// Callee: Handle received offer and create answer
26async function handleOffer(offer) {
27  try {
28    // Set remote description using the received offer
29    await peerConnection.setRemoteDescription(new RTCSessionDescription(offer));
30
31    // Add local tracks to the connection
32    localStream.getTracks().forEach(track => {
33      peerConnection.addTrack(track, localStream);
34    });
35
36    // Create an answer
37    const answer = await peerConnection.createAnswer();
38
39    // Set local description
40    await peerConnection.setLocalDescription(answer);
41
42    // Send the answer back to the caller via signaling server
43    sendToSignalingServer({
44      type: 'answer',
45      answer: peerConnection.localDescription
46    });
47  } catch (error) {
48    console.error('Error creating answer:', error);
49  }
50}
51
52// Caller: Handle received answer
53async function handleAnswer(answer) {
54  try {
55    await peerConnection.setRemoteDescription(new RTCSessionDescription(answer));
56  } catch (error) {
57    console.error('Error handling answer:', error);
58  }
59}
60
4. ICE Candidate Exchange
ICE candidates represent potential connection endpoints. They need to be exchanged between peers:
1// Listen for ICE candidates
2peerConnection.onicecandidate = event => {
3  if (event.candidate) {
4    // Send the ICE candidate to the remote peer via signaling server
5    sendToSignalingServer({
6      type: 'candidate',
7      candidate: event.candidate
8    });
9  }
10};
11
12// Handle received ICE candidates
13function handleCandidate(candidate) {
14  try {
15    peerConnection.addIceCandidate(new RTCIceCandidate(candidate));
16  } catch (error) {
17    console.error('Error adding ICE candidate:', error);
18  }
19}
20
When ICE candidates are successfully exchanged and matched, the connection is established, and media can begin flowing.
Using Data Channels for Arbitrary Data Transfer
While media streaming is a primary use case for WebRTC, data channels offer powerful capabilities for sending arbitrary data directly between peers.
1// Create a data channel (by the caller)
2const dataChannel = peerConnection.createDataChannel('myDataChannel', {
3  ordered: true, // Guarantee message order
4  maxRetransmits: 3 // Maximum number of retransmission attempts
5});
6
7// Set up event handlers for the data channel
8dataChannel.onopen = () => {
9  console.log('Data channel is open');
10  dataChannel.send('Hello from the data channel!');
11};
12
13dataChannel.onmessage = event => {
14  console.log('Received message:', event.data);
15};
16
17dataChannel.onerror = error => {
18  console.error('Data channel error:', error);
19};
20
21dataChannel.onclose = () => {
22  console.log('Data channel is closed');
23};
24
25// On the receiver side, listen for the datachannel event
26peerConnection.ondatachannel = event => {
27  const receivedDataChannel = event.channel;
28
29  receivedDataChannel.onopen = () => {
30    console.log('Received data channel is open');
31  };
32
33  receivedDataChannel.onmessage = event => {
34    console.log('Received message:', event.data);
35    // Respond to the message
36    receivedDataChannel.send('Message received!');
37  };
38};
39
Data channels are ideal for:
- Text chat applications
- File sharing
- Game state synchronization
- Collaborative editing
- IoT device communication
You can configure data channels for different use cases by adjusting parameters like ordered delivery, reliability, and priority.
WebRTC and Security Considerations
WebRTC was designed with security in mind and incorporates several important security features:
DTLS Encryption
All WebRTC communications (media and data) are encrypted using Datagram Transport Layer Security (DTLS), similar to HTTPS for web pages. This ensures that even if the connection is intercepted, the content cannot be deciphered.
Fingerprint Verification
During the signaling process, peers exchange fingerprints of their DTLS certificates. These should be verified to prevent man-in-the-middle attacks. A secure signaling channel is essential for this verification process.
Signaling Server Security
While the signaling server doesn't handle the media streams, it's a critical part of the security chain. Always:
- Use HTTPS for your signaling server
- Implement proper authentication
- Validate all messages
- Consider end-to-end encryption for signaling messages
Potential Vulnerabilities
Some security considerations to keep in mind:
- IP address leakage: WebRTC can expose local IP addresses
- Camera/microphone access: Always request explicit permission and provide visual indicators when active
- Third-party STUN/TURN servers: Use trusted providers or host your own
Browser Compatibility and Adapter.js
WebRTC is now supported by all major browsers, but implementation differences can cause compatibility issues. Enter
adapter.js, a shim maintained by the WebRTC project to handle cross-browser differences.1// Include adapter.js before your WebRTC code
2<script src="https://webrtc.github.io/adapter/adapter-latest.js"></script>
3Adapter.js:
- Normalizes the WebRTC APIs across different browsers
- Handles prefix differences
- Abstracts away browser-specific implementations
- Makes your WebRTC code more portable and future-proof
This library is particularly useful when supporting older browsers or dealing with experimental WebRTC features that may have different implementations.
Advanced WebRTC Features
Once you've mastered the basics, you might want to explore these advanced WebRTC capabilities:
Encoded Transforms
The
RTCRtpScriptTransform API allows manipulation of encoded audio and video frames before they're sent or after they're received. This enables scenarios like custom encryption, watermarking, or bandwidth adaptation.Scalable Video Coding (SVC)
SVC enables a single video stream to contain multiple layers of different quality. This is particularly useful in multi-party video conferencing, allowing endpoints to receive quality levels appropriate for their available bandwidth.
DTMF (Dual-Tone Multi-Frequency signaling)
The
RTCDTMFSender interface allows sending DTMF tones over a connection, useful for applications that need to interact with traditional telephony systems.Trickle ICE
This optimization technique allows ICE candidates to be exchanged incrementally as they're gathered, rather than waiting for all candidates before beginning the exchange. This significantly reduces connection establishment time.
Key Takeaways
WebRTC provides a powerful framework for real-time communication in web applications:
- It enables peer-to-peer audio, video, and data transfer directly in the browser
- The connection process requires signaling to exchange metadata and ICE candidates
- Security is built-in with mandatory encryption
- Adapter.js helps manage browser compatibility issues
- Advanced features extend WebRTC's capabilities for specialized use cases
The core components—RTCPeerConnection, MediaStream, and RTCDataChannel—work together to create a robust system for real-time applications.
Conclusion
WebRTC has transformed what's possible in browser-based applications, enabling a new generation of real-time experiences without plugins or native apps. While the learning curve can be steep, understanding the fundamental concepts and connection process sets a solid foundation for building innovative applications.
As you continue your WebRTC journey, consider exploring more advanced topics like simulcast, bandwidth adaptation, and multi-party architectures. The WebRTC ecosystem is constantly evolving, with new features and optimizations being added regularly.
What real-time application will you build with WebRTC?
Want to level-up your learning? Subscribe now
Subscribe to our newsletter for more tech based insights
FAQ