The demand for interactive live streaming in mobile applications has skyrocketed, with the iOS app market seeing a 43% increase in apps incorporating live video features in the past year alone. From social platforms and e-commerce to education and gaming, users now expect real-time, interactive video experiences.
However, implementing robust interactive live streaming functionality in iOS apps presents significant technical challenges. The complexities of video capture, encoding, transmission, and managing interactive elements can quickly overwhelm even experienced developers.
Fortunately, specialized SDKs (Software Development Kits) provide streamlined solutions for implementing these features in Swift and Objective-C. This comprehensive guide will walk you through selecting the right SDK, setting up your development environment, implementing core streaming functionality, adding interactive features, and optimizing for performance and security.
Understanding Interactive Live Streaming for iOS
What is Interactive Live Streaming?
Interactive live streaming goes beyond traditional one-way broadcasting by enabling real-time engagement between broadcasters and viewers. In iOS apps, this means users can:
- Send and receive real-time messages
- Participate in polls and Q&A sessions
- Share reactions and emojis
- Join as co-hosts or participants
- Interact with on-screen elements
- Receive personalized responses from hosts
This two-way communication creates more engaging experiences, increases user retention, and opens new monetization opportunities for app developers.
Use Cases for Interactive Live Streaming in iOS Apps
Interactive live streaming is transforming multiple industries:
E-commerce and Live Shopping: Retailers use live streams to showcase products, answer questions, and enable instant purchases, with iOS apps reporting conversion rates up to 30% higher than traditional shopping.
Social Media: Platforms like Instagram and TikTok leverage live streaming for real-time connection between creators and followers.
Education and Training: Interactive live classes enable students to ask questions, participate in discussions, and receive immediate feedback.
Gaming: Game streamers interact with viewers through chat, polls, and game-changing decisions influenced by the audience.
Virtual Events: Conferences, concerts, and workshops use interactive streaming to recreate in-person experiences with audience participation.
HLS (HTTP Live Streaming) Overview
Apple's HTTP Live Streaming (HLS) protocol is the foundation for most iOS streaming applications. Developed by Apple, HLS is optimized for iOS devices and offers several advantages:
- Adaptive bitrate streaming: Automatically adjusts quality based on network conditions
- Wide compatibility: Works with standard web servers and CDNs
- Security features: Supports content encryption and authentication
- Native iOS support: Deeply integrated with iOS frameworks
HLS works by segmenting video into small chunks (typically 2-10 seconds each) and creating a playlist (manifest file) that clients use to request appropriate segments based on network conditions.
While HLS offers excellent reliability and compatibility, it traditionally introduces higher latency (10+ seconds) compared to other protocols like RTMP (Real-Time Messaging Protocol) or WebRTC. For highly interactive applications, this latency must be addressed through specialized SDKs or by using alternative protocols.
Live Activities Integration
iOS 16+ introduced Live Activities, allowing apps to display real-time information on the Lock Screen and in the Dynamic Island (on iPhone 14 Pro models and newer). This feature pairs excellently with live streaming apps:
- Display streaming status (live indicator, viewer count)
- Show recent interactions or questions
- Provide playback controls without opening the app
- Highlight upcoming segments or events during the stream
Integrating Live Activities requires ActivityKit and WidgetKit frameworks, which we'll cover later in this guide.
Choosing the Right Interactive Live Streaming SDK
Key Features to Look For in an iOS Streaming SDK
When evaluating SDKs for interactive live streaming on iOS, consider these essential features:
- Low latency: Look for SDKs that can achieve sub-second to 3-second latency for true interactivity
- Interactive components: Built-in support for chat, reactions, polls, and screen sharing
- Scalability: Ability to handle thousands of concurrent viewers
- Customization: Flexibility to match your app's UI/UX
- Recording: Options to record and store streams for replay
- Analytics: Detailed metrics on stream quality, viewer engagement, and performance
- Swift and Objective-C support: Native libraries for iOS development
- Documentation quality: Comprehensive guides, sample code, and technical support
Popular iOS Live Streaming SDKs
Several established SDKs offer interactive live streaming capabilities for iOS:
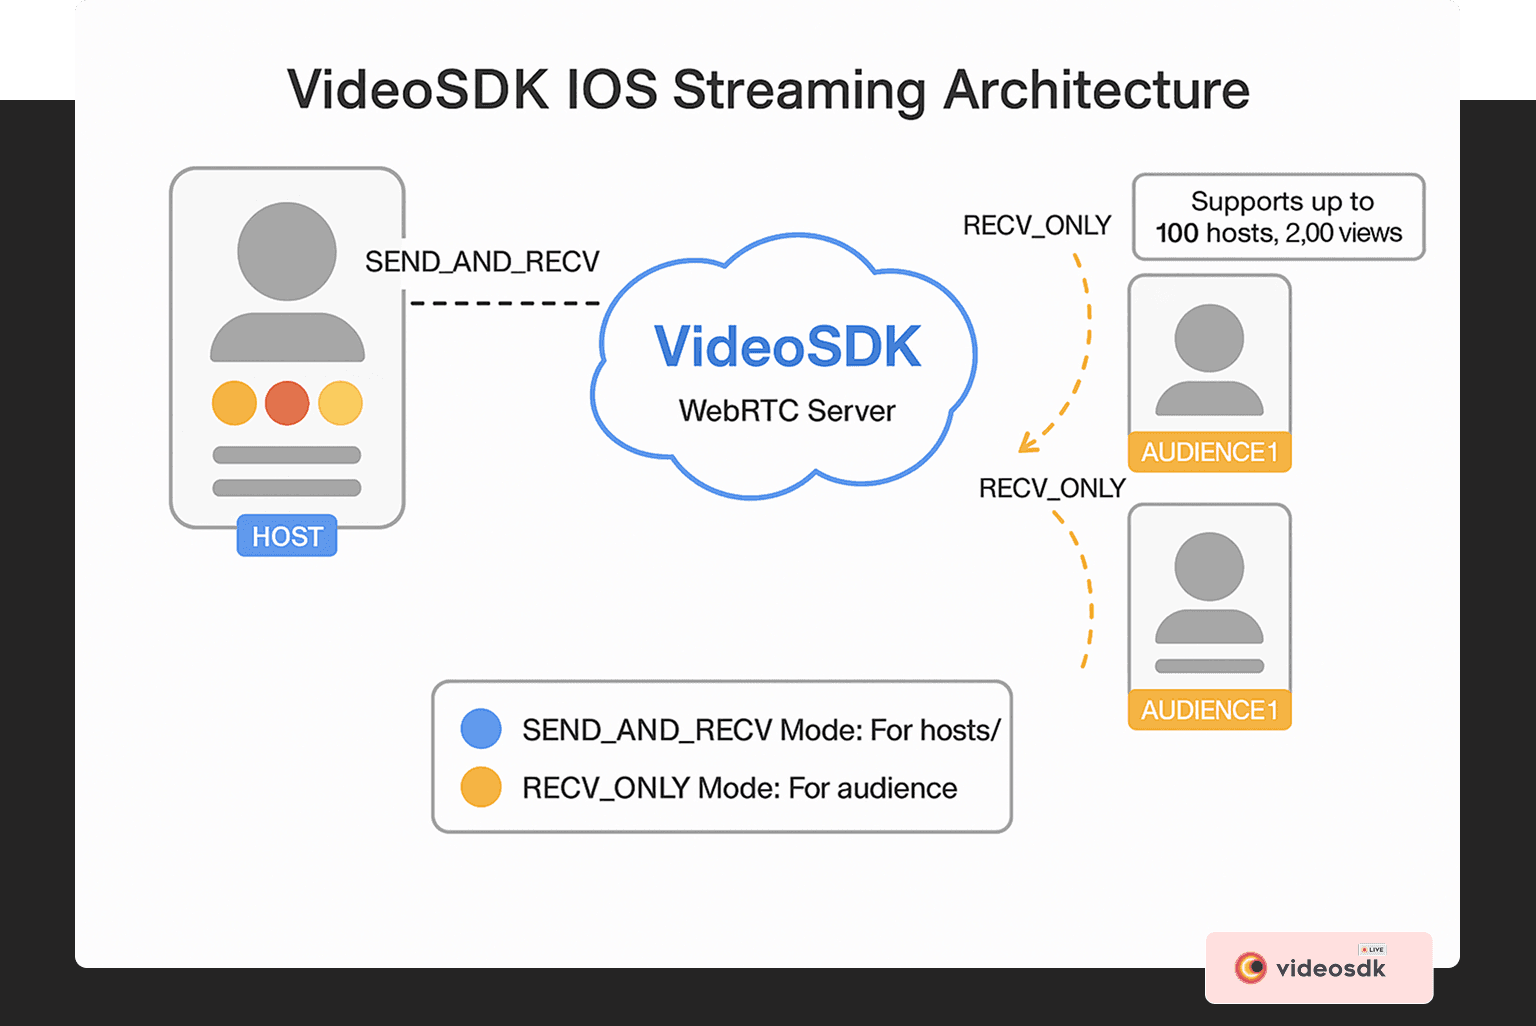
VideoSDK.live:
- Specialized in interactive features with support for up to 100 hosts/co-hosts and 2,000 viewers
- Built for ultra-low latency with WebRTC technology
- Extensive customization options
- Robust iOS SDK with Swift support
- Perfect for social use cases
- Simplified participant mode management (host vs. audience)
Vonage Video API (formerly TokBox OpenTok):
- WebRTC-based platform with iOS SDK
- Strong multi-party video support
- Customizable UI components
- Enterprise-grade security features
- Advanced network intelligence for connection quality
Twilio Programmable Video:
- Reliable infrastructure with global reach
- Simple, developer-friendly API
- Strong documentation and support
- Flexible pricing based on usage
- Good integration with other Twilio services
Evaluating SDKs Based on Project Needs
When selecting an SDK, prioritize based on your specific requirements:
- Latency needs: For highly interactive features (e.g., live auctions, real-time Q&A), prioritize ultra-low latency solutions like WebRTC-based SDKs.
- Audience size: Ensure the SDK can scale to your expected audience size without degradation.
- Interactive features: If your app heavily relies on interactive elements, choose an SDK with robust built-in support rather than implementing these features yourself.
- Budget constraints: Compare pricing models (pay-as-you-go, monthly subscription, or usage tiers) against your expected usage.
- Developer experience: Consider your team's expertise with Swift vs. Objective-C and evaluate the learning curve for each SDK.
- Geographic reach: If your audience is global, ensure the SDK has a global CDN or server infrastructure.
Setting Up the Development Environment
Prerequisites
Before implementing interactive live streaming, ensure you have:
- Xcode 15.0 or later installed
- iOS development target of iOS 13.0+
- Swift 5.0+
- Apple Developer account (required for TestFlight distribution and Live Activities)
- Physical iOS device for testing (camera and microphone capabilities)
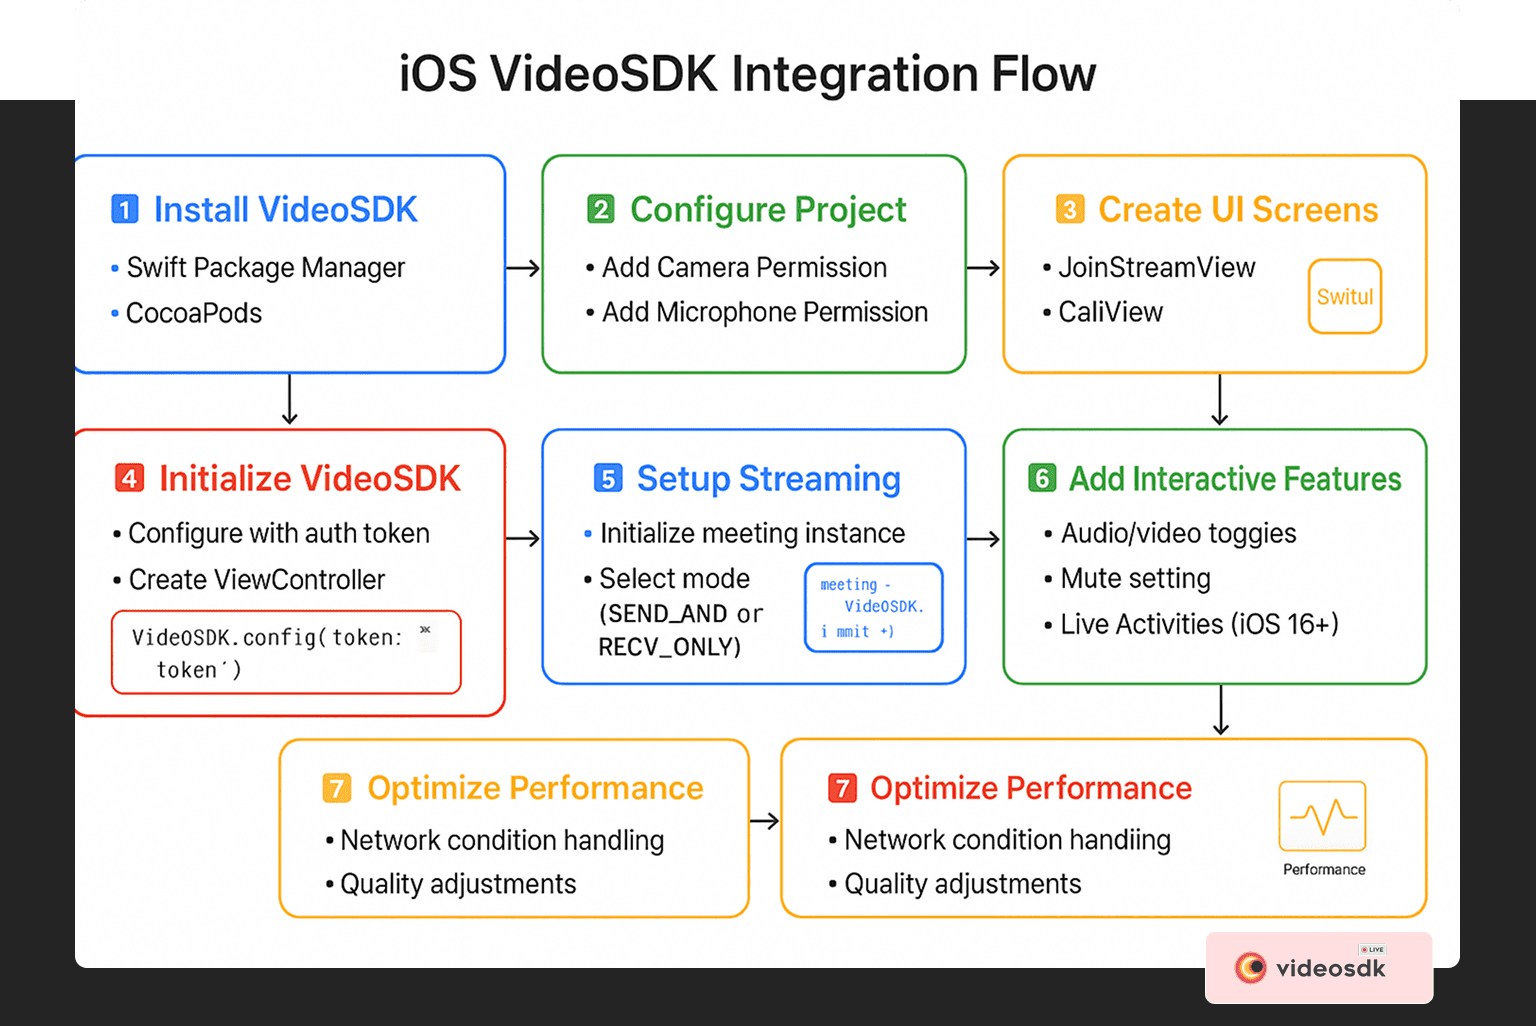
Installing VideoSDK
You can install VideoSDK using either Swift Package Manager (SPM) or CocoaPods:
Using Swift Package Manager (SPM):
- Open your Xcode project and go to File > Add Packages
- Enter the repository URL:
https://github.com/videosdk-live/videosdk-rtc-ios-spm - Choose the version rule (e.g., "Up to Next Major") and add the package to your target
- Import the library in Swift files:
import VideoSDKRTC
Using CocoaPods:
- Initialize CocoaPods in your project directory
- Update your Podfile to add the VideoSDK dependency
- Install the pod with
pod install
Configuring Project Settings
Add the necessary permissions to your Info.plist file for camera and microphone access, and for Live Activities support if needed.
Implementing Basic Live Streaming Functionality
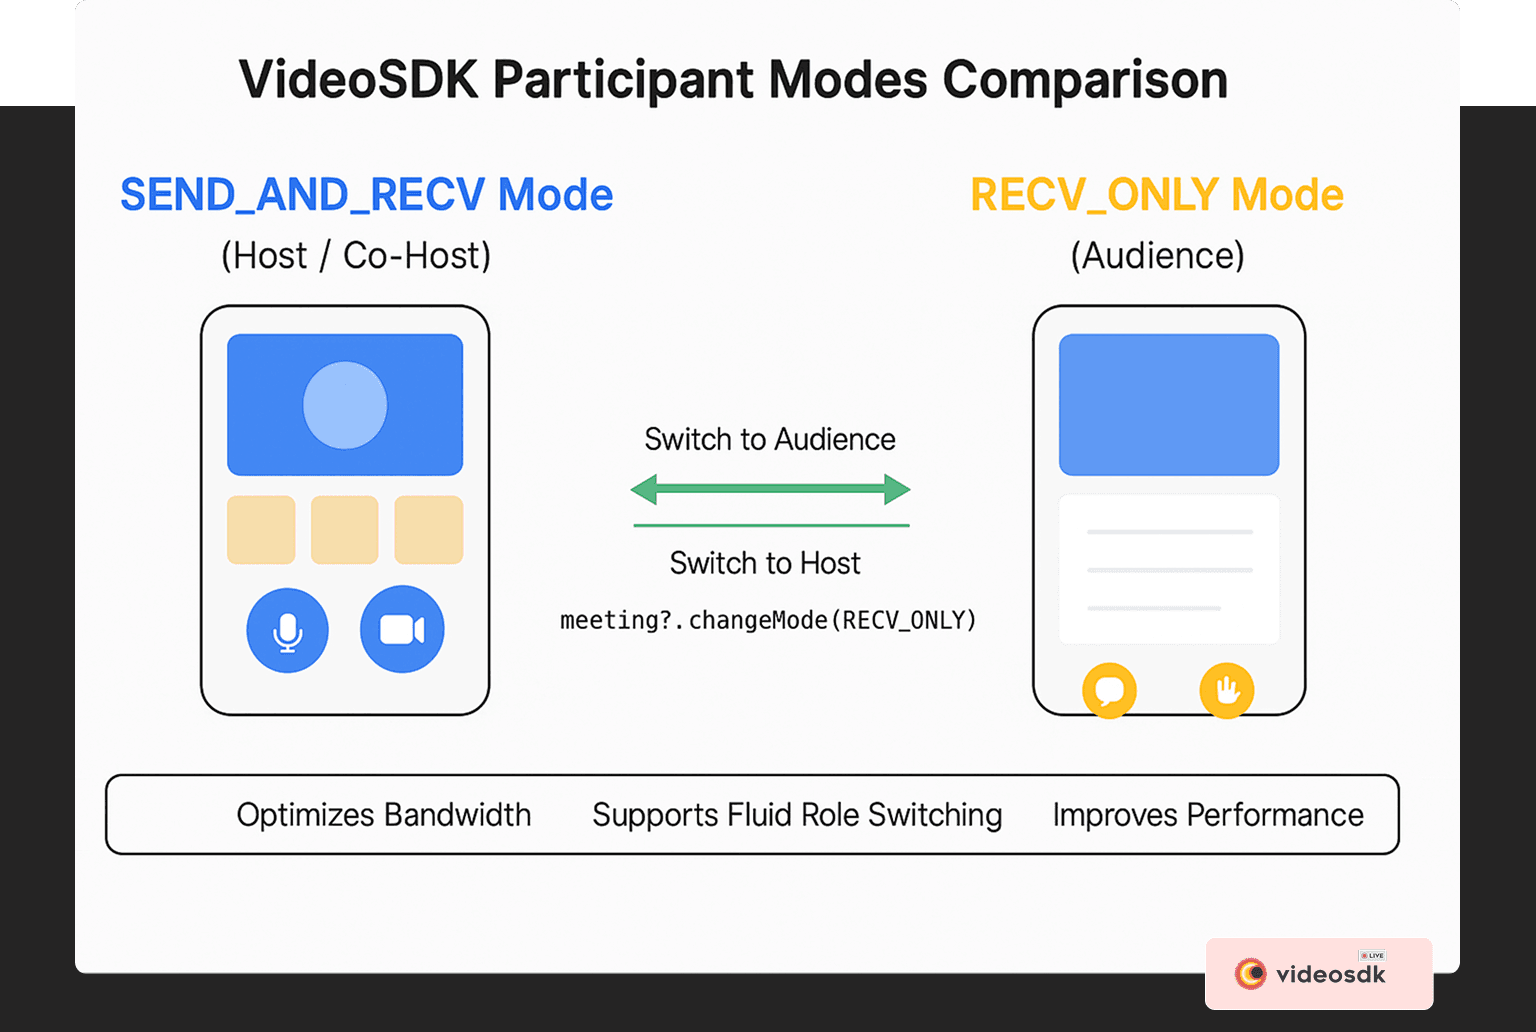
For our implementation, we'll follow a dual-mode approach as provided by VideoSDK:
- SENDANDRECV Mode: For hosts and co-hosts who can broadcast audio/video and interact with the audience
- RECV_ONLY Mode: For audience members who can view and listen but cannot share their own media
Creating the App Structure
Our app will have two main screens:
- A Join Stream View for entering or creating streams
- A Live Stream View for the actual streaming interface
Here's a simplified example of the Join Stream View in SwiftUI:
1struct JoinStreamView: View {
2    @State var streamId: String = ""
3    @State var name: String = ""
4
5    var body: some View {
6        NavigationView {
7            ZStack {
8                // Background styling
9
10                VStack {
11                    // App title headers
12
13                    // Create Stream Button
14                    NavigationLink(
15                        destination: LiveStreamView(
16                            userName: name.isEmpty ? "Guest" : name,
17                            mode: .SEND_AND_RECV
18                        )
19                    ) {
20                        ActionButton(title: "Create Live Stream", icon: "plus.circle.fill")
21                    }
22
23                    // Stream ID input field
24
25                    // Join options
26                    HStack {
27                        // Join as Host button (SEND_AND_RECV mode)
28                        // Join as Audience button (RECV_ONLY mode)
29                    }
30                }
31            }
32        }
33    }
34}
35
Initializing and Joining the Live Stream
Create a view controller to handle the streaming functionality:
1class LiveStreamViewController: ObservableObject {
2    var token = "YOUR_TOKEN"
3    @Published var meeting: Meeting? = nil
4    @Published var participants: [Participant] = []
5    @Published var streamID: String = ""
6
7    // Initialize a stream with specific mode (host or audience)
8    func initializeStream(streamId: String, userName: String, mode: Mode) {
9        // Initialize the meeting with VideoSDK
10        meeting = VideoSDK.initMeeting(
11            meetingId: streamId,
12            participantName: userName,
13            micEnabled: true,
14            webcamEnabled: true,
15            mode: mode
16        )
17
18        // Join the stream and add event listeners
19        meeting?.join()
20        meeting?.addEventListener(self)
21    }
22
23    // Create a new stream
24    func joinRoom(userName: String, mode: Mode) {
25        // API call to create new room
26    }
27
28    // Join existing stream
29    func joinStream(streamId: String, userName: String, mode: Mode) {
30        // Join with provided stream ID
31    }
32}
33
34// Event listeners for meeting events
35extension LiveStreamViewController: MeetingEventListener {
36    func onMeetingJoined() {
37        // Handle local participant joining
38    }
39
40    func onParticipantJoined(_ participant: Participant) {
41        // Add new participant to the list
42    }
43
44    // Other event handling methods
45}
46
47// Event listeners for participant events
48extension LiveStreamViewController: ParticipantEventListener {
49    func onStreamEnabled(_ stream: MediaStream, forParticipant participant: Participant) {
50        // Handle media stream being enabled
51    }
52
53    func onStreamDisabled(_ stream: MediaStream, forParticipant participant: Participant) {
54        // Handle media stream being disabled
55    }
56}
57
Creating the Live Stream View
The main streaming interface includes participant videos and control buttons:
1struct LiveStreamView: View {
2    @ObservedObject var liveStreamViewController = LiveStreamViewController()
3    @State private var currentMode: Mode
4    @State var isUnMute: Bool = true
5    @State var camEnabled: Bool = true
6
7    // Check if the user is in audience mode
8    private var isAudienceMode: Bool {
9        // Logic to determine if user is in audience mode
10    }
11
12    var body: some View {
13        VStack {
14            if liveStreamViewController.participants.isEmpty {
15                Text("Stream Initializing")
16            } else {
17                VStack {
18                    // Stream ID information
19
20                    // Participant videos
21                    List {
22                        // Display participants who are broadcasting
23                    }
24
25                    // Media controls for hosts
26                    if !isAudienceMode {
27                        HStack {
28                            // Mic toggle button
29                            // Camera toggle button
30                        }
31                    }
32
33                    // General controls
34                    HStack {
35                        // Leave stream button
36
37                        // Mode switching button
38                        Button {
39                            let newMode: Mode = isAudienceMode ? .SEND_AND_RECV : .RECV_ONLY
40                            liveStreamViewController.meeting?.changeMode(newMode)
41                            currentMode = newMode
42                        } label: {
43                            Text(isAudienceMode ? "Switch to Host" : "Switch to Audience")
44                        }
45                    }
46                }
47            }
48        }
49        .onAppear {
50            // Initialize VideoSDK and join stream
51        }
52    }
53}
54
Adding Interactive Features with VideoSDK
Implementing Live Activities
For iOS 16+, you can add Live Activities to show stream status on the Lock Screen and Dynamic Island:
1import ActivityKit
2import WidgetKit
3
4// Define the Live Activity attributes
5struct StreamActivityAttributes: ActivityAttributes {
6    public struct ContentState: Codable, Hashable {
7        var viewerCount: Int
8        var isLive: Bool
9        var elapsedTime: TimeInterval
10        var recentMessage: String?
11    }
12
13    var streamTitle: String
14    var channelName: String
15    var broadcasterName: String
16}
17
18// Add Live Activity methods to your controller
19extension LiveStreamViewController {
20    // Start Live Activity
21    func startLiveActivity() {
22        // Initialize activity with streaming metadata
23    }
24
25    // Update Live Activity with new information
26    func updateLiveActivity(viewerCount: Int, recentMessage: String? = nil) {
27        // Update the activity with new data
28    }
29
30    // End Live Activity when stream ends
31    func endLiveActivity() {
32        // Finalize the activity
33    }
34}
35
Optimizing Performance and Scalability
Handling Network Conditions
With VideoSDK, you can optimize streaming quality based on network conditions:
1extension LiveStreamViewController {
2    func optimizeForNetworkConditions() {
3        // Set up network quality monitoring
4
5        // Set initial stream quality
6        meeting?.localParticipant.setQuality(.high)
7    }
8
9    @objc func handleNetworkQualityChange(_ notification: Notification) {
10        if let quality = notification.userInfo?["quality"] as? NetworkQuality {
11            // Adjust video quality based on network conditions
12            switch quality {
13            case .poor:
14                meeting?.localParticipant.setQuality(.low)
15                showNetworkWarningUI()
16            case .good:
17                meeting?.localParticipant.setQuality(.medium)
18                hideNetworkWarningUI()
19            case .excellent:
20                meeting?.localParticipant.setQuality(.high)
21                hideNetworkWarningUI()
22            }
23        }
24    }
25}
26
Key Takeaways
When implementing interactive live streaming in iOS apps with VideoSDK:
- Consider participant modes: Use the appropriate mode (SENDANDRECV for hosts, RECV_ONLY for audience) to optimize performance and bandwidth.
- Provide mode switching: Allow users to transition between host and audience roles dynamically.
- Optimize network handling: Implement network quality detection and adjust streaming quality accordingly.
- Enhance with Live Activities: For iOS 16+, add Lock Screen and Dynamic Island integration for better user engagement.
- Manage permissions properly: Ensure camera and microphone permissions are properly requested and handled.
- Test on real devices: Simulator testing is insufficient for evaluating performance and user experience.
Conclusion
Implementing interactive live streaming in iOS apps offers tremendous engagement opportunities across various industries. By leveraging VideoSDK's powerful features and intuitive API, you can build robust, scalable, and feature-rich streaming experiences with significantly less development time.
This guide has walked you through the essential steps of setting up and implementing interactive live streaming in your iOS application. As you continue to build on this foundation, consider exploring more advanced features like custom layouts, real-time analytics, and additional interactive elements to create truly differentiated streaming experiences for your users.
Want to level-up your learning? Subscribe now
Subscribe to our newsletter for more tech based insights
FAQ