WebRTC JavaScript Implementation: A Practical Guide to Real-Time Chat and Video
Learn how to implement WebRTC in JavaScript with practical examples for building real-time chat and video applications. This comprehensive guide covers WebRTC fundamentals, signaling, peer connections, and troubleshooting.
In today's digital landscape, users expect real-time communication directly within their web applications. Whether it's video conferencing, instant messaging, or collaborative tools, the demand for real-time features continues to grow exponentially. This is where
WebRTC
(Web Real-Time Communication) shines as a powerful technology enabling direct browser-to-browser communication without requiring plugins or additional software.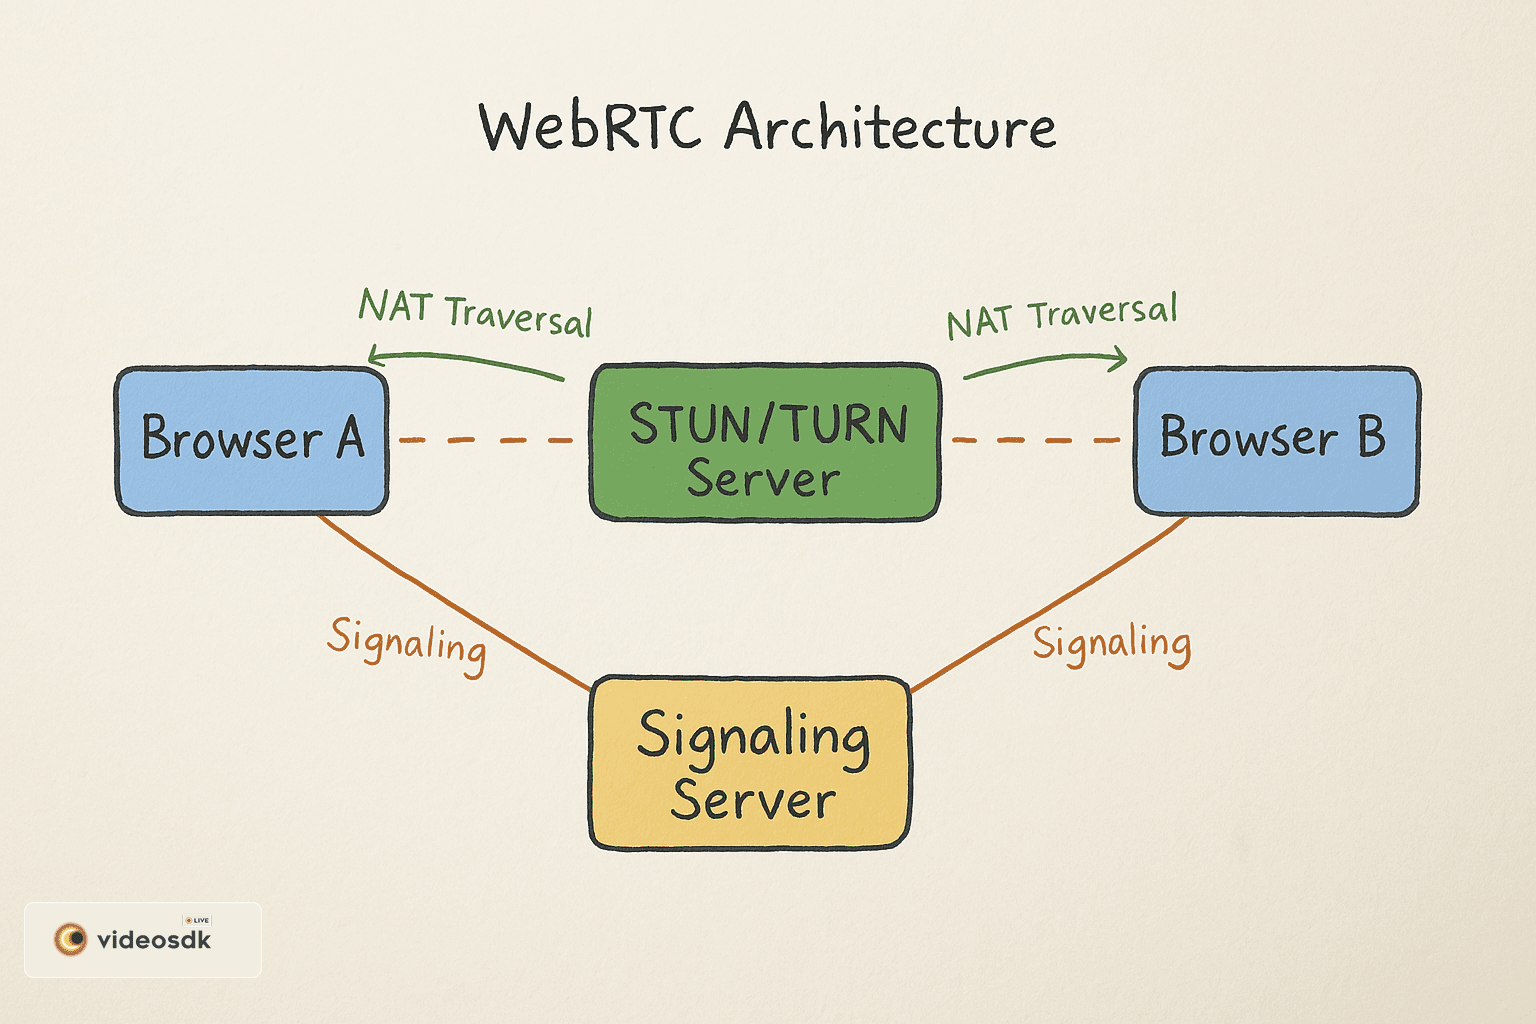
However, implementing WebRTC in JavaScript can be challenging for developers who are new to the technology. This comprehensive guide will walk you through the process of WebRTC JavaScript implementation with practical examples for building real-time chat and video applications. We'll cover everything from core concepts to practical code examples that you can use in your own projects.
Understanding WebRTC Fundamentals
What is WebRTC?
WebRTC is an open-source project that provides web browsers and mobile applications with real-time communication capabilities via simple APIs. It allows audio, video, and data to be exchanged directly between browsers without requiring intermediary servers for the actual media transfer.
The key components of WebRTC include:
- MediaStream: Represents streams of audio and video data
- RTCPeerConnection: Handles the connection between peers
- RTCDataChannel: Enables peer-to-peer exchange of arbitrary data
WebRTC Architecture Overview
WebRTC follows a peer-to-peer communication model, where data flows directly between users' browsers. However, it still requires a signaling mechanism to coordinate communication and exchange metadata. This is typically implemented using a separate signaling server.
The architecture includes:
- Peer-to-peer connection: Direct communication between browsers
- Signaling server: Coordinates connection establishment
- STUN and TURN servers: Help with NAT traversal to connect peers behind firewalls
WebRTC API Basics
The core JavaScript APIs for WebRTC include:
getUserMedia(): Accesses the user's camera and microphoneRTCPeerConnection(): Establishes connection between peerscreateOffer()/createAnswer(): Creates SDP (Session Description Protocol) offers and answerssetLocalDescription()/setRemoteDescription(): Sets session descriptionsaddIceCandidate(): Handles ICE candidates for NAT traversal
Setting Up the Development Environment
Before diving into WebRTC implementation, you need to set up your development environment:
Required Tools and Technologies
- Node.js and npm (or yarn)
- A code editor (VS Code recommended)
- A modern web browser (Chrome or Firefox)
Project Setup
Create a basic project structure with HTML, JavaScript, and CSS files. Initialize a Node.js project and install necessary packages:
1# Create project directory
2mkdir webrtc-chat-example
3cd webrtc-chat-example
4
5# Initialize Node.js project
6npm init -y
7
8# Install necessary packages
9npm install socket.io express
10
Implementing Signaling
The Role of Signaling
WebRTC requires a signaling mechanism to exchange session metadata between peers. While WebRTC doesn't specify how this signaling should be implemented, developers commonly use
WebSocket
or HTTP for this purpose.Using Socket.IO for Signaling
Socket.IO is a popular library for implementing real-time, bidirectional communication, making it ideal for
WebRTC signaling
. Here's how to set up a basic Socket.IO server for your WebRTC application:1// server.js
2const express = require('express');
3const http = require('http');
4const socketIO = require('socket.io');
5
6const app = express();
7const server = http.createServer(app);
8const io = socketIO(server);
9
10// Serve static files
11app.use(express.static('public'));
12
13// Socket.IO connection handling
14io.on('connection', (socket) => {
15 console.log('A user connected:', socket.id);
16
17 // Handle room joining
18 socket.on('join-room', (roomId, userId) => {
19 socket.join(roomId);
20 // Notify other users in the room
21 socket.to(roomId).emit('user-connected', userId);
22
23 socket.on('disconnect', () => {
24 socket.to(roomId).emit('user-disconnected', userId);
25 });
26 });
27
28 // Handle SDP offer exchange
29 socket.on('offer', (roomId, userId, sdp) => {
30 socket.to(roomId).emit('offer', userId, sdp);
31 });
32
33 // Handle SDP answer exchange
34 socket.on('answer', (roomId, userId, sdp) => {
35 socket.to(roomId).emit('answer', userId, sdp);
36 });
37
38 // Handle ICE candidate exchange
39 socket.on('ice-candidate', (roomId, userId, candidate) => {
40 socket.to(roomId).emit('ice-candidate', userId, candidate);
41 });
42});
43
44// Start the server
45const PORT = process.env.PORT || 3000;
46server.listen(PORT, () => {
47 console.log(`Server running on port ${PORT}`);
48});
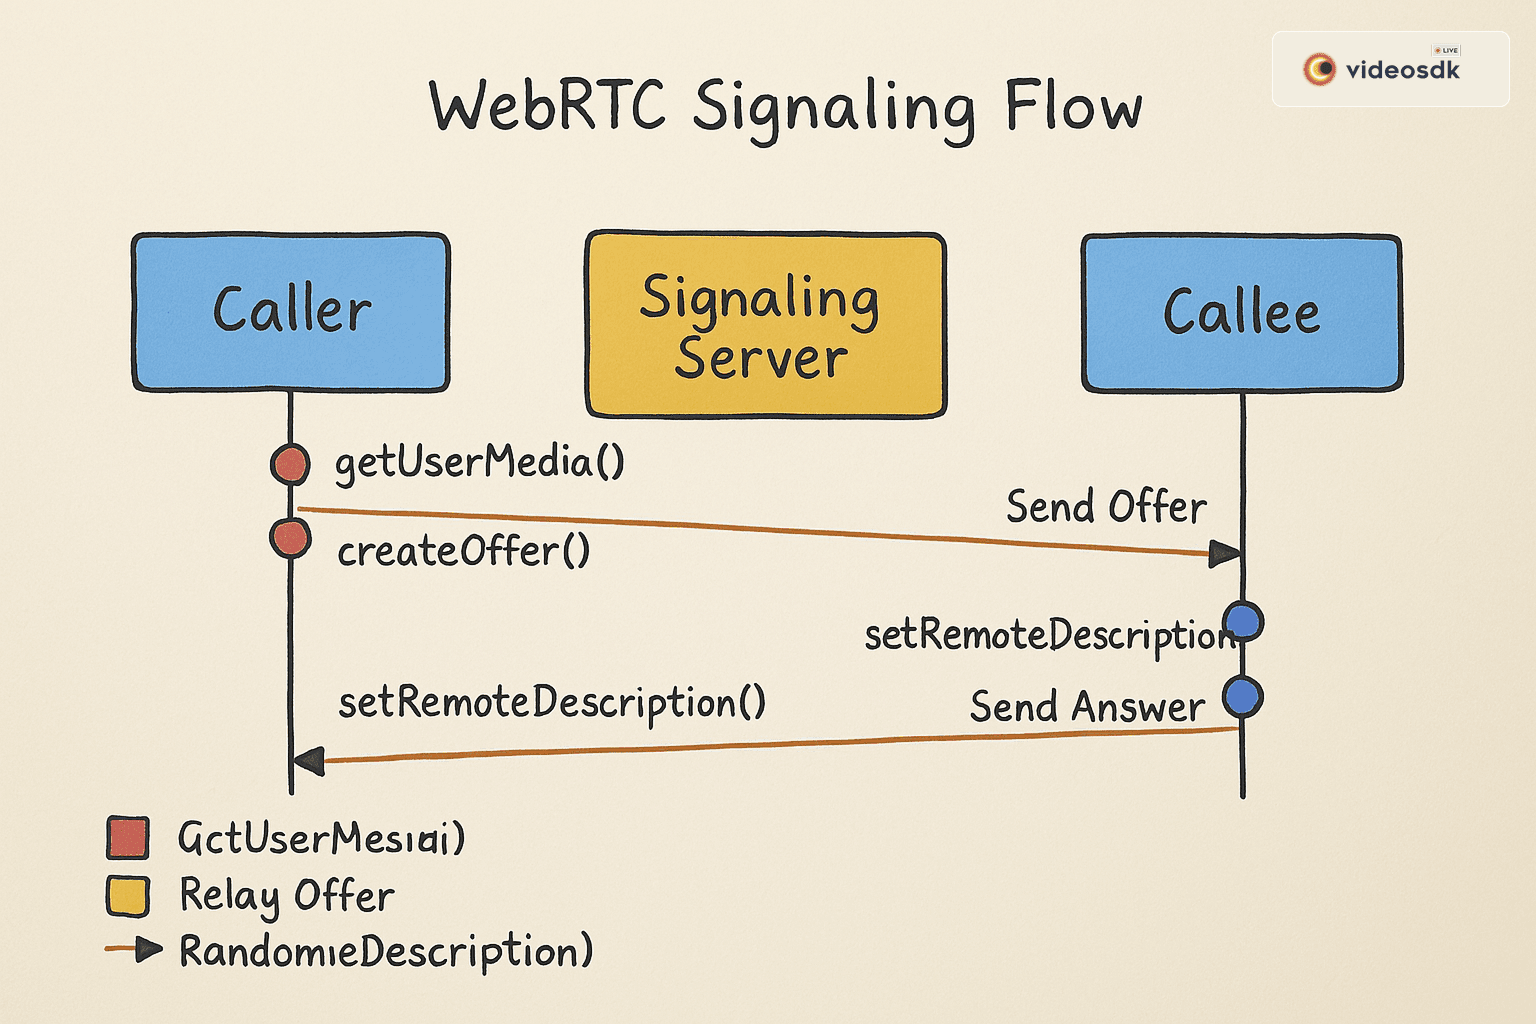
49Exchanging SDP Offers and Answers
Once you have your signaling server set up, you need to implement the client-side code for creating and exchanging SDP offers and answers:
1// client.js
2const socket = io('/');
3const localPeer = new RTCPeerConnection(configuration);
4
5// Function to create and send an offer
6async function createOffer(roomId, userId) {
7  try {
8    const offer = await localPeer.createOffer();
9    await localPeer.setLocalDescription(offer);
10
11    // Send the offer to the signaling server
12    socket.emit('offer', roomId, userId, localPeer.localDescription);
13  } catch (error) {
14    console.error('Error creating offer:', error);
15  }
16}
17
18// Handle incoming offer
19socket.on('offer', async (userId, sdp) => {
20  try {
21    await localPeer.setRemoteDescription(new RTCSessionDescription(sdp));
22
23    // Create an answer
24    const answer = await localPeer.createAnswer();
25    await localPeer.setLocalDescription(answer);
26
27    // Send the answer to the signaling server
28    socket.emit('answer', roomId, myUserId, localPeer.localDescription);
29  } catch (error) {
30    console.error('Error handling offer:', error);
31  }
32});
33
34// Handle incoming answer
35socket.on('answer', async (userId, sdp) => {
36  try {
37    await localPeer.setRemoteDescription(new RTCSessionDescription(sdp));
38  } catch (error) {
39    console.error('Error handling answer:', error);
40  }
41});
42
Handling ICE Candidates
ICE (Interactive Connectivity Establishment) candidates are used to establish the most efficient path for communication between peers, especially when they are behind NATs or firewalls:
1// client.js
2// Listen for local ICE candidates and send them to the remote peer
3localPeer.onicecandidate = (event) => {
4  if (event.candidate) {
5    socket.emit('ice-candidate', roomId, myUserId, event.candidate);
6  }
7};
8
9// Handle incoming ICE candidates from the remote peer
10socket.on('ice-candidate', async (userId, candidate) => {
11  try {
12    await localPeer.addIceCandidate(new RTCIceCandidate(candidate));
13  } catch (error) {
14    console.error('Error adding ICE candidate:', error);
15  }
16});
17
Building a Basic Video Chat Application
Now let's build a complete WebRTC video chat example, one of the most common WebRTC applications:
Getting User Media
First, we need to access the user's camera and microphone:
1// client.js
2let localStream;
3
4async function initializeMedia() {
5  try {
6    // Request access to the user's camera and microphone
7    localStream = await navigator.mediaDevices.getUserMedia({
8      audio: true,
9      video: true
10    });
11
12    // Display the local video stream
13    const localVideo = document.getElementById('local-video');
14    localVideo.srcObject = localStream;
15
16    // Add the local stream to the peer connection
17    localStream.getTracks().forEach(track => {
18      localPeer.addTrack(track, localStream);
19    });
20  } catch (error) {
21    console.error('Error accessing media devices:', error);
22  }
23}
24
Creating and Configuring the RTCPeerConnection
Next, we need to create and configure the RTCPeerConnection with STUN/TURN servers:
1// client.js
2const configuration = {
3  iceServers: [
4    { urls: 'stun:stun.l.google.com:19302' },  // Google's public [STUN server](https://videosdk.live/developer-hub/stun-turn-server/webrtc-stun-server)
5    {
6      urls: 'turn:your-turn-server.com:3478',
7      username: 'your-username',
8      credential: 'your-password'
9    }
10  ]
11};
12
13const localPeer = new RTCPeerConnection(configuration);
14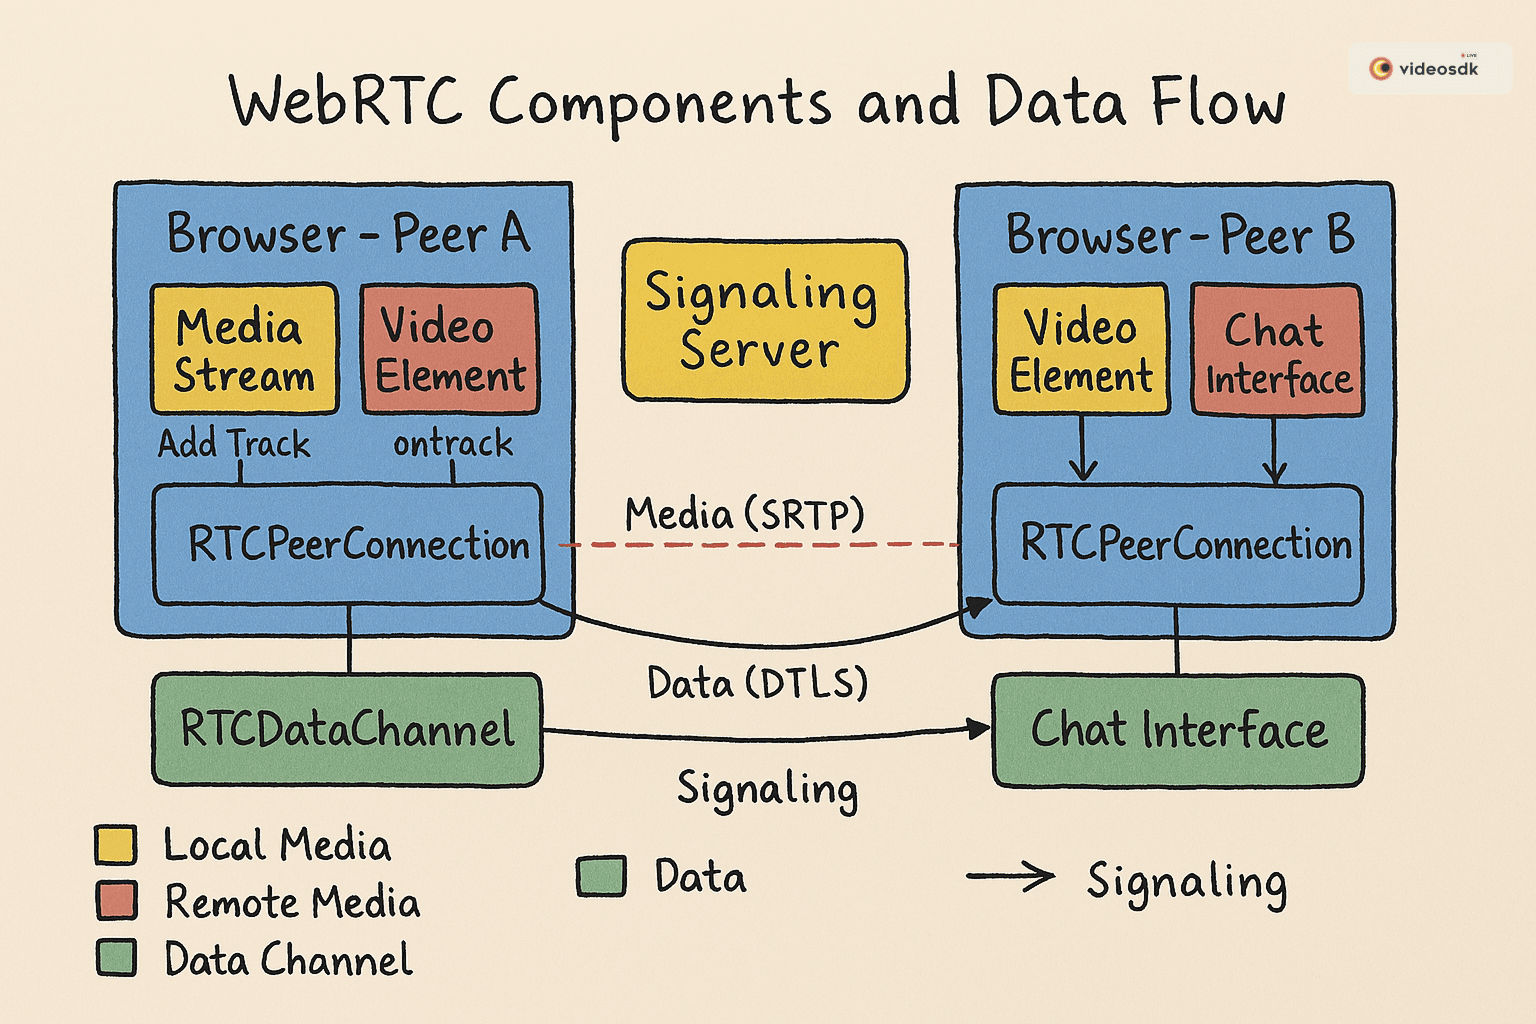
Adding Media Streams to the RTCPeerConnection
We already added our local stream in the
initializeMedia function. Now, we need to handle incoming remote streams:1// client.js
2// Handle incoming remote stream
3localPeer.ontrack = (event) => {
4 if (event.streams && event.streams[0]) {
5 const remoteVideo = document.getElementById('remote-video');
6 remoteVideo.srcObject = event.streams[0];
7 }
8};
9Connecting Peers and Starting the Video Chat
Here's the complete flow for establishing a video chat connection:
1// client.js
2// Initialize everything when the page loads
3window.addEventListener('load', async () => {
4  // Get room ID from URL or generate a random one
5  const roomId = getOrCreateRoomId();
6  const myUserId = generateUserId();
7
8  // Initialize media
9  await initializeMedia();
10
11  // Join the room
12  socket.emit('join-room', roomId, myUserId);
13
14  // Handle a new user connecting
15  socket.on('user-connected', (userId) => {
16    console.log('New user connected:', userId);
17    // Create an offer to connect with the new user
18    createOffer(roomId, myUserId);
19  });
20});
21
The corresponding HTML for this WebRTC chat example would look like this:
1<!DOCTYPE html>
2<html lang="en">
3<head>
4  <meta charset="UTF-8">
5  <meta name="viewport" content="width=device-width, initial-scale=1.0">
6  <title>WebRTC Video Chat Example</title>
7  <link rel="stylesheet" href="styles.css">
8</head>
9<body>
10  <div class="container">
11    <h1>WebRTC Video Chat</h1>
12    <div class="video-container">
13      <div class="video-wrapper">
14        <video id="local-video" autoplay muted playsinline></video>
15        <p>You</p>
16      </div>
17      <div class="video-wrapper">
18        <video id="remote-video" autoplay playsinline></video>
19        <p>Remote User</p>
20      </div>
21    </div>
22  </div>
23
24  <script src="/socket.io/socket.io.js"></script>
25  <script src="client.js"></script>
26</body>
27</html>
28
Building a Basic Text Chat Application
Besides video chat, WebRTC also enables text-based communication through the RTCDataChannel:
Using RTCDataChannel
RTCDataChannel allows sending arbitrary data between peers without going through a server:
1// client.js
2let dataChannel;
3
4// Create a data channel
5function createDataChannel() {
6  dataChannel = localPeer.createDataChannel('chat', {
7    ordered: true, // Guarantee message order
8  });
9
10  setupDataChannel(dataChannel);
11}
12
13// For the receiving peer
14localPeer.ondatachannel = (event) => {
15  dataChannel = event.channel;
16  setupDataChannel(dataChannel);
17};
18
19// Setup data channel event handlers
20function setupDataChannel(channel) {
21  channel.onopen = () => {
22    console.log('Data channel is open');
23    document.getElementById('send-button').disabled = false;
24  };
25
26  channel.onmessage = (event) => {
27    // Display the received message
28    displayMessage('Them', event.data);
29  };
30
31  channel.onclose = () => {
32    console.log('Data channel is closed');
33    document.getElementById('send-button').disabled = true;
34  };
35}
36
37// Function to send a message
38function sendMessage() {
39  const input = document.getElementById('message-input');
40  const message = input.value.trim();
41
42  if (message && dataChannel && dataChannel.readyState === 'open') {
43    dataChannel.send(message);
44    displayMessage('You', message);
45    input.value = '';
46  }
47}
48
49// Function to display a message
50function displayMessage(sender, message) {
51  const messagesDiv = document.getElementById('messages');
52  const messageElement = document.createElement('div');
53  messageElement.innerHTML = `<strong>${sender}:</strong> ${message}`;
54  messagesDiv.appendChild(messageElement);
55  messagesDiv.scrollTop = messagesDiv.scrollHeight;
56}
57
With this implementation, you can add a simple chat interface to your WebRTC application:
1<div class="chat-container">
2  <div id="messages" class="messages"></div>
3  <div class="input-area">
4    <input type="text" id="message-input" placeholder="Type a message...">
5    <button id="send-button" onclick="sendMessage()" disabled>Send</button>
6  </div>
7</div>
8
Advanced WebRTC Concepts
As you become more comfortable with basic WebRTC implementations, you may want to explore more advanced concepts:
Adaptive Bitrate Streaming
WebRTC automatically adapts to changing network conditions through its built-in congestion control and bandwidth estimation mechanisms. You can also manually adjust media quality based on network quality:
1// Set preferred video bitrate
2const sender = localPeer.getSenders().find(s => s.track.kind === 'video');
3const parameters = sender.getParameters();
4parameters.encodings[0].maxBitrate = 1000000; // 1 Mbps
5sender.setParameters(parameters);
6
Simulcasting
Simulcasting involves sending multiple versions of the same video at different qualities to accommodate different network conditions:
1// Enable simulcast (example with three quality layers)
2const transceiver = localPeer.addTransceiver('video', {
3  direction: 'sendonly',
4  sendEncodings: [
5    { rid: 'high', maxBitrate: 900000, scaleResolutionDownBy: 1 },
6    { rid: 'medium', maxBitrate: 600000, scaleResolutionDownBy: 2 },
7    { rid: 'low', maxBitrate: 300000, scaleResolutionDownBy: 4 }
8  ]
9});
10
Security Considerations
WebRTC is designed with security in mind, but you should still follow best practices:
- Always use secure WebSockets (WSS) for signaling
- Implement proper authentication for your signaling server
- Use a firewall-friendly
TURN server
as a fallback - Consider end-to-end encryption for highly sensitive applications
Troubleshooting Common WebRTC Issues
When working with WebRTC, you may encounter various issues:
NAT Traversal Problems
If peers cannot connect, check your STUN/TURN server configuration:
1// More comprehensive ICE server configuration
2const configuration = {
3  iceServers: [
4    { urls: 'stun:stun1.l.google.com:19302' },
5    { urls: 'stun:stun2.l.google.com:19302' },
6    {
7      urls: 'turn:your-turn-server.com:3478',
8      username: 'your-username',
9      credential: 'your-password'
10    }
11  ],
12  iceTransportPolicy: 'all', // Try 'relay' if direct connection fails
13  iceCandidatePoolSize: 10
14};
15
Media Stream Issues
If you're experiencing issues with media streams, check browser permissions and try the following:
1// More detailed error handling for getUserMedia
2async function initializeMedia() {
3  try {
4    localStream = await navigator.mediaDevices.getUserMedia({
5      audio: true,
6      video: {
7        width: { ideal: 1280 },
8        height: { ideal: 720 },
9        frameRate: { max: 30 }
10      }
11    });
12
13    // Proceed with setup...
14  } catch (error) {
15    if (error.name === 'NotAllowedError') {
16      console.error('Permission denied for media devices');
17      alert('Please allow camera and microphone access to use this app');
18    } else if (error.name === 'NotFoundError') {
19      console.error('No media devices found');
20      alert('No camera or microphone found. Please connect these devices and try again');
21    } else {
22      console.error('Error accessing media devices:', error);
23      alert('An error occurred while trying to access your camera and microphone');
24    }
25  }
26}
27
Key Takeaways
WebRTC is a powerful technology that enables real-time communication directly in the browser. Here's what you should remember:
- WebRTC requires a signaling mechanism to exchange metadata between peers
- STUN and TURN servers are essential for NAT traversal
- RTCPeerConnection handles the peer-to-peer connection
- RTCDataChannel enables sending arbitrary data between peers
- Security is built into WebRTC with mandatory encryption
Conclusion
WebRTC has revolutionized real-time communication on the web, enabling developers to build powerful applications with native browser APIs. By following this guide and exploring the provided WebRTC JavaScript examples, you should now have a solid foundation for implementing your own real-time communication features.
Whether you're building a video conferencing platform, a collaborative workspace, or just adding chat functionality to your application, WebRTC provides the tools you need to create seamless real-time experiences for your users.
Want to level-up your learning? Subscribe now
Subscribe to our newsletter for more tech based insights
FAQ