


A video chat app with WebRTC and Node.js uses WebRTC for peer-to-peer media transmission and Node.js for signaling and room orchestration. WebRTC handles low-latency audio and video streams directly between browsers, while the Node.js server coordinates the connection setup. Developers use this stack to build secure, scalable real-time communication applications.
The surge in real-time communication has fundamentally changed how applications handle user interaction. Developers increasingly choose to build a custom video chat app over relying on generic third-party services. A custom implementation gives you complete control over data privacy, user experience, and feature sets. By combining WebRTC for media transport and Node.js for signaling, you can create a highly performant, low-latency video chat application tailored to your specific use case. This approach ensures that your infrastructure scales with your user base and adapts to your unique business requirements. Whether you are building a telehealth platform, an online tutoring portal, or a remote team collaboration tool, understanding the underlying architecture of a video chat app with WebRTC and Node.js is the first step toward delivering a seamless user experience. The ability to own your communication stack means you can integrate video directly into your existing workflows without paying per-minute fees or being subject to the uptime of a third-party API. Furthermore, a custom build allows you to implement specific security protocols, compliance measures, and user interface designs that align perfectly with your brand and industry standards.
What Is a Video Chat App with WebRTC and Node.js?
A video chat app with WebRTC and Node.js is a real-time communication system where WebRTC manages the direct peer-to-peer media streams and Node.js operates as the signaling and orchestration backend. WebRTC is a free, open-source project that provides web browsers and mobile applications with real-time communication via simple application programming interfaces. It handles the complex tasks of capturing media, negotiating codecs, and traversing network address translators. Node.js complements this by running a lightweight server that coordinates the exchange of session descriptions, manages chat rooms, and tracks user presence. Together, they form a robust foundation for production-grade video chat applications. The separation of concerns is critical: Node.js never touches the heavy media traffic, preventing bottlenecks, while WebRTC ensures sub-second latency by establishing direct peer connections whenever possible. This architecture is widely adopted because it leverages the strengths of both technologies: the event-driven, non-blocking I/O model of Node.js for signaling, and the built-in media processing capabilities of modern browsers via WebRTC. The result is a system that can handle thousands of concurrent connections for signaling while maintaining high-quality, low-latency media streams between participants.
Core Building Blocks
WebRTC Basics
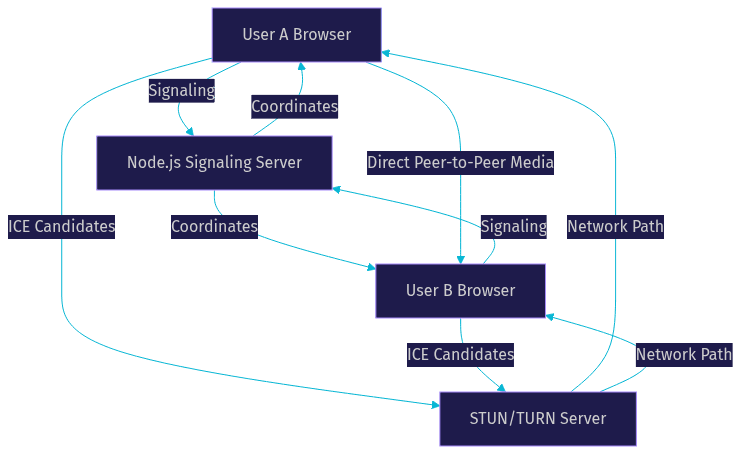
WebRTC enables peer-to-peer media transmission directly between connected clients. It relies on Interactive Connectivity Establishment (ICE) to find the best network path between peers. ICE candidates are network paths discovered by the client, which are then exchanged through the signaling server. To traverse firewalls and NATs, WebRTC uses Session Traversal Utilities for NAT (STUN) servers to discover public IP addresses. When direct peer-to-peer connections fail, Traversal Using Relays around NAT (TURN) servers act as relays for the media traffic. Understanding these components is essential because network topology often dictates the quality of the call. A well-configured STUN/TURN infrastructure ensures that your video chat app works across different networks, including restrictive corporate firewalls. The WebRTC API also provides access to data channels, which allow for low-latency text and binary data exchange, making it possible to build features like real-time chat and file sharing alongside video. The media engine within WebRTC handles echo cancellation, noise suppression, and automatic gain control, ensuring clear audio quality even in less-than-ideal environments.
Node.js Signaling Server
The Node.js signaling server acts as the coordination layer. It does not handle the media streams themselves. Instead, it manages the exchange of offer and answer messages, which contain session description protocol (SDP) information detailing media codecs and formats. The server also handles room management, allowing users to create or join specific video chat sessions, and tracks user presence to notify participants when someone joins or leaves. Using a library like Socket.IO with Node.js simplifies the real-time, bidirectional communication required for signaling. The server maintains a registry of active rooms and connected sockets, routing messages precisely to the intended recipients. This server is also responsible for enforcing access control, ensuring that only authenticated users can join specific rooms. The non-blocking nature of Node.js makes it ideal for handling a large number of concurrent WebSocket connections, which are essential for real-time signaling.
Front-End Media Capture
On the client side, the browser's media capture API is used to access the user's camera and microphone. This involves requesting permissions, accessing the hardware, and managing audio and video tracks. The user interface must handle scenarios where permissions are denied or hardware is unavailable, providing clear feedback to the user. These media tracks are then attached to the WebRTC peer connection for transmission. Developers must also consider UI elements like mute toggles, camera switches, and screen sharing integration, all of which interact directly with the media tracks retrieved from the browser. The media capture API is the entry point for all audio and video data in the application, and handling it correctly is crucial for a smooth user experience. Constraints can be applied to the media capture API to request specific resolutions or frame rates, optimizing the video stream for the available bandwidth.
Architecture Overview
The architecture of a video chat app with WebRTC and Node.js follows a clear separation of concerns. The Node.js server sits in the middle, handling signaling traffic over WebSockets. The clients connect to the server to exchange metadata. Once the signaling process completes, a direct peer-to-peer media connection is established between the clients, bypassing the server for the actual video and audio data. STUN and TURN servers are used during the connection phase to ensure the media can traverse various network topologies. This architecture minimizes server load and reduces latency, as the media flows directly between participants. The Node.js server only steps in to manage state, handle disconnections, and coordinate new connections. This design is highly efficient because the bandwidth-intensive media traffic is distributed directly among the peers, while the lightweight signaling traffic is centralized.
Signaling Flow in Detail
Connection Establishment
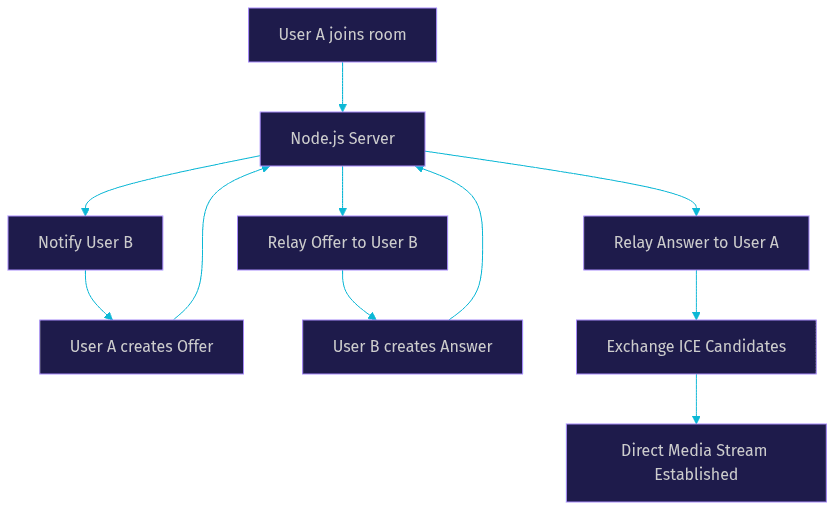
When a user joins a room, the client sends a join message to the Node.js signaling server. The server registers the user and notifies other participants in the room. To establish a connection, the initiating client creates an offer containing its media capabilities. This offer is sent to the Node.js server, which relays it to the intended recipient. The recipient processes the offer, generates an answer containing its own media capabilities, and sends it back through the server. Once both clients have the offer and answer, they configure their peer connections. This exchange is known as the Session Description Protocol (SDP) negotiation, where both parties agree on the codecs, resolutions, and media types to be used. The SDP negotiation is a critical step because it ensures that both clients can decode and render the media they receive.
ICE Candidate Exchange
After the offer and answer are exchanged, both clients begin gathering ICE candidates. These candidates represent potential network paths for the media stream. As each client discovers a candidate, it sends the candidate to the other peer via the Node.js signaling server. The receiving client adds the candidate to its peer connection. This process continues until a viable connection path is found, at which point the media stream begins flowing directly between the peers. ICE gathering involves discovering host candidates, server reflexive candidates via STUN, and relay candidates via TURN. The ICE framework continuously tests these paths to find the most efficient route. This process is known as ICE connectivity checks, and it ensures that the media connection is established using the best available network path.
Handling Disconnections
Network instability requires robust disconnection handling. If a user closes their browser or loses connectivity, the Node.js server detects the dropped WebSocket connection. The server then broadcasts a user-left event to the remaining participants in the room. The remaining clients close their peer connections with the departed user and remove their video and audio elements from the user interface. Reconnection logic can prompt the client to attempt a rejoin, triggering a fresh signaling flow. Proper room cleanup on the server prevents memory leaks and ensures accurate user presence tracking. Implementing heartbeat mechanisms can help detect zombie connections, where the WebSocket is open but the client is unresponsive.
Scaling Strategies
Mesh vs SFU
In a pure peer-to-peer mesh network, every participant connects directly to every other participant. This works well for small groups but causes exponential bandwidth consumption as participants increase. For larger groups, a Selective Forwarding Unit (SFU) is used. An SFU acts as a media router, receiving one stream from each participant and forwarding it to others. This significantly reduces upload bandwidth for clients. Solutions like mediasoup can be integrated with a Node.js backend to handle SFU operations. Transitioning from a mesh to an SFU architecture is a critical scaling step for any production-grade video chat app. The SFU model allows the server to selectively forward streams, enabling features like simulcast, where multiple resolutions of the same video are sent, and the SFU chooses the best one for each receiver based on their network conditions.
Horizontal Scaling of the Signaling Layer
As your user base grows, a single Node.js server will not handle all signaling traffic. The signaling layer must be horizontally scaled. This requires a stateless server design where session state is stored externally. Using Redis pub/sub allows multiple Node.js instances to broadcast signaling messages to the correct clients across different servers. A load balancer distributes incoming WebSocket connections evenly across the Node.js instances. This setup ensures high availability and fault tolerance for your signaling infrastructure. The Redis adapter for Socket.IO makes this process straightforward, allowing you to scale your signaling server horizontally without changing your application logic.
Cloud Deployment Tips
Deploying a production-grade video chat app requires specific configurations. HTTPS is mandatory for WebRTC to access camera and microphone APIs. Docker containers ensure consistent environments from development to production. Environment variables should manage sensitive data like API keys and TURN server credentials. A continuous integration and deployment pipeline automates testing and deployment, reducing downtime and manual errors. Monitoring tools should be integrated to track server health, WebSocket connection counts, and signaling latency. Using a reverse proxy like Nginx can help manage SSL termination and load balancing, ensuring that your Node.js server focuses on application logic.
Security and Privacy
End-to-End Encryption
WebRTC mandates encryption for all media and data streams. It uses Datagram Transport Layer Security (DTLS) to encrypt the transport layer and Secure Real-time Transport Protocol (SRTP) for the media streams. For applications requiring higher security, end-to-end encryption (E2EE) can be implemented using insertable streams, ensuring that even the media servers cannot decrypt the content. This is particularly important for telehealth and legal consultations where confidentiality is paramount. The DTLS handshake occurs during the signaling phase, establishing a secure connection before any media is transmitted.
Token-Based Authentication
Securing room access is critical. Token-based authentication, typically using JSON Web Tokens (JWT), ensures that only authorized users can join a chat. The Node.js server generates a token upon successful authentication, which the client uses to validate its connection to the signaling server and specific rooms. Tokens should have short expiration times and be scoped to specific rooms to minimize the impact of token theft. The server should verify the token on every connection attempt, rejecting any unauthenticated requests.
Data Protection Regulations
When storing recordings or user data, compliance with regulations like GDPR and SOC2 is necessary. Implementing data retention policies, securing storage buckets, and providing users with the ability to delete their data are key steps in maintaining compliance and user trust. The Node.js backend should enforce these policies, automatically purging old data and logging access to sensitive information. Anonymizing user data and encrypting recordings at rest are also critical components of a compliant video chat application.
Performance Optimizations
Optimizing video chat performance involves adapting to varying network conditions. Adaptive bitrate allows the video quality to scale up or down based on available bandwidth. Network-adaptive resolution ensures the video stream remains smooth even on poor connections. If video becomes unsustainable, an audio-only fallback keeps the communication channel open. Monitoring latency and packet loss using the WebRTC stats API provides real-time insights into connection quality, allowing developers to trigger adaptive mechanisms proactively. Implementing these optimizations ensures a consistent user experience across diverse network environments. The WebRTC stats API provides a wealth of information, including round-trip time, jitter, and available bandwidth, which can be used to dynamically adjust the video encoder settings.
Testing and Debugging
Testing a video chat app requires specific tools. Browser developer tools offer insights into network activity and console errors. The WebRTC internals page provides detailed graphs of packet loss, jitter, and bitrate. Logging in the Node.js server helps trace signaling messages and identify failed connection attempts. Testing across different network conditions, including 3G and high-latency environments, ensures the application remains robust. Automated testing can simulate multiple peers joining a room, verifying the signaling server's stability under load. Using tools like Selenium or Puppeteer can help automate browser interactions, allowing you to test the full signaling flow and media connection process.
Real-World Use Cases
A video chat app with WebRTC and Node.js powers various real-world applications. Telehealth platforms use it for secure patient consultations. Edtech applications leverage it for online tutoring and interactive classrooms. Remote teams rely on it for daily stand-ups and collaborative sessions. Customer support centers integrate video chat to provide personalized assistance, improving resolution times and customer satisfaction. The flexibility of this stack makes it suitable for any scenario requiring low-latency, high-quality real-time video. Social platforms also use WebRTC for live streaming and interactive broadcasts, taking advantage of the low latency to enable real-time audience interaction.
Definitions Glossary
WebRTC: A free, open-source project that provides web browsers and mobile applications with real-time communication via simple APIs, enabling peer-to-peer audio and video connections.
Node.js Signaling Server: A backend service that coordinates the exchange of WebRTC session descriptions and ICE candidates between clients to establish peer connections.
ICE Candidate: A network path discovered by a WebRTC client, which is exchanged with peers to find the best route for media transmission.
STUN/TURN Server: STUN servers help clients discover their public IP address for NAT traversal, while TURN servers act as relays when direct peer-to-peer connections fail.
SFU (Selective Forwarding Unit): A media routing server that receives a single stream from each participant and forwards it to others, optimizing bandwidth for larger group calls.
Key Takeaways
- Building a video chat app with WebRTC and Node.js separates media transport from signaling, creating a scalable architecture.
- WebRTC handles secure, low-latency peer-to-peer media, while Node.js manages room orchestration and connection setup.
- Scaling requires transitioning from a mesh network to an SFU model for larger groups and horizontally scaling the Node.js signaling layer.
- Security is built into WebRTC via DTLS and SRTP, with token-based authentication protecting room access.
- Adaptive bitrate and network-adaptive resolution are essential for maintaining call quality across varying network conditions.
Conclusion
Building a video chat app with WebRTC and Node.js gives you the flexibility to create tailored, secure, and scalable real-time communication experiences. By understanding the separation between WebRTC media transport and Node.js signaling, you can architect systems that handle everything from one-on-one calls to large group conferences. Start prototyping your application using the concepts covered here, and explore deeper resources to refine your implementation. What are you building with WebRTC? Drop a comment below to share your use case.
Step 5: Implement Participant View
In this section, we will focus on implementing the participant view for your Node-WebRTC application. This view will handle the display of remote video streams from other participants in the chat room. We will enhance our existing JavaScript code to manage multiple video streams effectively.
Rendering Participants
To effectively display remote video streams, we need to ensure that our application can dynamically create and manage video elements for each participant. We will update our
script.js file to include the necessary logic.JavaScript to Handle Participant Views
Update your
script.js file with the following code to manage remote video streams:JavaScript
1   const socket = io();
2
3   const joinScreen = document.getElementById('join-screen');
4   const videoChat = document.getElementById('video-chat');
5   const joinBtn = document.getElementById('join-btn');
6   const leaveBtn = document.getElementById('leave-btn');
7   const roomNameInput = document.getElementById('room-name');
8   const localVideo = document.getElementById('local-video');
9   const remoteVideos = document.getElementById('remote-videos');
10   const muteBtn = document.getElementById('mute-btn');
11   const videoBtn = document.getElementById('video-btn');
12
13   let localStream;
14   let peerConnections = {};
15   let isMuted = false;
16   let isVideoDisabled = false;
17
18   joinBtn.addEventListener('click', () => {
19       const roomName = roomNameInput.value;
20       if (roomName) {
21           joinRoom(roomName);
22       }
23   });
24
25   leaveBtn.addEventListener('click', leaveRoom);
26   muteBtn.addEventListener('click', toggleMute);
27   videoBtn.addEventListener('click', toggleVideo);
28
29   async function joinRoom(roomName) {
30       joinScreen.style.display = 'none';
31       videoChat.style.display = 'block';
32
33       localStream = await navigator.mediaDevices.getUserMedia({ video: true, audio: true });
34       localVideo.srcObject = localStream;
35
36       socket.emit('join', roomName);
37
38       socket.on('offer', async (id, description) => {
39           const peerConnection = new RTCPeerConnection();
40           peerConnections[id] = peerConnection;
41
42           localStream.getTracks().forEach(track => peerConnection.addTrack(track, localStream));
43
44           await peerConnection.setRemoteDescription(new RTCSessionDescription(description));
45           const answer = await peerConnection.createAnswer();
46           await peerConnection.setLocalDescription(answer);
47
48           socket.emit('answer', id, peerConnection.localDescription);
49
50           peerConnection.ontrack = event => {
51               const remoteVideo = createRemoteVideoElement(id, event.streams[0]);
52               remoteVideos.appendChild(remoteVideo);
53           };
54
55           peerConnection.onicecandidate = event => {
56               if (event.candidate) {
57                   socket.emit('candidate', id, event.candidate);
58               }
59           };
60       });
61
62       socket.on('answer', async (id, description) => {
63           const peerConnection = peerConnections[id];
64           await peerConnection.setRemoteDescription(new RTCSessionDescription(description));
65       });
66
67       socket.on('candidate', (id, candidate) => {
68           const peerConnection = peerConnections[id];
69           peerConnection.addIceCandidate(new RTCIceCandidate(candidate));
70       });
71
72       socket.on('leave', id => {
73           const peerConnection = peerConnections[id];
74           peerConnection.close();
75           delete peerConnections[id];
76           removeRemoteVideoElement(id);
77       });
78   }
79
80   function leaveRoom() {
81       for (let id in peerConnections) {
82           peerConnections[id].close();
83           delete peerConnections[id];
84       }
85       localStream.getTracks().forEach(track => track.stop());
86       joinScreen.style.display = 'block';
87       videoChat.style.display = 'none';
88       socket.emit('leave');
89       remoteVideos.innerHTML = '';
90   }
91
92   function toggleMute() {
93       isMuted = !isMuted;
94       localStream.getAudioTracks()[0].enabled = !isMuted;
95       muteBtn.textContent = isMuted ? 'Unmute' : 'Mute';
96   }
97
98   function toggleVideo() {
99       isVideoDisabled = !isVideoDisabled;
100       localStream.getVideoTracks()[0].enabled = !isVideoDisabled;
101       videoBtn.textContent = isVideoDisabled ? 'Enable Video' : 'Disable Video';
102   }
103
104   function createRemoteVideoElement(id, stream) {
105       const video = document.createElement('video');
106       video.id = `remote-video-${id}`;
107       video.srcObject = stream;
108       video.autoplay = true;
109       video.playsinline = true;
110       return video;
111   }
112
113   function removeRemoteVideoElement(id) {
114       const video = document.getElementById(`remote-video-${id}`);
115       if (video) {
116           video.remove();
117       }
118   }
Participant View Management
In the JavaScript code, we have implemented the following functionality to manage the participant view:
Creating Remote Video Elements
- The
createRemoteVideoElementfunction dynamically creates a video element for a remote participant and sets its source to the remote media stream. - This function is called whenever a new stream is received from a remote peer.
Adding Remote Video Elements
- When a remote peer sends an offer, a new
RTCPeerConnectionis created, and the remote video stream is appended to theremoteVideoscontainer. - The
ontrackevent of theRTCPeerConnectionhandles the addition of the remote video element.
Removing Remote Video Elements
- When a remote peer leaves the room, the corresponding
RTCPeerConnectionis closed, and the remote video element is removed from theremoteVideoscontainer. - The
removeRemoteVideoElementfunction is used to remove the video element by its ID.
Updating the Local Stream
- The local media stream is captured using
getUserMediaand displayed in the local video element. - The local stream tracks are added to the peer connections for sharing with remote participants.
Handling Room Leave
- When the user leaves the room, all peer connections are closed, the local media tracks are stopped, and the
remoteVideoscontainer is cleared.
With these steps, we have successfully implemented the participant view for your Node-WebRTC application. The application can now dynamically create and manage video elements for multiple participants, enhancing the user experience by providing a seamless real-time video chat experience. The final step will focus on running and testing your application to ensure everything works as expected.
Step 6: Run Your Code Now
In this final step, we will focus on running and testing your Node-WebRTC application to ensure that everything is working as expected. We will also address some common issues you might encounter and how to troubleshoot them.
Running the Node-WebRTC Application
Start the Server
Ensure you are in the root directory of your project (where
package.json is located). Start your server using the following command:bash
1 node src/index.jsThis command will start your Node.js server, and you should see a message indicating that the server is listening on
http://localhost:3000.Open the Application in a Browser
Open your web browser and navigate to
http://localhost:3000. You should see the join screen of your Node-WebRTC application.Join a Room
- Enter a room name in the input field and click the "Join" button.
- Allow access to your microphone and camera when prompted by the browser.
- You should see your local video stream displayed on the screen.
Test with Multiple Participants
- Open another browser tab or use a different device to join the same room.
- You should see both local and remote video streams displayed on the screen.
- Test the mute/unmute and enable/disable video functionality to ensure that the controls are working correctly.
Troubleshooting Common Issues
No Video/Audio Stream
- Ensure that you have granted the necessary permissions for the browser to access your microphone and camera.
- Check if your device's camera and microphone are working correctly with other applications.
Unable to Connect to Room
- Ensure that the server is running and accessible at
http://localhost:3000. - Check if there are any errors in the browser console or the server logs that might indicate issues with the connection or signaling.
Remote Video Not Displayed
- Verify that the signaling messages (offer, answer, and ICE candidates) are being exchanged correctly between peers.
- Ensure that the
RTCPeerConnectionis properly set up and that media tracks are being added to the connection.
Poor Video/Audio Quality
- Check your network connection for any issues that might affect the quality of the video and audio streams.
- Consider adjusting the media constraints in the
getUserMediafunction to optimize the quality based on your network conditions.
Conclusion
With your Node-WebRTC application now up and running, you have a solid foundation for building real-time communication features. This tutorial has guided you through setting up the server, creating the join screen, implementing user controls, and managing participant views.
Free $20 Balance for AI Voice Agents & Video Calls
FAQ