Imagine players not just hearing each other's voices, but seeing real-time facial expressions when a last-minute goal is scored or a difficult raid boss is defeated. Picture teammates strategizing with actual hand gestures or streamers broadcasting their reactions live within your game environment. This is the immersive future of multiplayer gaming that Unity WebRTC video streaming can deliver.
While incorporating video chat into games once required extensive custom development, VideoSDK now makes it surprisingly straightforward to integrate robust, high-quality video streaming directly into your Unity multiplayer experiences. In this guide, we'll walk through the entire process of implementing WebRTC-powered video capabilities in your Unity game using VideoSDK's powerful toolkit.
Understanding Unity WebRTC Architecture
When implementing video streaming in Unity games, it's important to understand how all the components work together. VideoSDK simplifies this complex system by handling much of the underlying infrastructure, but having a clear picture of the architecture helps developers make informed decisions.
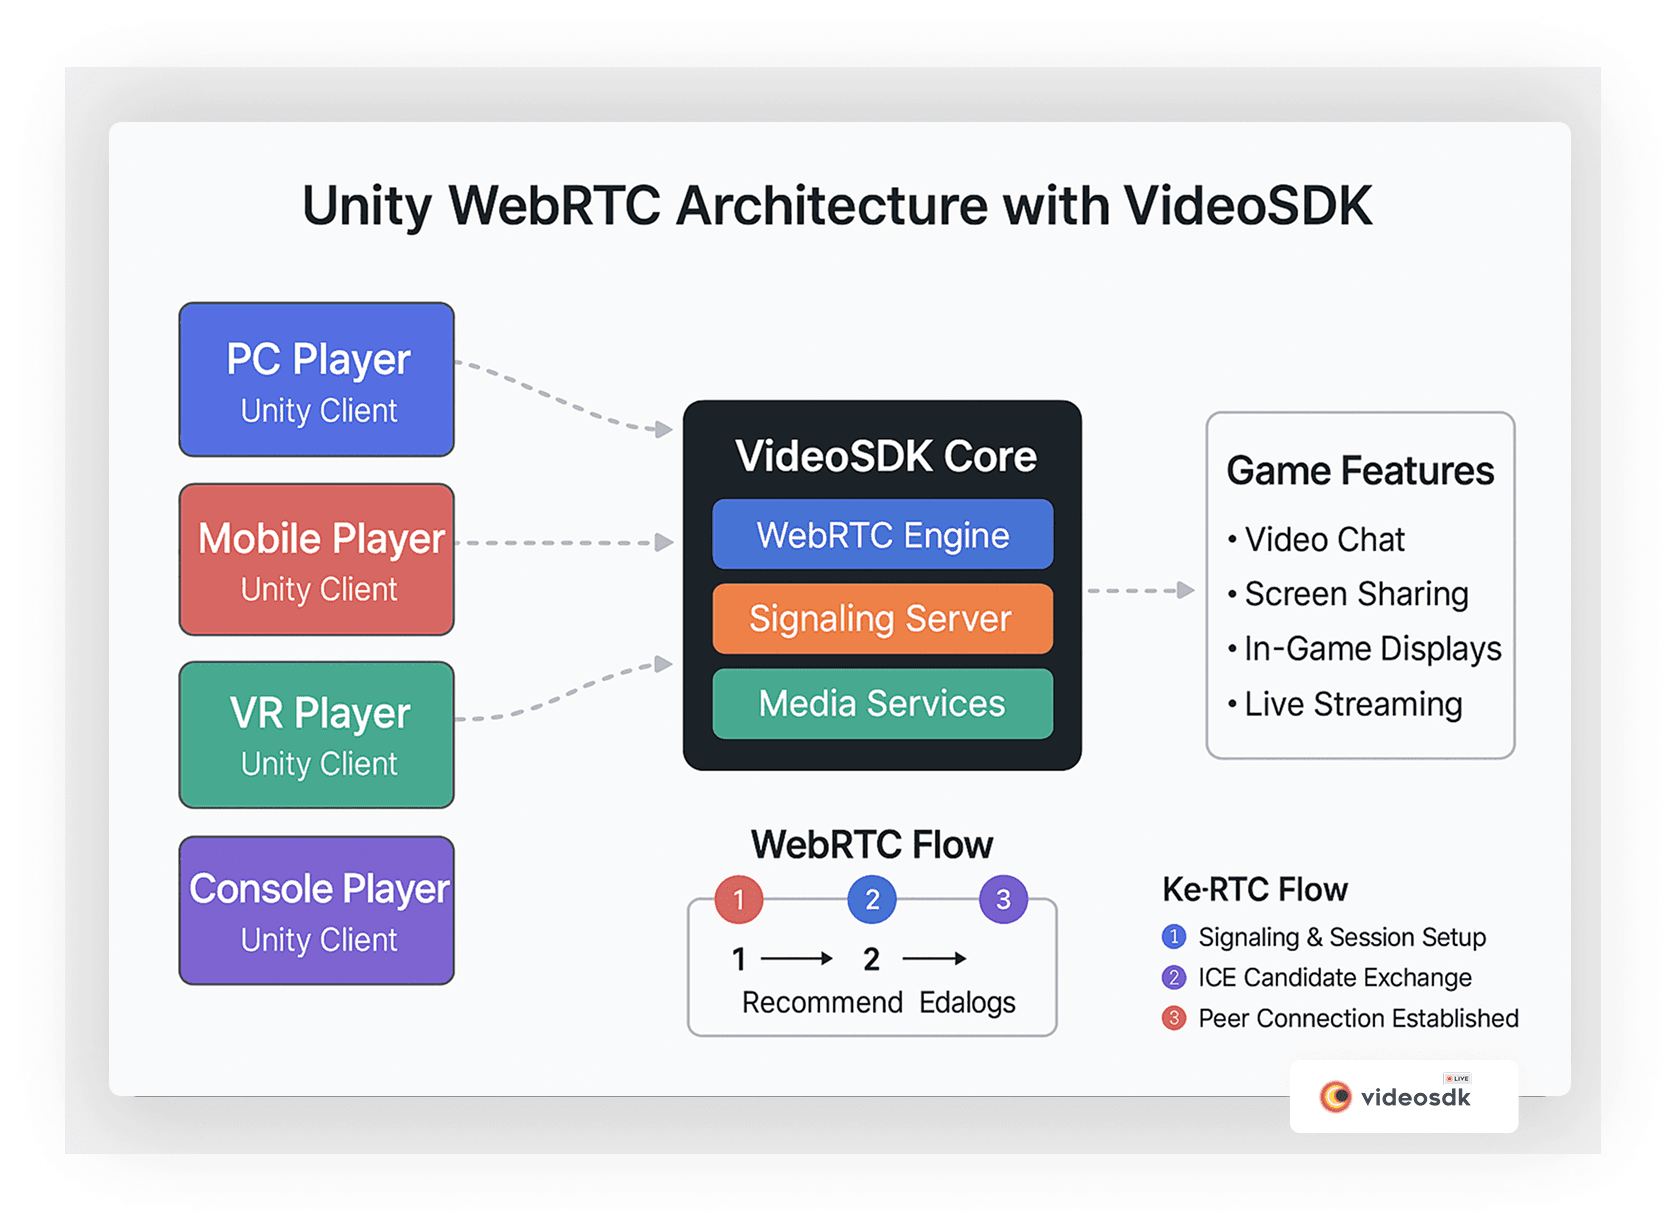
As shown above, VideoSDK's core sits at the heart of this system, connecting players across different platforms through its robust WebRTC engine, signaling server, and media services. This architecture enables seamless communication between PC, mobile, VR, and console players while providing the foundation for advanced game features like video chat, screen sharing, and live streaming.
Why Add Video Streaming to Your Multiplayer Game?
Before diving into implementation, let's consider the substantial benefits video streaming brings to multiplayer games:
- Enhanced Player Connection: Video creates stronger social bonds between players, increasing retention and community engagement
- Improved Communication: Complex tactics are easier to explain when players can see each other's gestures and expressions
- Competitive Advantage: Stand out in the marketplace with premium communication features
- Content Creation: Enable streamers to broadcast directly from within your game
- New Gameplay Mechanics: Create innovative gameplay based on real-life movement, expressions, or environments
The social aspect of gaming has always been crucial, but video takes this to new heights. Research shows that facial expressions and non-verbal cues account for over 50% of effective communication—something that voice chat alone simply cannot deliver.
Video Integration Methods Comparison
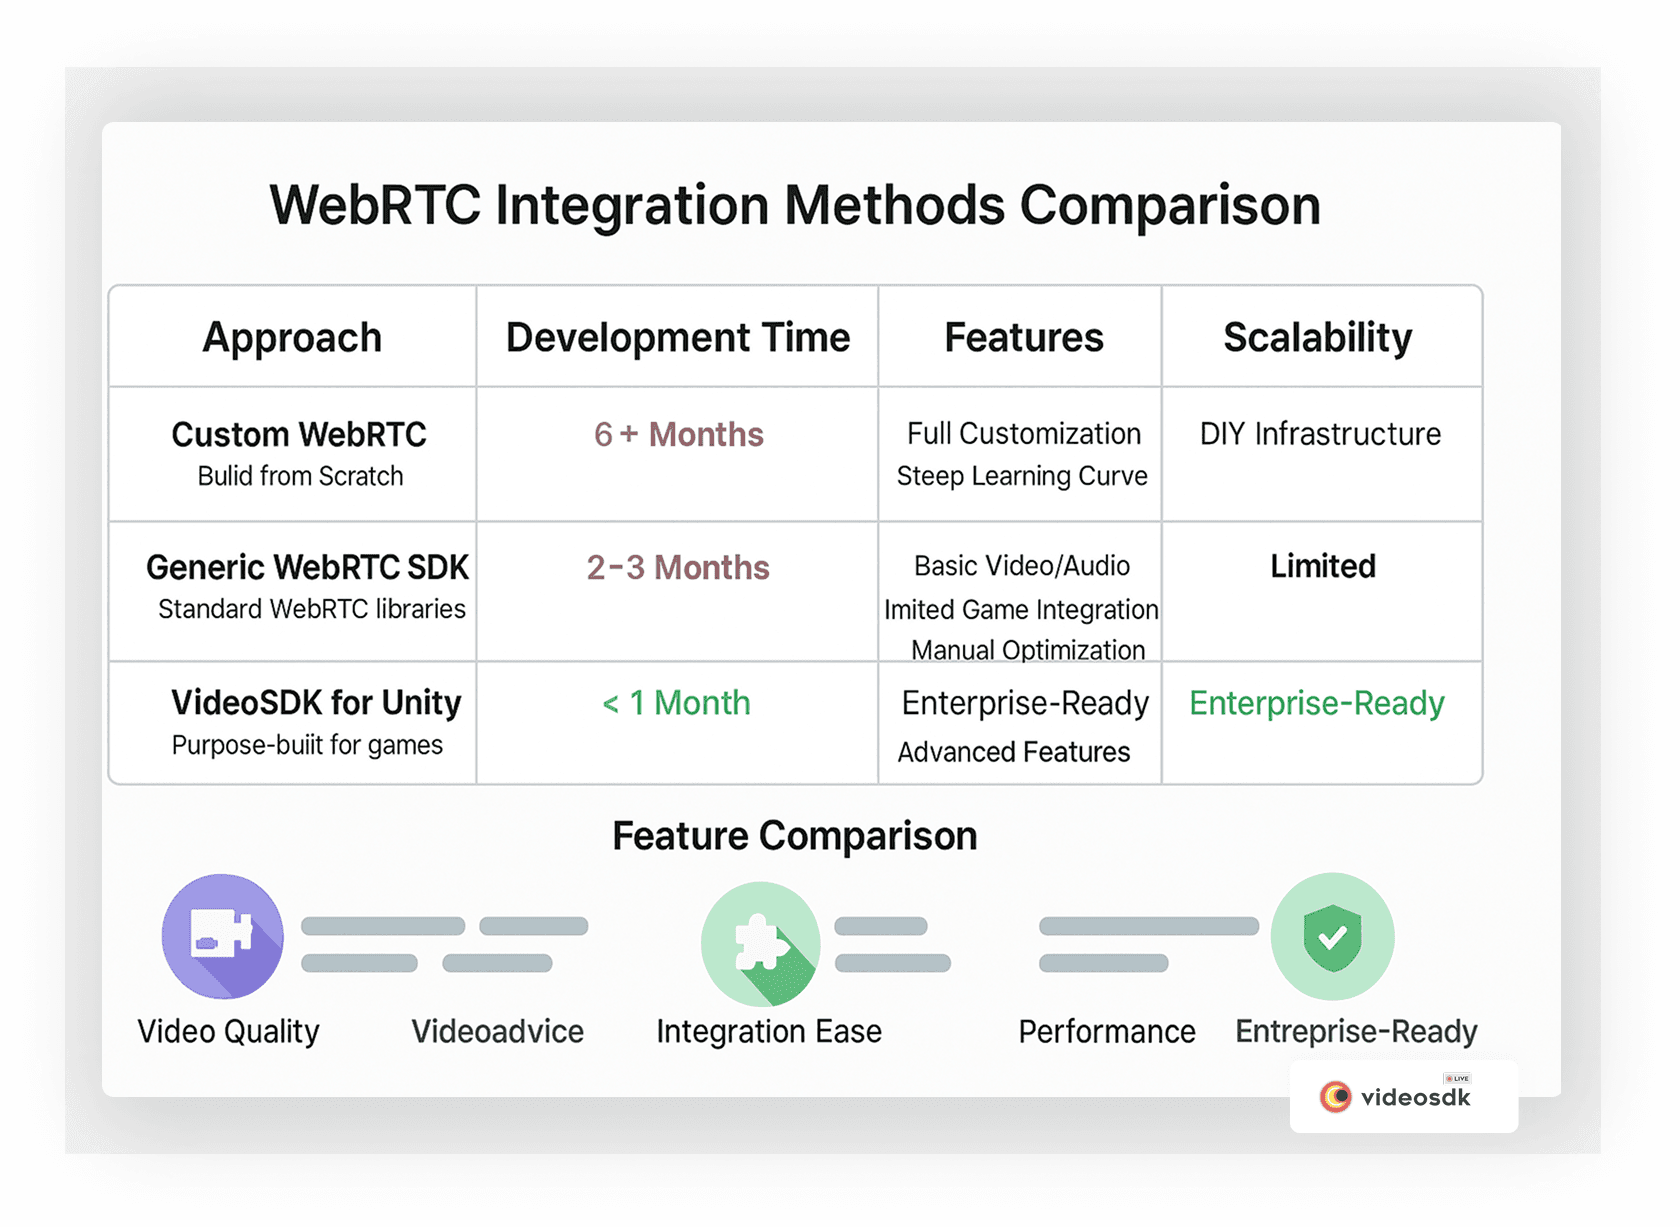
When considering how to implement video in your Unity game, you have several options. Let's compare different approaches to help you make the best choice for your project.
As this comparison illustrates, VideoSDK for Unity stands out as the most efficient approach, dramatically reducing development time while providing enterprise-ready scalability and Unity-optimized features. Custom WebRTC implementations offer complete control but require months of development and ongoing maintenance, while generic WebRTC SDKs fall short in game-specific optimizations and features.
Setting Up Your Unity Project for WebRTC Video
Let's start with the practical steps to integrate VideoSDK's video capabilities into your Unity game:
Step 1: Install the VideoSDK Package
- Open your Unity project in the editor
- Go to Window → Package Manager
- Click the "+" button in the top-left corner
- Select "Add package from git URL..."
- Enter the following URL:
https://github.com/videosdk-live/videosdk-rtc-unity-sdk.git - Click "Add" and wait for the package to install
- Add the Newtonsoft.json package as well (required dependency)
Step 2: Configure Required Settings
For VideoSDK to work properly, we need to update a few project settings:
- For Android:
- Open Player Settings (Edit → Project Settings → Player)
- Under "Other Settings", set Minimum API Level to Android 5.0 (API level 21) or higher
- Enable "Internet Access"
- Add camera and microphone permissions to your AndroidManifest.xml:
1<uses-permission android:name="android.permission.CAMERA" /> 2<uses-permission android:name="android.permission.INTERNET" /> 3<uses-permission android:name="android.permission.RECORD_AUDIO" /> 4<uses-permission android:name="android.permission.MODIFY_AUDIO_SETTINGS" /> 5 - For iOS:
- In Player Settings, add camera and microphone usage descriptions
- Enable "Requires ARKit support" if you plan to use AR features
- For WebGL:
- Enable "WebCam" and "Microphone" in Publishing Settings
Step 3: Create a Video Manager Script
Now, let's create a core manager script that will handle our video integration. Create a new C# script named
VideoStreamManager.cs:1using System.Collections.Generic;
2using UnityEngine;
3using UnityEngine.UI;
4using live.videosdk;
5
6public class VideoStreamManager : MonoBehaviour
7{
8 [Header("Configuration")]
9 [SerializeField] private string authToken = "YOUR_VIDEOSDK_TOKEN"; // Get from VideoSDK dashboard
10 [SerializeField] private string meetingID = ""; // Can be generated or joined
11 [SerializeField] private string participantName = "Player";
12
13 [Header("UI References")]
14 [SerializeField] private RawImage localVideoDisplay;
15 [SerializeField] private Transform remoteVideosContainer;
16 [SerializeField] private GameObject remoteVideoTemplate;
17 [SerializeField] private GameObject connectionPanel;
18 [SerializeField] private GameObject streamingPanel;
19 [SerializeField] private InputField meetingIdInput;
20
21 // Core VideoSDK objects
22 private Meeting videoMeeting;
23 private Dictionary<string, VideoSurface> participantSurfaces = new Dictionary<string, VideoSurface>();
24
25 // Initialization
26 private void Start()
27 {
28 // Initialize VideoSDK meeting instance
29 videoMeeting = Meeting.GetMeetingObject();
30
31 // Register event callbacks
32 RegisterCallbacks();
33
34 // Set initial UI state
35 connectionPanel.SetActive(true);
36 streamingPanel.SetActive(false);
37
38 // Ensure remote video template is inactive
39 if (remoteVideoTemplate != null)
40 remoteVideoTemplate.SetActive(false);
41 }
42
43 // Register necessary event callbacks
44 private void RegisterCallbacks()
45 {
46 videoMeeting.OnMeetingJoined += OnMeetingJoined;
47 videoMeeting.OnMeetingLeft += OnMeetingLeft;
48 videoMeeting.OnParticipantJoined += OnParticipantJoined;
49 videoMeeting.OnParticipantLeft += OnParticipantLeft;
50 videoMeeting.OnCreateMeetingIdCallback += OnMeetingCreated;
51 videoMeeting.OnCreateMeetingIdFailedCallback += OnMeetingCreationFailed;
52 }
53
54 // Create a new video meeting/room
55 public void CreateMeeting()
56 {
57 videoMeeting.CreateMeetingId(authToken);
58 }
59
60 // Join an existing meeting with ID from input field
61 public void JoinMeeting()
62 {
63 if (string.IsNullOrEmpty(meetingIdInput.text))
64 return;
65
66 meetingID = meetingIdInput.text;
67 videoMeeting.Join(authToken, meetingID, participantName);
68 }
69
70 // Leave the current video meeting
71 public void LeaveMeeting()
72 {
73 videoMeeting.Leave();
74 }
75
76 #region VideoSDK Callbacks
77
78 // Called when meeting ID is successfully created
79 private void OnMeetingCreated(string newMeetingId)
80 {
81 meetingID = newMeetingId;
82 Debug.Log("Meeting created: " + meetingID);
83
84 // Join the newly created meeting
85 videoMeeting.Join(authToken, meetingID, participantName);
86 }
87
88 // Called when meeting creation fails
89 private void OnMeetingCreationFailed(string errorMsg)
90 {
91 Debug.LogError("Failed to create meeting: " + errorMsg);
92 }
93
94 // Called when successfully joined a meeting
95 private void OnMeetingJoined()
96 {
97 Debug.Log("Successfully joined meeting: " + meetingID);
98
99 // Update UI
100 connectionPanel.SetActive(false);
101 streamingPanel.SetActive(true);
102 }
103
104 // Called when left a meeting
105 private void OnMeetingLeft()
106 {
107 Debug.Log("Left meeting: " + meetingID);
108
109 // Reset UI
110 connectionPanel.SetActive(true);
111 streamingPanel.SetActive(false);
112
113 // Clean up participant video surfaces
114 foreach (var surface in participantSurfaces.Values)
115 {
116 if (surface != null && surface.gameObject != null)
117 Destroy(surface.gameObject);
118 }
119
120 participantSurfaces.Clear();
121 }
122
123 // Called when a new participant joins the meeting
124 private void OnParticipantJoined(Participant participant)
125 {
126 Debug.Log("Participant joined: " + participant.ParticipantId);
127
128 if (participant.IsLocal)
129 {
130 // Set up local video preview
131 if (localVideoDisplay != null)
132 {
133 VideoSurface surface = localVideoDisplay.gameObject.AddComponent<VideoSurface>();
134 surface.SetVideoSurfaceType(VideoSurfaceType.RawImage);
135 surface.SetParticipant(participant);
136 surface.SetEnable(true);
137 }
138 }
139 else
140 {
141 // Create remote participant video element
142 CreateRemoteParticipantView(participant);
143 }
144 }
145
146 // Called when a participant leaves the meeting
147 private void OnParticipantLeft(Participant participant)
148 {
149 Debug.Log("Participant left: " + participant.ParticipantId);
150
151 // Remove their video display
152 if (!participant.IsLocal && participantSurfaces.TryGetValue(participant.ParticipantId, out VideoSurface surface))
153 {
154 if (surface != null && surface.gameObject != null)
155 Destroy(surface.gameObject);
156
157 participantSurfaces.Remove(participant.ParticipantId);
158 }
159 }
160
161 #endregion
162
163 // Create video display for remote participant
164 private void CreateRemoteParticipantView(Participant participant)
165 {
166 if (remoteVideoTemplate == null || remoteVideosContainer == null)
167 return;
168
169 // Instantiate from template
170 GameObject videoObj = Instantiate(remoteVideoTemplate, remoteVideosContainer);
171 videoObj.SetActive(true);
172
173 // Set participant name if there's a Text component
174 TMPro.TextMeshProUGUI nameText = videoObj.GetComponentInChildren<TMPro.TextMeshProUGUI>();
175 if (nameText != null)
176 nameText.text = participant.DisplayName;
177
178 // Set up video surface
179 RawImage rawImage = videoObj.GetComponentInChildren<RawImage>();
180 if (rawImage != null)
181 {
182 VideoSurface surface = rawImage.gameObject.AddComponent<VideoSurface>();
183 surface.SetVideoSurfaceType(VideoSurfaceType.RawImage);
184 surface.SetParticipant(participant);
185 surface.SetEnable(true);
186
187 // Store reference to this surface
188 participantSurfaces[participant.ParticipantId] = surface;
189 }
190 }
191
192 // Toggle camera on/off
193 public void ToggleCamera()
194 {
195 foreach (var participant in videoMeeting.Participants)
196 {
197 if (participant.Value.IsLocal)
198 {
199 bool currentState = participant.Value.CamEnabled;
200 participant.Value.SetCam(!currentState);
201 break;
202 }
203 }
204 }
205
206 // Toggle microphone on/off
207 public void ToggleMicrophone()
208 {
209 foreach (var participant in videoMeeting.Participants)
210 {
211 if (participant.Value.IsLocal)
212 {
213 bool currentState = participant.Value.MicEnabled;
214 participant.Value.SetMic(!currentState);
215 break;
216 }
217 }
218 }
219}
220Step 4: Create a Basic Video UI
Now let's set up a simple UI for our video streaming:
- Create a Canvas for your UI (GameObject → UI → Canvas)
- Add two panels to your canvas:
- Connection Panel: For joining/creating video sessions
- Streaming Panel: For displaying videos and controls when connected
- For the Connection Panel:
- Add an Input Field for entering meeting IDs
- Add buttons for "Create Meeting" and "Join Meeting"
- Connect these to the corresponding methods in the VideoStreamManager script
- For the Streaming Panel:
- Add a RawImage for local video preview
- Create a container (like a Grid Layout Group) for remote videos
- Create a remote video template prefab with a RawImage component
- Add buttons for toggling camera, microphone, and leaving the meeting
- Connect these to the corresponding methods in the VideoStreamManager script
- Drag these UI elements to the appropriate serialized fields in your VideoStreamManager component.
Performance Optimization for WebRTC in Games
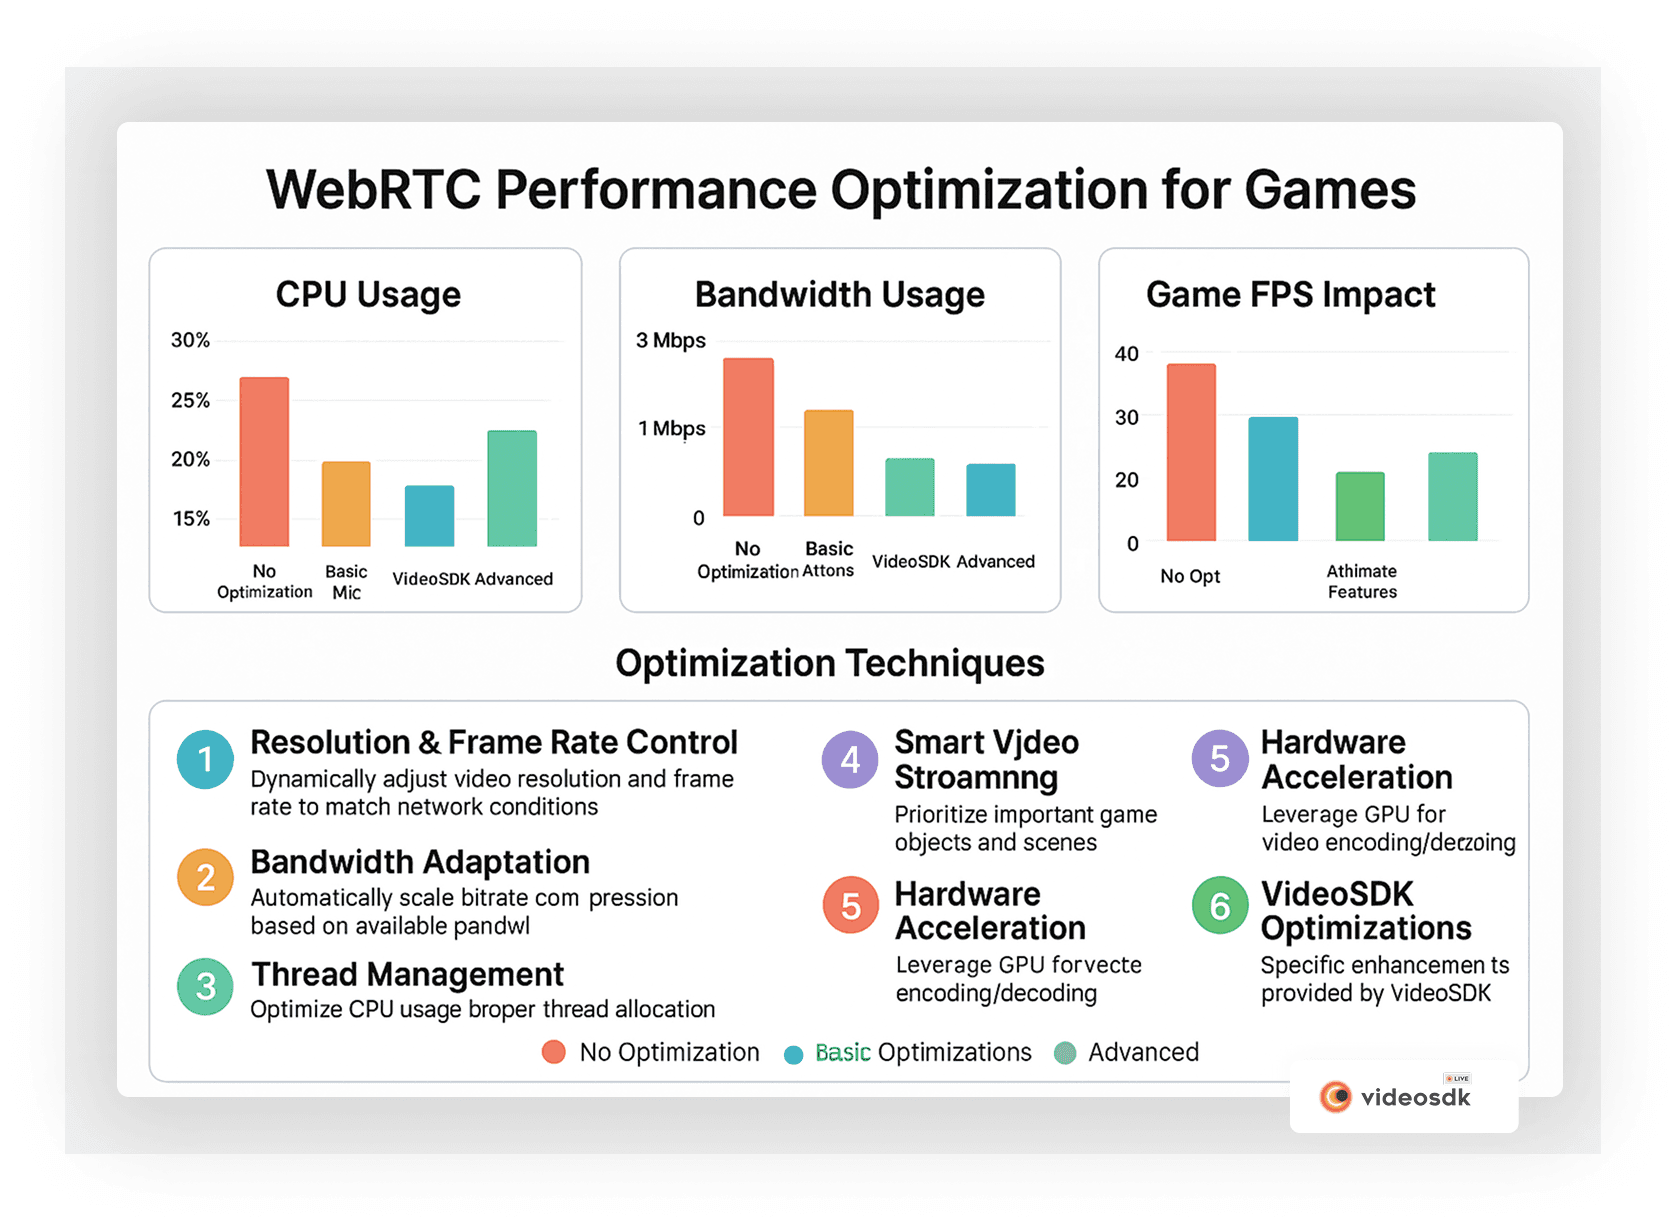
One of the biggest challenges when integrating video streaming into games is ensuring that it doesn't negatively impact your game's performance. VideoSDK provides several tools to optimize video streaming and maintain smooth gameplay.
As this chart illustrates, proper optimization techniques can significantly reduce the CPU usage, bandwidth consumption, and overall performance impact of video streaming in your game. Without optimization, video can consume substantial resources, but with VideoSDK's built-in optimizations and advanced techniques, the impact becomes minimal.
Here are key optimization techniques to implement:
Resolution and Frame Rate Control
Adjust video quality dynamically based on network conditions and game performance:
1// Set video quality based on device performance
2private void SetVideoQuality(DevicePerformanceLevel level)
3{
4    switch (level)
5    {
6        case DevicePerformanceLevel.Low:
7            videoMeeting.SetVideoConfig(320, 240, 15, 300000); // 320x240, 15fps, 300kbps
8            break;
9        case DevicePerformanceLevel.Medium:
10            videoMeeting.SetVideoConfig(640, 360, 24, 600000); // 640x360, 24fps, 600kbps
11            break;
12        case DevicePerformanceLevel.High:
13            videoMeeting.SetVideoConfig(1280, 720, 30, 1500000); // 720p, 30fps, 1.5Mbps
14            break;
15    }
16}
17
18// Define performance levels
19public enum DevicePerformanceLevel
20{
21    Low,
22    Medium,
23    High
24}
25
Smart Video Streaming
Only process and render video for participants who are actively visible or speaking:
1// Limit maximum visible remote streams
2[SerializeField] private int maxVisibleStreams = 4;
3
4private void ManageVisibleStreams()
5{
6    // Get all active remote participants
7    List<Participant> remoteParticipants = new List<Participant>();
8    foreach (var participant in videoMeeting.Participants)
9    {
10        if (!participant.Value.IsLocal)
11            remoteParticipants.Add(participant.Value);
12    }
13
14    // Sort by activity, audio level, etc. - whatever makes sense for your game
15    remoteParticipants.Sort((a, b) => b.AudioLevel.CompareTo(a.AudioLevel));
16
17    // Show/hide video surfaces based on priority
18    for (int i = 0; i < remoteParticipants.Count; i++)
19    {
20        string participantId = remoteParticipants[i].ParticipantId;
21
22        if (participantSurfaces.TryGetValue(participantId, out VideoSurface surface))
23        {
24            bool shouldBeVisible = i < maxVisibleStreams;
25            surface.gameObject.SetActive(shouldBeVisible);
26        }
27    }
28}
29
Hardware Acceleration
Leverage GPU acceleration when available:
1// Enable hardware acceleration
2videoMeeting.SetHardwareAcceleration(true);
3
Bandwidth Adaptation
Monitor network conditions and adjust accordingly:
1private void CheckNetworkQuality()
2{
3    if (!videoMeeting.IsJoined())
4        return;
5
6    NetworkQuality quality = videoMeeting.GetNetworkQuality();
7
8    switch (quality)
9    {
10        case NetworkQuality.Poor:
11            SetVideoQuality(DevicePerformanceLevel.Low);
12            break;
13        case NetworkQuality.Average:
14            SetVideoQuality(DevicePerformanceLevel.Medium);
15            break;
16        case NetworkQuality.Good:
17            SetVideoQuality(DevicePerformanceLevel.High);
18            break;
19    }
20}
21
Enhancing Immersion with Creative Video Integration
Beyond basic implementation, consider these creative ways to integrate video feeds directly into your game world for a more immersive experience:
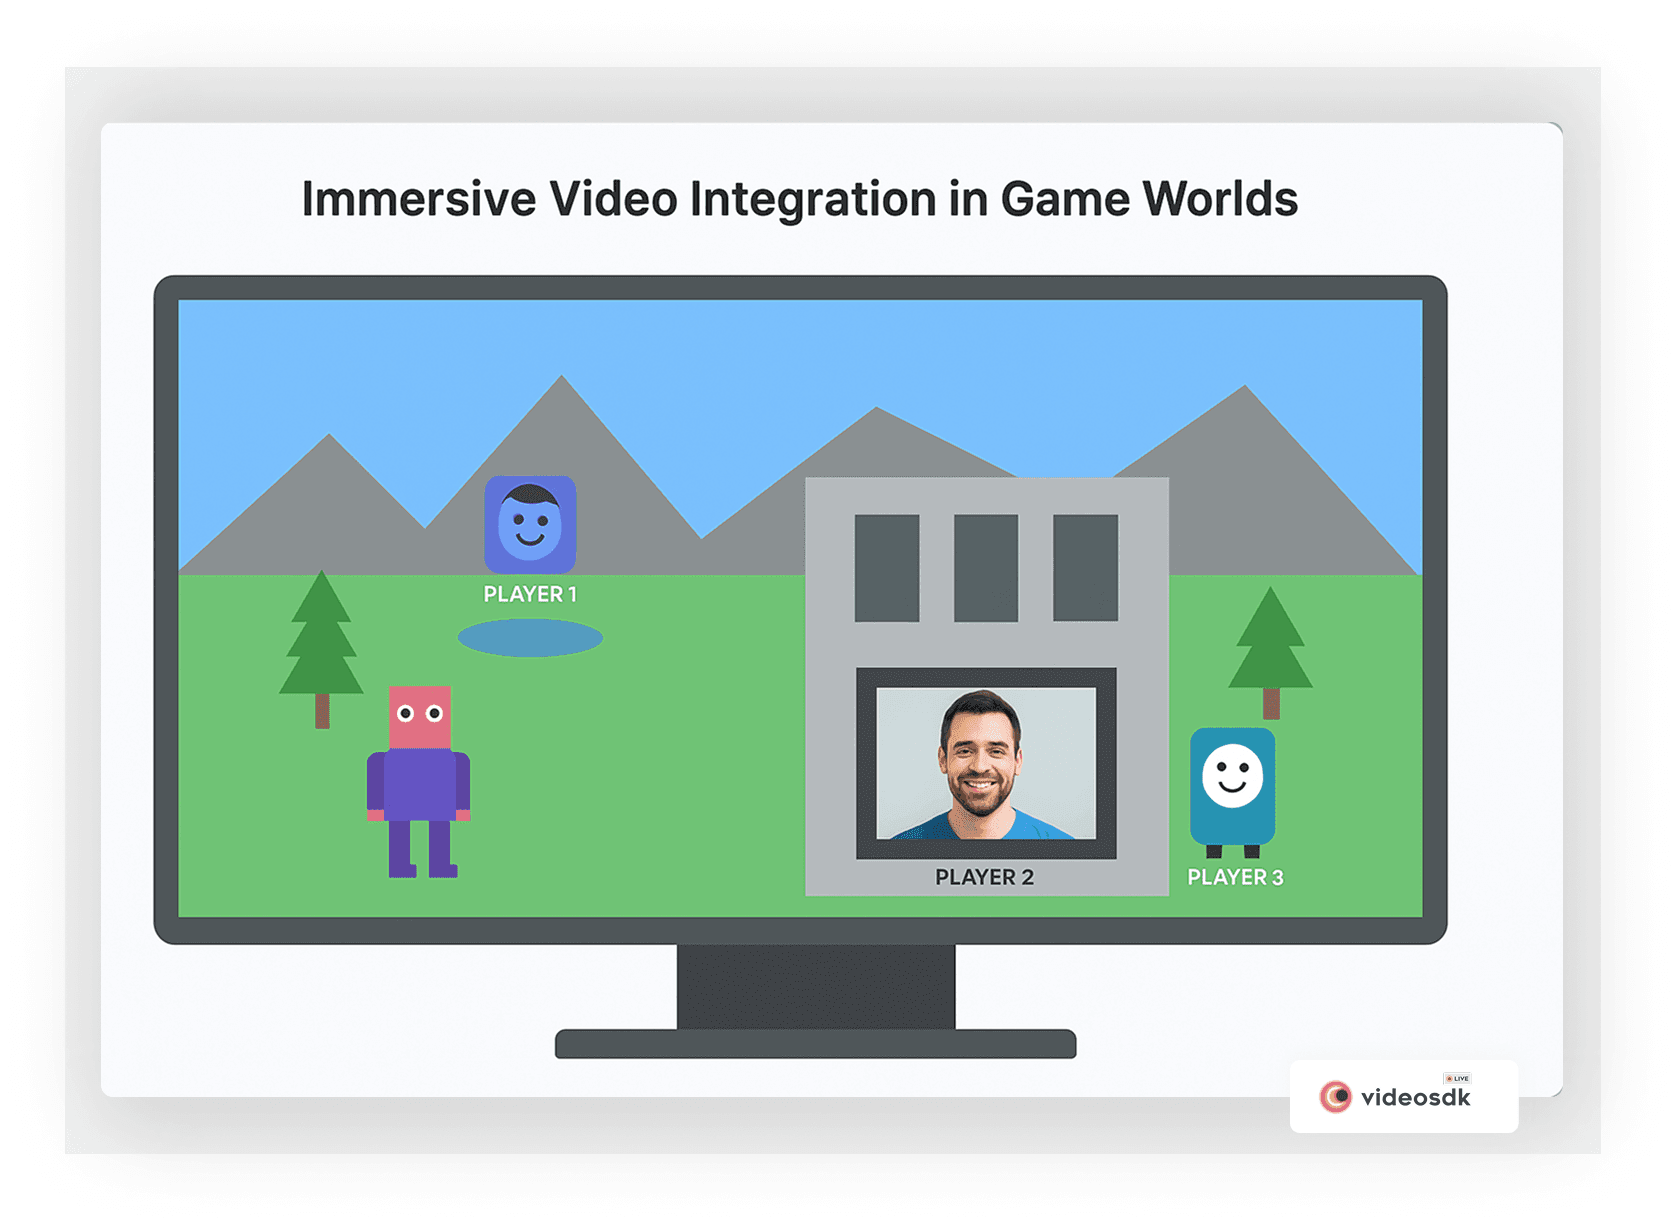
As illustrated above, there are multiple creative ways to display player video streams within your game world. Rather than simply showing video in a standard UI panel, you can create in-game displays on walls, holographic projections, character heads, or mobile devices within the game environment.
Here's how you can implement such immersive integration:
1// Attach this script to in-game objects that should display video
2public class InGameVideoDisplay : MonoBehaviour
3{
4    [SerializeField] private Material videoMaterial;
5    [SerializeField] private string participantId;
6
7    private VideoStreamManager videoManager;
8
9    void Start()
10    {
11        videoManager = FindObjectOfType<VideoStreamManager>();
12
13        // Register for event when participants join
14        videoManager.OnParticipantAddedEvent += HandleNewParticipant;
15    }
16
17    void HandleNewParticipant(string id, Participant participant)
18    {
19        if (id == participantId)
20        {
21            // Create a RenderTexture for the video
22            RenderTexture renderTexture = new RenderTexture(512, 512, 0);
23
24            // Create video surface for this participant
25            VideoSurface surface = gameObject.AddComponent<VideoSurface>();
26            surface.SetVideoSurfaceType(VideoSurfaceType.RenderTexture);
27            surface.SetTargetTexture(renderTexture);
28            surface.SetParticipant(participant);
29            surface.SetEnable(true);
30
31            // Set the render texture on our material
32            videoMaterial.mainTexture = renderTexture;
33        }
34    }
35}
36
You can get even more creative by adding spatial audio to these video displays:
1// Add this component to game objects with InGameVideoDisplay
2[RequireComponent(typeof(AudioSource))]
3public class SpatialVideoAudio : MonoBehaviour
4{
5    private AudioSource audioSource;
6    private VideoSurface videoSurface;
7
8    void Start()
9    {
10        audioSource = GetComponent<AudioSource>();
11        videoSurface = GetComponent<VideoSurface>();
12
13        if (videoSurface != null && videoSurface.Participant != null)
14        {
15            // Configure spatial audio settings
16            audioSource.spatialBlend = 1.0f; // Fully 3D
17            audioSource.minDistance = 1.0f;
18            audioSource.maxDistance = 20.0f;
19
20            // Set up participant to route audio through this source
21            videoSurface.Participant.SetCustomAudioOutput(audioSource);
22        }
23    }
24}
25
Advanced Features and Customization
Once you have the basic implementation working, you can explore these advanced features:
Implementing Screen Sharing
Screen sharing lets players show their screens to others, which is useful for tutorials, debugging, or sharing content:
1// Add this method to your VideoStreamManager class
2public void ToggleScreenShare()
3{
4    foreach (var participant in videoMeeting.Participants)
5    {
6        if (participant.Value.IsLocal)
7        {
8            bool isScreenSharing = participant.Value.IsScreenShared;
9
10            if (isScreenSharing)
11                participant.Value.StopScreenShare();
12            else
13                participant.Value.StartScreenShare();
14
15            break;
16        }
17    }
18}
19
Add a "Share Screen" button to your UI and connect it to this method.
Adding Custom Video Filters
You can enhance video streams with custom filters or overlays using Unity's shader system:
1// Create a simple grayscale shader
2Shader "VideoSDK/Grayscale"
3{
4    Properties
5    {
6        _MainTex ("Texture", 2D) = "white" {}
7    }
8    SubShader
9    {
10        Tags { "RenderType"="Opaque" }
11        LOD 100
12
13        Pass
14        {
15            CGPROGRAM
16            #pragma vertex vert
17            #pragma fragment frag
18
19            #include "UnityCG.cginc"
20
21            struct appdata
22            {
23                float4 vertex : POSITION;
24                float2 uv : TEXCOORD0;
25            };
26
27            struct v2f
28            {
29                float2 uv : TEXCOORD0;
30                float4 vertex : SV_POSITION;
31            };
32
33            sampler2D _MainTex;
34
35            v2f vert (appdata v)
36            {
37                v2f o;
38                o.vertex = UnityObjectToClipPos(v.vertex);
39                o.uv = v.uv;
40                return o;
41            }
42
43            fixed4 frag (v2f i) : SV_Target
44            {
45                fixed4 col = tex2D(_MainTex, i.uv);
46                float gray = dot(col.rgb, float3(0.299, 0.587, 0.114));
47                return fixed4(gray, gray, gray, col.a);
48            }
49            ENDCG
50        }
51    }
52}
53
Then apply this shader to the Material used by your video RawImage:
1// Apply grayscale filter to local video
2public void ApplyGrayscaleFilter()
3{
4    if (localVideoDisplay != null)
5    {
6        Material grayMaterial = new Material(Shader.Find("VideoSDK/Grayscale"));
7        localVideoDisplay.material = grayMaterial;
8    }
9}
10
Implementing Video Recording
VideoSDK supports recording video sessions, which can be useful for replays, content creation, or archiving:
1// Add recording functionality
2private bool isRecording = false;
3
4public void ToggleRecording()
5{
6    isRecording = !isRecording;
7
8    if (isRecording)
9    {
10        // Start recording
11        videoMeeting.StartRecording();
12        Debug.Log("Recording started");
13    }
14    else
15    {
16        // Stop recording
17        videoMeeting.StopRecording();
18        Debug.Log("Recording stopped");
19    }
20}
21
Building for Privacy and Safety
When implementing video chat, consider privacy and safety:
Implementing Moderation Tools
Add basic moderation features to protect players:
1// Example moderation functions
2public void MuteParticipant(string participantId)
3{
4    if (videoMeeting.Participants.TryGetValue(participantId, out Participant participant))
5    {
6        participant.SetMic(false);
7    }
8}
9
10public void DisableParticipantVideo(string participantId)
11{
12    if (videoMeeting.Participants.TryGetValue(participantId, out Participant participant))
13    {
14        participant.SetCam(false);
15    }
16}
17
18public void RemoveParticipant(string participantId)
19{
20    videoMeeting.RemoveParticipant(participantId);
21}
22
Privacy Controls and Settings
Give players control over their privacy:
1// Add these to your VideoStreamManager
2[SerializeField] private bool joinWithVideoOff = false;
3[SerializeField] private bool joinWithAudioOff = false;
4
5// Modify your Join method
6public void JoinMeeting()
7{
8    if (string.IsNullOrEmpty(meetingIdInput.text))
9        return;
10
11    meetingID = meetingIdInput.text;
12
13    // Join with preferred initial settings
14    videoMeeting.Join(authToken, meetingID, participantName, !joinWithAudioOff, !joinWithVideoOff);
15}
16
Conclusion
Integrating Unity WebRTC video streaming with VideoSDK opens up exciting possibilities for enhancing player connection, immersion, and engagement in your multiplayer games. From basic video chat to sophisticated in-game integrations, the technology enables new forms of interaction that can set your game apart.
By following this guide, you've learned how to:
- Set up the VideoSDK package in your Unity project
- Implement basic video streaming functionality
- Add advanced features like screen sharing and filters
- Optimize performance for different devices and network conditions
- Create immersive integrations with your game world
- Handle common challenges and edge cases
The future of multiplayer gaming increasingly involves rich, real-time communication between players. By incorporating video streaming now, you're not just adding a feature—you're preparing your game for the social, connected future of interactive entertainment.
Remember that successful video integration balances technical performance with user experience. Start with the basics, test thoroughly across different devices and network conditions, and gradually add more advanced features as you refine your implementation.
Ready to get started?
Sign up for VideoSDK
today and begin building more connected, immersive multiplayer experiences for your players!Want to level-up your learning? Subscribe now
Subscribe to our newsletter for more tech based insights
FAQ