How to Use WebRTC: A Comprehensive Guide for Developers
WebRTC (Web Real-Time Communication) is a free, open-source project providing web browsers and mobile applications with real-time communication (RTC) via simple APIs. This guide will walk you through the fundamentals of WebRTC, from setting up your development environment to building a simple video chat application.
Introduction to WebRTC
What is WebRTC?
WebRTC is an API definition drafted by the World Wide Web Consortium (W3C) that supports browser-to-browser applications for voice calling, video chat, and P2P file sharing without the need of either internal or external plugins.
Why use WebRTC?
WebRTC offers several advantages:
- No plugins required: WebRTC is built directly into modern browsers.
- Open source and free: The WebRTC project is open source and royalty-free.
- Real-time communication: WebRTC enables low-latency communication, crucial for video and audio calls.
- Peer-to-peer: WebRTC allows direct communication between browsers, reducing server load.
WebRTC Capabilities: Video, Audio, and Data
WebRTC empowers developers to create applications that handle:
- Video: Enable video conferencing, streaming, and surveillance.
- Audio: Build voice chat, podcasting, and music collaboration tools.
- Data: Develop peer-to-peer file sharing, remote control, and real-time gaming applications.
Prerequisites for using WebRTC
Before diving into WebRTC, you should have a basic understanding of:
- HTML, CSS, and JavaScript
- Networking concepts (e.g., TCP/IP, UDP)
- Asynchronous programming
- A code editor and a modern web browser
Setting up your Development Environment
To start building WebRTC applications, you need to configure your development environment correctly.
Choosing a Browser
WebRTC is supported by most modern browsers, including Chrome, Firefox, Safari, and Edge. Chrome and Firefox are commonly used for development due to their robust developer tools.
Setting up Necessary Libraries and Tools
For basic WebRTC development, you only need an HTML file and a JavaScript file. However, for signaling, you will need a server-side technology like Node.js with Socket.IO or a similar WebSocket library.
HTML
1<!DOCTYPE html>
2<html>
3<head>
4    <title>WebRTC Example</title>
5</head>
6<body>
7    <h1>WebRTC</h1>
8    <video id="localVideo" autoplay muted></video>
9    <video id="remoteVideo" autoplay></video>
10    <script src="script.js"></script>
11</body>
12</html>
13
Testing your Browser's WebRTC Capabilities
You can check if your browser supports WebRTC by running a simple JavaScript test. This checks for the existence of the
RTCPeerConnection object.Javascript
1if (window.RTCPeerConnection) {
2    console.log("WebRTC is supported!");
3} else {
4    console.error("WebRTC is not supported in this browser.");
5}
6
Setting up a Signaling Server
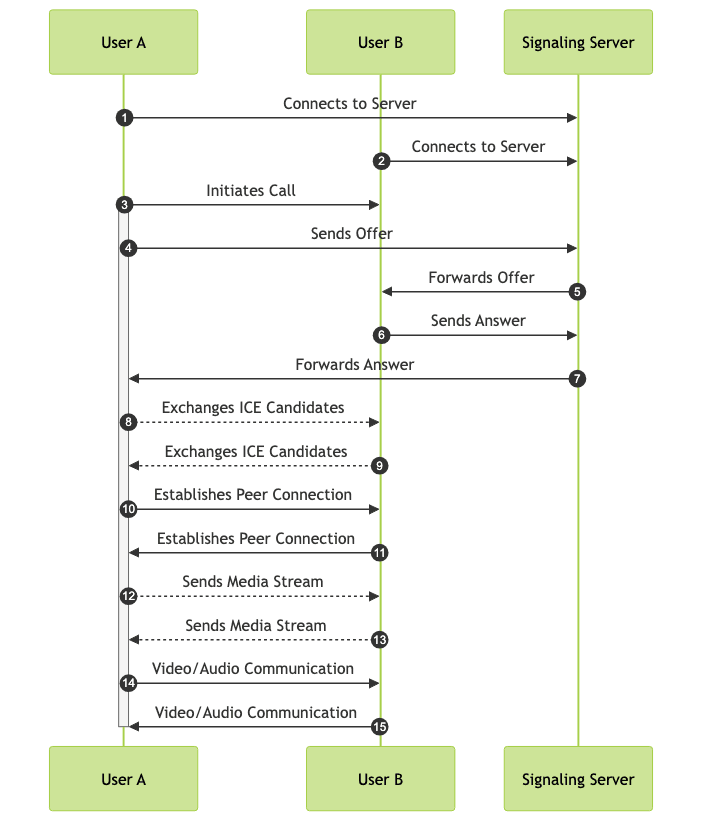
A signaling server is crucial for WebRTC applications. It helps peers find each other and negotiate a connection. Common choices include Node.js with Socket.IO, or other WebSocket servers.
Core WebRTC APIs: A Deep Dive
WebRTC relies on a few core APIs:
navigator.mediaDevices.getUserMedia(): Accesses the user's camera and microphone.RTCPeerConnection: Establishes a peer-to-peer connection.RTCDataChannel: Enables sending and receiving arbitrary data.
navigator.mediaDevices.getUserMedia()
This API allows you to request access to the user's camera and microphone. It returns a
Promise that resolves with a MediaStream object containing the video and/or audio tracks.Javascript
1navigator.mediaDevices.getUserMedia({ video: true, audio: true })
2    .then(stream => {
3        const localVideo = document.getElementById('localVideo');
4        localVideo.srcObject = stream;
5    })
6    .catch(error => {
7        console.error('Error accessing media devices.', error);
8    });
9
Handling Permissions and Errors
Users can deny permission to access their camera and microphone. You should handle these cases gracefully.
Javascript
1nnavigator.mediaDevices.getUserMedia({ video: true, audio: true })
2    .then(stream => {
3        const localVideo = document.getElementById('localVideo');
4        localVideo.srcObject = stream;
5    })
6    .catch(error => {
7        console.error('Error accessing media devices.', error);
8        // Display a user-friendly message explaining why access is needed.
9        alert('Please allow camera and microphone access to use this feature.');
10    });
11
RTCPeerConnection
The
RTCPeerConnection API is the core component of WebRTC. It handles the establishment and maintenance of a peer-to-peer connection.Establishing a Peer-to-Peer Connection
Establishing a connection involves signaling (exchanging information) and ICE (Interactive Connectivity Establishment) negotiation.
Creating and configuring RTCPeerConnection
Javascript
1const peerConnection = new RTCPeerConnection();
2
3peerConnection.onicecandidate = event => {
4    if (event.candidate) {
5        // Send the ICE candidate to the other peer via the signaling server.
6        sendMessage({
7            type: 'candidate',
8            candidate: event.candidate
9        });
10    }
11};
12
13peerConnection.ontrack = event => {
14    const remoteVideo = document.getElementById('remoteVideo');
15    remoteVideo.srcObject = event.streams[0];
16};
17
Handling ICE Candidates and Negotiation
ICE candidates are potential network paths that the peers can use to connect. The peers exchange ICE candidates through the signaling server and choose the best path.
RTCDataChannel
The
RTCDataChannel API allows you to send and receive arbitrary data between peers. This is useful for applications like file sharing and real-time gaming.Sending and Receiving Data
Javascript
1const dataChannel = peerConnection.createDataChannel('myChannel');
2
3dataChannel.onopen = () => {
4    console.log('Data channel opened!');
5    dataChannel.send('Hello, world!');
6};
7
8dataChannel.onmessage = event => {
9    console.log('Received message:', event.data);
10};
11
Sending a message via RTCDataChannel
1dataChannel.send('This is a message sent via the data channel.');
2
Implementing a Simple Video Chat Application
Let's build a basic video chat application using WebRTC.
Project Setup
Create three files:
index.html, script.js, and server.js.Setting up HTML Structure
HTML
1<!DOCTYPE html>
2<html>
3<head>
4    <title>Simple Video Chat</title>
5</head>
6<body>
7    <h1>Simple Video Chat</h1>
8    <video id="localVideo" autoplay muted width="320" height="240"></video>
9    <video id="remoteVideo" autoplay width="320" height="240"></video>
10    <script src="/socket.io/socket.io.js"></script>
11    <script src="script.js"></script>
12</body>
13</html>
14
Including necessary JS files
Include the Socket.IO client library and your
script.js file in the HTML.Setting up the Signaling Server
Use Node.js and Socket.IO for the signaling server.
Choosing a Signaling Protocol
Socket.IO is a popular choice for WebRTC signaling due to its ease of use and real-time capabilities.
Basic signaling server structure (using socket.io example)
Javascript
1const io = require('socket.io')(3000, {
2    cors: { origin: '*' }
3});
4
5io.on('connection', socket => {
6    console.log('User connected', socket.id)
7
8    socket.on('message', message => {
9        console.log('Message received', message)
10        socket.broadcast.emit('message', message)
11    })
12})
13
Client-Side Implementation
Implement the WebRTC logic in
script.js.Connecting to the Signaling Server
Javascript
1const socket = io('http://localhost:3000');
2
3socket.on('connect', () => {
4    console.log('Connected to signaling server.');
5});
6
Handling Signaling Messages
Handle offer, answer, and candidate messages from the signaling server.
Javascript
1socket.on('message', message => {
2    if (message.type === 'offer') {
3        // Handle offer
4    } else if (message.type === 'answer') {
5        // Handle answer
6    } else if (message.type === 'candidate') {
7        // Handle candidate
8    }
9});
10
Setting up the Media Stream
Get the user's media stream and display it in the local video element.
Javascript
1const localVideo = document.getElementById('localVideo');
2
3navigator.mediaDevices.getUserMedia({ video: true, audio: true })
4    .then(stream => {
5        localVideo.srcObject = stream;
6    })
7    .catch(error => {
8        console.error('Error accessing media devices.', error);
9    });
10
Establishing the Peer Connection
Create and configure the
RTCPeerConnection, add the local stream, and handle ICE candidates.Advanced WebRTC Techniques
Handling Network Conditions
WebRTC applications need to adapt to varying network conditions. Techniques like adaptive bitrate streaming and congestion control can help.
Optimizing Video and Audio Quality
Codec selection, resolution adjustment, and frame rate control can significantly impact video and audio quality.
Implementing Screen Sharing
WebRTC supports screen sharing via
navigator.mediaDevices.getDisplayMedia(). This requires handling permissions and setting up the stream correctly.Troubleshooting Common WebRTC Issues
Debugging Tips
Use browser developer tools to inspect WebRTC logs and network traffic. The
chrome://webrtc-internals page in Chrome provides detailed information about WebRTC sessions.Common Errors and Solutions
- ICE gathering timeout: Check your STUN/TURN server configuration.
- No audio/video: Verify permissions and device availability.
- Connection failed: Ensure that signaling is working correctly and that peers can reach each other.
Security Considerations
Data Encryption and Integrity
WebRTC uses DTLS (Datagram Transport Layer Security) for encrypting media streams and data channels.
Authentication and Authorization
Implement proper authentication and authorization mechanisms to prevent unauthorized access to your WebRTC application.
Further Resources:
- Learn WebRTC: "
Get started with the official WebRTC documentation
" - MDN WebRTC API: "
Explore the detailed WebRTC API reference on Mozilla Developer Network
" - WebRTC samples: "
Try out different WebRTC demos and examples
"
Want to level-up your learning? Subscribe now
Subscribe to our newsletter for more tech based insights
FAQ