In the competitive world of multiplayer gaming, effective communication can make the difference between victory and defeat. While text chat serves its purpose, nothing beats the immediacy and nuance of real-time voice communication. Imagine coordinating complex strategies in a MOBA, calling out enemy positions in an FPS, or simply sharing a laugh with teammates during a casual gaming session – all seamlessly integrated within your Unity game.
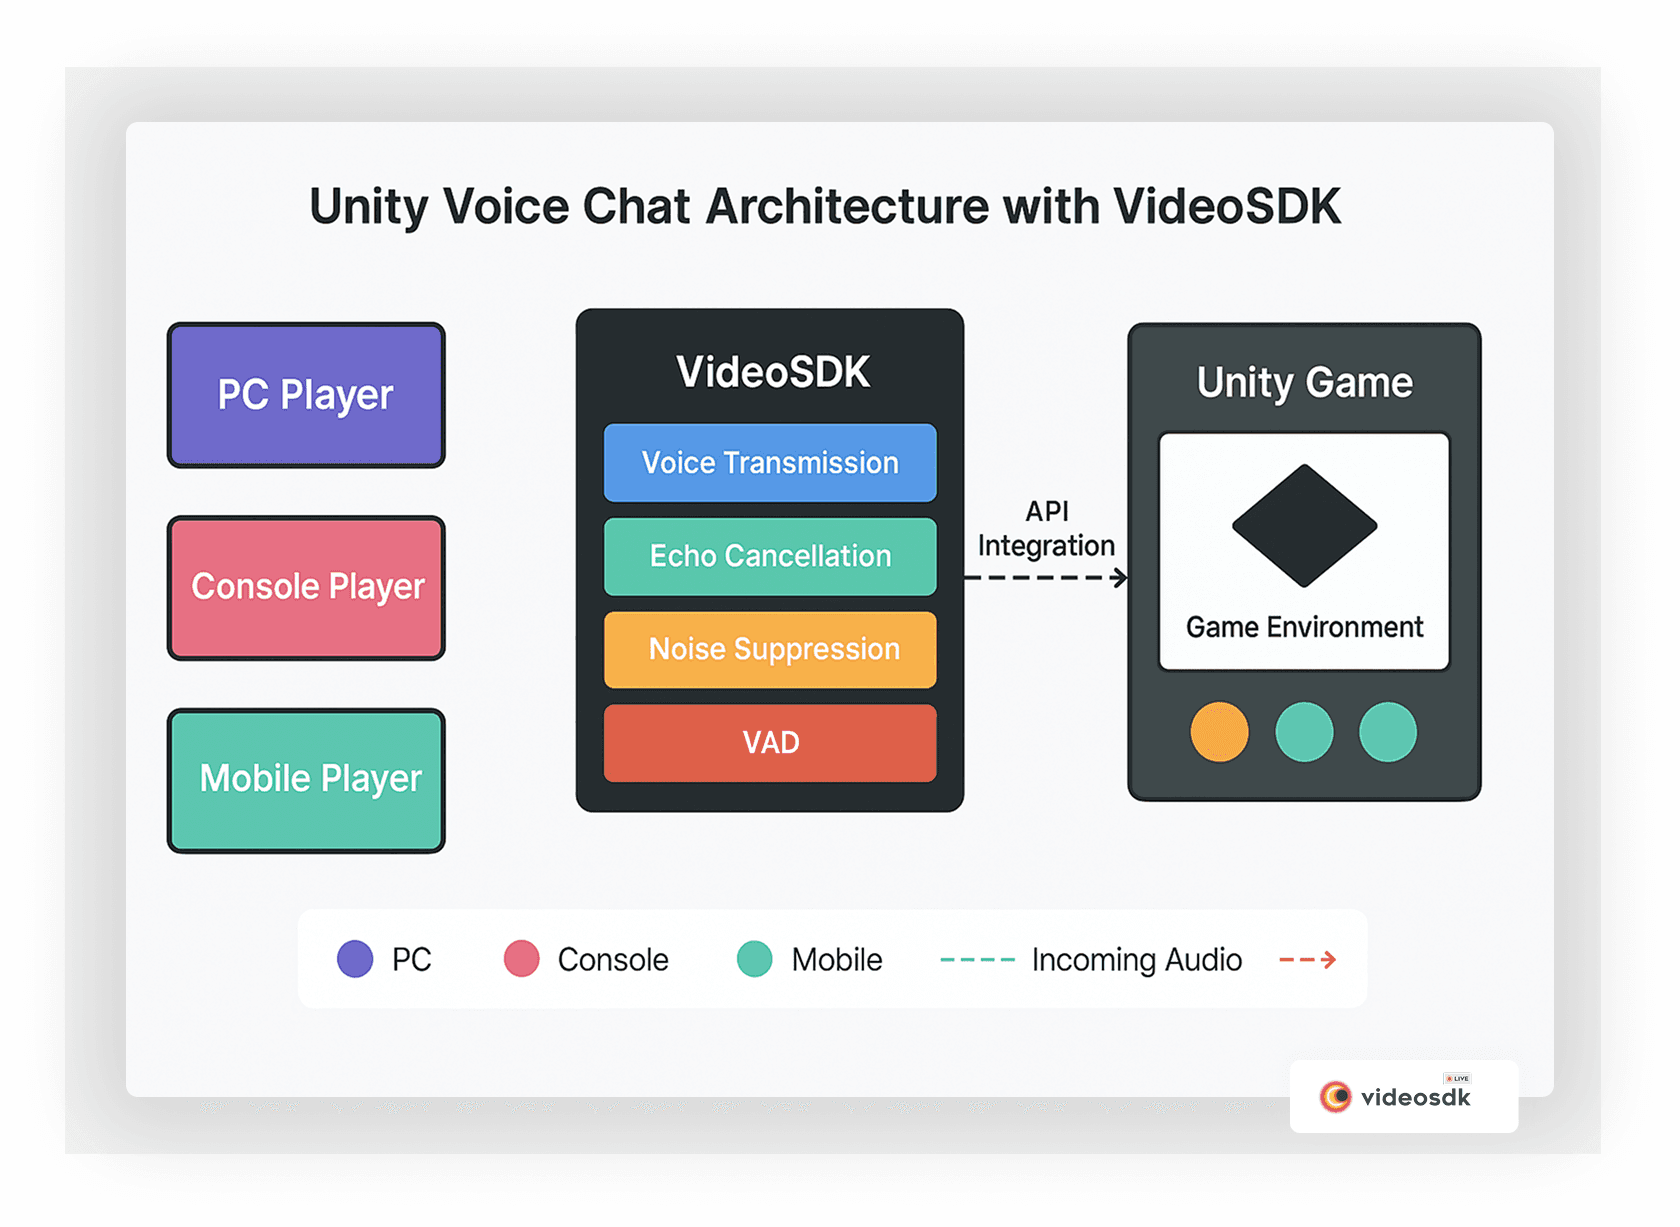
At VideoSDK, we've built a powerful, easy-to-implement solution that enables game developers to add professional-grade voice chat to their Unity projects with minimal effort. Our Unity WebRTC SDK delivers crystal-clear audio with ultra-low latency, enhancing player experiences and fostering stronger gaming communities.
Why Voice Chat is Essential for Modern Multiplayer Games
The most successful multiplayer games on the market understand that voice communication is no longer a luxury – it's an expectation. Here's why integrating voice chat should be a priority:
- Enhanced Teamwork: Players can coordinate strategies in real-time without stopping to type messages
- Improved Immersion: Voice adds a human element that strengthens connections between players
- Competitive Edge: In fast-paced games, the seconds saved by verbal communication can determine outcomes
- Community Building: Voice chat facilitates deeper social bonds between players, increasing retention
- Accessibility: For many players, speaking is faster and more accessible than typing during gameplay
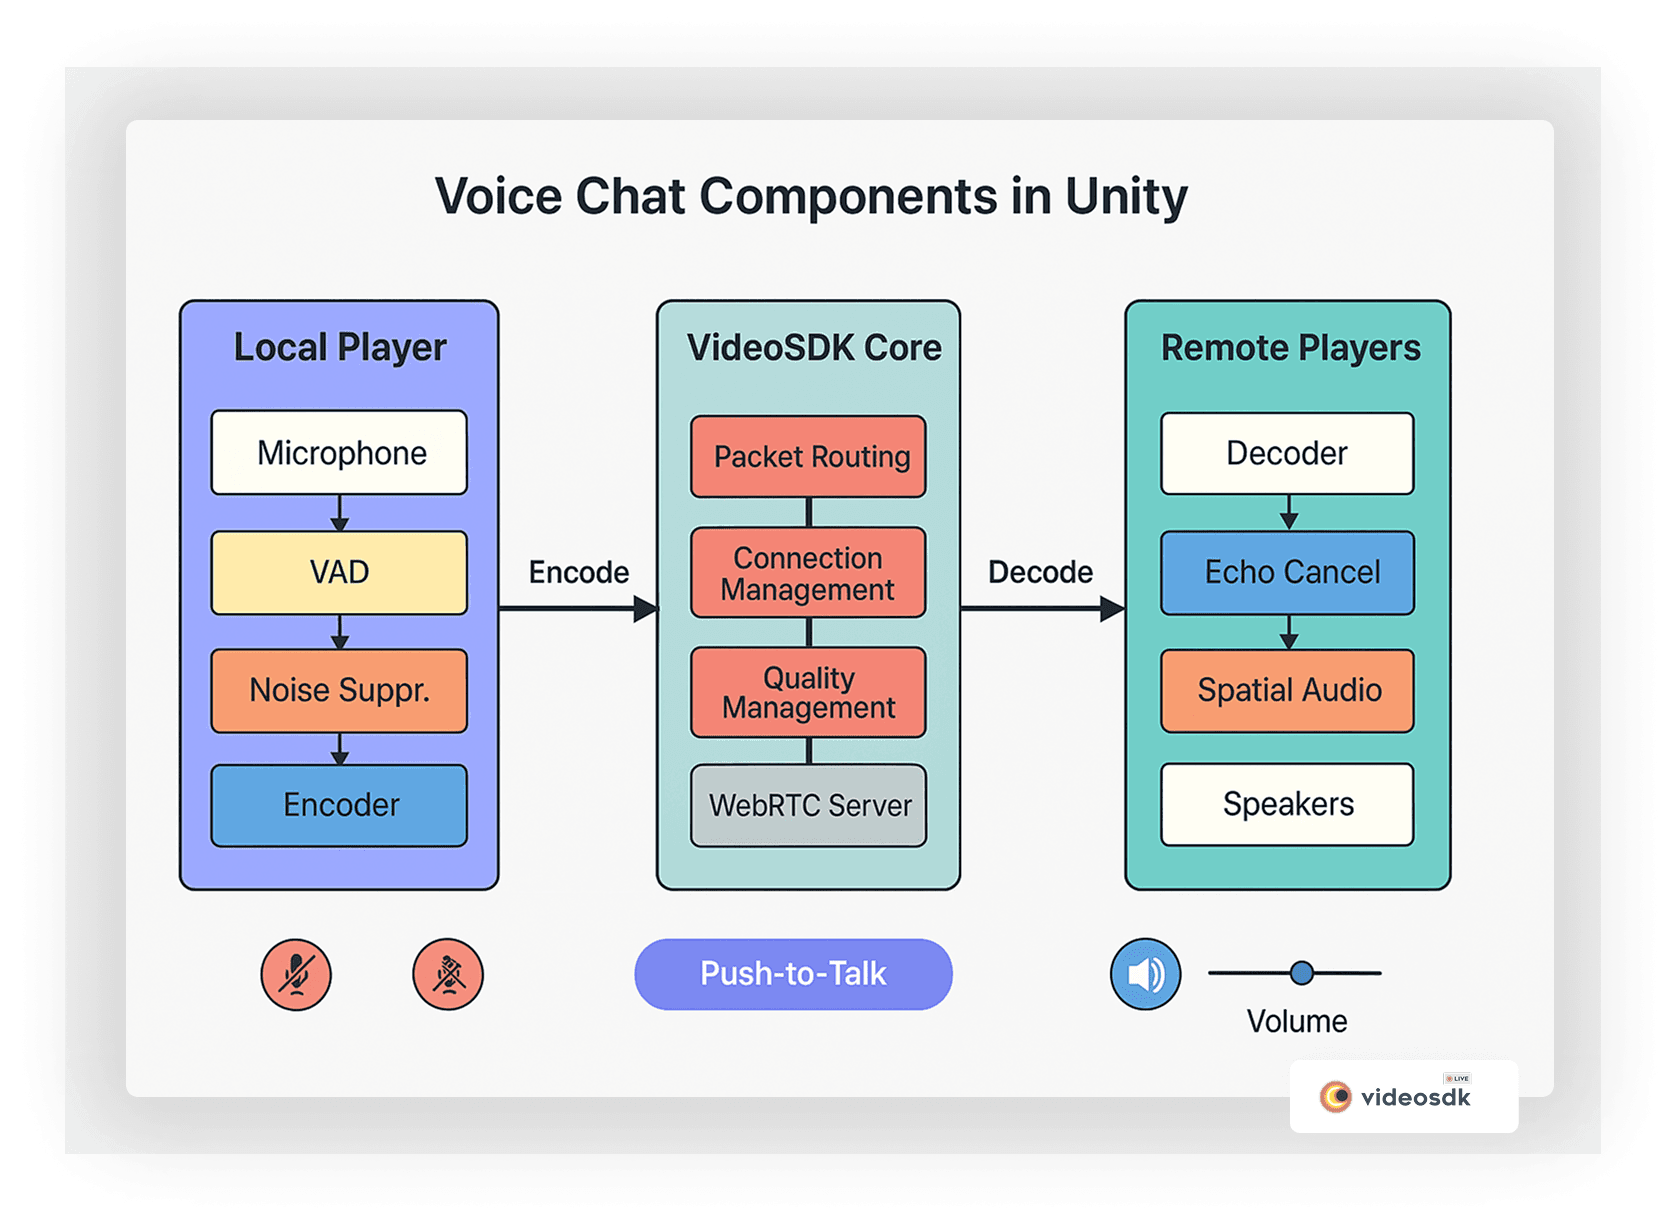
The VideoSDK Unity Solution: WebRTC for Seamless Voice Integration
Our Unity SDK leverages the power of WebRTC technology to provide reliable, high-quality voice communication with remarkably low latency. Here's what makes our solution stand out:
- Simple Integration: Add voice chat to your game with just a few lines of code
- Cross-Platform Support: Works seamlessly across PC, mobile, consoles, and VR
- Minimal Overhead: Optimized for performance with negligible impact on frame rates
- Scalable Infrastructure: From indie games to AAA titles, our backend scales with your needs
- Customizable Audio Settings: Fine-tune voice quality, implement spatial audio, or add voice effects
Quick Start Implementation Guide
Let's implement a basic voice chat system in your Unity game using our VideoSDK. The following guide focuses specifically on the voice communication aspects of our SDK.
Prerequisites
Before getting started, ensure you have:
- Unity Hub and Unity Editor (version 2018.4.0 or later)
- A VideoSDK account (sign up at
videosdk.live
) - Basic knowledge of Unity development
Step 1: Install the VideoSDK Package
- Open Unity's Package Manager (Window → Package Manager)
- Click the "+" button and select "Add package from git URL..."
- Paste the following URL and click Add:
https://github.com/videosdk-live/videosdk-rtc-unity-sdk.git - Add the Newtonsoft JSON package as a dependency (follow Unity's standard package installation process)
Step 2: Set Up Permissions
For Android:
Add the following to your AndroidManifest.xml:
1<manifest>
2    <uses-permission android:name="android.permission.RECORD_AUDIO"/>
3    <uses-permission android:name="android.permission.MODIFY_AUDIO_SETTINGS"/>
4    <!-- Camera permission only needed if adding video later -->
5    <uses-permission android:name="android.permission.CAMERA"/>
6    <application>
7        <...>
8    </application>
9</manifest>
10
Step 3: Create a Basic Voice Chat Manager
Let's break down the implementation into smaller parts, explaining each component as we go along. Create a new C# script called
VoiceChatManager.cs and we'll build it step by step.1. Setting Up the Basic Class Structure
First, set up the basic class structure with necessary imports and variables:
1// Basic class setup with required imports
2using System.Collections.Generic;
3using UnityEngine;
4using live.videosdk;  // VideoSDK namespace
5using UnityEngine.Android;  // For Android permissions
6using TMPro;  // TextMeshPro for UI text
7
8public class VoiceChatManager : MonoBehaviour
9{
10    // UI elements (panels, text fields, etc.)
11    [SerializeField] GameObject _joinPanel, _chatPanel;
12    [SerializeField] TMP_Text _roomIdText;
13    [SerializeField] TMP_InputField _roomIdInput;
14
15    // Core variables
16    private Meeting meeting;
17    private bool micToggle = true;
18    private readonly string _token = "YOUR_TOKEN";
19
20    // Additional implementation will go here
21}
22
Explanation:
We set up the necessary imports, UI references, and core variables that will be used throughout the implementation.
2. Initialization and Permission Handling
Next, implement initialization and permission handling:
1// Initialization code for Start() method
2void Start()
3{
4    // Initialize meeting object and register callbacks
5    meeting = Meeting.GetMeetingObject();
6    RegisterCallbacks();
7
8    // Request permission and set initial UI state
9    RequestMicPermission();
10    _joinPanel.SetActive(true);
11    _chatPanel.SetActive(false);
12}
13
14// Register all needed callbacks
15private void RegisterCallbacks()
16{
17    meeting.OnCreateMeetingIdCallback += OnRoomCreated;
18    meeting.OnCreateMeetingIdFailedCallback += OnRoomCreationFailed;
19    meeting.OnParticipantJoinedCallback += OnParticipantJoined;
20    meeting.OnParticipantLeftCallback += OnParticipantLeft;
21}
22
23// Request microphone permission (important for Android)
24private void RequestMicPermission()
25{
26    // Android-specific permission handling
27    if (Application.platform == RuntimePlatform.Android)
28    {
29        if (!Permission.HasUserAuthorizedPermission(Permission.Microphone))
30        {
31            var callbacks = new PermissionCallbacks();
32            Permission.RequestUserPermission(Permission.Microphone, callbacks);
33        }
34    }
35}
36
Explanation:
We initialize the SDK, register essential callbacks, request necessary permissions, and set up the initial UI state.
3. Room Creation and Joining
Implement methods for creating and joining rooms:
1// Create a new voice chat room
2public void CreateVoiceRoom()
3{
4    _joinPanel.SetActive(false);
5    meeting.CreateMeetingId(_token);
6}
7
8// Join an existing voice chat room
9public void JoinVoiceRoom()
10{
11    if (string.IsNullOrEmpty(_roomIdInput.text)) return;
12
13    try
14    {
15        // Join with mic enabled, camera disabled for voice-only
16        meeting.Join(_token, _roomIdInput.text, "Player", true, false);
17    }
18    catch (System.Exception ex)
19    {
20        Debug.LogError("Failed to join voice room: " + ex.Message);
21    }
22}
23
24// Callback when room creation succeeds
25private void OnRoomCreated(string roomId)
26{
27    _roomIdText.text = "Room ID: " + roomId;
28    meeting.Join(_token, roomId, "Host", true, false);
29}
30
31// Callback when room creation fails
32private void OnRoomCreationFailed(string errorMsg)
33{
34    Debug.LogError(errorMsg);
35    _joinPanel.SetActive(true);
36}
37
Explanation:
These methods handle creating new voice chat rooms and joining existing ones, with appropriate error handling.
4. Participant Handling and Controls
Implement participant event handling and basic controls:
1// Called when a participant joins
2private void OnParticipantJoined(IParticipant participant)
3{
4    // If local player is joining, show chat UI
5    if (participant.IsLocal)
6    {
7        _chatPanel.SetActive(true);
8        _joinPanel.SetActive(false);
9    }
10}
11
12// Called when a participant leaves
13private void OnParticipantLeft(IParticipant participant)
14{
15    if (participant.IsLocal)
16    {
17        OnLeaveVoiceChat();
18    }
19}
20
21// Toggle microphone on/off
22public void MicToggle()
23{
24    micToggle = !micToggle;
25
26    // Find local participant and update their audio state
27    foreach (var participant in meeting.Participants)
28    {
29        if (participant.Value.IsLocal)
30        {
31            participant.Value.SetAudio(micToggle);
32            break;
33        }
34    }
35}
36
37// Leave the voice chat
38public void LeaveVoiceChat()
39{
40    meeting?.Leave();
41}
42
43// Handle cleanup when leaving
44private void OnLeaveVoiceChat()
45{
46    // Reset UI state
47    _joinPanel.SetActive(true);
48    _chatPanel.SetActive(false);
49
50    // Reset microphone state
51    micToggle = true;
52
53    // Reset room ID text
54    _roomIdText.text = "Voice Chat";
55}
56
Explanation:
These methods handle participant events and provide basic voice chat controls (mute/unmute, leave chat).
Step 4: Create a Simple UI
Create a basic UI with two panels:
- Join Panel with:
- Input field for room ID
- "Create Room" button
- "Join Room" button
- Chat Panel with:
- Room ID display text
- "Mute/Unmute" button
- "Leave Chat" button
Attach your
VoiceChatManager script to a GameObject and drag the appropriate UI elements to the serialized fields in the Inspector.Step 5: Connect the UI to Your Script
Link the UI buttons to the corresponding methods:
- Connect the "Create Room" button to the
CreateVoiceRoom()method - Connect the "Join Room" button to the
JoinVoiceRoom()method - Connect the "Mute/Unmute" button to the
MicToggle()method - Connect the "Leave Chat" button to the
LeaveVoiceChat()method
That's it! This minimal implementation gives you a functional voice chat system in your game.
Advanced Voice Chat Features
Once you have the basic implementation working, you can explore more advanced features:
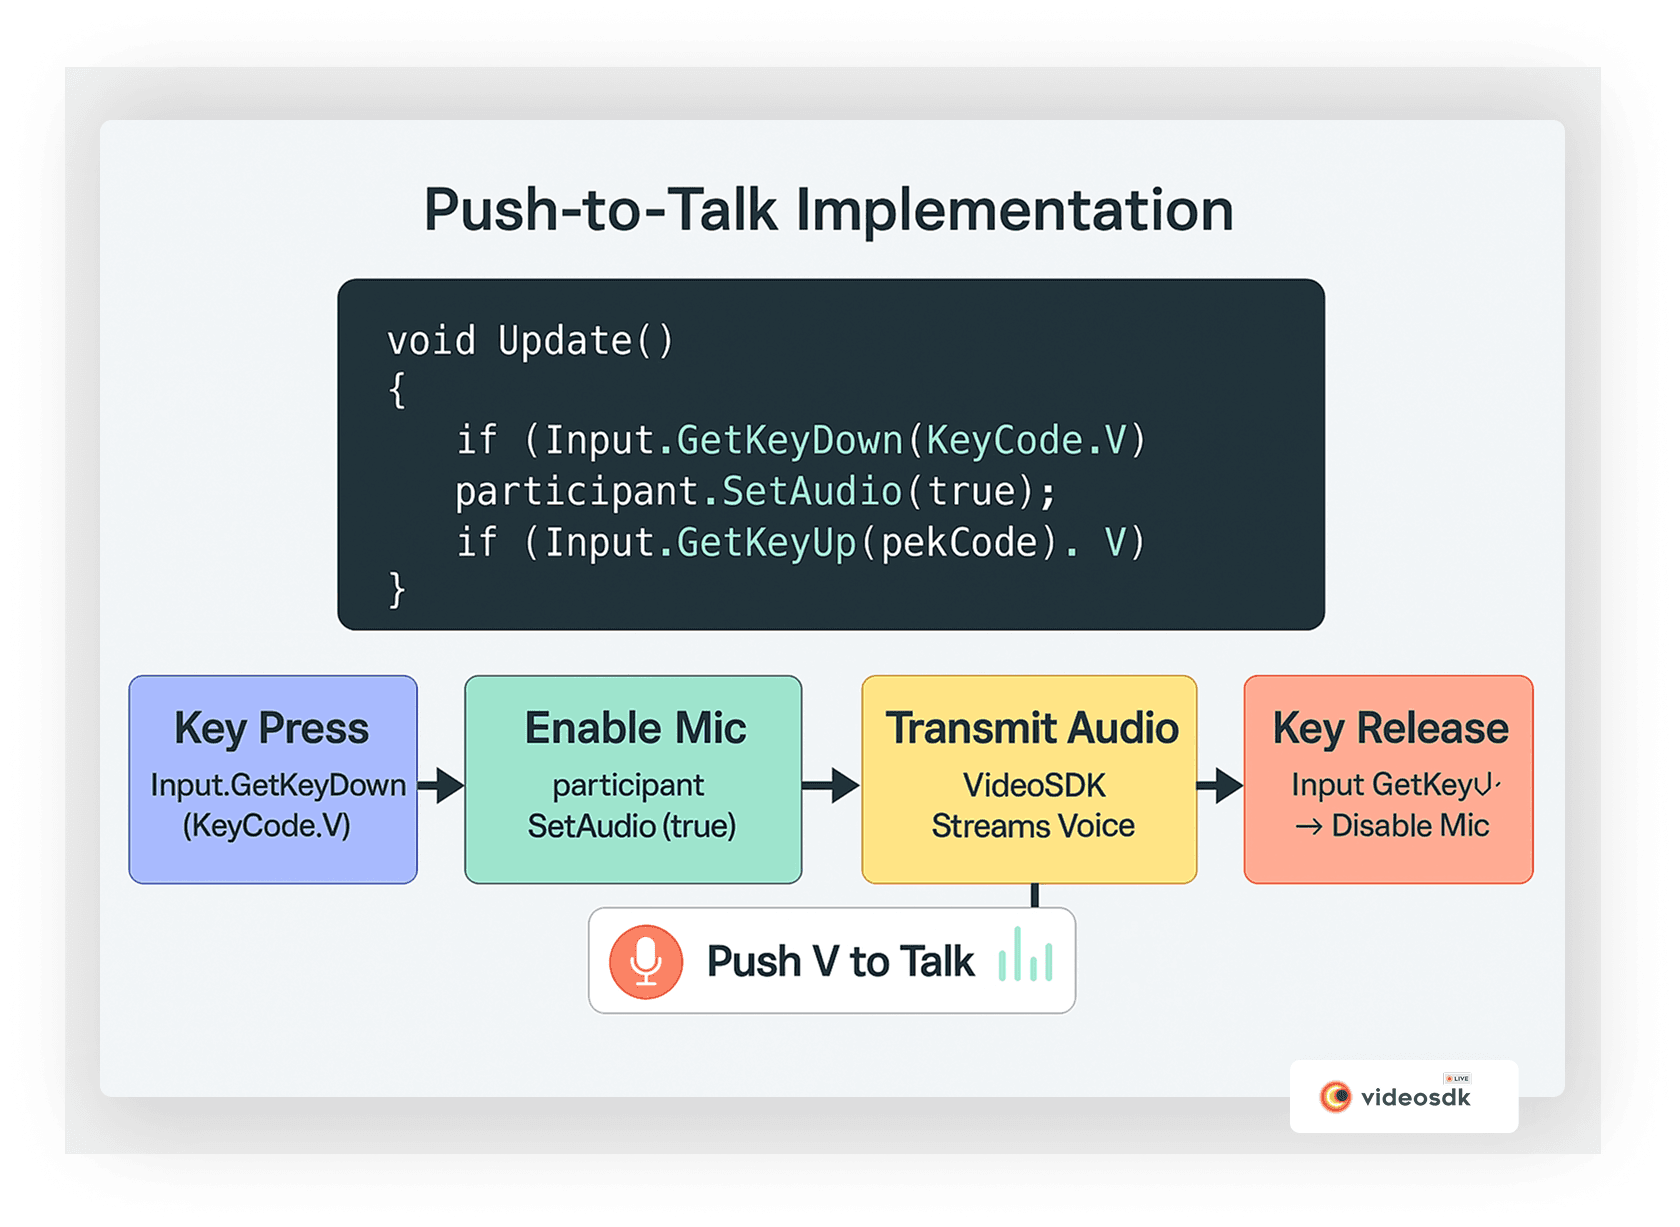
Implementing Push-to-Talk
For games where open mics might cause unwanted noise or in competitive scenarios where clear communication is critical, a push-to-talk system is ideal. Let's implement this feature:
1// Add these variables to your VoiceChatManager class
2[SerializeField] KeyCode pushToTalkKey = KeyCode.V;
3private bool isPushToTalkMode = true;
4private bool wasTransmittingBefore = false;
5
6// Add this to your Update method
7void Update()
8{
9    // Only check for push-to-talk when in an active chat
10    if (isPushToTalkMode && _chatPanel.activeInHierarchy)
11    {
12        if (Input.GetKeyDown(pushToTalkKey))
13            EnableMicrophone();
14
15        if (Input.GetKeyUp(pushToTalkKey))
16            DisableMicrophone();
17    }
18}
19
20// Methods to handle microphone state
21private void EnableMicrophone()
22{
23    // Find local participant and enable audio
24    foreach (var participant in meeting.Participants)
25    {
26        if (participant.Value.IsLocal)
27        {
28            participant.Value.SetAudio(true);
29            break;
30        }
31    }
32}
33
34private void DisableMicrophone()
35{
36    // Find local participant and disable audio
37    foreach (var participant in meeting.Participants)
38    {
39        if (participant.Value.IsLocal)
40        {
41            participant.Value.SetAudio(false);
42            break;
43        }
44    }
45}
46
47// Toggle between push-to-talk and open mic modes
48public void TogglePushToTalkMode()
49{
50    // Logic to switch between modes, preserving mic state
51    isPushToTalkMode = !isPushToTalkMode;
52
53    // Implementation details for managing the mode toggle...
54}
55
Explanation:
This implementation adds a push-to-talk system that only transmits audio when the designated key is pressed, which is ideal for competitive gaming scenarios.
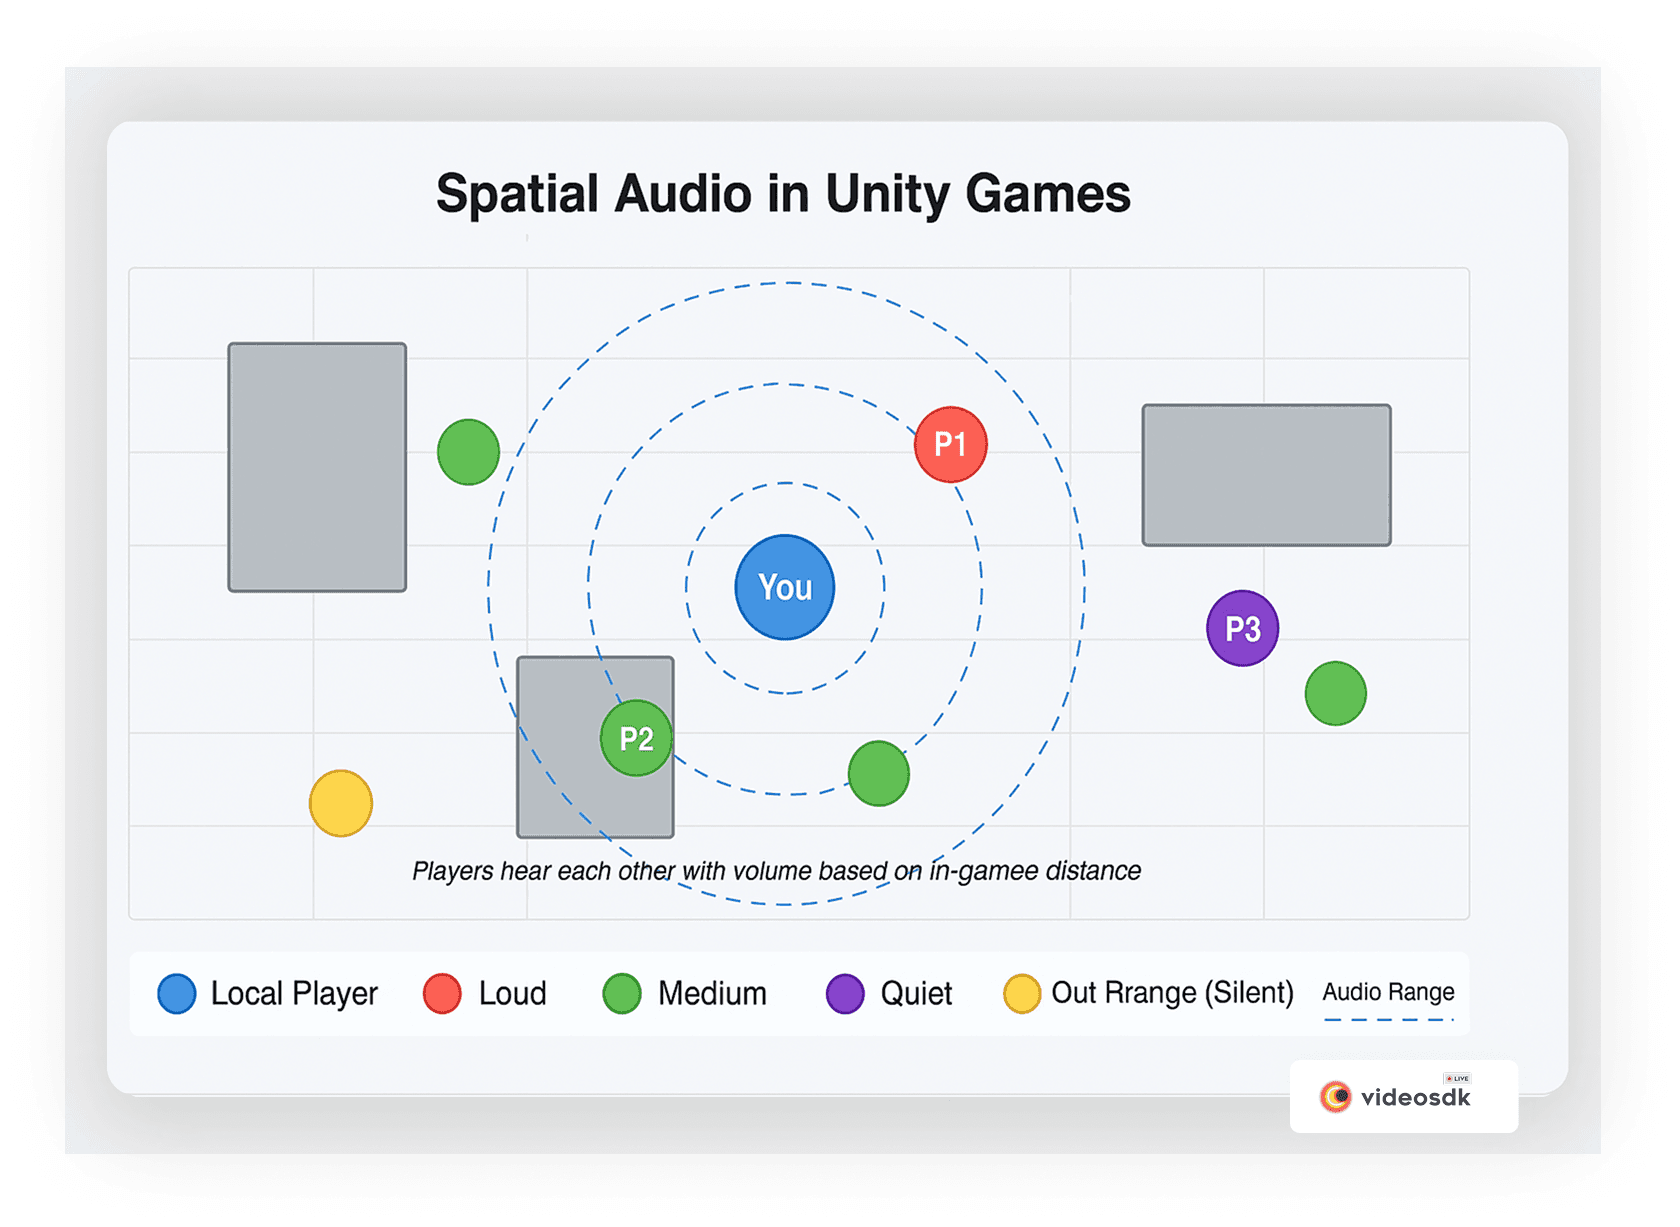
Implementing Spatial Audio
Spatial audio significantly enhances immersion in 3D games by making voice chat sound like it's coming from players' actual in-game positions. Let's break down how to implement this feature:
Create a new script called
SpatialVoiceEmitter.cs:1// Script to attach to each player object for spatial audio
2using UnityEngine;
3using live.videosdk;
4
5public class SpatialVoiceEmitter : MonoBehaviour
6{
7 private string participantId;
8 [SerializeField] private float maxAudibleDistance = 20f;
9 [SerializeField] private bool useStereoPanning = true;
10 private Transform listenerTransform;
11
12 void Start()
13 {
14 // Get listener transform (usually the camera/player)
15 listenerTransform = Camera.main.transform;
16 }
17
18 // Connect this game object to a specific voice chat participant
19 public void SetParticipantId(string id)
20 {
21 participantId = id;
22 }
23
24 void Update()
25 {
26 // Skip if no participant is connected
27 if (string.IsNullOrEmpty(participantId)) return;
28
29 // Get the participant and update their audio settings
30 if (Meeting.GetMeetingObject().Participants.TryGetValue(participantId, out IParticipant participant))
31 {
32 UpdateSpatialAudio(participant);
33 }
34 }
35
36 // Update volume and panning based on position
37 private void UpdateSpatialAudio(IParticipant participant)
38 {
39 // Calculate distance and convert to volume
40 float distance = Vector3.Distance(transform.position, listenerTransform.position);
41 float volume = Mathf.Clamp01(1f - (distance / maxAudibleDistance));
42 participant.SetVolume(volume);
43
44 // If using stereo panning, calculate left/right position
45 if (useStereoPanning)
46 {
47 Vector3 direction = transform.position - listenerTransform.position;
48 float rightAmount = Vector3.Dot(direction.normalized, listenerTransform.right);
49 participant.SetPan(rightAmount);
50 }
51 }
52}
53Explanation:
This script creates a realistic 3D audio experience by adjusting both volume (based on distance) and stereo panning (based on direction) of voice chat participants.
Integrating Spatial Audio with Player Spawning
Here's a simple example of how to connect players to their spatial audio:
1// Example method for your player manager
2public void SetupPlayerVoice(GameObject playerObject, string participantId, bool isLocalPlayer)
3{
4    // Add or get the spatial audio component
5    var voiceEmitter = playerObject.GetComponent<SpatialVoiceEmitter>()
6        ?? playerObject.AddComponent<SpatialVoiceEmitter>();
7
8    // Connect to voice chat participant
9    voiceEmitter.SetParticipantId(participantId);
10
11    // Typically disable for local player (you don't spatialize your own voice)
12    if (isLocalPlayer)
13        Destroy(voiceEmitter);
14}
15
Adding Voice Activity Detection (VAD)
Voice Activity Detection (VAD) optimizes bandwidth usage and improves overall chat clarity by only transmitting audio when someone is actually speaking:
1// Add these variables to your VoiceChatManager class
2[SerializeField] private bool useVoiceActivityDetection = true;
3[SerializeField, Range(0.0f, 1.0f)] private float vadSensitivity = 0.7f;
4[SerializeField] private float vadGracePeriod = 0.5f; // seconds
5
6// Configure VAD settings
7private void ConfigureVoiceActivityDetection()
8{
9    if (!useVoiceActivityDetection) return;
10
11    // Enable VAD with configured settings
12    meeting.SetVADEnabled(true);
13    meeting.SetVADSensitivity(vadSensitivity);
14    meeting.SetVADGracePeriodMs((int)(vadGracePeriod * 1000));
15    meeting.SetAutoTransmit(false); // Only transmit when speech detected
16}
17
18// Toggle VAD on/off
19public void ToggleVAD(bool enabled)
20{
21    useVoiceActivityDetection = enabled;
22
23    if (meeting != null)
24    {
25        meeting.SetVADEnabled(enabled);
26        meeting.SetAutoTransmit(!enabled);
27
28        // Apply settings if enabling
29        if (enabled)
30        {
31            meeting.SetVADSensitivity(vadSensitivity);
32            meeting.SetVADGracePeriodMs((int)(vadGracePeriod * 1000));
33        }
34    }
35}
36
37// Optional: Add a VAD status indicator
38private void SetupVADIndicator()
39{
40    meeting.OnVADStateChangedCallback += (isSpeaking) => {
41        // Update UI to show speaking status
42        if (vadIndicator != null)
43            vadIndicator.color = isSpeaking ? Color.green : Color.red;
44    };
45}
46
Explanation:
VAD automatically detects when a player is speaking and only transmits audio during those times, reducing bandwidth usage and background noise.
Performance Optimization Tips
To ensure your voice chat runs smoothly on all devices:
- Manage Audio Quality: Adjust bit rates based on network conditions and device capabilities. For example:
1// Example method to configure quality based on device performance
2public void ConfigureAudioQuality(DevicePerformanceLevel level)
3{
4    switch(level) {
5        case DevicePerformanceLevel.Low:
6            meeting.SetAudioBitrate(16000);  // 16 kbps
7            meeting.SetSampleRate(8000);     // 8 kHz
8            break;
9        case DevicePerformanceLevel.Medium:
10            meeting.SetAudioBitrate(24000);  // 24 kbps
11            meeting.SetSampleRate(16000);    // 16 kHz
12            break;
13        case DevicePerformanceLevel.High:
14            meeting.SetAudioBitrate(32000);  // 32 kbps
15            meeting.SetSampleRate(24000);    // 24 kHz
16            break;
17    }
18}
19- Dynamic Quality Adjustment: Monitor network conditions and adjust settings accordingly:
1// Example of network quality monitoring
2private void CheckNetworkQuality()
3{
4    NetworkStats stats = meeting.GetNetworkStats();
5
6    // If network quality is poor, reduce quality
7    if (stats.packetLoss > 5.0f || stats.rtt > 300)
8    {
9        meeting.SetAudioBitrate(16000); // Lower quality
10    }
11    else
12    {
13        meeting.SetAudioBitrate(32000); // Higher quality
14    }
15}
16- Limit Concurrent Speakers: In large sessions, limit the number of simultaneous speakers:
1// Example of managing active speakers
2private void ManageActiveSpeakers(int maxSpeakers)
3{
4    // Track active speakers and mute oldest when exceeding limit
5    if (activeSpeakers.Count > maxSpeakers)
6    {
7        string oldestSpeaker = activeSpeakers[0];
8        activeSpeakers.RemoveAt(0);
9
10        // Temporarily mute oldest speaker
11        if (meeting.Participants.TryGetValue(oldestSpeaker, out IParticipant participant))
12        {
13            participant.SetVolume(0);
14        }
15    }
16}
17
Common Voice Chat Issues and Solutions
Here are solutions to common voice chat problems:
1. Echo Problems
1// Configure echo cancellation
2public void SolveEchoProblem()
3{
4    // Enable echo cancellation
5    meeting.SetEchoCancellation(true);
6    meeting.SetAcousticEchoCancellation(true);
7
8    // Lower output volume slightly
9    meeting.SetSpeakerVolume(0.8f);
10
11    // Enable full suite of audio processing
12    meeting.SetNoiseSuppression(true);
13    meeting.SetHighpassFilter(true);
14}
15
2. Background Noise
1// Configure noise reduction
2public void ConfigureNoiseReduction()
3{
4    // Enable noise suppression with custom level
5    meeting.SetNoiseSuppression(true);
6    meeting.SetNoiseSuppressionLevel(0.7f);
7
8    // Add high-pass filter to remove low rumbles
9    meeting.SetHighpassFilter(true);
10
11    // Add automatic gain control
12    meeting.SetAutomaticGainControl(true);
13}
14
3. High Latency
1// Optimize for low latency
2public void OptimizeForLatency()
3{
4    // Reduce audio buffer size
5    meeting.SetAudioBufferSize(120); // milliseconds
6
7    // Disable non-essential processing
8    meeting.SetAcousticEchoCancellation(false);
9    meeting.SetHighpassFilter(false);
10
11    // Set codec to prioritize latency
12    meeting.SetOpusMode(OpusMode.OPUS_MODE_VOIP);
13    meeting.SetOpusComplexity(5); // Medium complexity
14
15    // Lower bitrate slightly
16    meeting.SetAudioBitrate(20000); // 20 kbps
17}
18
4. Connection Drops
1// Handle connection state changes
2private void OnConnectionStateChanged(ConnectionState state)
3{
4    // If disconnected, attempt reconnection
5    if (state == ConnectionState.Disconnected && !isReconnecting)
6    {
7        StartReconnection();
8    }
9}
10
11// Reconnection with exponential backoff
12private void StartReconnection()
13{
14    // Implement reconnection logic with exponential backoff
15    // Try to rejoin meeting with same ID and settings
16}
17
Conclusion
Integrating real-time voice chat into your Unity game doesn't have to be complicated. With VideoSDK's Unity WebRTC solution, you can implement professional-grade voice communication with minimal effort, enhancing player experiences and building stronger communities around your game.
Whether you're developing a competitive FPS, a cooperative RPG, or a casual social game, our SDK provides the flexibility and performance you need to keep players talking and engaged.
Ready to take your multiplayer game to the next level?
Sign up for VideoSDK
today and start integrating voice chat in minutes.Want to level-up your learning? Subscribe now
Subscribe to our newsletter for more tech based insights
FAQ