


CallKit is Apple's iOS framework that lets third-party VoIP and video calling apps present calls through the native system call interface, the same screen the iPhone uses for cellular calls. It handles incoming call UI, lock screen ringing, call groups, hold and resume, and even lets your app replace the default phone app. If you are building a calling app for iOS in 2026, CallKit is not optional polish, it is the difference between an app that feels native and one that feels like a webpage pretending to be a phone.
A missed call notification that arrives four seconds late, a call screen that does not appear on the lock screen, audio that cuts out when the user switches apps: these are the symptoms of a VoIP app that skipped CallKit. Apple built CallKit specifically so third-party calling apps behave like the Phone app, and users notice the difference immediately.
This guide walks through what CallKit is, when to use it, how to set it up in a native iOS project, how to handle incoming and outgoing calls, how to become the default calling app, and what to consider when you need the same experience on Android or in React Native and Flutter. Throughout, we will also look at how a real-time communication SDK like VideoSDK fits into the picture, because CallKit manages the call interface while your RTC stack manages the actual media.
What is CallKit?
CallKit is defined as an Apple framework, introduced with iOS 10, that provides third-party apps with system-level call handling for VoIP and video calls. CallKit works by acting as a bridge between your app's calling logic and iOS system services: your app reports call events to the system, and the system renders the native call UI, manages audio sessions, coordinates with the lock screen, and integrates with system features like CarPlay and Bluetooth devices.
CallKit has four core components. The provider is the object your app uses to report call events to the system, such as an incoming call arriving or a call ending. The call controller is the object your app uses to request call actions, such as starting an outgoing call or placing a call on hold. A call object represents a single call instance with a unique identifier, and a transaction groups one or more call actions so the system applies them atomically.
The key insight is that CallKit does not carry any audio or video. It is purely the interface and coordination layer. Your actual media, whether that is WebRTC, a proprietary codec, or an SDK like VideoSDK's video calling API, runs underneath. This separation is what makes CallKit powerful: you get the native call experience without rebuilding the phone app, while your RTC layer handles rooms, participants, streams, and network adaptation.
Compared to raw WebRTC with a custom in-app call screen, CallKit gives you lock screen and Control Center integration, proper audio session management, interruption handling for things like an actual cellular call arriving mid-session, and Call Directory integration for caller ID and blocking. A custom UI gives you none of that for free.
When to Use CallKit
CallKit is the right choice whenever your app makes or receives calls that users should treat like real phone calls. That includes VoIP calling apps, video calling apps, messaging apps with voice or video call features, enterprise communication tools, and telehealth or consultation apps where a doctor calls a patient directly.
The framework is especially valuable when calls can arrive while the app is backgrounded or terminated. Without CallKit, a VoIP push wakes your app but you must render your own UI, which cannot appear on the lock screen and will not survive if the system kills your app. With CallKit, the system itself displays the incoming call screen.
CallKit is not required when calls only happen inside an active app session with the screen already on, such as a live shopping stream where viewers raise hands to join, or a multiplayer game with built-in voice chat. For those cases, an in-app calling interface built with an SDK like VideoSDK's interactive live streaming is simpler and fully sufficient.
Setting Up CallKit in a Native iOS Project
Setting up CallKit involves three coordinated pieces: the framework itself, the VoIP background mode that lets iOS wake your app for incoming calls, and the PushKit registration that delivers call notifications even when the app is terminated. Get all three right or incoming calls will silently fail.
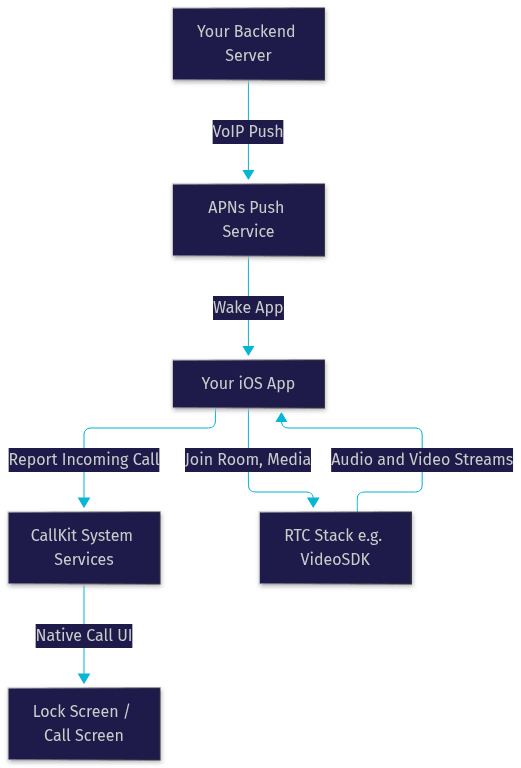
The overall architecture looks like this: your server signals an incoming call, Apple's push service wakes your app, your app reports the call to CallKit, and the system takes over the UI while your RTC stack establishes media.
Adding the CallKit Framework
In Xcode, add CallKit to your target's frameworks and libraries list on the General tab. CallKit is a system framework, so there is nothing to download or install. Then import it wherever you manage call logic, typically a dedicated call manager class. Keep that class separate from your media code: one object talks to CallKit, another talks to your RTC SDK, and they communicate through your own internal call state model. This separation keeps the system-facing layer testable and makes swapping your media stack later far less painful.
Configuring Entitlements and Info.plist
Your app must declare the VoIP background mode in its capabilities so iOS will launch or wake it for incoming VoIP pushes. In the Signing and Capabilities tab, enable Background Modes and check the VoIP option. This adds the voip entry to the background modes list in your app's configuration.
If you want your app to appear as a candidate default calling app, you also need the calling-app entitlement, which Apple grants through a request process for apps that provide calling functionality. Declare the supported call types, audio and video, in your capability configuration. Be precise here: claiming capabilities you do not actually implement is a common reason for App Store rejection during review.
Registering for VoIP Push
Incoming calls depend on PushKit, Apple's push mechanism for VoIP apps. At launch, your app registers for VoIP push notifications and sends the resulting token to your backend server. When a call comes in, your server sends a VoIP push, iOS wakes your app even if it was terminated, and your app must immediately report the call to CallKit.
One critical rule: Apple requires that every VoIP push results in a reported call to CallKit. If your app receives a VoIP push and fails to report an incoming call, iOS will terminate the app and may stop delivering pushes to it entirely. If a push arrives for something that is not a call, such as a chat message, use a regular notification push instead, never a VoIP push.
Handling Incoming Calls with CallKit
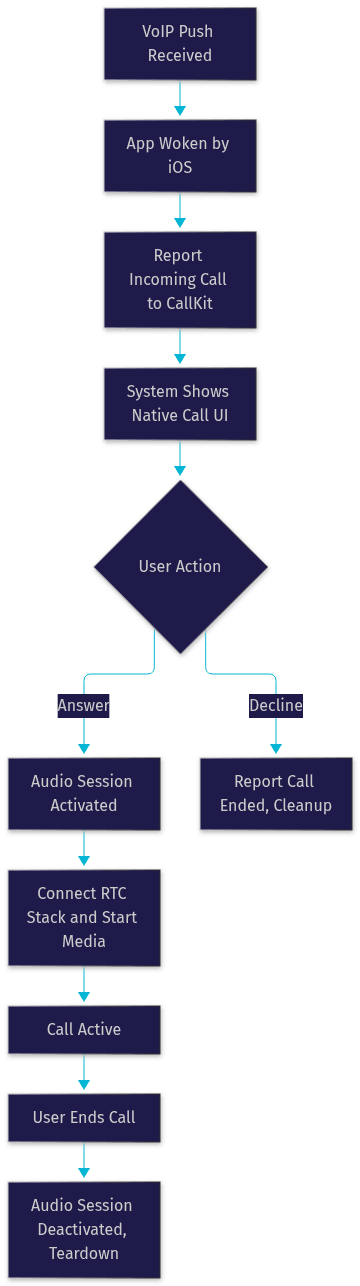
The incoming call flow is where CallKit earns its keep. Your app receives a VoIP push, reports the call to the system, and the system renders the full-screen incoming call UI, complete with the caller's name, avatar if you supply one, and Answer and Decline buttons, all on the lock screen without requiring the user to unlock the phone.
After reporting the call, your app must respond to a series of provider callbacks. When the user answers, the system activates the audio session and hands it to your app, at which point you connect your RTC stack and start media flowing. When the call ends, the system deactivates the audio session and you tear down your media connection. The system also notifies you when the user performs actions like holding the call or starting a call group with another line.
Responding to User Actions
Your provider delegate receives callbacks for every action the user takes on the system call UI: answer, decline, end, hold, resume, and mute. For each one, you must both perform the corresponding action in your RTC stack and confirm the action back to the system. For example, when the user taps Answer, you connect your media, then report the answer action as fulfilled. Failing to confirm actions leaves the system UI in an inconsistent state, which is one of the most common CallKit bugs.
Managing Call Groups
CallKit supports call groups, which let users merge or swap between multiple simultaneous calls, similar to cellular conference handling. Each provider supports a limited number of call groups, and each group supports a limited number of calls, so validate your app's behavior when a third call arrives while two are already active. When the user swaps calls, the system tells you which call to hold and which to resume, and your RTC layer must actually pause and resume the right media streams. With a rooms-based SDK like VideoSDK, this maps cleanly to leaving one room's active audio and joining another, or muting one participant track while unmuting the other.
Integrating Video Support
For video calls, mark the call as including video when you report it, so the system UI presents the appropriate answer options. CallKit renders the system call screen for the ringing and early states, but your app supplies the actual video rendering surface once the call connects. The transition matters: when the call is answered, dismiss the system UI quickly and present your in-app video view, ideally preloaded and ready so the user does not see a blank frame. VideoSDK's React SDK and native iOS SDK both give you participant view components you can drop into that transition screen.
Initiating Outgoing Calls via CallKit
Outgoing calls through CallKit start with the call controller. Your app requests a start-call action, and the system presents the native calling UI showing the dialing state, then transitions to the active call screen once media connects.
The flow has a defined sequence: your app creates the call action, wraps it in a transaction, asks the call controller to perform it, and the system responds by showing the call UI and invoking your provider callbacks. You then connect your RTC stack, and once media is flowing, you report the call as fully connected. If the connection fails, for example the callee is unreachable or your signaling times out, you report the call as failed and the system dismisses the UI with the appropriate feedback.
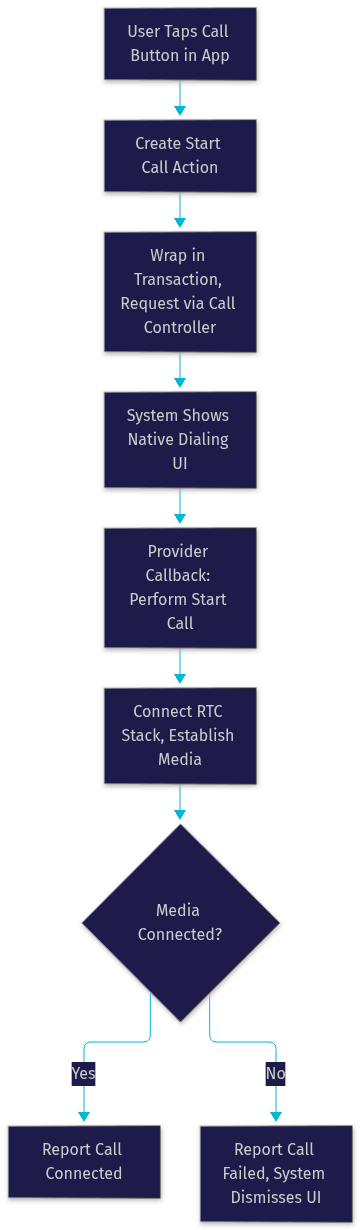
The subtle part is coordinating with your VoIP stack. CallKit owns the UI state, but your signaling layer owns whether the call actually connects. Keep them synchronized: if your signaling says the callee answered but you report the call as still dialing, the user sees a stuck screen. Report state changes promptly at each milestone, dialing, ringing, connected, ended, and your call UI will always match reality.
Making Your App the Default Calling App
Since iOS 14 and later, apps with the calling-app entitlement can register as candidates for the system's default calling app setting. When your app is selected as default, tel: URLs from Safari, Contacts, and other apps route to your app instead of the Phone app.
To support this, your app must declare the calling-app entitlement with the call types it supports, audio and optionally video, and implement handling for tel: URL requests. When your app receives such a request, you can either place the call through your VoIP stack or, if the number is not reachable through your service, hand it back to the system dialer. Implementing that fallback gracefully is important: a default calling app that cannot actually place calls to arbitrary numbers frustrates users quickly.
From an App Store review perspective, be prepared to demonstrate real calling functionality. Reviewers check that apps claiming calling capabilities genuinely provide them, that the entitlement matches actual features, and that the privacy policy covers call metadata handling. Apps that request the calling entitlement without a genuine calling feature are routinely rejected.
Cross-Platform Considerations
Android's equivalent of CallKit is ConnectionService, part of the telecom framework. It serves the same purpose: letting third-party apps present calls through the system's call UI, integrate with the dialer, and manage multiple lines. The concepts map closely, provider to connection, call controller to telecom manager, but the APIs, permissions, and lifecycle details differ significantly, so do not expect shared code at the system integration layer.
For cross-platform apps, wrapper libraries exist. React Native CallKeep and the Flutter CallKit-family plugins wrap both CallKit on iOS and ConnectionService on Android behind a single JavaScript or Dart interface. These are good choices when your call flows are simple and you want one codebase for the system integration.
Choose a native implementation when you need call groups, default calling app behavior, CarPlay integration, or fine-grained audio session control, since wrappers often lag behind on those features. A common production pattern is native CallKit and ConnectionService modules bridged into a shared React Native or Flutter app, with the media layer handled by a cross-platform SDK like VideoSDK's Flutter or React Native SDK, which gives you one consistent rooms, participants, and streams model on every platform.
Testing CallKit on Real Devices
CallKit cannot be meaningfully tested in the iOS Simulator. The simulator does not render the native call UI, does not deliver VoIP pushes reliably, and does not exercise real audio session behavior. Budget for real hardware from day one.
A practical device testing workflow: keep a second test device for the callee side, use your backend to trigger real VoIP pushes rather than simulating them locally, and test the full matrix of app states, foreground, background, and terminated. The terminated state is the one that breaks most often, because it exercises the complete wake, report, and connect path.
Common pitfalls worth checking early: incoming calls that show briefly then vanish usually mean the app failed to report the call within the required window after the push; audio that never starts usually means the RTC stack connected before the audio session was activated; and pushes that stop arriving entirely usually mean an earlier push was handled without reporting a call, after which iOS suspends delivery. Debugging is easier if you log every provider callback with timestamps so you can see exactly where the flow stalls.
Best Practices and Performance Tips
Minimize latency between push receipt and call reporting. The user's perception of your app's quality is largely set by how fast the incoming call screen appears. Do only the minimum work needed to report the call, then fetch caller details and connect media afterward. If your push payload carries the caller name and a small avatar reference, you can render the system UI immediately and enrich it later.
Be battery-friendly in the background. Report the call, connect media, and avoid holding wake locks or timers longer than the call requires. Tear down cleanly on every end-call path, including user-initiated ends, failures, and system interruptions like a real cellular call arriving.
On security and privacy, treat call metadata as sensitive data. Do not log phone numbers or caller identities in analytics, declare your data collection honestly in your privacy nutrition labels, and use end-to-end encryption for media where your use case demands it. VideoSDK supports E2E encryption for calls, which pairs well with CallKit's system-level interface for a calling experience that is both native and private.
Definitions Glossary
CallKit: Apple's iOS framework that lets third-party VoIP and video calling apps present calls through the native system call interface, including lock screen ringing, call groups, and system audio session management.
CXProvider: The CallKit object an app uses to report call events to the system, such as incoming calls, call state changes, and action confirmations.
CXCallController: The CallKit object an app uses to request call actions from the system, such as starting an outgoing call or placing a call on hold.
PushKit: Apple's push notification mechanism for VoIP apps that wakes the app for incoming calls even when it is terminated, and which must always result in a reported CallKit call.
ConnectionService: Android's telecom framework equivalent of CallKit, letting third-party apps present calls through the system dialer interface on Android devices.
VoIP Background Mode: The iOS capability, declared as the voip background mode, that permits the system to launch or wake an app in the background to handle incoming VoIP pushes.
Key Takeaways
- CallKit gives iOS VoIP and video calling apps the native system call experience, including lock screen UI, call groups, hold and resume, and proper audio session handling, without building any of that yourself.
- Every VoIP push must result in a reported CallKit call, or iOS will terminate your app and may stop delivering pushes entirely.
- CallKit is only the interface layer; your RTC stack, such as VideoSDK's video calling SDK with rooms, participants, and network-adaptive streaming, handles the actual media underneath.
- Real device testing is mandatory because the simulator cannot render the CallKit UI or deliver VoIP pushes reliably, especially in the terminated-app state.
- For cross-platform apps, wrapper libraries cover simple flows, but call groups, default calling app behavior, and CarPlay usually warrant native CallKit and ConnectionService modules.
Conclusion
CallKit is the difference between a calling app that feels bolted on and one that feels like part of the iPhone. The integration path is clear: enable the VoIP background mode, register for PushKit pushes, report incoming calls immediately, confirm every user action, and keep your CallKit layer cleanly separated from your media stack. Pair it with a solid RTC layer like VideoSDK, which handles rooms, participants, recording, and network-adaptive streaming across ten-plus platforms, and you have a production-grade calling experience. Start with the VideoSDK quickstart and a free account at app.videosdk.live/login, then wire in CallKit for the native polish. What are you building with CallKit? Drop a comment, I'd love to hear what kind of calling use case you're working on.
Free $20 Balance for AI Voice Agents & Video Calls
FAQ