Build a Real-Time Messaging App with React Native: A Comprehensive Guide
Learn how to build a comprehensive real-time messaging app with React Native, using Stream Chat for cross-platform functionality. This guide covers installation, authentication, messaging features, media attachments, and advanced user experience enhancements.
In today's digital landscape, messaging apps have become an essential part of our daily communication. Users now expect rich features and real-time updates in their messaging experiences. However, developing a robust messaging app from scratch can be complex and time-consuming, especially when targeting multiple platforms.
Fortunately,
React Native
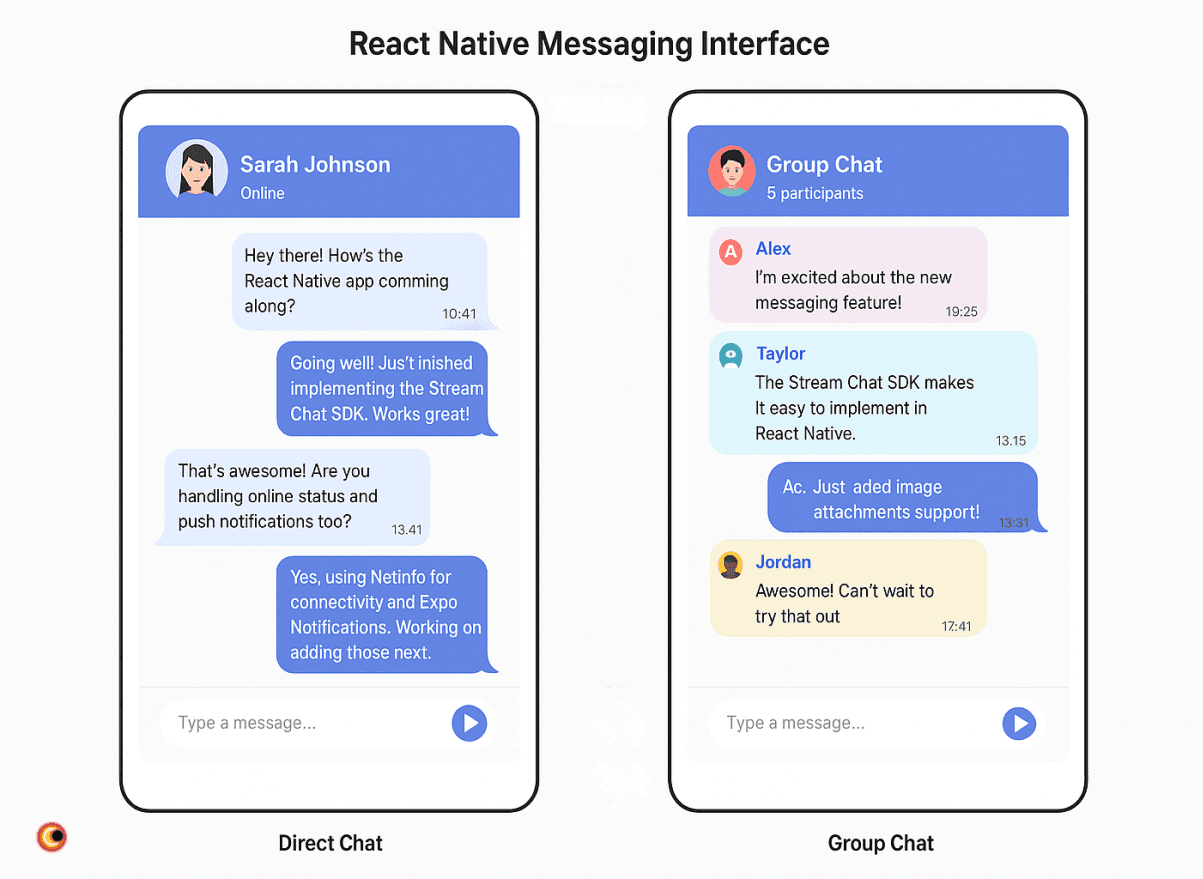
offers an excellent cross-platform solution, and using libraries like Stream Chat can significantly simplify the development process. This article will guide you through building a fully functional React Native messaging app using React Native, Expo, and Stream Chat. We'll cover everything from setup to implementing core features like real-time messaging, media attachments, and user authentication.
Understanding the Landscape: React Native for Messaging Apps
Why React Native?
React Native
offers several benefits for cross-platform development, with code reusability and faster development cycles being the most significant advantages. Using a single codebase for both iOS and Android platforms can dramatically reduce development time and maintenance efforts.Framework Choices
When starting your messaging app project, you'll need to choose between Expo and React Native CLI. Expo provides an easier setup and rapid prototyping capabilities, making it ideal for developers who want to get started quickly. React Native CLI, on the other hand, offers more control over native modules but requires additional setup steps.
Key Components
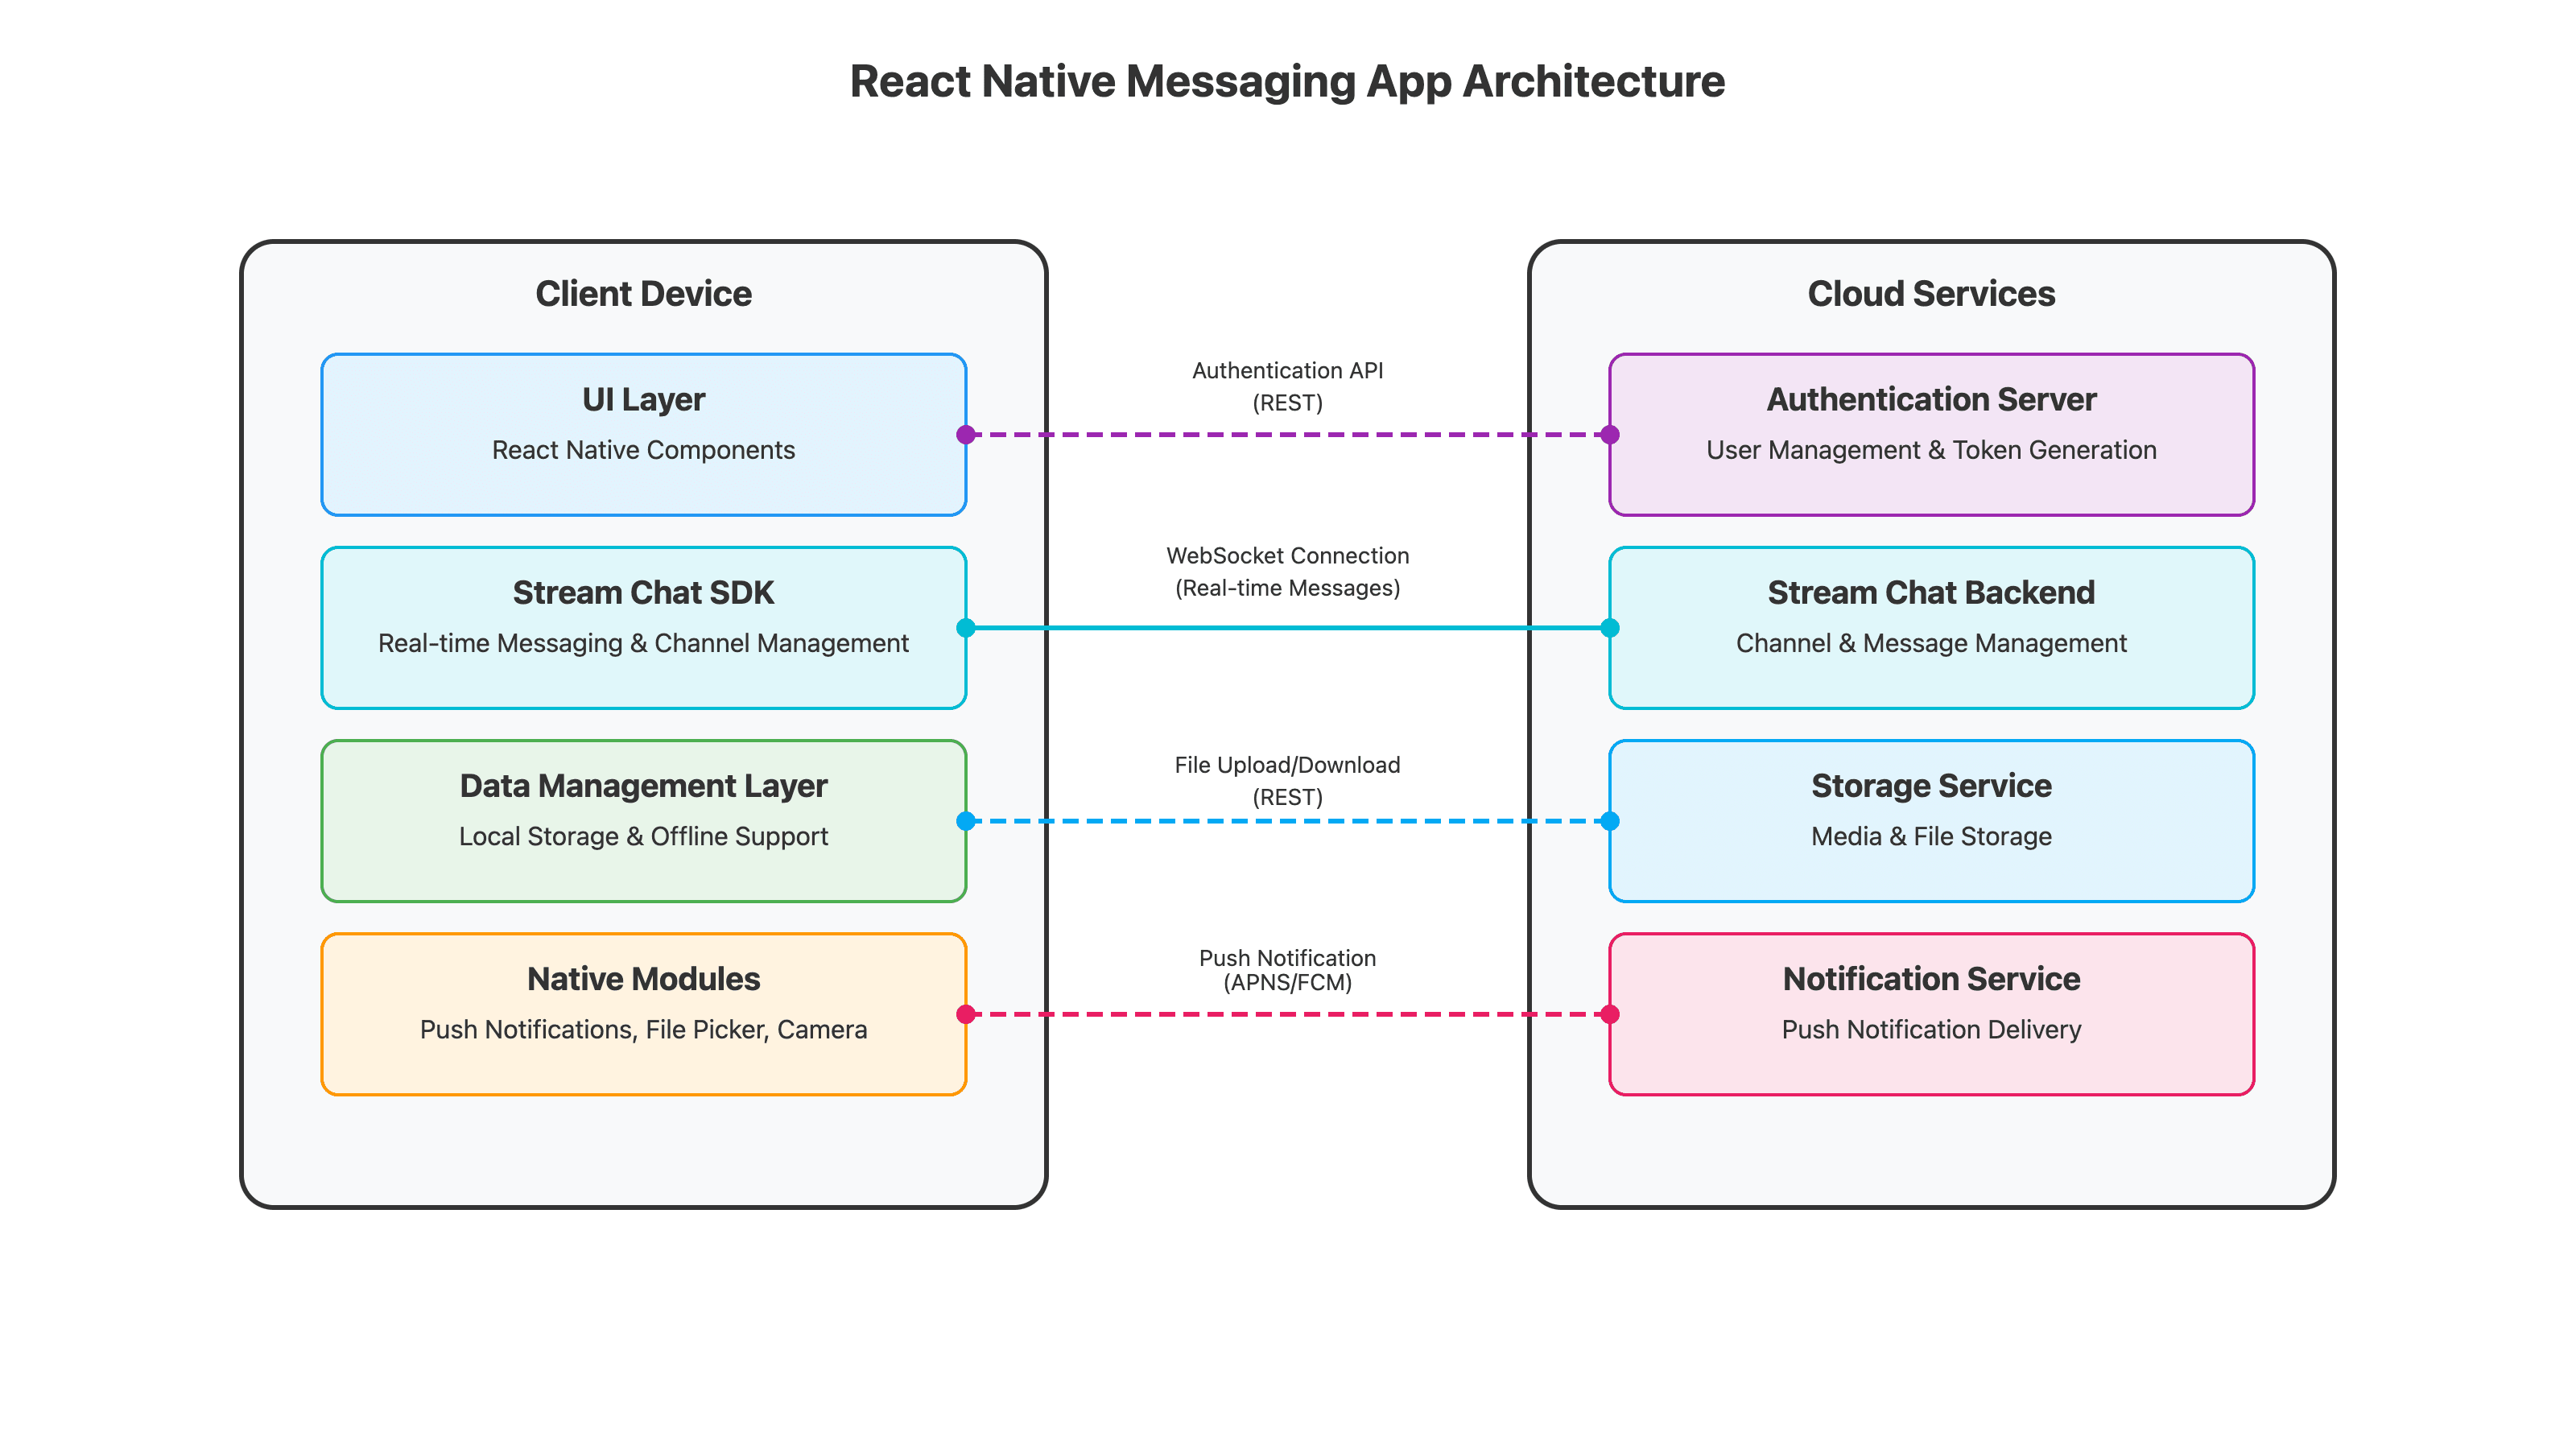
The architecture of a messaging app typically consists of:
- Frontend built with React Native components
- Backend services for handling authentication and user management
- Real-time communication infrastructure for message delivery

Setting Up Your Development Environment
Prerequisites
Before starting, ensure you have:
- Node.js (v12 or newer)
- VS Code or your preferred IDE
- Basic knowledge of JavaScript and React
Expo Installation
Install Expo CLI globally using npm:
1npm install -g expo-cli
2
Creating a New Project
Create a new Expo project with the following command:
1npx create-expo-app my-messaging-app
2cd my-messaging-app
3
Project Structure
A typical Expo project includes:
App.js- The entry point of your applicationassets/- For storing images and fontspackage.json- For managing dependenciesapp.json- For Expo configuration
Integrating Stream Chat into Your React Native App
Installing the Stream Chat Expo SDK
To add Stream Chat functionality to your app, install the Stream Chat Expo SDK:
1expo install stream-chat-expo
2
You'll also need several dependencies for full functionality:
1expo install @stream-io/flat-list-mvcp @react-native-community/netinfo expo-file-system expo-image-manipulator expo-image-picker expo-media-library react-native-gesture-handler react-native-reanimated react-native-svg
2
Configuring babel.config.js
React Native Reanimated requires specific Babel configuration. Update your
babel.config.js file:1module.exports = function(api) {
2 api.cache(true);
3 return {
4 presets: ['babel-preset-expo'],
5 plugins: [
6 'react-native-reanimated/plugin', // Must be the last plugin
7 ],
8 };
9};
10Initializing the Stream Chat Client
To use Stream Chat, you'll need to create an account at Stream and obtain API keys. Then, initialize the client in your app:
1import { StreamChat } from 'stream-chat';
2import { STREAM_API_KEY, USER_ID, USER_TOKEN } from './config';
3
4// Initialize the Stream Chat client
5const chatClient = StreamChat.getInstance(STREAM_API_KEY);
6
7// Connect the user
8const connectUser = async () => {
9  try {
10    await chatClient.connectUser(
11      {
12        id: USER_ID,
13        name: 'Demo User',
14        image: 'https://example.com/user-image.jpg',
15      },
16      USER_TOKEN
17    );
18    console.log('User connected successfully');
19  } catch (error) {
20    console.error('Failed to connect user', error);
21  }
22};
23
24connectUser();
25
The singleton pattern used with
StreamChat.getInstance() ensures efficient management of client instances throughout your app.Building Core Messaging App Features
User Authentication
Proper authentication is crucial for a messaging app. Stream Chat uses token-based authentication for secure user connections. Always generate tokens on your backend server:
1// On your backend (Node.js example)
2const { StreamChat } = require('stream-chat');
3
4const serverClient = StreamChat.getInstance(API_KEY, API_SECRET);
5const token = serverClient.createToken(userId);
6
7// Return this token to your frontend
8
Creating and Managing Channels
Stream Chat offers different channel types (messaging, livestream, team) for various use cases. To create a new channel:
1const createChannel = async () => {
2  try {
3    const channel = chatClient.channel('messaging', {
4      members: ['user1', 'user2'],
5      name: 'Chat with User 2',
6    });
7
8    await channel.create();
9    return channel;
10  } catch (error) {
11    console.error('Error creating channel', error);
12  }
13};
14
Sending and Receiving Messages
Sending a text message is straightforward with Stream Chat:
1const sendMessage = async (channelId, text) => {
2  const channel = chatClient.channel('messaging', channelId);
3  try {
4    await channel.sendMessage({
5      text: text,
6      mentioned_users: [],
7    });
8  } catch (error) {
9    console.error('Error sending message', error);
10  }
11};
12
The SDK handles real-time message updates automatically using
WebSockets
, so you don't need to implement polling or manual refresh mechanisms.Implementing Media Attachments
Adding media attachments like images to messages enhances your chat experience:
1import * as ImagePicker from 'expo-image-picker';
2import * as FileSystem from 'expo-file-system';
3
4const sendImageMessage = async (channelId) => {
5  // Request permission
6  const { status } = await ImagePicker.requestMediaLibraryPermissionsAsync();
7
8  if (status !== 'granted') {
9    alert('Sorry, we need camera roll permissions to make this work!');
10    return;
11  }
12
13  // Pick an image
14  const result = await ImagePicker.launchImageLibraryAsync({
15    mediaTypes: ImagePicker.MediaTypeOptions.Images,
16    allowsEditing: true,
17    quality: 0.8,
18  });
19
20  if (!result.canceled && result.assets && result.assets.length > 0) {
21    const imageUri = result.assets[0].uri;
22    const channel = chatClient.channel('messaging', channelId);
23
24    // Get file information
25    const fileInfo = await FileSystem.getInfoAsync(imageUri);
26
27    // Send message with image attachment
28    await channel.sendMessage({
29      text: 'Check out this image!',
30      attachments: [{
31        type: 'image',
32        image_url: imageUri,
33        thumb_url: imageUri,
34        file_size: fileInfo.size,
35      }],
36    });
37  }
38};
39
Enhancing User Experience: Advanced Features
Reactions and Threads
Adding reactions to messages provides users with an expressive way to respond:
1const addReaction = async (messageId, reactionType) => {
2  try {
3    await chatClient.addReaction(messageId, {
4      type: reactionType, // e.g., 'love', 'like', 'haha'
5    });
6  } catch (error) {
7    console.error('Error adding reaction', error);
8  }
9};
10
Implementing threads allows for organized conversations around specific messages, making it easier to follow discussions on particular topics.
Push Notifications
To keep users engaged, implement push notifications for new messages. With Expo, you can use the Expo Notifications API:
1import * as Notifications from 'expo-notifications';
2
3// Request permissions
4async function registerForPushNotifications() {
5  const { status } = await Notifications.requestPermissionsAsync();
6  if (status !== 'granted') {
7    alert('Failed to get push token for push notification!');
8    return;
9  }
10
11  // Get the token
12  const token = (await Notifications.getExpoPushTokenAsync()).data;
13
14  // Store this token on your backend and associate it with the user
15  // Then configure Stream Chat to send notifications to this token
16}
17
Offline Support
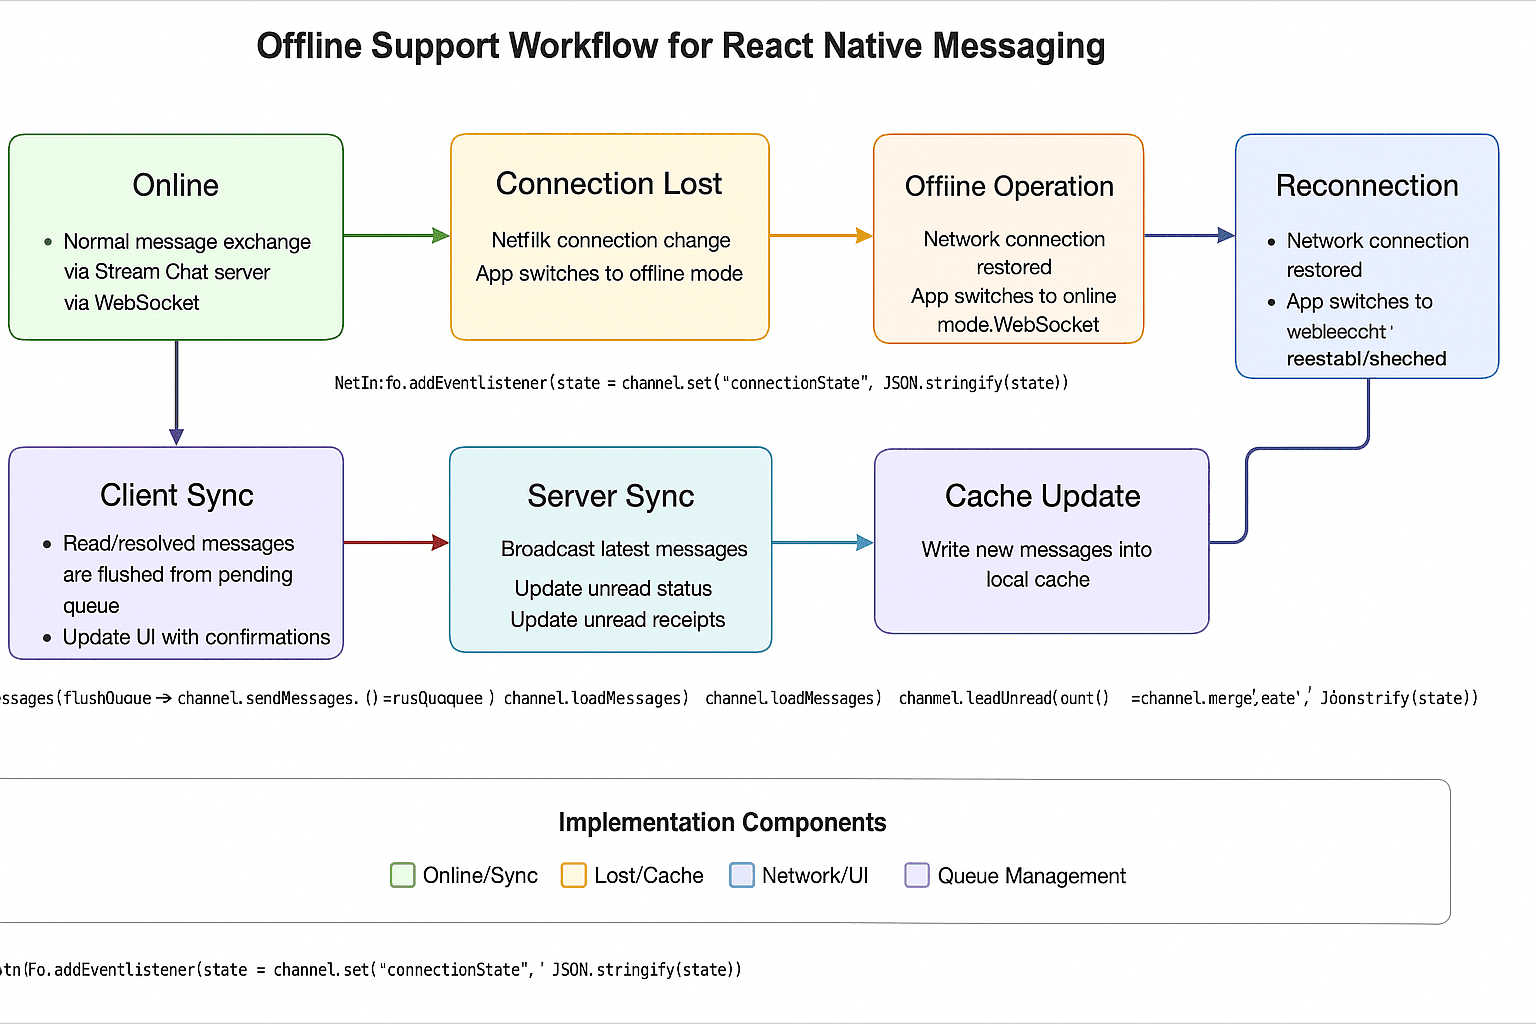
A great messaging app should work even when connectivity is intermittent. Implement offline support by caching data and handling network changes:
1import NetInfo from '@react-native-community/netinfo';
2
3// Subscribe to network state updates
4const unsubscribe = NetInfo.addEventListener(state => {
5  if (state.isConnected) {
6    // Device is online, sync pending messages
7    syncPendingMessages();
8  } else {
9    // Device is offline, store messages locally
10    enableOfflineMode();
11  }
12});
13
14// Don't forget to unsubscribe when component unmounts
15// unsubscribe();
16
Testing and Debugging Your React Native Messaging App
When testing your app, use Expo Go to quickly test on both iOS and Android devices. Simply run:
1expo start
2
Then scan the QR code with the Expo Go app on your device.
For debugging, use a combination of:
- Console logs for basic debugging
- React DevTools for component inspection
- Stream Chat Dashboard for monitoring API usage and troubleshooting
Key Takeaways
Building a React Native messaging app with Stream Chat offers several advantages:
- Cross-platform support saves development time
- Pre-built UI components accelerate development
- Real-time features work out of the box
- Scalable infrastructure handles growth
The combination of React Native's flexibility and Stream Chat's robust messaging infrastructure provides a powerful foundation for building modern messaging applications.
Conclusion
Creating a feature-rich messaging app with React Native has never been easier. By leveraging the power of React Native and Stream Chat, you can build a professional-grade messaging experience that works seamlessly across platforms.
Start building your React Native messaging app today and join the growing community of developers creating innovative communication solutions. We'd love to hear about your experiences or see your projects in the comments below!
Want to level-up your learning? Subscribe now
Subscribe to our newsletter for more tech based insights
FAQ