


React Native VideoSDK speech to text integration lets you add real-time transcription to mobile video calls using the built-in useTranscription hook, which captures audio from participants, routes it through VideoSDK's cloud-based STT pipeline, and delivers transcription text events back to your app. You control the flow with startTranscription and stopTranscription methods, listen for state changes and text events, and optionally configure webhooks for server-side transcript storage. This approach requires no low-level WebRTC or audio processing code on your end. Start with the VideoSDK React Native quickstart to get a room running first.
Live captions are no longer a nice-to-have feature. They are an accessibility requirement, a compliance tool, and a user-experience differentiator for any mobile app that includes voice or video communication. For users who are deaf or hard of hearing, real-time transcription transforms a video call from a frustrating experience into an inclusive one. For users in noisy environments or non-native speakers, captions provide a critical fallback when audio quality degrades.
VideoSDK brings real-time transcription directly into its React Native SDK through a dedicated hook and event system. Instead of wiring up a separate speech-to-text provider, managing audio routing, and handling WebSocket connections yourself, you use VideoSDK's built-in transcription pipeline that runs alongside your existing video call infrastructure.
By the end of this guide, you will understand the full architecture of VideoSDK's transcription pipeline, how to configure microphone permissions on both iOS and Android, how to integrate the useTranscription hook into your React Native components, how to listen for and display transcription events, and how to handle webhooks for server-side transcript processing. You will have everything needed to ship a production-ready speech-to-text flow without writing low-level WebRTC audio processing code.
How VideoSDK Handles Real-Time Speech-to-Text
VideoSDK's transcription pipeline is designed to abstract away the complexity of real-time speech recognition while giving developers enough control to customize the experience. The pipeline operates in four stages: audio capture on the client device, media routing through the VideoSDK cloud infrastructure, speech-to-text processing by an integrated STT provider, and event delivery back to the React Native client.
When a participant speaks during a VideoSDK meeting, their microphone audio is captured as a media track and sent to the VideoSDK cloud server through the same WebRTC connection that handles video and audio calling. The VideoSDK server forwards the audio stream to a configured speech-to-text provider, which processes the audio and returns transcription text. That text is then delivered to your React Native app through transcription events that you can listen to and render in your UI.
The key components you interact with are the useTranscription hook, which exposes transcription methods and state, the onTranscriptionStateChanged event, which tells you when transcription starts, stops, or encounters an error, and the onTranscriptionText event, which delivers the actual transcribed text along with metadata about which participant spoke and when. You can explore the full VideoSDK transcription documentation for the complete API surface.
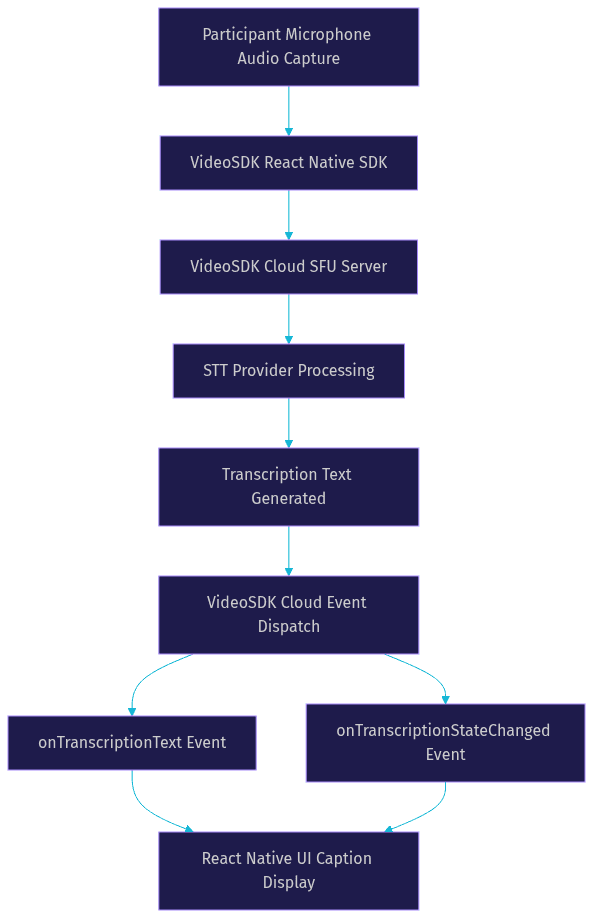
This architecture means your React Native app never directly communicates with the STT provider. VideoSDK handles the connection, the audio forwarding, the transcription request, and the event delivery. Your code only needs to call the start and stop methods and listen for the resulting events.
Preparing Your React Native Project
Before you can use the useTranscription hook, your React Native project needs three things in place: the VideoSDK React Native SDK installed and initialized, microphone permissions configured for both iOS and Android, and a secure backend endpoint that generates VideoSDK meeting tokens.
SDK Installation and Initialization
Install the VideoSDK React Native SDK package into your project using your preferred package manager. The SDK requires React Native 0.60 or higher and supports both the New Architecture (Fabric) and the legacy architecture. After installation, link the native modules if your React Native version does not support autolinking.
Once installed, import the VideoSDK provider at the root of your application and wrap your app component with it. This provider establishes the context that the useMeeting and useTranscription hooks rely on. You will also need to configure your VideoSDK token, which brings us to the next critical step.
Microphone Permissions for iOS and Android
Speech-to-text requires microphone access, and both iOS and Android enforce strict permission models. On iOS, you must add a microphone usage description string to your Info.plist file. This string explains to users why your app needs microphone access and is mandatory for App Store approval. You should also add a speech recognition usage description if you plan to use on-device speech recognition as a fallback.
On Android, add the microphone permission to your AndroidManifest file. For Android 13 and above, you may also need to handle the POST_NOTIFICATIONS permission if your app sends transcription notifications. Ensure your permission strings are descriptive and user-friendly, because vague descriptions like "need mic" can trigger App Store or Play Store rejections.
Setting Up Token Authentication
VideoSDK uses token-based authentication to secure access to meeting rooms. You should never embed your VideoSDK API secret in your React Native app. Instead, create a backend endpoint, typically built with Node.js, Python, or any server framework, that accepts a request from your mobile app, generates a JWT using your VideoSDK API key and secret, and returns the token to the client.
Your React Native app calls this endpoint before joining a meeting, receives the token, and passes it to the VideoSDK SDK's join method. This keeps your API secret on the server and limits token exposure. Read the full VideoSDK authentication and token guide for implementation details.
Integrating the useTranscription Hook
The useTranscription hook is your primary interface for controlling speech-to-text within a VideoSDK meeting. It exposes methods to start and stop transcription and provides access to the transcription state and text events that you use to render captions in your UI.
Importing and Instantiating the Hook
The useTranscription hook is part of the VideoSDK React Native SDK package. You import it alongside the useMeeting hook in the component where you want to manage transcription. The hook must be called within a component that is a child of the VideoSDK provider and inside a meeting context, meaning a meeting must be active before you call transcription methods.
In practice, developers typically structure their app so that the useMeeting hook manages the meeting lifecycle in a parent component, and the useTranscription hook is called in a child component that renders the caption UI. This separation keeps your component tree clean and ensures transcription logic only runs when a meeting is active.
Starting Transcription with startTranscription
The startTranscription method initiates the transcription pipeline for the current meeting. When called, VideoSDK's cloud server begins routing participant audio to the configured STT provider and dispatching transcription events back to your app.
The method accepts a configuration object with several important fields. You can specify a webhook URL, which VideoSDK will call with transcription data as it becomes available. This is useful for server-side transcript storage, compliance logging, or post-call summary generation. You can also enable summary generation, which produces a condensed version of the transcript after the meeting ends.
You can configure the STT model through a model configuration parameter. VideoSDK supports multiple STT providers, and you can choose between low-latency models that prioritize real-time caption speed and high-accuracy models that prioritize transcription correctness. The choice depends on your use case: live captions for accessibility benefit from low latency, while post-call transcripts for compliance benefit from high accuracy.
Call startTranscription after the meeting has successfully joined and the participant's audio is active. A common pattern is to provide a toggle button in the meeting UI that lets users enable captions on demand, rather than starting transcription automatically for all participants.
Stopping Transcription with stopTranscription
The stopTranscription method halts the transcription pipeline. Call it when the meeting ends, when the user disables captions, or when you need to pause transcription temporarily. After calling this method, no further transcription text events will be delivered until you call startTranscription again.
A best practice is to call stopTranscription in your meeting cleanup logic, typically in the onMeetingLeft event handler. This ensures transcription is properly terminated even if the user exits the app abruptly or loses network connectivity.
Handling Token Expiration and Reconnection
VideoSDK meeting tokens have a finite lifespan. If a token expires during an active meeting with transcription running, the SDK will attempt to reconnect using the refresh token mechanism. However, transcription state may not automatically resume after a reconnection. You should listen for reconnection events and re-invoke startTranscription if the transcription state indicates it has stopped.
This is a subtle gotcha that catches many developers. The meeting may reconnect successfully, audio and video may resume, but transcription can remain in a stopped state. Always verify the transcription state after any reconnection event and restart transcription if needed.
Listening to Transcription Events
Transcription events are how your React Native app receives transcribed text and state updates from the VideoSDK cloud. Two events form the core of the transcription event system: onTranscriptionStateChanged and onTranscriptionText. Understanding both is essential for building a reliable caption UI.
onTranscriptionStateChanged Event
The onTranscriptionStateChanged event fires whenever the transcription pipeline transitions between states. The possible states typically include starting, started, stopping, stopped, and failed. Each state has implications for your UI.
When the state transitions to started, your UI should indicate that captions are active and ready to display. When the state is starting, you can show a loading indicator. If the state transitions to failed, you should display an error message and provide a retry button. The stopped state should reset your caption UI to its inactive state.
This event is also your primary mechanism for detecting transcription errors. If the STT provider is unavailable, if the webhook URL is unreachable, or if there is a configuration error, the state will transition to failed and the event payload will include an error message that you can log or display.
onTranscriptionText Event
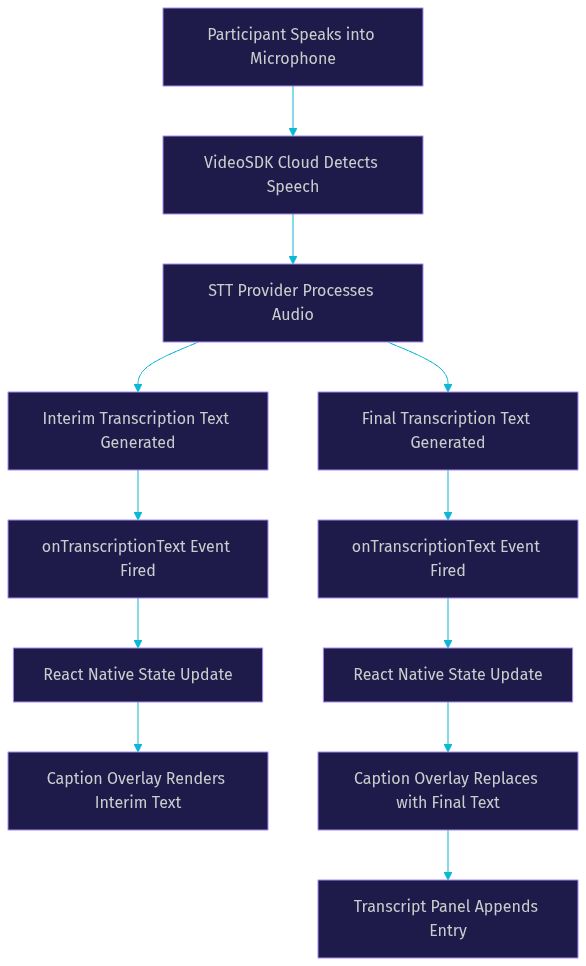
The onTranscriptionText event delivers the actual transcribed text. Each event payload contains several fields: the participant ID of the person who spoke, the participant's display name, the transcribed text string, and a timestamp indicating when the speech occurred. Some payloads also include a flag indicating whether the text is interim or final, which is important for rendering smooth captions.
Interim text represents partial transcription results that may change as the STT provider processes more audio. Final text represents a completed transcription segment that will not change. For live caption UIs, you typically display interim text immediately and replace it with final text when it arrives. This creates a smooth, real-time captioning experience similar to what users see on live television broadcasts.
Best-Practice UI Patterns for Captions
For the caption overlay, position transcribed text at the bottom of the video view with a semi-transparent background for readability. Limit the display to the most recent two or three lines of text to avoid obscuring the video feed. Use a readable font size, typically at least 16 points, and ensure sufficient contrast between text and background colors.
For a scrollable transcript panel, maintain a list of all transcription text events sorted by timestamp. Auto-scroll to the bottom as new text arrives, but allow users to scroll up to read previous captions. Include the speaker's name and a timestamp for each entry so users can follow the conversation flow.
For accessibility, ensure your caption UI is compatible with VoiceOver on iOS and TalkBack on Android. Each caption update should trigger an accessibility announcement so screen reader users are notified of new text. Consider providing a setting to adjust caption font size and background opacity for users with visual impairments.
Managing Webhooks for Server-Side Processing
The webhook URL parameter in startTranscription is one of the most powerful features of VideoSDK's transcription system. When configured, VideoSDK sends transcription data to your server as it becomes available, enabling server-side processing that goes beyond what the client app can do alone.
When to Configure a Webhook URL
Webhooks are essential for any use case that requires persistent transcript storage. If you need to save transcripts to a database for compliance, legal, or training purposes, the webhook is your mechanism. If you want to generate a post-call summary using an LLM, the webhook delivers the raw transcript to your server where you can process it. If you need to feed transcripts into a knowledge base or CRM system, the webhook provides the data pipeline.
Even if your initial use case only requires live captions on the client, configuring a webhook from the start is a good architectural decision. It costs nothing to set up and gives you the flexibility to add server-side features later without changing your client code.
Security Best Practices for Webhooks
VideoSDK signs webhook payloads so your server can verify that incoming requests are genuinely from VideoSDK and not from a malicious actor. Always verify the webhook signature on your server before processing the payload. Use HTTPS for your webhook endpoint to encrypt the transcription data in transit. Consider limiting the IP ranges that your webhook endpoint accepts requests from to VideoSDK's server IP ranges.
Treat transcription data as sensitive personal data. Depending on your jurisdiction and use case, you may need to comply with GDPR, HIPAA, or other data protection regulations when storing transcripts. Implement data retention policies, encryption at rest, and access controls on your transcript storage.
Server-Side Use Cases
Three common server-side use cases emerge from webhook-based transcription processing. First, saving full transcripts to a database with participant metadata, timestamps, and meeting IDs for later retrieval and search. Second, feeding transcripts to an LLM-powered summarization service that generates meeting notes, action items, or compliance reports. Third, triggering real-time notifications to external systems, such as sending a Slack message when specific keywords are detected in the transcription.
Optimizing Performance and Accuracy
Real-time transcription quality depends on several factors that you can control through VideoSDK's configuration options and your app's audio settings. Understanding these levers lets you balance latency, accuracy, and resource usage for your specific use case.
Choosing the Right STT Model
VideoSDK's model configuration parameter lets you select between STT models optimized for different priorities. Low-latency models produce transcription text with minimal delay, typically under one second, which is ideal for live captioning where users need to read captions in sync with the speaker. High-accuracy models may introduce slightly more latency but produce fewer transcription errors, which is better for post-call transcripts where correctness matters more than speed.
Network-Adaptive Streaming and Transcription Latency
VideoSDK's network-adaptive streaming automatically adjusts audio bitrate and quality based on the participant's network conditions. On poor connections, the SDK reduces audio quality to maintain connectivity, which can affect transcription accuracy because lower-quality audio is harder for STT providers to process. On strong connections, the SDK uses higher audio bitrates, producing clearer audio that transcribes more accurately.
You cannot directly control the adaptive streaming algorithm, but you can monitor network quality through VideoSDK's analytics and inform users when their connection is degrading transcription quality. Consider displaying a network quality indicator alongside your caption UI so users understand why transcription accuracy may fluctuate.
Noise Suppression and Audio Track Configuration
VideoSDK supports custom audio track configuration that includes built-in noise suppression and echo cancellation. Enabling noise suppression filters out background noise before the audio reaches the STT provider, which significantly improves transcription accuracy in noisy environments like coffee shops, open offices, or moving vehicles.
Configure noise suppression on the audio track when the meeting starts, before enabling transcription. This ensures the STT provider receives the cleanest possible audio signal. You can read more about audio track configuration in the VideoSDK custom audio track documentation.
Monitoring Transcription Latency
VideoSDK provides session analytics through its REST API that include transcription-related metrics. After a meeting ends, you can query the analytics endpoint to review transcription latency, the number of transcription events dispatched, and any error states that occurred. Use this data to identify patterns, such as specific participants or network conditions that consistently produce high latency or low accuracy.
Handling Edge Cases and Errors
Real-time transcription is inherently fragile because it depends on network conditions, microphone quality, STT provider availability, and user permissions. Building a robust transcription feature means anticipating failure states and providing graceful fallbacks.
Common Failure States
The most common failure state is TRANSCRIPTION_FAILED, which indicates the STT provider could not process the audio or returned an error. This can happen due to provider outages, rate limiting, or configuration errors. When this state occurs, display a non-intrusive message to the user indicating that transcription is temporarily unavailable and provide a retry button.
Network interruptions can cause transcription events to stop arriving even if the meeting itself remains connected. If your app detects that no transcription text events have arrived for an extended period while the meeting is active and participants are speaking, consider calling stopTranscription followed by startTranscription to restart the pipeline.
Permission denials are another common issue. If a user revokes microphone permission mid-call, transcription will fail because no audio is being captured. Listen for permission change events and prompt the user to re-grant microphone access before attempting to restart transcription.
Recommended Fallback UI
When transcription fails, your UI should never crash or show a raw error message. Instead, display a simple banner or toast notification stating that captions are unavailable, with an optional retry button. If the user had captions enabled, automatically attempt to restart transcription after a brief delay, but limit the number of automatic retries to avoid creating a loop of failed attempts.
Graceful Reconnection Strategy
When a participant reconnects after a network interruption, the meeting state may change but the transcription state may not automatically sync. Implement a reconnection handler that checks the current transcription state after reconnection and restarts transcription if it was previously active. This ensures users do not lose caption functionality after a brief network drop.
Real-World Example: Accessible Video Call App
Consider a healthcare startup building a telemedicine app with VideoSDK's React Native SDK. Their patient base includes elderly users and users with hearing impairments who struggle with audio-only consultations. The product team decides to add live captions to every video call to improve accessibility and patient comprehension.
The implementation follows the architecture described in this guide. The app requests microphone permissions during onboarding, generates VideoSDK tokens through a secure backend, and joins meetings using the useMeeting hook. When a call starts, the app calls startTranscription with a webhook URL configured to send transcripts to the startup's HIPAA-compliant database.
The caption UI renders at the bottom of the video view with a semi-transparent background, displaying interim and final transcription text as events arrive. The app includes a settings panel where users can adjust caption font size and toggle captions on or off. After each call, the webhook delivers the full transcript to the backend, where an LLM generates a summary that is added to the patient's medical record.
The result is a measurable improvement in patient engagement. Users who previously struggled to follow consultations now have a text reference they can read in real time and review afterward. The startup also gains a compliance benefit: every consultation is transcribed and stored, creating an auditable record that satisfies regulatory requirements.
The checklist of steps implemented includes: configuring microphone permissions for iOS and Android, setting up a token generation endpoint, integrating the useTranscription hook, rendering caption UI with accessibility support, configuring a webhook for transcript storage, enabling noise suppression on the audio track, and implementing error handling with retry logic.
Definitions Glossary
useTranscription Hook: A React Native hook provided by the VideoSDK SDK that exposes methods to start and stop real-time speech transcription within an active meeting, along with access to transcription state and text events.
onTranscriptionStateChanged: An event fired by the VideoSDK SDK whenever the transcription pipeline transitions between states such as starting, started, stopping, stopped, or failed, allowing the app to update its UI accordingly.
onTranscriptionText: An event that delivers transcribed text from the VideoSDK STT pipeline to the React Native client, including metadata such as participant ID, display name, text content, and timestamp.
Meeting Token: A JWT generated server-side using your VideoSDK API key and secret that authenticates a participant's access to a VideoSDK room, required before joining any meeting or enabling transcription.
Interim Transcription Text: Partial transcription results produced by the STT provider as it processes audio in real time, which may be updated or replaced by final transcription text as more audio is processed.
Webhook URL: An optional HTTPS endpoint configured in the startTranscription method that receives transcription data server-side as it becomes available, enabling persistent storage, summarization, and compliance workflows.
Key Takeaways
- React Native VideoSDK speech to text integration uses the built-in useTranscription hook to start, stop, and manage real-time transcription without requiring low-level WebRTC or audio processing code.
- The transcription pipeline routes participant audio through VideoSDK's cloud infrastructure to an STT provider and delivers results via onTranscriptionStateChanged and onTranscriptionText events.
- Microphone permissions must be configured for both iOS and Android, and VideoSDK tokens must be generated server-side to keep your API secret secure.
- Webhook configuration enables server-side transcript storage, post-call summarization, and compliance workflows that go beyond client-only captioning.
- VideoSDK's network-adaptive streaming, noise suppression, and model configuration options let you balance transcription latency and accuracy for your specific use case.
Conclusion
Adding speech-to-text to your React Native video calling app is one of the highest-impact features you can ship for accessibility and user experience. VideoSDK's built-in transcription pipeline removes the need to integrate a separate STT provider, manage audio routing, or build a custom WebSocket layer. The useTranscription hook, event system, and webhook support give you everything needed to deliver live captions and persistent transcripts in production.
If you are ready to try it yourself, sign up for the VideoSDK free tier and follow the React Native quickstart guide to get a meeting running. For instant captions without custom UI work, explore the VideoSDK Prebuilt UI Kit, which includes transcription support out of the box.
What are you building with VideoSDK? Drop a comment or join the VideoSDK Discord community to share your React Native speech-to-text implementations and ask questions. I would love to hear what kind of transcription use case you are working on.
FAQ