Chat applications have become an integral part of our digital lives, powering everything from social media platforms to customer service interfaces. Whether you're scrolling through Instagram DMs, collaborating with colleagues on Slack, or getting support through a website's live chat, real-time messaging has transformed how we communicate online.
Many individuals and businesses find themselves needing custom chat solutions but aren't sure where to begin. The good news is that creating a chat application is more accessible than ever before, with options ranging from no-code platforms to fully customized development.
This guide will walk you through the process of creating your own chat application, covering different approaches, helping you choose the right technology stack, and guiding you through implementation and deployment.
Understanding the Basics: Types of Chat Applications
Before diving into development, it's important to understand the different types of chat applications and their specific use cases:
- One-on-one messaging: Similar to WhatsApp or Signal, focusing on private conversations between two users
- Group chat: Like Slack or Discord, allowing multiple participants to communicate in shared spaces
- Live chat for customer support: Enabling businesses to provide real-time assistance to website visitors
- In-app chat for collaboration: Facilitating communication within applications for team collaboration
Each type has unique requirements and features to consider, such as file sharing capabilities, video call integration, user authentication systems, and message persistence.
Choosing Your Approach: No-Code vs. Custom Development
No-Code Platforms
For those with limited technical expertise or who need to launch quickly, no-code platforms offer an attractive solution:
- Popular options: Appy Pie, Bubble, and Sendbird's UIKit allow you to build chat applications through visual interfaces
- Advantages: Rapid development, minimal technical knowledge required, and quick time-to-market
- Limitations: Restricted customization options, potential platform dependency, and possible scalability challenges
These platforms typically provide drag-and-drop interfaces where you can assemble chat components without writing code.
Custom Development
Building a chat application from scratch gives you complete control but requires more resources:
- Advantages: Full control over features, unlimited customization possibilities, and superior scalability
- Challenges: Requires significant technical expertise, longer development timeline, and higher costs
- Best for: Applications with unique requirements, high-volume usage, or specialized security needs
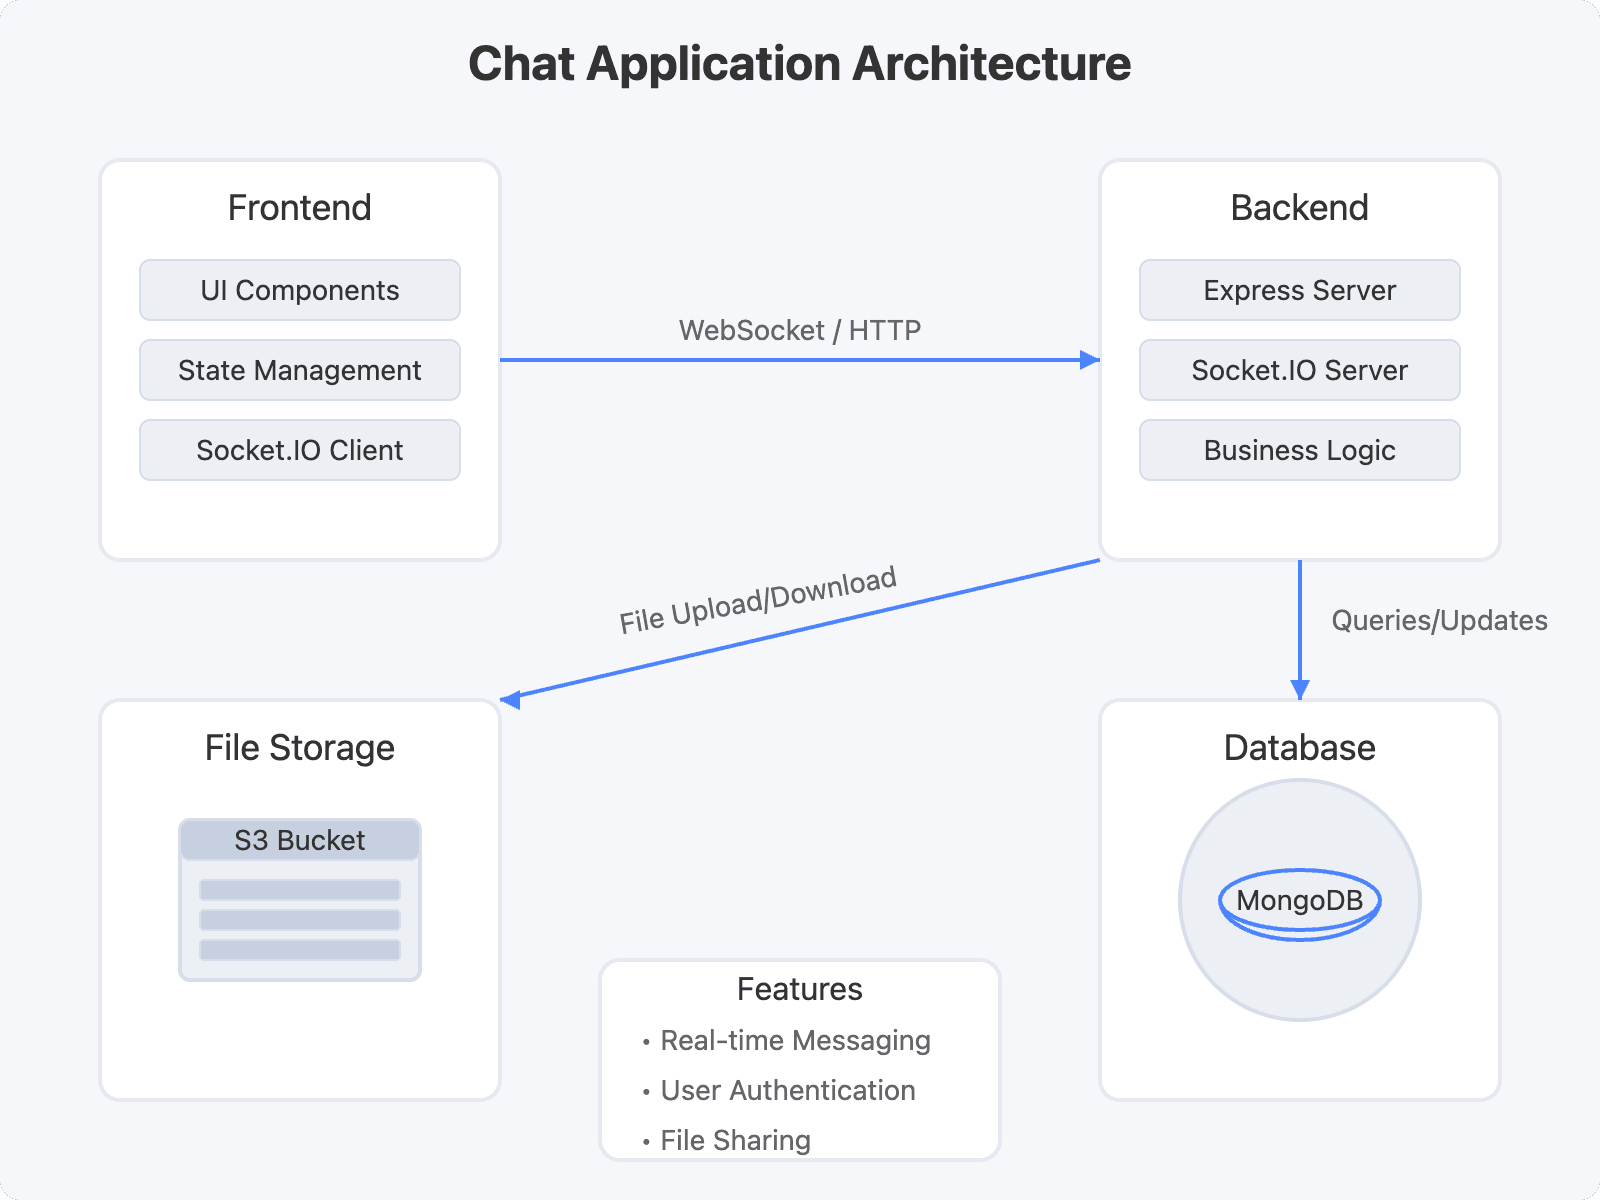
Selecting the Right Technology Stack
Frontend Technologies
The user interface of your chat application requires careful consideration:
- JavaScript frameworks: React, Angular, and Vue.js all offer robust options for building interactive chat interfaces
- HTML and CSS: Essential for structuring and styling your application's user interface
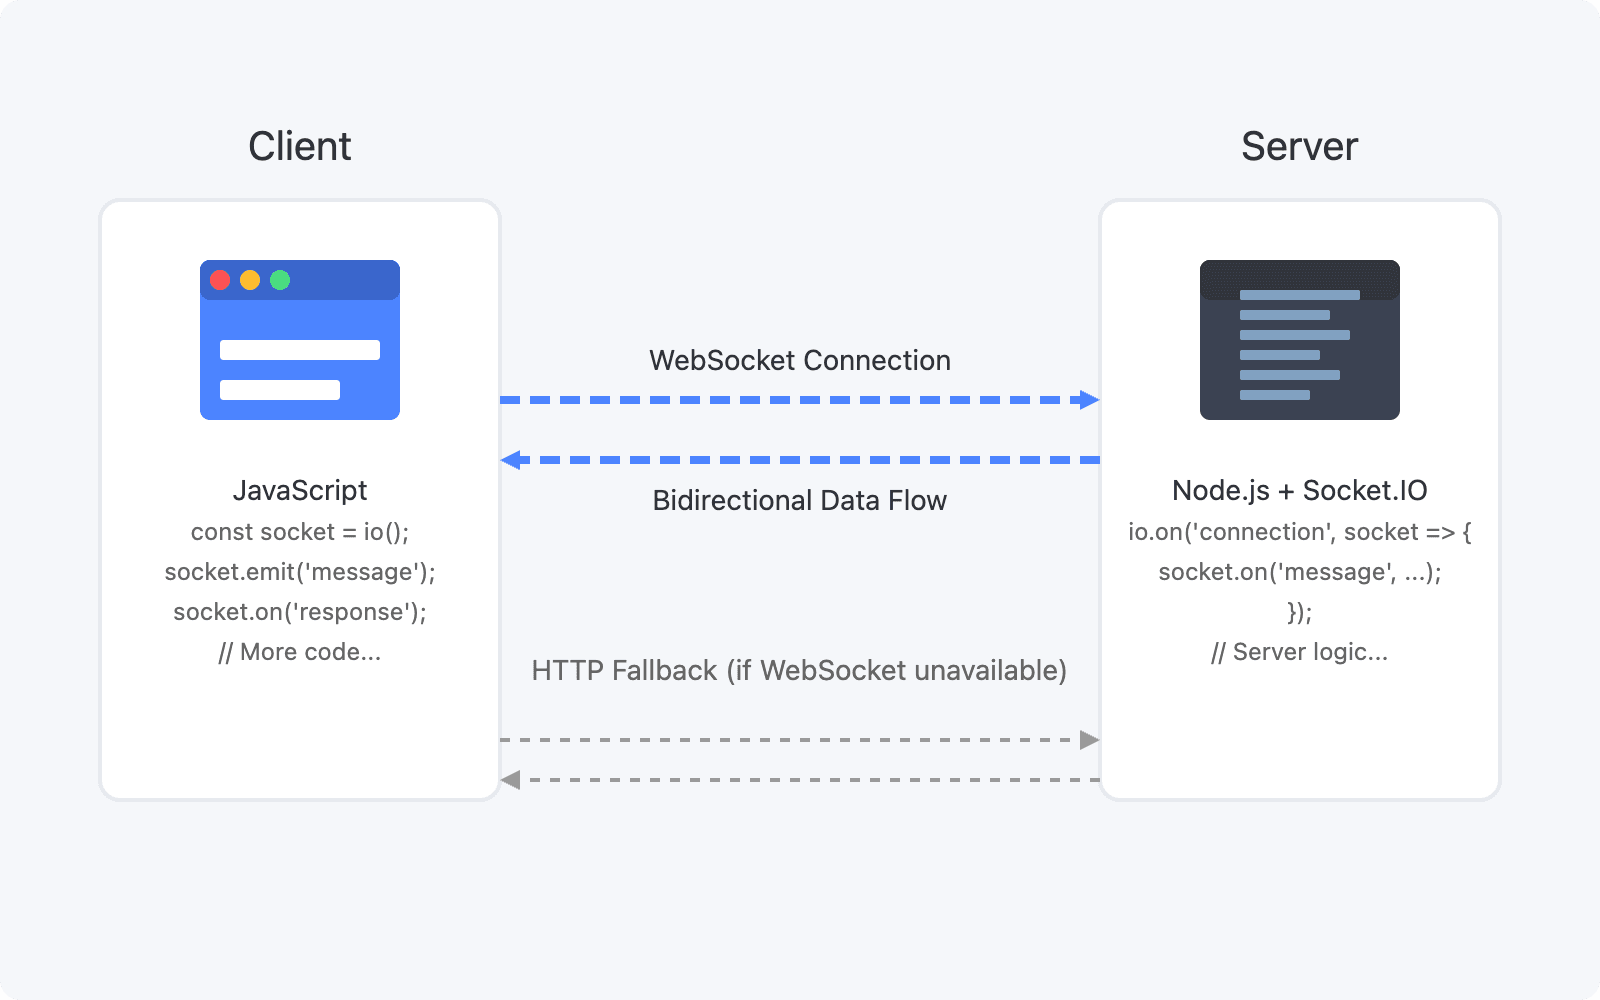
- Real-time communication libraries: Socket.IO and the WebSocket API provide the foundation for bidirectional communication
Backend Technologies
Your server-side implementation will handle the core functionality:
- Programming languages: Node.js, Python, Java, and Go are all viable options for backend development
- Databases: MongoDB works well for flexible data models, PostgreSQL offers robust transaction support, and Firebase provides real-time capabilities
- Cloud platforms: AWS, Google Cloud, and Azure offer scalable infrastructure for hosting
Protocols
Understanding the communication protocols is crucial:
- WebSocket protocol: Enables full-duplex communication channels over a single TCP connection
- Alternative protocols: Server-Sent Events (SSE) can be used for one-way server-to-client messaging, but with some limitations
Building a Basic Chat Application: Step-by-Step Guide
Setting Up the Development Environment
- Install Node.js and npm (or yarn) on your development machine
- Create a new project directory and initialize it with
npm init - Install the necessary dependencies:
1npm install express socket.io cors
2
Implementing the Backend
Create a simple Express server with Socket.IO integration:
1const express = require('express');
2const http = require('http');
3const socketIo = require('socket.io');
4const cors = require('cors');
5
6const app = express();
7app.use(cors());
8
9const server = http.createServer(app);
10const io = socketIo(server, {
11  cors: {
12    origin: "*",
13    methods: ["GET", "POST"]
14  }
15});
16
17io.on('connection', (socket) => {
18  console.log('New client connected');
19
20  socket.on('sendMessage', (message) => {
21    io.emit('message', message);
22  });
23
24  socket.on('disconnect', () => {
25    console.log('Client disconnected');
26  });
27});
28
29const PORT = process.env.PORT || 4000;
30server.listen(PORT, () => console.log(`Server running on port ${PORT}`));
31
Developing the Frontend
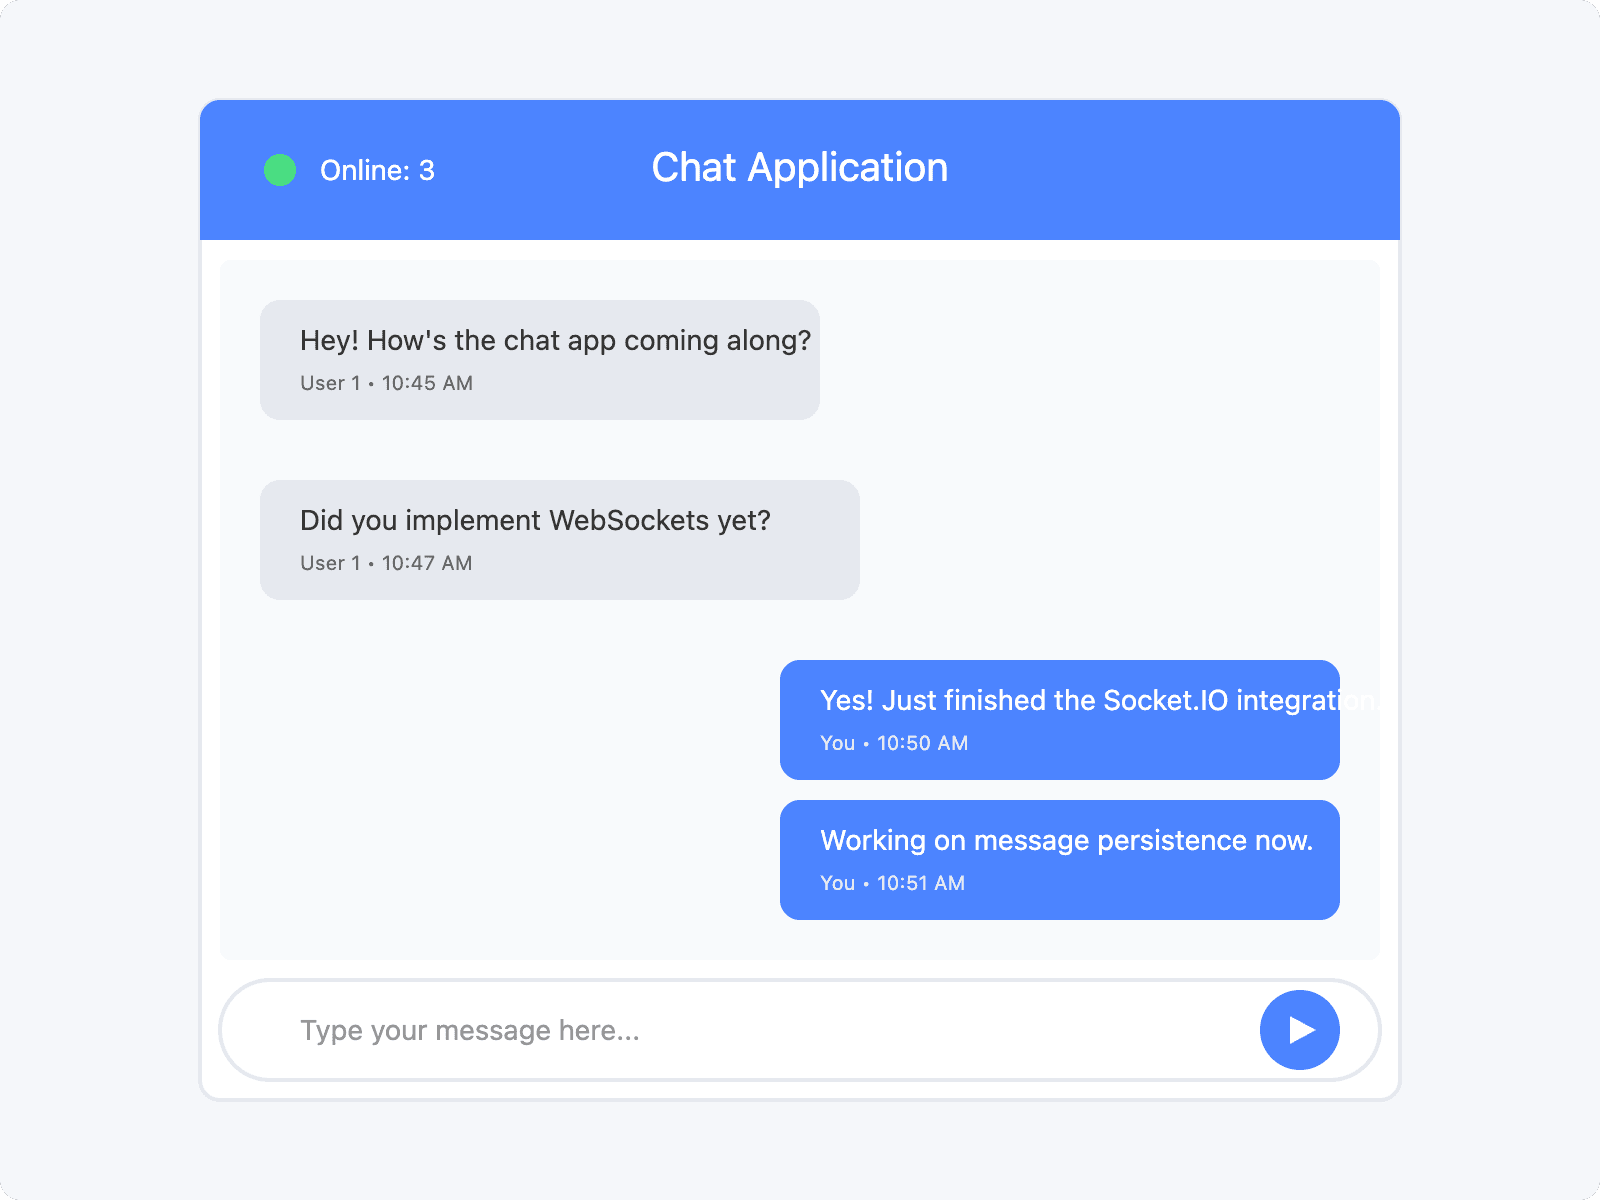
Create an HTML structure for your chat interface:
1<!DOCTYPE html>
2<html lang="en">
3<head>
4    <meta charset="UTF-8">
5    <meta name="viewport" content="width=device-width, initial-scale=1.0">
6    <title>Simple Chat App</title>
7    <style>
8        #chat-container {
9            width: 400px;
10            height: 500px;
11            border: 1px solid #ccc;
12            margin: 0 auto;
13            padding: 20px;
14            display: flex;
15            flex-direction: column;
16        }
17        #messages {
18            flex: 1;
19            overflow-y: auto;
20            margin-bottom: 10px;
21            padding: 10px;
22            background: #f9f9f9;
23        }
24        .message {
25            margin-bottom: 10px;
26            padding: 8px;
27            background: #e6e6e6;
28            border-radius: 5px;
29        }
30        #message-form {
31            display: flex;
32        }
33        #message-input {
34            flex: 1;
35            padding: 8px;
36        }
37    </style>
38</head>
39<body>
40    <div id="chat-container">
41        <div id="messages"></div>
42        <form id="message-form">
43            <input type="text" id="message-input" placeholder="Type a message...">
44            <button type="submit">Send</button>
45        </form>
46    </div>
47
48    <script src="https://cdn.socket.io/4.5.0/socket.io.min.js"></script>
49    <script>
50        const socket = io('http://localhost:4000');
51        const messagesContainer = document.getElementById('messages');
52        const messageForm = document.getElementById('message-form');
53        const messageInput = document.getElementById('message-input');
54
55        messageForm.addEventListener('submit', (e) => {
56            e.preventDefault();
57            const message = messageInput.value;
58            if (message.trim()) {
59                socket.emit('sendMessage', message);
60                messageInput.value = '';
61            }
62        });
63
64        socket.on('message', (message) => {
65            const messageElement = document.createElement('div');
66            messageElement.classList.add('message');
67            messageElement.textContent = message;
68            messagesContainer.appendChild(messageElement);
69            messagesContainer.scrollTop = messagesContainer.scrollHeight;
70        });
71    </script>
72</body>
73</html>
74
Enhancing Your Chat Application: Advanced Features
User Authentication
Secure your chat application with proper authentication:
- Implement user registration and login functionality using libraries like Passport.js or Auth0
- Store credentials securely using encryption and proper password hashing
- Create user sessions to maintain authenticated connections
Message Persistence
Ensure conversations aren't lost when users disconnect:
- Configure a database like MongoDB to store message history
- Implement message retrieval to load previous conversations
- Create data models that efficiently store and query message content
Real-time Presence
Show who's online and available to chat:
- Track user connection status through Socket.IO events
- Update presence indicators when users connect or disconnect
- Implement typing indicators to show when someone is composing a message
File Sharing
Enable users to exchange more than just text:
- Implement file upload functionality using libraries like Multer
- Store files securely using services like AWS S3
- Generate previews for common file types like images and PDFs
Group Chat
Support conversations with multiple participants:
- Create data structures for chat rooms or channels
- Implement joining and leaving functionality
- Manage user permissions within group contexts
Deploying Your Chat Application
When you're ready to make your chat application available to users:
- Choose a suitable hosting platform like Heroku, Netlify, or AWS
- Configure your application for production (environment variables, optimizations)
- Set up a domain name and SSL certificate for secure connections
- Implement monitoring to track performance and identify issues
Key Takeaways
Building a chat application involves several important steps:
- Determining the right approach based on your technical capabilities
- Selecting appropriate technologies for your specific requirements
- Implementing core functionality before adding advanced features
- Ensuring security throughout the development process
- Testing thoroughly to provide a seamless user experience
The right technology choices will depend on your specific needs, but WebSocket-based solutions like Socket.IO provide the most robust foundation for real-time applications.
Conclusion
Creating a chat application has never been more accessible, whether you choose a no-code solution or build from scratch. By understanding the core concepts and following best practices, you can develop a communication platform that meets your specific needs.
As messaging continues to be a central part of digital interaction, custom chat solutions offer valuable opportunities for businesses to enhance customer engagement and improve collaboration. Start small, focus on core functionality, and then expand with features that address your unique requirements.
Want to level-up your learning? Subscribe now
Subscribe to our newsletter for more tech based insights
FAQ