


An Angular video chat app integrates real-time video and audio calling into Angular applications using WebRTC-based SDKs like VideoSDK. VideoSDK provides a JavaScript SDK that works within Angular's component architecture, handling media stream negotiation, participant management, and network-adaptive streaming with sub-300ms latency. This guide walks through planning the architecture, setting up the project, implementing video features, and deploying to production using VideoSDK's Rooms-based infrastructure.
Real-time video has shifted from a nice-to-have to a baseline expectation in modern web applications. Whether you are building a telehealth platform, a virtual classroom, or a customer support portal, users now expect face-to-face interaction without leaving the browser. According to the W3C WebRTC specification, billions of WebRTC sessions are established daily across Chrome alone, underscoring how deeply embedded this technology has become in everyday web experiences.
This Angular video chat app guide covers everything you need to build a production-ready video calling application using VideoSDK. You will learn how to architect the system, integrate the VideoSDK JavaScript SDK within an Angular project, manage participants and media streams, handle network variability, and deploy securely to production.
Before diving in, you should have a working knowledge of Angular (version 16 or later), TypeScript, and basic REST API concepts. Familiarity with RxJS observables will help, since Angular's reactive patterns map naturally onto VideoSDK's event-driven participant and stream lifecycle.
Understanding the Core Concepts
What is WebRTC and How It Powers Video Calls?
WebRTC is an open-source project that enables real-time peer-to-peer audio, video, and data communication directly between browsers without requiring plugins. The W3C specification defines three core APIs: media capture, peer connections, and data channels. Every video chat app built today, including those using VideoSDK, relies on these underlying primitives.
WebRTC works by establishing a peer connection through a process called ICE (Interactive Connectivity Establishment). STUN servers help devices discover their public IP addresses, while TURN servers relay media traffic when direct peer-to-peer connections fail due to NAT or firewall restrictions. VideoSDK manages this entire negotiation automatically, so Angular developers never need to hand-write SDP offers, handle ICE candidates, or configure STUN/TURN infrastructure manually.
Why Use Angular for Real-Time Communication?
Angular's architecture is particularly well-suited for real-time video applications. Its change detection system efficiently updates the DOM when participant states change, such as when a new user joins or a speaker goes mute. RxJS observables, which are built into Angular, map cleanly onto VideoSDK's event streams for participant join and leave events, media track updates, and room state changes.
Angular's component-based structure also lets you encapsulate video-related logic into reusable directives and services. You can create a dedicated video room component, a participant tile component, and a control bar component, each managing its own lifecycle and inputs. This separation of concerns keeps your video chat codebase maintainable as the application grows.
VideoSDK Overview for Angular
VideoSDK provides a JavaScript SDK that integrates seamlessly into Angular applications. The SDK is built on a Rooms-based architecture where participants join a room, share media streams, and communicate over WebRTC with sub-300ms latency. VideoSDK handles the SFU media routing, signaling, and network adaptation internally, so Angular developers can focus on UI and user experience rather than transport-layer complexity.
Key capabilities relevant to Angular developers include the Prebuilt UI Kit for zero-code video call embedding, custom video tracks for screen sharing and virtual backgrounds, network-adaptive streaming that automatically adjusts bitrate and resolution based on bandwidth, and comprehensive collaborative features like in-meeting chat, polls, and recording. VideoSDK also offers code samples that demonstrate integration patterns across multiple frameworks.
Planning the Architecture
A well-planned architecture separates concerns between the Angular frontend, your backend token server, and the VideoSDK cloud infrastructure. This separation ensures that your API secrets never reach the client, that room management remains server-controlled, and that the Angular application focuses purely on rendering and user interaction.
High-Level System Diagram
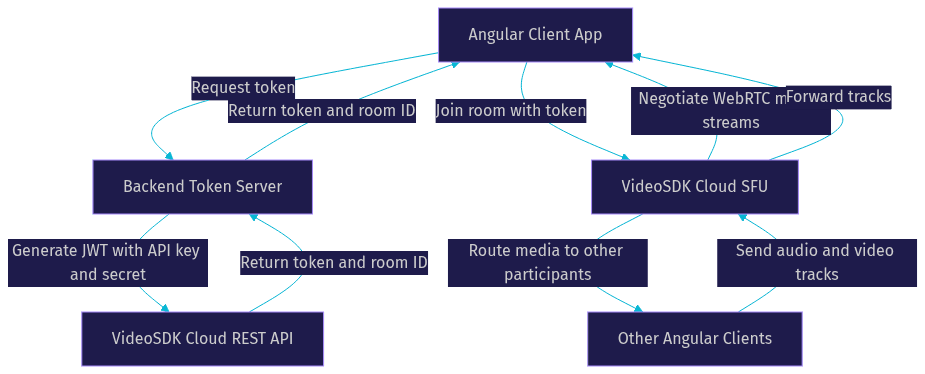
The following diagram illustrates how data flows between the Angular client, your backend token server, and the VideoSDK cloud:
Choosing the Right VideoSDK Features
VideoSDK offers two primary integration paths for Angular developers. The Prebuilt UI Kit provides a complete video calling interface with speaker view, gallery view, chat, and controls, all embeddable with minimal configuration. This is ideal for rapid MVPs or when your team needs to ship a working video feature in days rather than weeks.
The custom SDK path gives you full control over the UI and UX. You build your own participant tiles, layout logic, and control bar using Angular components, while VideoSDK handles the media layer. This approach is better when your application has specific branding requirements, custom layouts, or unique interaction patterns that a prebuilt UI cannot accommodate.
For multi-party calls, VideoSDK's SFU architecture scales more effectively than peer-to-peer mesh networks. The SFU receives each participant's media stream once and forwards it to all other participants, keeping bandwidth usage linear rather than exponential as participant count grows.
Backend Responsibilities
Your backend server handles three critical tasks: token generation, room management, and session orchestration. Token generation involves creating a JWT signed with your VideoSDK API secret, scoped to a specific room and participant role. This token is then passed to the Angular frontend, which uses it to authenticate with the VideoSDK cloud.
Room management uses VideoSDK's REST API to create rooms before meetings, validate room IDs, list active participants, and deactivate rooms when sessions end. Your backend should expose endpoints that the Angular app calls to request tokens and room IDs, keeping the API secret entirely server-side.
Session orchestration includes starting and stopping recordings programmatically, pulling post-call analytics, and automating workflows like sending follow-up emails after a consultation ends. All of these operations happen through the REST API, independent of the Angular frontend.
Setting Up the Angular Project
Installing VideoSDK Angular Packages
To integrate VideoSDK into an Angular project, you need the VideoSDK JavaScript SDK package, which provides the core room and participant management APIs. Since Angular uses TypeScript, the SDK's type definitions ensure you get compile-time safety when working with room events, participant objects, and media streams.
You will also need the VideoSDK prebuilt package if you choose the zero-code UI path. This package contains the embeddable video calling interface that you can drop into an Angular component template. Both packages are available through standard npm installation, and you should verify the latest version numbers on the VideoSDK JavaScript SDK documentation before installing.
Configuring the VideoSDK Provider
Once the packages are installed, you configure VideoSDK within your Angular application by initializing the SDK with your authentication token. The recommended pattern is to create a dedicated Angular service that wraps the VideoSDK initialization, room joining, and event subscription logic. This service acts as the single source of truth for video call state throughout your application.
The service should expose RxJS observables that emit when participants join or leave, when media streams change, and when the room state transitions. Angular components subscribe to these observables and update their templates reactively. This approach leverages Angular's built-in reactivity model and avoids manual change detection calls.
Token initialization happens after your Angular app receives a token from your backend token server. Never hardcode the API secret in your Angular application, as this would expose it to anyone inspecting the client-side code. Always fetch tokens from your secure backend endpoint at runtime.
Integrating the Prebuilt UI Kit
For teams that need a working video call interface quickly, the VideoSDK Prebuilt UI Kit offers a zero-code embedding path. You create a container element in your Angular component template, then initialize the Prebuilt SDK with your token, room ID, and participant name. The Prebuilt UI handles all rendering, including participant grids, active speaker detection, screen share display, and control bars.
The Prebuilt UI is customizable through configuration options. You can toggle features like chat, screen share, recording controls, and participant lists. You can also choose between speaker view and gallery view layouts. For many applications, the Prebuilt UI provides enough flexibility to ship a polished video calling experience without writing custom UI code.
Implementing Real-Time Video Features
Joining a Video Room
The room joining flow follows a clear sequence that your Angular service orchestrates end to end. First, your Angular application requests a token from your backend server, which generates it using the VideoSDK API key and secret. Next, the Angular service calls the VideoSDK SDK's room initialization method, passing the token, room ID, and participant display name. The SDK then negotiates the WebRTC connection with the VideoSDK cloud SFU, exchanging SDP offers and answers and completing ICE candidate exchange.
Once the connection is established, the SDK requests camera and microphone permissions from the browser. After the user grants permissions, the local media stream is published to the room, and remote participants' streams begin arriving as they join. Your Angular service should expose the room state as an observable so components can react to connection status changes, including connecting, connected, and disconnected states.
Managing Participants and Layouts
VideoSDK provides active speaker detection out of the box, identifying which participant is currently speaking based on audio volume analysis. Your Angular application can subscribe to this event and dynamically switch between speaker view (one large participant tile with others in a sidebar) and gallery view (equal-sized tiles for all participants).
Participant management involves tracking join and leave events, updating the participant list observable, and rendering or removing video tiles accordingly. Each participant object contains properties for their audio and video track status, display name, and role (host, co-host, or viewer). Angular components can use structural directives to conditionally render tiles based on whether a participant has their camera enabled.
For larger calls, VideoSDK supports pagination of participant tiles and bandwidth optimization strategies like streaming only visible participants' video at full resolution while reducing resolution for off-screen participants.
Adding Custom Video Tracks
VideoSDK's custom video track feature lets developers send processed or alternative video feeds alongside or instead of the camera feed. Common use cases include screen sharing, virtual backgrounds, canvas-based overlays, and custom video filters.
To implement screen sharing, your Angular service calls the VideoSDK SDK method that captures the user's display media and publishes it as a custom track to the room. Other participants receive this track and can render it in a dedicated screen share tile. Virtual backgrounds work similarly: you capture the camera stream, apply a background removal effect using a canvas or WebGL pipeline, and publish the processed stream as a custom track.
The custom track API gives you access to the raw media stream track, which you can manipulate before publishing. This flexibility is valuable for applications that need compliance watermarks, face tracking overlays, or branded video frames.
Handling Network Variability
VideoSDK's network-adaptive streaming automatically adjusts video bitrate and resolution based on real-time bandwidth conditions. When a participant's connection degrades, the SDK reduces video quality to maintain audio clarity, since audio is more critical for conversation continuity than video.
For severe bandwidth drops, VideoSDK can fall back to audio-only mode, disabling video tracks entirely while maintaining the audio connection. Your Angular application should listen for network quality events and display visual indicators to users, such as a poor connection badge or a prompt to switch to audio-only mode manually.
Best practices for Angular video chat apps include setting maximum video resolutions appropriate for your use case (720p for one-on-one calls, 360p for group calls), enabling noise suppression for clearer audio, and configuring the SDK's bandwidth estimation parameters to match your expected network conditions. The VideoSDK JavaScript SDK documentation provides detailed guidance on these configuration options.
Production Considerations
Security and Access Control
VideoSDK uses token-based authentication with JWT tokens scoped to specific rooms and participant roles. Your backend should generate tokens with the minimum required permissions for each participant. For example, a viewer in a webinar should receive a token that only allows audio listening, not screen sharing or recording control.
Role-based access control lets you define permissions per participant type. Hosts can mute others, start recordings, and manage participants. Viewers have limited capabilities. Waiting rooms add another security layer by requiring host approval before participants can join the main call.
VideoSDK supports end-to-end encryption for media streams, ensuring that even VideoSDK's servers cannot decrypt the video and audio content. This is critical for telehealth, legal consultations, and any application handling sensitive conversations.
Scaling and Performance
VideoSDK's SFU architecture scales linearly with participant count, unlike peer-to-peer mesh networks where bandwidth usage grows quadratically. For large events, VideoSDK's Interactive Live Streaming mode can handle thousands of viewers by placing them in a low-latency viewing mode while keeping active speakers in the real-time interaction layer.
TURN server configuration matters for production reliability. VideoSDK provides managed TURN servers, but if your infrastructure requires custom TURN deployment, ensure that the TURN server has sufficient bandwidth and is geographically close to your users. The WebRTC Stats project provides reference data on TURN performance across different network conditions.
Monitoring via VideoSDK analytics gives you visibility into call quality metrics, participant connection stats, and room-level health. You should integrate these analytics into your application's observability stack to catch quality degradation before users report it.
Deployment Checklist
Before deploying your Angular video chat app to production, verify the following items. Your application must be served over HTTPS, since browsers only grant camera and microphone permissions on secure origins. Configure your firewall to allow outbound traffic to VideoSDK's STUN and TURN servers on the required UDP and TCP ports. Use a CDN for your Angular application's static assets to minimize initial load time. Set up health-check endpoints on your backend token server so your infrastructure can detect and restart failed instances. Finally, test your application across Chrome, Firefox, Safari, and Edge to catch browser-specific WebRTC quirks.
Troubleshooting Common Pitfalls
Invalid token errors typically occur when the token has expired or was generated with incorrect API credentials. Always generate tokens fresh for each session and verify your API key and secret match your VideoSDK dashboard values.
ICE negotiation failures happen when participants are behind restrictive firewalls that block UDP traffic. Ensure your TURN server is configured and reachable, and verify that your firewall rules allow outbound connections to VideoSDK's media servers.
Participant disconnects can result from unstable network conditions. Implement reconnection logic in your Angular service that automatically attempts to rejoin the room when the connection drops, and display a reconnecting state to the user.
Browser compatibility issues often involve Safari's stricter autoplay policies, which require user interaction before playing video elements. Ensure your Angular components handle these cases by showing a click-to-join button rather than auto-playing remote video streams.
Quick Recap and Next Steps
You now have a complete blueprint for building an Angular video chat app with VideoSDK. The architecture separates your Angular frontend, backend token server, and VideoSDK cloud. The JavaScript SDK integrates into Angular's service and component model, with RxJS observables bridging VideoSDK events to Angular's change detection. Production deployment requires HTTPS, proper TURN configuration, and cross-browser testing.
To extend your application, consider adding in-meeting chat, participant recording, real-time transcription, or even AI voice agents using VideoSDK's AI agent capabilities. The VideoSDK documentation and code samples provide deeper guides for each of these features.
Definitions Glossary
Room: A VideoSDK meeting container that participants join to share audio and video media streams, identified by a unique room ID and managed through the REST API.
Participant: A user or AI agent connected to a VideoSDK room, with their own audio and video tracks, display name, and role-based permissions.
Meeting Token: A JWT generated server-side using your VideoSDK API key and secret, authenticating a participant's access to a specific room with scoped permissions.
SFU (Selective Forwarding Unit): A media server that receives each participant's video stream once and forwards it to all other participants, enabling scalable multi-party calls without mesh networking.
Custom Video Track: A VideoSDK feature that lets developers publish processed or alternative video feeds, such as screen shares, virtual backgrounds, or canvas overlays, alongside the standard camera stream.
Network-Adaptive Streaming: VideoSDK's automatic adjustment of video bitrate and resolution based on real-time bandwidth detection, prioritizing audio continuity over video quality on poor connections.
Key Takeaways
- VideoSDK's JavaScript SDK integrates into Angular applications through a service-based architecture, with RxJS observables bridging SDK events to Angular's reactive component model.
- The Prebuilt UI Kit enables zero-code video calling for rapid MVPs, while the custom SDK path gives full control over participant tiles, layouts, and controls.
- Token-based authentication requires a backend server to generate JWTs with your VideoSDK API secret, keeping credentials entirely server-side.
- VideoSDK's SFU architecture and network-adaptive streaming handle scaling and quality degradation automatically, reducing the infrastructure burden on Angular developers.
- Production deployment requires HTTPS, TURN server configuration, firewall rules for media traffic, and cross-browser testing for WebRTC compatibility.
Conclusion
Building an Angular video chat app with VideoSDK combines Angular's reactive component architecture with a WebRTC infrastructure that handles the hard parts of real-time media. From token authentication to network-adaptive streaming, VideoSDK abstracts the complexity that makes raw WebRTC integration painful. Whether you ship quickly with the Prebuilt UI Kit or build a fully custom interface, the JavaScript SDK gives Angular developers a clean integration surface. Start building your video chat application today by signing up at app.videosdk.live/login and exploring the VideoSDK JavaScript SDK quickstart. What are you building with VideoSDK? Drop a comment below, I would love to hear what kind of Angular video chat use case you are working on.
Free $20 Balance for AI Voice Agents & Video Calls
FAQ