Introduction to WebWormHole Technology
What is WebWormHole WebRTC?
WebWormHole is an innovative tool designed to facilitate secure and efficient peer-to-peer file transfers using WebRTC technology. Developed by Sam Whited, WebWormHole leverages the capabilities of WebRTC to create direct connections between devices, enabling seamless data sharing without relying on centralized servers.
Key Features
Peer-to-Peer File Transfer
WebWormHole establishes direct connections between peers using WebRTC, a protocol that supports real-time communication and data transfer over peer-to-peer networks. This method ensures that data is transferred directly between devices, reducing latency and enhancing security.
WebAssembly and Go
The core components of WebWormHole are built using WebAssembly and Go. WebAssembly allows the application to run at near-native speed in web browsers, while Go provides a robust and efficient backend for handling complex tasks and ensuring reliable performance.
Secure Connections with CPace
To enhance security, WebWormHole employs a Password-Authenticated Key Exchange (PAKE) mechanism known as CPace. This ensures that the exchange of session descriptions (offers and answers) is protected by a randomly generated password, preventing unauthorized access and ensuring the integrity of the data being transferred.
How It Works
WebWormHole creates ephemeral connections, or "wormholes," between devices. Users generate a one-time code to establish a connection. For example, a user can send a file by running the command
ww send <filename> and then provide the generated code to the recipient. The recipient can then use the code to receive the file by running ww receive <code>. This simple yet effective approach ensures that file transfers are both easy to perform and secure.Advantages of WebWormHole
Privacy
By using WebRTC for direct peer-to-peer connections, WebWormHole ensures that data is not stored or processed by intermediary servers, protecting user privacy and data integrity.
Cross-Platform Compatibility
WebWormHole works seamlessly across various platforms and devices, thanks to its use of WebRTC and WebAssembly, making it a versatile solution for file transfers.
Open Source
As an open-source project, WebWormHole allows developers to inspect, modify, and enhance its code, fostering a community of collaboration and continuous improvement.
In summary, WebWormHole represents a significant advancement in peer-to-peer file transfer technology, combining the strengths of WebRTC, WebAssembly, and Go to deliver a secure, efficient, and user-friendly solution.
Getting Started with WebWormHole
Creating a New WebWormHole App
To start using WebWormHole, you need to set up a new project environment. Follow these steps to create a new WebWormHole application:
Set Up Your Development Environment
- Ensure you have Go installed on your system. You can download it from the official
Go website
. - Install any necessary dependencies and tools required for WebAssembly.
Clone the WebWormHole Repository
Open your terminal and run the following command to clone the WebWormHole repository:
bash
1     git clone https://github.com/saljam/webwormhole.git
2     cd webwormhole
3
Installing Dependencies
WebWormHole relies on several dependencies that need to be installed. Here’s how to set them up:
Install Go Dependencies
Navigate to the project directory and run the following command to install the necessary Go packages:
bash
1     go install webwormhole.io/cmd/ww@latest
2
This command installs the
ww command-line tool, which is essential for running WebWormHole.Compile WebAssembly Files
WebWormHole uses WebAssembly for part of its functionality. Compile these files by running:
bash
1     make wasm
2
Ensure that the
wasm files are correctly generated in the project directory.Project Structure
Understanding the structure of a WebWormHole project is crucial for effective development. The main components include:
- cmd/: Contains the command-line tools for WebWormHole.
- web/: Includes the web-based components and frontend code.
- wormhole/: Houses the core logic for establishing and managing WebRTC connections.
- Dockerfile: Used for containerizing the application.
- Makefile: Contains build scripts for compiling WebAssembly and other tasks.
App Architecture
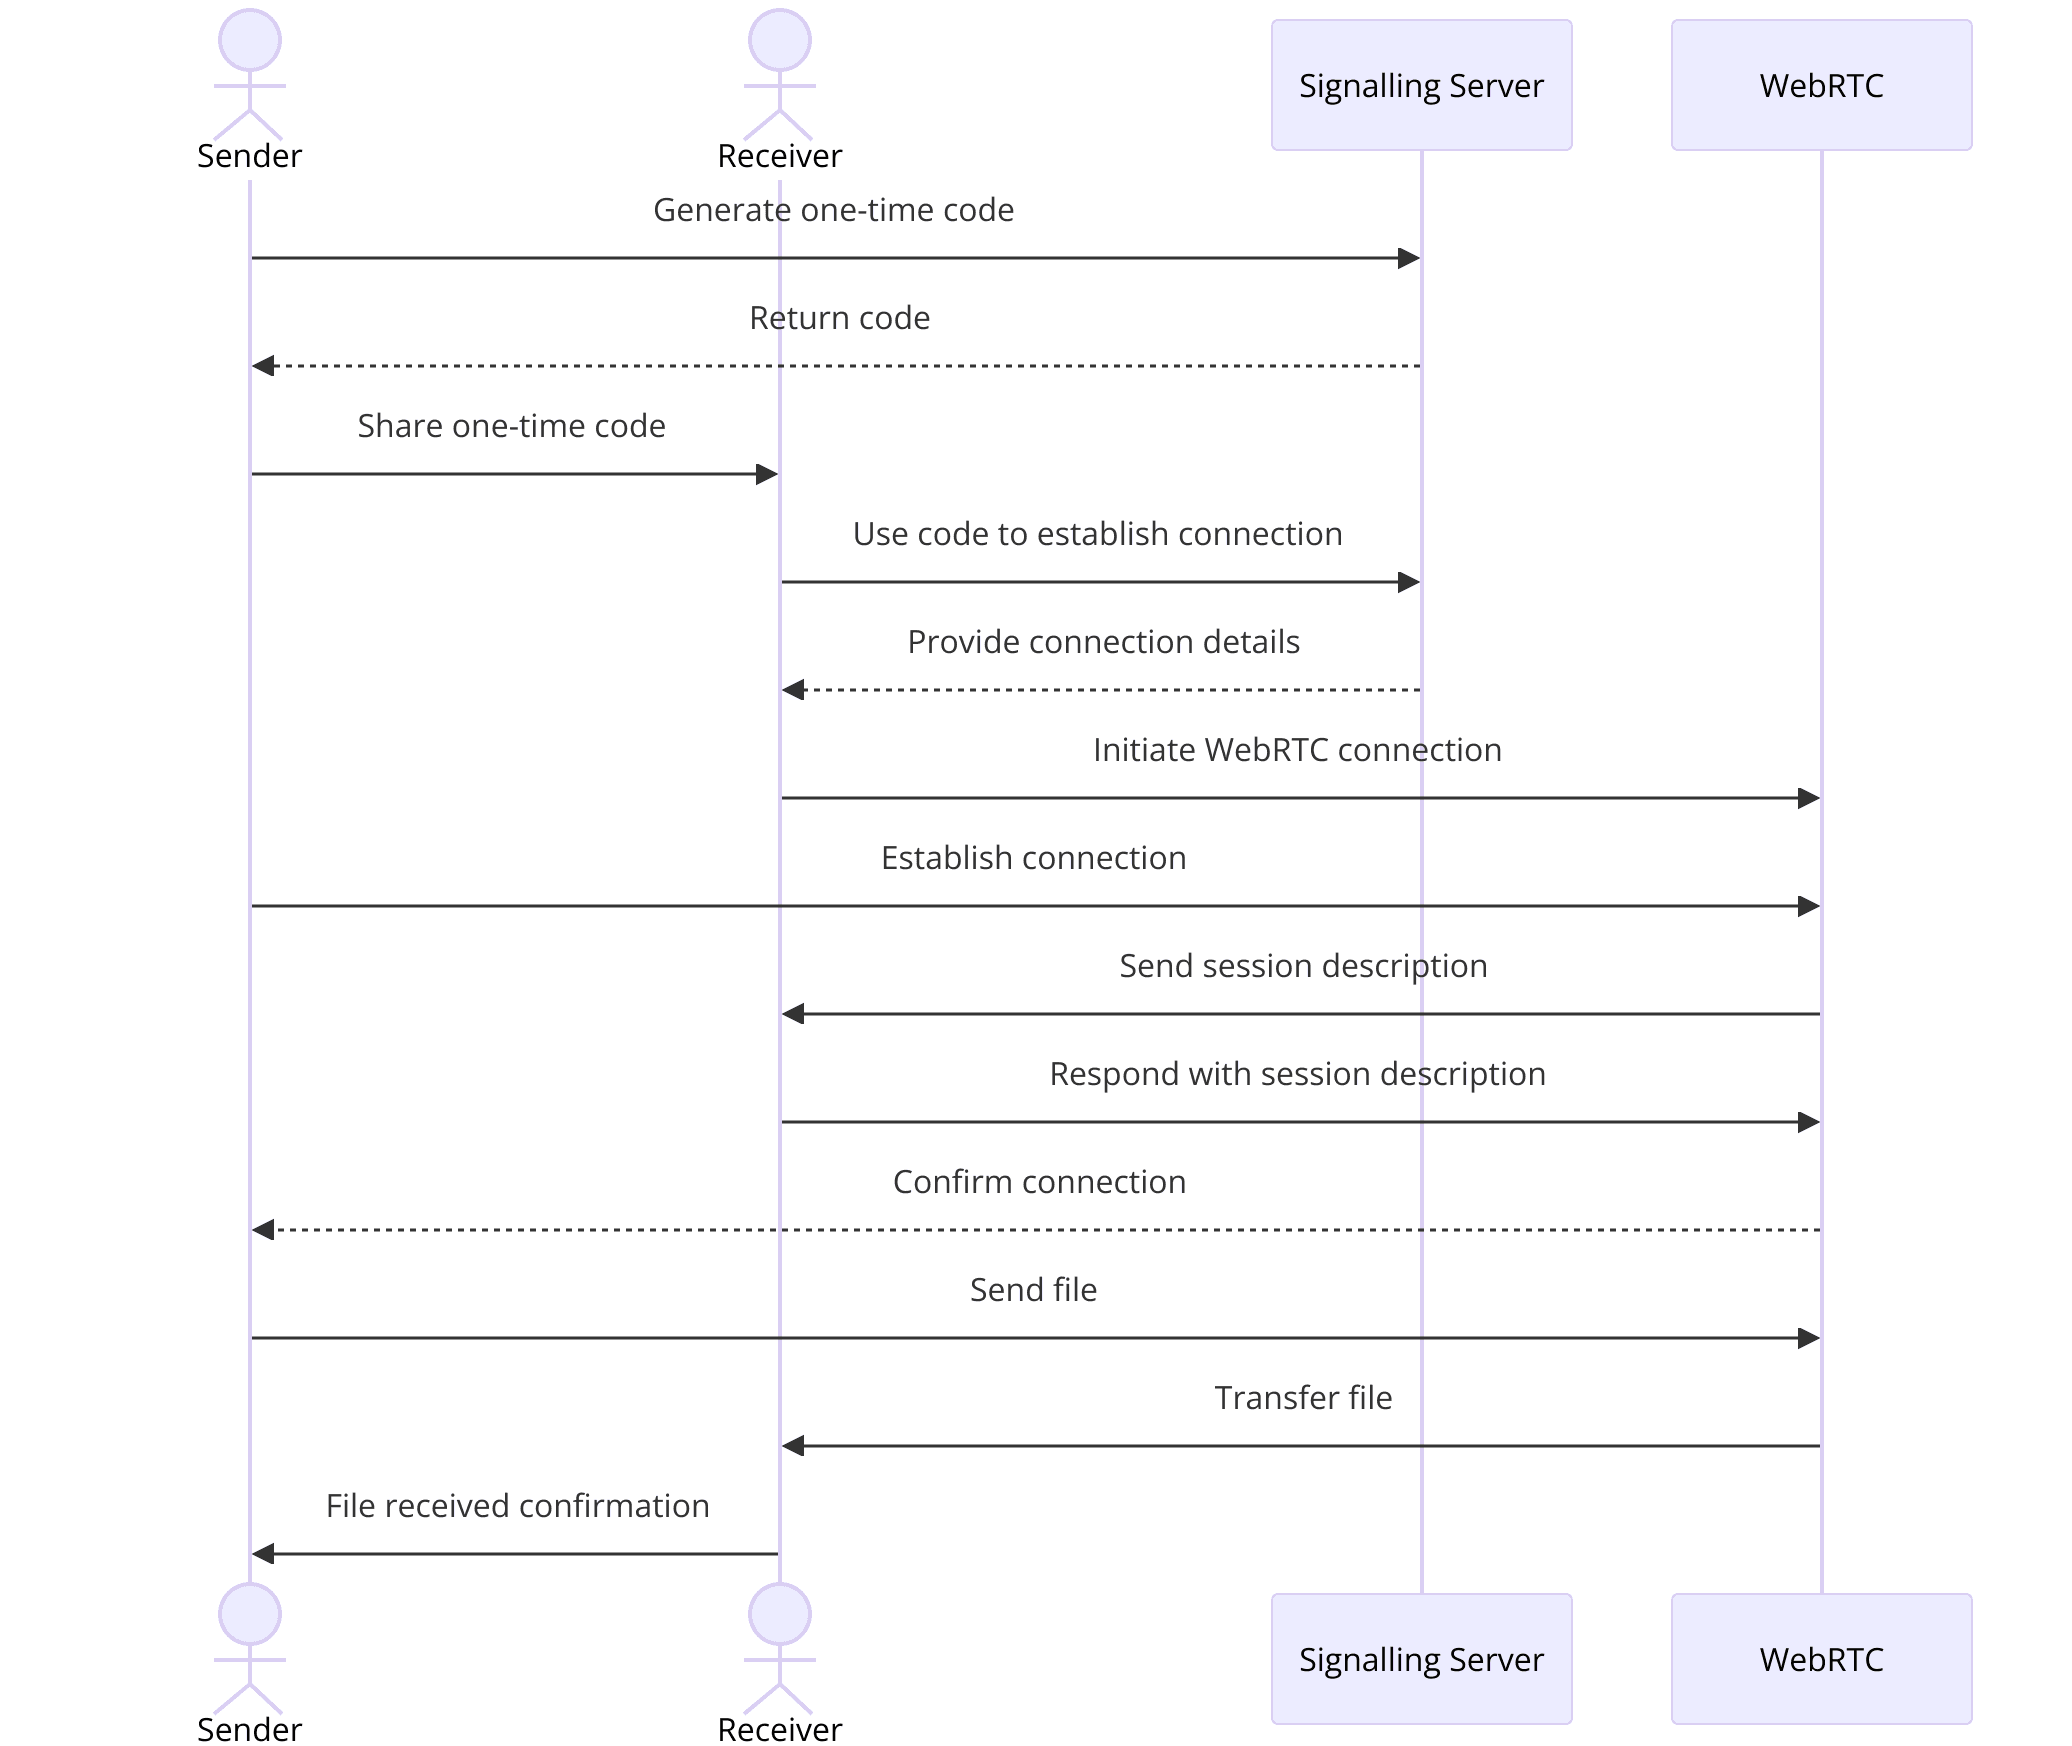
Signalling Server
- Acts as a mediator to exchange session descriptions (offers and answers) between peers.
- Uses a password-authenticated key exchange (PAKE) to secure the connection setup.
WebRTC Data Channels
- Facilitate direct file transfer between peers without routing through a server.
- Ensure low latency and high transfer speeds.
WebAssembly Module
- Provides a performance boost by running critical code directly in the browser.
- Ensures cross-platform compatibility, allowing the application to run on different operating systems and devices.
By understanding the project structure and architecture, you can effectively navigate and modify the WebWormHole codebase to suit your specific needs. In the following sections, we will delve deeper into each step of setting up and running your WebWormHole application.
Example Commands and Tips
Here are a few essential commands and tips to get you started:
Run the Signalling Server
bash
1  ww server -http=localhost:8000
2
Send a File
bash
1  ww send myfile.txt
2
Receive a File
bash
1  ww receive <one-time-code>
2
These commands will help you perform basic operations with WebWormHole, ensuring a smooth start to your development journey.
Step 1: Setting Up the Signalling Server
Introduction to Signalling Servers
In the context of WebRTC, a signalling server is essential for setting up and managing the initial connection between peers. It handles the exchange of connection information, such as session descriptions and network data, enabling peers to locate each other and establish a direct communication link. While the actual data transfer happens peer-to-peer, the signalling server facilitates the initial handshake process.
Configuring the Server
To set up a signalling server for WebWormHole, follow these detailed steps:
[a] Install Dependencies
Ensure you have the necessary dependencies installed. You will need Go and some WebAssembly tools:
bash
1   go install webwormhole.io/cmd/ww@latest
2
[b] Compile WebAssembly Files
Compile the WebAssembly files required for the server. This step ensures that the server can handle WebAssembly code efficiently:
bash
1   make wasm
2
[c] Server Configuration
Configure the server by setting up the necessary environment variables and configurations. Here is an example configuration:
bash
1   ww server -http=localhost:8000
2
Running the Server
Once you have configured the server, you can start it using the following commands:
[a] Start the Server
Run the server on your local machine to facilitate the signalling process:
bash
1   ww server -http=localhost:8000
2
This command starts the server on port 8000, making it accessible via
http://localhost:8000.[b] Server Output
Upon starting the server, you should see output similar to this:
1   2023/06/11 12:34:56 Starting WebWormHole signalling server
2   2023/06/11 12:34:56 Listening on http://localhost:8000
3
[c] Testing the Server
Open a web browser and navigate to
http://localhost:8000 to verify that the server is running correctly. You should see the WebWormHole interface, indicating that the server is ready to handle connection requests.Example Code Snippets
Here are some example code snippets for setting up and running the signalling server:
[a] Installing Dependencies
bash
1  go install webwormhole.io/cmd/ww@latest
2
[b] Compiling WebAssembly Files
bash
1  make wasm
2
[c] Starting the Server
bash
1  ww server -http=localhost:8000
2
Expected Outputs
When running the server, you can expect outputs that confirm the server is listening for connections. For example:
12023/06/11 12:34:56 Starting WebWormHole signalling server
22023/06/11 12:34:56 Listening on http://localhost:8000
3
This indicates that the signalling server is operational and ready to facilitate WebRTC connections.
Additional Tips
- Security Considerations: Ensure that your server setup follows best practices for security. Use HTTPS for secure communication and consider additional measures to protect against potential threats.
- Troubleshooting: If you encounter issues while setting up the server, check the server logs for error messages. Common issues include incorrect configurations or missing dependencies.
By following these steps, you will have a fully functional signalling server for WebWormHole, enabling secure and efficient peer-to-peer file transfers using WebRTC.
Step 2: Implementing the Client Interface
Designing the Client UI
Creating a user-friendly interface is crucial for any application, and WebWormHole is no exception. The client UI allows users to interact with the application, initiate file transfers, and monitor the progress of these transfers. Here are the steps to design an effective client interface for WebWormHole:
[a] Choosing the Framework
WebWormHole’s frontend can be built using popular web frameworks like React, Vue.js, or Angular. For simplicity and performance, React is a good choice due to its component-based architecture and widespread use.
Install React by running:
bash
1     npx create-react-app webwormhole-client
2     cd webwormhole-client
3
[b] Basic Layout
The client UI should have a simple layout with clear sections for sending and receiving files. Use a clean and minimalistic design to enhance usability.
Create a basic layout with two main sections: "Send File" and "Receive File".
[c] Styling
Use CSS or a CSS-in-JS library like styled-components to style your components. Ensure that the interface is responsive and looks good on both desktop and mobile devices.
Developing the Client Side Code
To build the client-side functionality, follow these steps:
[a] Setting Up Components
Create components for different parts of the application, such as
SendFile, ReceiveFile, and FileTransferStatus.Example structure:
JSX
1     // src/components/SendFile.js
2     import React, { useState } from 'react';
3
4     const SendFile = () => {
5       const [file, setFile] = useState(null);
6
7       const handleFileChange = (event) => {
8         setFile(event.target.files[0]);
9       };
10
11       const handleSend = () => {
12         // Logic to send the file using WebWormHole
13       };
14
15       return (
16         <div>
17           <h2>Send File</h2>
18           <input type="file" onChange={handleFileChange} />
19           <button onClick={handleSend}>Send</button>
20         </div>
21       );
22     };
23
24     export default SendFile;
25
[b] Implementing State Management
Use React’s state management to handle the state of the application. For complex state management, consider using Redux or the Context API.
Example of managing state for file transfer status:
JSX
1     // src/App.js
2     import React, { useState } from 'react';
3     import SendFile from './components/SendFile';
4     import ReceiveFile from './components/ReceiveFile';
5
6     const App = () => {
7       const [status, setStatus] = useState('');
8
9       return (
10         <div>
11           <h1>WebWormHole</h1>
12           <SendFile setStatus={setStatus} />
13           <ReceiveFile setStatus={setStatus} />
14           <p>{status}</p>
15         </div>
16       );
17     };
18
19     export default App;
20
Handling File Transfers
Integrate the file transfer logic using WebRTC data channels. Ensure that the file is read as a binary blob and sent over the data channel.
Example code for handling file send:
JSX
1     // src/components/SendFile.js
2     const handleSend = async () => {
3       if (file) {
4         const connection = new RTCPeerConnection();
5         const dataChannel = connection.createDataChannel('fileTransfer');
6
7         dataChannel.onopen = () => {
8           const reader = new FileReader();
9           reader.onload = (event) => {
10             dataChannel.send(event.target.result);
11             setStatus('File sent successfully');
12           };
13           reader.readAsArrayBuffer(file);
14         };
15
16         // More code to handle WebRTC connection setup
17       }
18     };
19
Integrating WebRTC
To enable peer-to-peer file transfers, integrate WebRTC into your client-side code:
- Creating the Peer Connection: Initialize the RTCPeerConnection and handle the creation of offer and answer for the WebRTC connection.
- Example:
JSX
1   const createPeerConnection = () => {
2     const connection = new RTCPeerConnection();
3
4     // Add handlers for ICE candidates and connection state
5     connection.onicecandidate = (event) => {
6       if (event.candidate) {
7         // Send the ICE candidate to the peer
8       }
9     };
10
11     connection.onconnectionstatechange = () => {
12       if (connection.connectionState === 'connected') {
13         setStatus('Connected to peer');
14       }
15     };
16
17     return connection;
18   };
19
Exchanging ICE Candidates
Use the signalling server to exchange ICE candidates between peers. This step ensures that the peers can find the most efficient path for direct communication.
- Example:
JSX
1     connection.onicecandidate = (event) => {
2       if (event.candidate) {
3         // Send the candidate to the peer via the signalling server
4       }
5     };
6
Establishing the Data Channel
Create and manage the data channel for file transfer.
- Example:
JSX
1     const dataChannel = connection.createDataChannel('fileTransfer');
2
3     dataChannel.onopen = () => {
4       setStatus('Data channel open');
5     };
6
7     dataChannel.onmessage = (event) => {
8       // Handle received file data
9     };
10
By following these steps, you will have a fully functional client interface for WebWormHole, enabling secure and efficient file transfers using WebRTC. This setup ensures a smooth user experience and leverages the power of peer-to-peer communication.
Step 3: Implementing File Transfer
Setting Up Data Channels
WebRTC’s data channels are a powerful feature that allows for direct, peer-to-peer communication between devices. In the context of WebWormHole, these data channels are used to facilitate the transfer of files. Here’s how to set them up:
Creating the Data Channel
When establishing a WebRTC connection, you can create a data channel to handle the file transfer.
- Example code to create a data channel:
JavaScript
1     const peerConnection = new RTCPeerConnection();
2     const dataChannel = peerConnection.createDataChannel('fileTransfer');
3
4     dataChannel.onopen = () => {
5       console.log('Data channel is open');
6     };
7
8     dataChannel.onclose = () => {
9       console.log('Data channel is closed');
10     };
11
Handling Data Channel Events
You need to handle various events such as
onopen, onmessage, and onclose to manage the data transfer process.- Example:
JavaScript
1     dataChannel.onmessage = (event) => {
2       console.log('Received message:', event.data);
3       // Handle the received data (e.g., save to file)
4     };
5
Handling File Transfer
Once the data channel is established, you can start transferring files between peers. This involves reading the file data, sending it over the data channel, and ensuring it is properly received on the other side.
Sending a File
Read the file as an ArrayBuffer and send it over the data channel.
- Example code to send a file:
JavaScript
1     const sendFile = (file) => {
2       const reader = new FileReader();
3       reader.onload = (event) => {
4         dataChannel.send(event.target.result);
5         console.log('File sent:', file.name);
6       };
7       reader.readAsArrayBuffer(file);
8     };
9
Receiving a File
On the receiving side, handle incoming data and reconstruct the file.
- Example code to receive and save a file:
JavaScript
1     dataChannel.onmessage = (event) => {
2       const receivedBuffer = event.data;
3       const blob = new Blob([receivedBuffer]);
4       const url = URL.createObjectURL(blob);
5       const link = document.createElement('a');
6       link.href = url;
7       link.download = 'receivedFile';
8       document.body.appendChild(link);
9       link.click();
10       document.body.removeChild(link);
11       console.log('File received and saved');
12     };
13
Error Handling and Debugging
Handling errors and debugging is crucial to ensure a smooth file transfer experience. Here are some tips:
Error Handling
Implement robust error handling for file reading and WebRTC events.
- Example:
JavaScript
1     dataChannel.onerror = (error) => {
2       console.error('Data channel error:', error);
3     };
4
Debugging Tips
Use console logs to trace the file transfer process. Monitor the state of the RTCPeerConnection and the data channel to catch issues early.
- Example:
JavaScript
1     peerConnection.onconnectionstatechange = () => {
2       console.log('Connection state:', peerConnection.connectionState);
3     };
4
5     dataChannel.onclose = () => {
6       console.log('Data channel closed');
7     };
8
Additional Considerations
- Large File Transfers: For large files, consider splitting the file into chunks and sending them sequentially. This can help manage memory usage and ensure reliable transfer.
- Security: Ensure that the data being transferred is encrypted. WebRTC’s DTLS-SRTP protocol provides encryption for data channels, but it’s good practice to verify the implementation and consider additional layers of encryption if necessary.
By following these steps, you can implement a robust file transfer mechanism in your WebWormHole application, leveraging the power of WebRTC data channels for secure and efficient peer-to-peer communication.
Step 4: Adding Security Features
Introduction to PAKE and CPace
To ensure secure file transfers, WebWormHole uses a Password-Authenticated Key Exchange (PAKE) mechanism called CPace. PAKE protocols allow two parties to establish a secure communication channel based on a shared password without revealing the password itself. CPace, in particular, is a strong PAKE that provides robust security with minimal computational overhead, making it suitable for applications like WebWormHole where efficiency and security are paramount.
Implementing Security Protocols
Implementing CPace in WebWormHole involves several steps to ensure that the exchange of session descriptions (offers and answers) is secure. Here’s a detailed guide to implementing these security protocols:
[a] Setting Up CPace
CPace requires generating a random password and using it to authenticate the exchange of WebRTC session descriptions. This password is used to derive a key that encrypts the session descriptions.
- Example code for generating a password:
Go
1     import (
2       "crypto/rand"
3       "encoding/base64"
4     )
5
6     func generatePassword() (string, error) {
7       password := make([]byte, 16)
8       _, err := rand.Read(password)
9       if err != nil {
10         return "", err
11       }
12       return base64.StdEncoding.EncodeToString(password), nil
13     }
14
[b] Integrating CPace with WebRTC
Use the generated password to derive a shared key and encrypt the session descriptions before exchanging them through the signalling server.
- Example of encrypting a session description:
Go
1     import (
2       "crypto/aes"
3       "crypto/cipher"
4       "crypto/sha256"
5     )
6
7     func encryptSessionDescription(desc string, password string) (string, error) {
8       key := sha256.Sum256([]byte(password))
9       block, err := aes.NewCipher(key[:])
10       if err != nil {
11         return "", err
12       }
13       gcm, err := cipher.NewGCM(block)
14       if err != nil {
15         return "", err
16       }
17       nonce := make([]byte, gcm.NonceSize())
18       _, err = rand.Read(nonce)
19       if err != nil {
20         return "", err
21       }
22       ciphertext := gcm.Seal(nonce, nonce, []byte(desc), nil)
23       return base64.StdEncoding.EncodeToString(ciphertext), nil
24     }
25
[c] Exchanging Encrypted Session Descriptions
When peers exchange session descriptions through the signalling server, they should send the encrypted versions. Upon receiving, they decrypt using the shared password-derived key.
- Example of decrypting a session description:
Go
1     func decryptSessionDescription(encryptedDesc string, password string) (string, error) {
2       key := sha256.Sum256([]byte(password))
3       block, err := aes.NewCipher(key[:])
4       if err != nil {
5         return "", err
6       }
7       gcm, err := cipher.NewGCM(block)
8       if err != nil {
9         return "", err
10       }
11       data, err := base64.StdEncoding.DecodeString(encryptedDesc)
12       if err != nil {
13         return "", err
14       }
15       nonceSize := gcm.NonceSize()
16       nonce, ciphertext := data[:nonceSize], data[nonceSize:]
17       plaintext, err := gcm.Open(nil, nonce, ciphertext, nil)
18       if err != nil {
19         return "", err
20       }
21       return string(plaintext), nil
22     }
23
Testing Security
To ensure that the implemented security features work correctly, thorough testing is essential. Here are some steps to test the security features:
Unit Testing
Write unit tests for the encryption and decryption functions to ensure they work as expected with various inputs.
- Example unit test in Go:
Go
1     func TestEncryptionDecryption(t *testing.T) {
2       password := "testpassword"
3       sessionDesc := "v=0\r\no=- 123456 2 IN IP4 127.0.0.1\r\ns=-\r\n"
4
5       encryptedDesc, err := encryptSessionDescription(sessionDesc, password)
6       if err != nil {
7         t.Fatalf("Encryption failed: %v", err)
8       }
9
10       decryptedDesc, err := decryptSessionDescription(encryptedDesc, password)
11       if err != nil {
12         t.Fatalf("Decryption failed: %v", err)
13       }
14
15       if decryptedDesc != sessionDesc {
16         t.Fatalf("Expected %v but got %v", sessionDesc, decryptedDesc)
17       }
18     }
19
Integration Testing
- Test the entire workflow by setting up two peers and verifying that they can securely exchange session descriptions and establish a WebRTC connection.
- Check that the encrypted data cannot be intercepted and read by unauthorized parties.
Security Audits
- Conduct regular security audits of the code to identify and fix potential vulnerabilities.
- Use tools like static code analyzers and conduct peer reviews to ensure the robustness of the security features.
By implementing and thoroughly testing these security protocols, you can ensure that WebWormHole provides a secure environment for peer-to-peer file transfers, protecting user data from unauthorized access and ensuring privacy.
Step 5: Running the Complete Application
Compiling and Running the Application
After implementing the signalling server, client interface, and security protocols, it's time to compile and run the complete WebWormHole application. Here are the steps to achieve this:
[a] Compile the Project
- Ensure all dependencies are installed and WebAssembly files are compiled as described in previous sections.
- In the project root directory, run the following commands:
bash
1     go build -o webwormhole
2
[b] Start the Signalling Server
- Start the signalling server to facilitate the WebRTC connections.
- Run the server using:
bash
1     ./webwormhole server -http=localhost:8000
2
[c] Run the Client Application
- If you are using a React application for the client interface, start the React development server.
- Navigate to the
webwormhole-clientdirectory and run:
bash
1     npm start
2- This will start the React application, and you can access it via
http://localhost:3000.
Testing the Application
To ensure everything is working correctly, perform thorough testing on different devices and browsers:
Local Testing
- Open the client application in a web browser and test sending and receiving files.
- Verify that the connection is established, files are transferred successfully, and the status messages are displayed correctly.
Cross-Device Testing
- Test the application on different devices (e.g., laptops, smartphones, tablets) to ensure compatibility and responsiveness.
- Check that the file transfer works seamlessly across different operating systems and browser versions.
Network Testing
- Test the application in different network conditions (e.g., Wi-Fi, mobile data) to ensure robust performance.
- Verify that the WebRTC connection handles NAT traversal and peer discovery effectively.
Common Issues and Fixes
Connection Issues
- If peers cannot establish a connection, check the signalling server logs for errors. Common issues include misconfigured server settings or network restrictions.
- Ensure that the ICE candidates are exchanged correctly and that both peers can reach the signalling server.
File Transfer Failures
- If file transfers fail, check the data channel state and the file reading/writing logic. Ensure that the data is being correctly read as an ArrayBuffer and sent over the data channel.
- Debug using console logs to trace the data transfer process and identify where it fails.
Security Warnings
- If there are security warnings or errors, verify that the CPace implementation is correct and that the session descriptions are properly encrypted and decrypted.
- Ensure that the password generation and key derivation processes are secure and free of vulnerabilities.
Example Commands and Expected Outputs
Start the Server
bash
1   ./webwormhole server -http=localhost:8000
2
Expected output:
1   2023/06/11 12:34:56 Starting WebWormHole signalling server
2   2023/06/11 12:34:56 Listening on http://localhost:8000
3
Send a File
JavaScript
1   // In the client application
2   const file = document.querySelector('input[type="file"]').files[0];
3   sendFile(file);
4
Expected output (console log):
1   Data channel is open
2   File sent: myfile.txt
3
Receive a File
JavaScript
1   dataChannel.onmessage = (event) => {
2     const receivedBuffer = event.data;
3     const blob = new Blob([receivedBuffer]);
4     const url = URL.createObjectURL(blob);
5     const link = document.createElement('a');
6     link.href = url;
7     link.download = 'receivedFile';
8     document.body.appendChild(link);
9     link.click();
10     document.body.removeChild(link);
11     console.log('File received and saved');
12   };
13
Expected output (console log):
1   File received and saved
2
By following these steps, you can compile, run, and test your complete WebWormHole application, ensuring it functions correctly and securely across various environments and conditions.
Conclusion
WebWormHole is a cutting-edge tool designed to facilitate secure, peer-to-peer file transfers using WebRTC technology. It combines the strengths of WebAssembly and Go to deliver high performance and cross-platform compatibility. By leveraging CPace for secure key exchange, WebWormHole ensures that all data transfers are encrypted and protected from unauthorized access. The application’s design emphasizes simplicity and efficiency, making it an ideal choice for users who need reliable and private file-sharing capabilities without the need for central servers.
Want to level-up your learning? Subscribe now
Subscribe to our newsletter for more tech based insights
FAQ