Introduction to ShareDrop WebRTC Technology
What is ShareDrop?
ShareDrop is an innovative, open-source web application designed to facilitate seamless peer-to-peer (P2P) file sharing, functioning as a robust alternative to Apple's AirDrop. Utilizing the power of WebRTC (Web Real-Time Communication), ShareDrop enables users to transfer files directly between devices over the internet without needing a centralized server to relay the data. This approach not only ensures faster file transfer speeds but also enhances privacy by eliminating the need for intermediaries.
ShareDrop was developed by Szymon Nowak and is hosted on GitHub, allowing developers and enthusiasts to explore, modify, and contribute to its ongoing improvement. The application supports various devices and operating systems, including desktops, laptops, tablets, and smartphones, provided they run a modern web browser that supports WebRTC, such as Google Chrome, Mozilla Firefox, or Microsoft Edge.
The Power of WebRTC
WebRTC is a free, open-source project that provides web applications and sites with real-time communication capabilities via simple application programming interfaces (APIs). By enabling direct media (audio, video) and data sharing between browsers and mobile applications, WebRTC revolutionizes the way users interact over the web. It is designed to work peer-to-peer, making it ideal for applications such as video conferencing, voice calls, and file sharing.
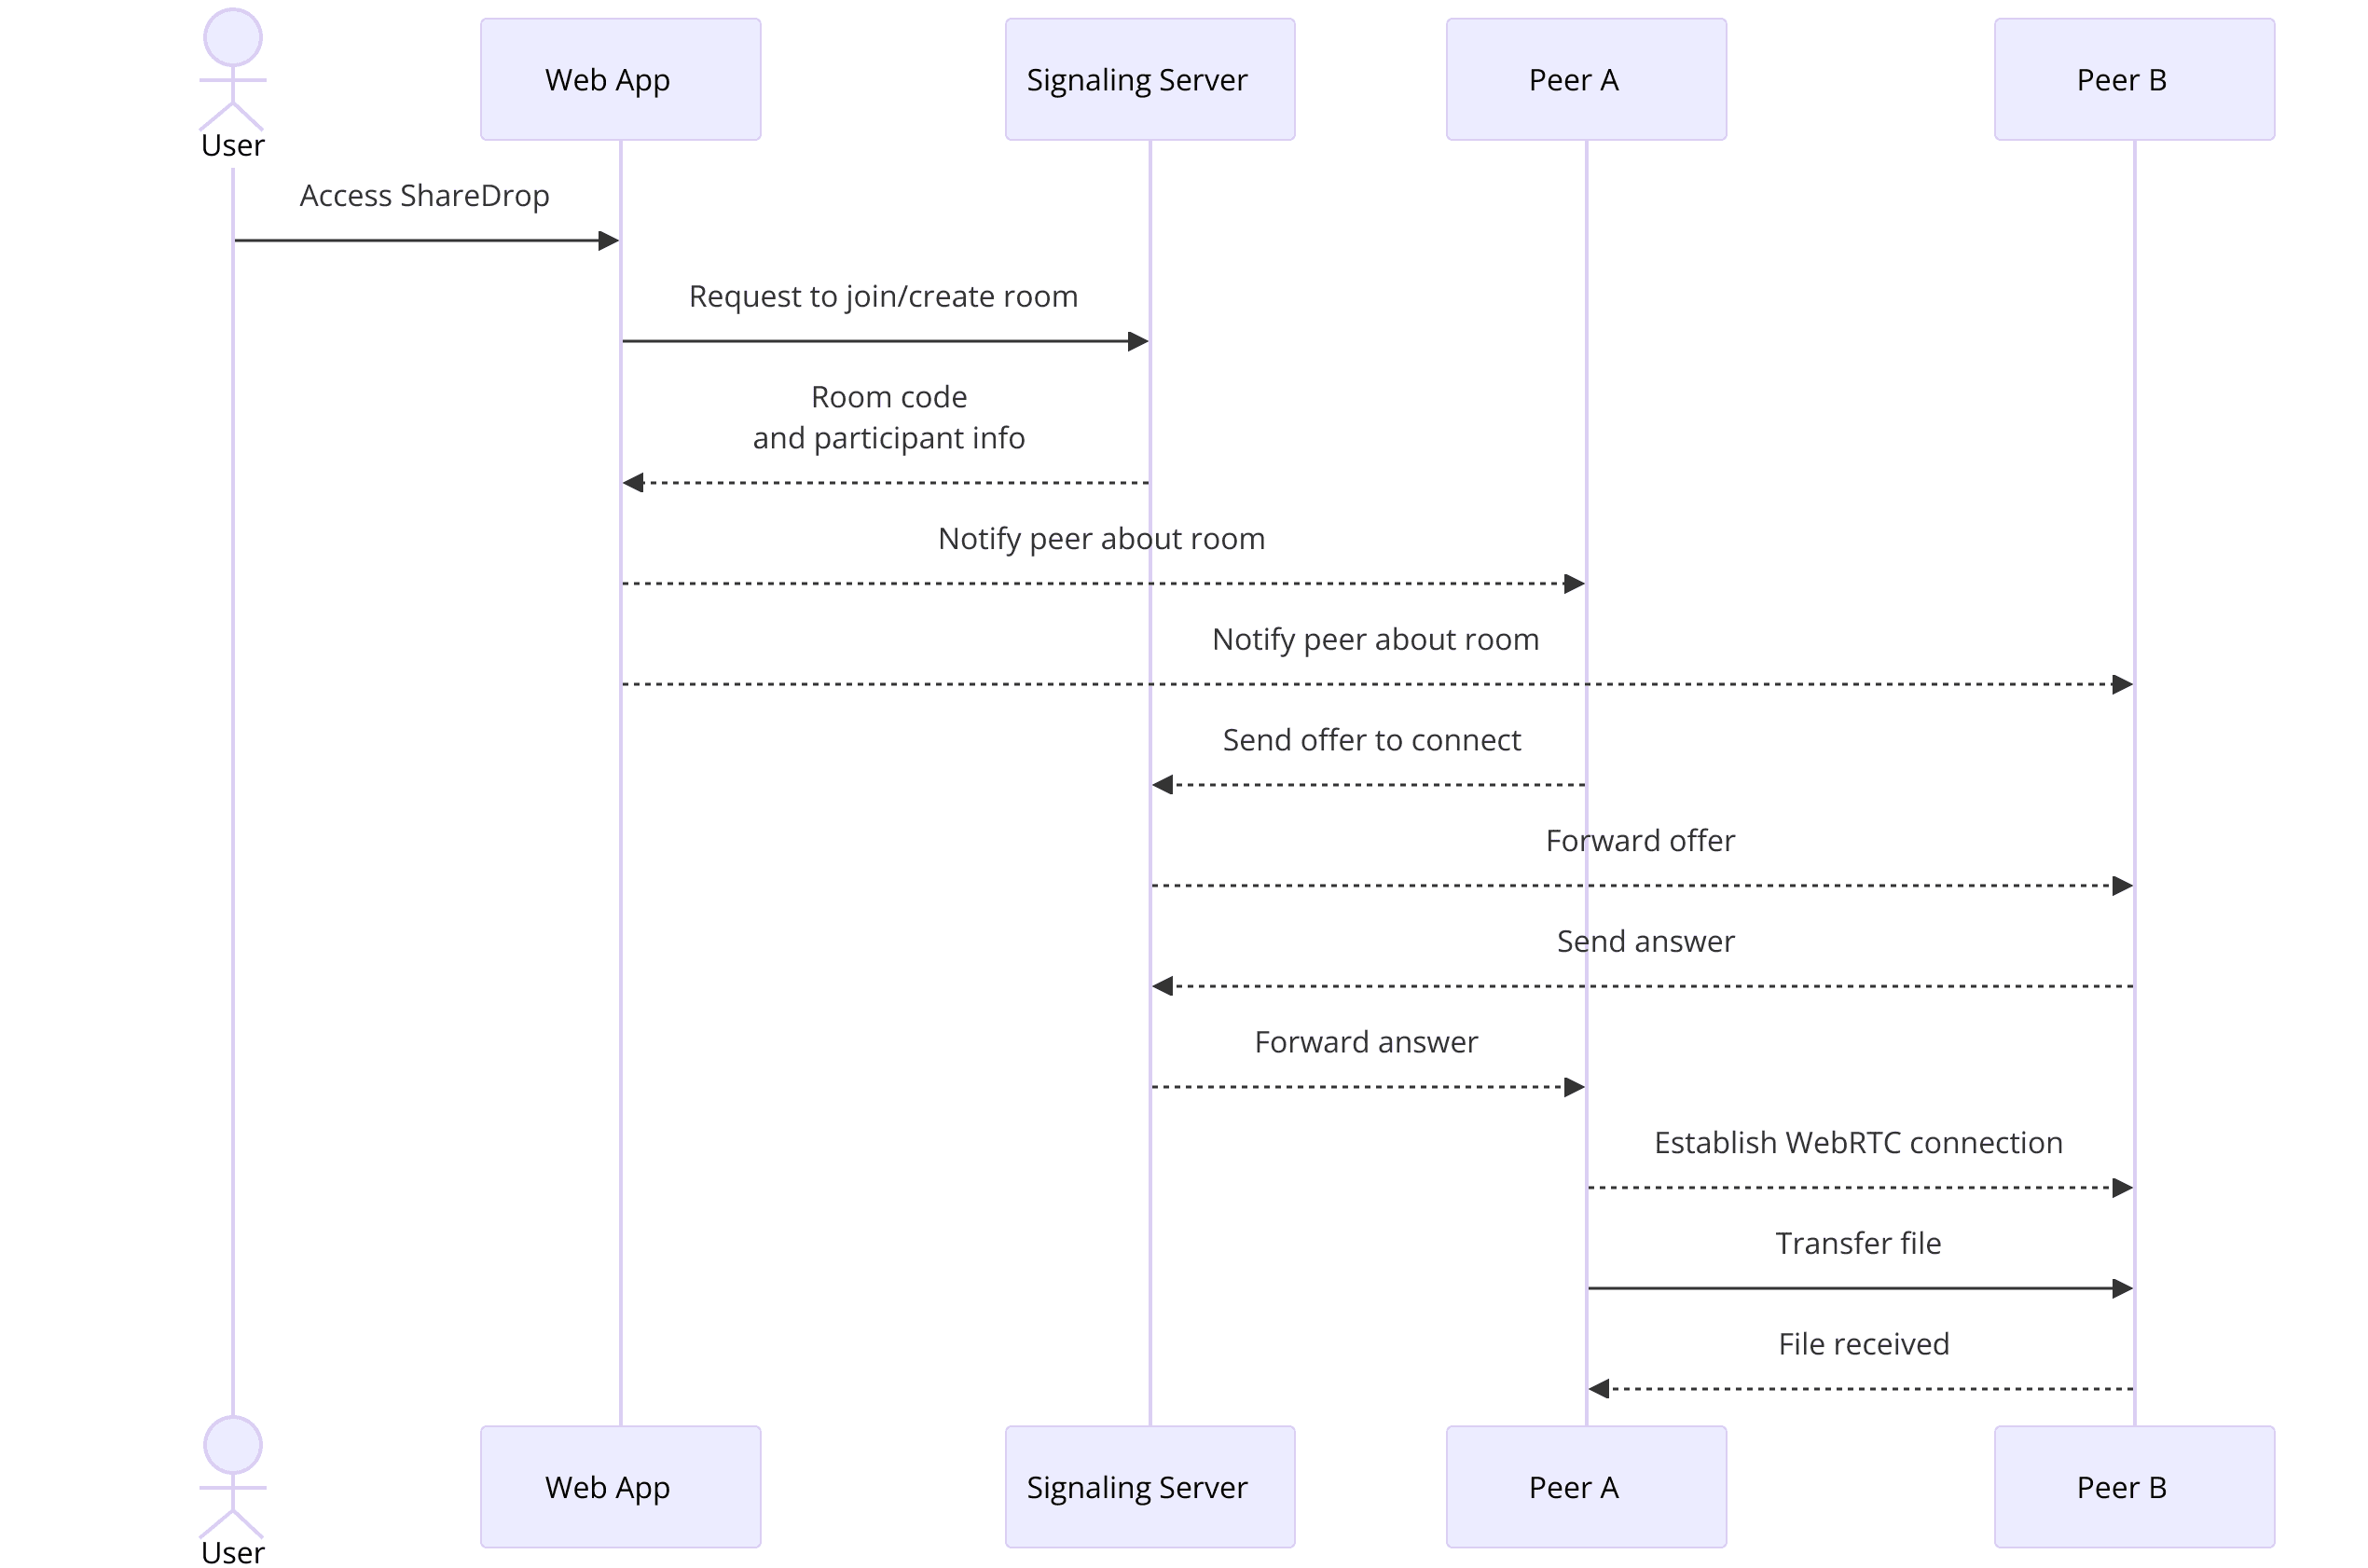
ShareDrop leverages WebRTC to establish direct connections between users who want to share files. When a user initiates a file transfer, WebRTC handles the heavy lifting by negotiating the connection and managing the data transfer directly between the two devices. This P2P architecture ensures that the file transfer is fast, secure, and efficient.
A Brief History and Development of ShareDrop
ShareDrop was created to provide a simple, intuitive, and efficient solution for file sharing without relying on cloud services or complicated setups. It was inspired by Apple's AirDrop but designed to be platform-independent and accessible via any modern web browser. By utilizing WebRTC, ShareDrop avoids the pitfalls of traditional file sharing methods that often involve third-party servers, thus enhancing security and privacy.
Since its inception, ShareDrop has garnered significant attention and appreciation within the developer community. Its open-source nature encourages collaboration, allowing developers to contribute to its growth, fix bugs, and implement new features. The project's GitHub repository is a testament to its collaborative spirit, with numerous contributors and a wealth of documentation to help new users get started.
In summary, ShareDrop represents the future of file sharing, combining the strengths of WebRTC with the convenience of a web-based application. Its open-source framework and community-driven development ensure that it continues to evolve, providing users with a reliable and efficient tool for their file sharing needs.
Getting Started with the Code
Create a New ShareDrop App
Creating a new ShareDrop application begins with setting up your development environment and acquiring the necessary resources from the GitHub repository. This section will guide you through the initial setup, installation of dependencies, understanding the project structure, and the overall architecture of the ShareDrop app.
Install ShareDrop
To start developing with ShareDrop, you first need to clone the repository from GitHub and install the required dependencies. Follow these steps:
[a] Clone the Repository
Open your terminal or command prompt and run the following command to clone the ShareDrop repository:
sh
1   git clone https://github.com/szimek/sharedrop.git
2
This command creates a local copy of the ShareDrop repository on your machine.
[b] Navigate to the Project Directory
Change your working directory to the newly cloned repository:
sh
1   cd sharedrop
2
[c] Install Dependencies
Install the required dependencies using npm (Node Package Manager). Ensure you have Node.js installed on your machine. Run the following command:
sh
1   npm install
2
This command installs all the necessary packages listed in the
package.json file.Structure of the Project
Understanding the structure of the ShareDrop project is crucial for efficient development and customization. Here is an overview of the main directories and files:
src/: Contains the source code for the application.components/: Reusable React components.services/: Services that handle WebRTC connections and file transfers.styles/: CSS and styling files.utils/: Utility functions used across the application.
public/: Static files served by the application.package.json: Lists the project dependencies and scripts.webpack.config.js: Configuration file for Webpack, which is used to bundle the application.
App Architecture
React Components
The application is built using React, a popular JavaScript library for building user interfaces. Components are used to create the various parts of the UI, such as the file upload button, the list of connected peers, and the status messages.
WebRTC Integration
WebRTC handles the peer-to-peer connections and data transfer. The services in the
src/services/ directory manage the WebRTC connections, including setting up the signaling process, managing peer connections, and handling data channels for file transfers.File Sharing Logic
The core file sharing functionality is implemented in the WebRTC services. When a user selects a file to share, the service establishes a WebRTC connection with the recipient and sends the file data through a data channel.
State Management
React's state management system is used to keep track of the application's state, including the list of connected peers, the status of file transfers, and any error messages.
By understanding the project structure and architecture, you can more easily navigate the codebase and make modifications to suit your specific needs. Whether you’re adding new features, fixing bugs, or simply exploring how ShareDrop works, this foundational knowledge will be invaluable.
In the next sections, we will delve into specific steps for setting up the environment, creating the UI wireframe, and implementing various features of the ShareDrop application.
Step 1: Setting Up the Environment
Get Started with the Environment Setup
To build your ShareDrop application, you need to set up the development environment properly. This involves configuring Node.js, managing dependencies, and setting up any required environment variables. Follow these steps to ensure a smooth setup:
Install Node.js and npm
If you haven't already, download and install Node.js from the
official Node.js website
. This installation includes npm, the Node Package Manager, which you will use to manage project dependencies.Clone the ShareDrop Repository
Open your terminal or command prompt and clone the ShareDrop repository from GitHub:
sh
1   git clone https://github.com/szimek/sharedrop.git
2
This command creates a local copy of the ShareDrop project on your machine. Navigate into the project directory:
sh
1   cd sharedrop
2
Install Project Dependencies
With npm, install the necessary dependencies listed in the
package.json file. Run the following command in your terminal:sh
1   npm install
2
This command will download and install all the required packages for the project, ensuring that your development environment has all the necessary tools and libraries.
Set Up Environment Variables
Depending on the specific requirements of your project or any customizations you plan to make, you may need to configure environment variables. For ShareDrop, create a
.env file in the root directory of the project and define any necessary variables. Here’s an example of what your .env file might look like:1 PORT=3000
2This file sets the port on which your development server will run.
Start the Development Server
With everything set up, you can now start the development server to see ShareDrop in action. Use the following command to start the server:
sh
1   npm start
2
This command runs the
server.js file and starts the application. By default, the server will run on http://localhost:3000. Open your web browser and navigate to this URL to access your local instance of ShareDrop.Configuring the Server
The
server.js file is crucial for setting up the WebSocket server, which is used for signaling between peers. Here’s a simplified version of the server setup:JavaScript
1const express = require('express');
2const http = require('http');
3const WebSocket = require('ws');
4
5const app = express();
6const server = http.createServer(app);
7const wss = new WebSocket.Server({ server });
8
9app.use(express.static('public'));
10
11wss.on('connection', (ws) => {
12  ws.on('message', (message) => {
13    // Broadcast the message to all connected clients
14    wss.clients.forEach((client) => {
15      if (client.readyState === WebSocket.OPEN) {
16        client.send(message);
17      }
18    });
19  });
20});
21
22const PORT = process.env.PORT || 3000;
23server.listen(PORT, () => {
24  console.log(`Server is listening on port ${PORT}`);
25});
26
This code sets up a basic Express server and WebSocket server. The WebSocket server listens for incoming connections and messages, broadcasting messages to all connected clients. This functionality is essential for establishing peer-to-peer connections using WebRTC.
By following these steps, you’ve set up a robust environment for developing and running your ShareDrop application. In the next part, we’ll dive into creating the initial wireframe, which will lay the foundation for the user interface of your file-sharing application.
Step 2: Creating the Initial Wireframe
Creating an initial wireframe for your ShareDrop application involves designing the user interface (UI) components and structuring the HTML and CSS. This step ensures that the application is both visually appealing and functional. The wireframe will serve as a blueprint for your development, helping you visualize the layout and user interactions.
Wireframe All the Components
To start, let's outline the main UI components that your ShareDrop application will need:
- Header: Includes the app name and a brief description.
- Join/Create Room Section: Allows users to create a new room or join an existing one by entering a room code.
- File Sharing Area: The main area where users can drag and drop files to share.
- Participant List: Displays the list of participants currently in the room.
- Footer: Contains additional information or links.
Designing the UI Components with HTML and CSS
Below is a basic example of the HTML structure for your ShareDrop application:
HTML
1<!DOCTYPE html>
2<html lang="en">
3<head>
4    <meta charset="UTF-8">
5    <meta name="viewport" content="width=device-width, initial-scale=1.0">
6    <title>ShareDrop</title>
7    <link rel="stylesheet" href="css/style.css">
8</head>
9<body>
10    <header>
11        <h1>ShareDrop</h1>
12        <p>Seamless file sharing using WebRTC</p>
13    </header>
14    <main>
15        <section id="join-create-room">
16            <h2>Join or Create a Room</h2>
17            <input type="text" id="room-code" placeholder="Enter room code">
18            <button id="create-room">Create Room</button>
19            <button id="join-room">Join Room</button>
20        </section>
21        <section id="file-sharing-area">
22            <h2>File Sharing Area</h2>
23            <div id="drop-zone">Drag & Drop Files Here</div>
24        </section>
25        <section id="participant-list">
26            <h2>Participants</h2>
27            <ul id="participants"></ul>
28        </section>
29    </main>
30    <footer>
31        <p>Powered by WebRTC</p>
32    </footer>
33    <script src="js/main.js"></script>
34</body>
35</html>
36
In this structure:
- The header contains the app name and a brief description.
- The main section is divided into three parts:
join-create-room,file-sharing-area, andparticipant-list. - The footer provides additional information or credits.
Next, we will add some basic CSS to style these components:
CSS
1/* css/style.css */
2body {
3    font-family: Arial, sans-serif;
4    margin: 0;
5    padding: 0;
6    display: flex;
7    flex-direction: column;
8    align-items: center;
9    background-color: #f7f7f7;
10}
11
12header {
13    background-color: #4CAF50;
14    color: white;
15    padding: 10px 0;
16    width: 100%;
17    text-align: center;
18}
19
20main {
21    width: 90%;
22    max-width: 800px;
23    margin: 20px auto;
24    display: flex;
25    flex-direction: column;
26    align-items: center;
27}
28
29section {
30    margin: 20px 0;
31    width: 100%;
32}
33
34#join-create-room {
35    text-align: center;
36}
37
38#file-sharing-area {
39    border: 2px dashed #ccc;
40    padding: 20px;
41    text-align: center;
42}
43
44#drop-zone {
45    height: 200px;
46    line-height: 200px;
47    color: #aaa;
48}
49
50#participant-list ul {
51    list-style: none;
52    padding: 0;
53}
54
55footer {
56    background-color: #4CAF50;
57    color: white;
58    padding: 10px 0;
59    width: 100%;
60    text-align: center;
61    position: fixed;
62    bottom: 0;
63}
64
This CSS styles the various sections of your application:
- Header: A green background with white text, centered.
- Main: Centers the content and limits the width for better readability.
- Sections: Adds margins and styles to differentiate each section.
- File Sharing Area: Highlights the drop zone with a dashed border.
Sample Code Snippet for Basic Wireframe Creation
The following JavaScript snippet will add functionality to the buttons for creating and joining rooms:
JavaScript
1// js/main.js
2document.getElementById('create-room').addEventListener('click', createRoom);
3document.getElementById('join-room').addEventListener('click', joinRoom);
4
5function createRoom() {
6    const roomCode = generateRoomCode();
7    alert(`Room created with code: ${roomCode}`);
8    // Redirect to the room or display the room code
9}
10
11function joinRoom() {
12    const roomCode = document.getElementById('room-code').value;
13    if (roomCode) {
14        alert(`Joining room with code: ${roomCode}`);
15        // Redirect to the room or connect to the room
16    } else {
17        alert('Please enter a room code');
18    }
19}
20
21function generateRoomCode() {
22    return Math.random().toString(36).substring(2, 10);
23}
24
This JavaScript handles the creation and joining of rooms, providing basic interactivity to your wireframe.
By setting up this initial wireframe, you have laid the groundwork for the user interface of your ShareDrop application. The next steps will involve implementing more complex functionalities, such as handling file sharing and managing participants.
Step 3: Implementing the Join Screen
The join screen is a critical component of your ShareDrop application, allowing users to either create a new room or join an existing one by entering a room code. This step involves enhancing the HTML structure with JavaScript functionality to handle these actions.
Implement Join Screen
We will start by enhancing our existing HTML and JavaScript code to implement a fully functional join screen.
[a] Enhance the HTML for Join/Create Room
First, we update the HTML to add more detailed elements that provide a better user experience. This includes adding feedback messages and refining the input and button elements.
HTML
1<!-- HTML: join-create-room section -->
2<section id="join-create-room">
3    <h2>Join or Create a Room</h2>
4    <input type="text" id="room-code" placeholder="Enter room code" aria-label="Room Code">
5    <div id="room-actions">
6        <button id="create-room">Create Room</button>
7        <button id="join-room">Join Room</button>
8    </div>
9    <p id="feedback" class="hidden">Feedback message will appear here.</p>
10</section>
11
In this updated HTML, we have:
- Added an
aria-labelfor accessibility. - Wrapped the buttons in a
divfor better styling. - Added a
pelement for feedback messages, initially hidden.
[b] Enhance CSS for Better Styling
Next, we add some CSS to style these elements:
CSS
1/* CSS: styles for join-create-room section */
2#join-create-room {
3    text-align: center;
4    margin-bottom: 30px;
5}
6
7#room-code {
8    padding: 10px;
9    margin: 10px 0;
10    width: calc(100% - 22px);
11    max-width: 400px;
12}
13
14#room-actions {
15    display: flex;
16    justify-content: center;
17    gap: 10px;
18}
19
20#room-actions button {
21    padding: 10px 20px;
22    background-color: #4CAF50;
23    color: white;
24    border: none;
25    cursor: pointer;
26    font-size: 16px;
27}
28
29#room-actions button:hover {
30    background-color: #45a049;
31}
32
33#feedback {
34    margin-top: 10px;
35    color: red;
36}
37
38.hidden {
39    display: none;
40}
41
This CSS:
- Centers and styles the join/create room section.
- Styles the input and button elements for better user interaction.
- Adds a
hiddenclass to control the visibility of feedback messages.
[c] JavaScript for Creating and Joining Rooms
Finally, we update our JavaScript to handle room creation and joining, including feedback for the user.
JavaScript
1// JavaScript: join-create-room functionality
2document.getElementById('create-room').addEventListener('click', createRoom);
3document.getElementById('join-room').addEventListener('click', joinRoom);
4
5function createRoom() {
6    const roomCode = generateRoomCode();
7    document.getElementById('feedback').textContent = `Room created with code: ${roomCode}`;
8    document.getElementById('feedback').classList.remove('hidden');
9    // Here you would typically redirect the user to the newly created room
10    // window.location.href = `/room/${roomCode}`;
11}
12
13function joinRoom() {
14    const roomCode = document.getElementById('room-code').value.trim();
15    if (roomCode) {
16        document.getElementById('feedback').textContent = `Joining room with code: ${roomCode}`;
17        document.getElementById('feedback').classList.remove('hidden');
18        // Here you would typically redirect the user to the specified room
19        // window.location.href = `/room/${roomCode}`;
20    } else {
21        document.getElementById('feedback').textContent = 'Please enter a room code';
22        document.getElementById('feedback').classList.remove('hidden');
23    }
24}
25
26function generateRoomCode() {
27    return Math.random().toString(36).substring(2, 10);
28}
29
This JavaScript:
- Generates a random room code when creating a new room.
- Displays feedback messages to inform the user of their actions.
- Handles the logic for joining an existing room by validating the room code input.
[d] Connecting Frontend to Backend
While the above steps provide a basic client-side implementation, you would need to connect the frontend to your backend server to manage rooms and facilitate peer-to-peer connections using WebRTC.
Here is a basic outline of what you need to do next:
- Backend Server: Modify your
server.jsfile to handle room creation and joining logic. - WebSocket Integration: Set up WebSocket connections to manage real-time communication between the clients and the server for room management.
JavaScript
1// server.js - Handling room creation and joining
2const express = require('express');
3const http = require('http');
4const WebSocket = require('ws');
5
6const app = express();
7const server = http.createServer(app);
8const wss = new WebSocket.Server({ server });
9
10app.use(express.static('public'));
11
12wss.on('connection', (ws) => {
13  ws.on('message', (message) => {
14    // Broadcast the message to all connected clients
15    wss.clients.forEach((client) => {
16      if (client.readyState === WebSocket.OPEN) {
17        client.send(message);
18      }
19    });
20  });
21});
22
23const PORT = process.env.PORT || 3000;
24server.listen(PORT, () => {
25  console.log(`Server is listening on port ${PORT}`);
26});
27
With these steps, you've implemented a functional join screen for your ShareDrop application, allowing users to create or join rooms and see immediate feedback. In the next section, we will focus on implementing file sharing controls and integrating WebRTC for peer-to-peer file transfers.
Step 4: Implementing Controls
Implementing controls for your ShareDrop application involves creating functionality that allows users to select and share files. This step will integrate WebRTC to handle peer-to-peer connections and file transfers. We'll cover the HTML, JavaScript, and WebRTC setup required to achieve this.
Implement Controls
[a] Enhance the HTML for File Sharing Controls
First, update the HTML to include file input and control buttons:
HTML
1<!-- HTML: file-sharing-area section -->
2<section id="file-sharing-area">
3    <h2>File Sharing Area</h2>
4    <input type="file" id="file-input" multiple>
5    <button id="share-files">Share Files</button>
6    <div id="drop-zone">Drag & Drop Files Here</div>
7</section>
8
This HTML includes:
- An input element for file selection.
- A button to trigger file sharing.
- A drop zone area for drag-and-drop file uploads.
[b] Enhance CSS for File Sharing Controls
Next, add CSS to style the new elements:
CSS
1/* CSS: styles for file-sharing-area section */
2#file-input {
3    display: none; /* Hide the default file input */
4}
5
6#share-files {
7    padding: 10px 20px;
8    background-color: #4CAF50;
9    color: white;
10    border: none;
11    cursor: pointer;
12    font-size: 16px;
13    margin-bottom: 20px;
14}
15
16#share-files:hover {
17    background-color: #45a049;
18}
19
20#drop-zone {
21    border: 2px dashed #ccc;
22    padding: 20px;
23    text-align: center;
24    color: #aaa;
25    margin-top: 20px;
26    cursor: pointer;
27}
28
29#drop-zone.dragover {
30    border-color: #4CAF50;
31    color: #4CAF50;
32}
33
This CSS:
- Hides the default file input for better custom styling.
- Styles the share files button.
- Adds styles for the drag-and-drop area, including visual feedback when files are dragged over it.
[c] JavaScript for File Sharing Controls
Implement the JavaScript to handle file selection, drag-and-drop, and file sharing:
JavaScript
1// JavaScript: file-sharing-area functionality
2document.getElementById('share-files').addEventListener('click', shareFiles);
3document.getElementById('drop-zone').addEventListener('dragover', handleDragOver);
4document.getElementById('drop-zone').addEventListener('drop', handleFileDrop);
5
6let selectedFiles = [];
7
8function handleFileSelect(event) {
9    selectedFiles = Array.from(event.target.files);
10    updateDropZone();
11}
12
13function handleDragOver(event) {
14    event.preventDefault();
15    event.dataTransfer.dropEffect = 'copy';
16    document.getElementById('drop-zone').classList.add('dragover');
17}
18
19function handleFileDrop(event) {
20    event.preventDefault();
21    document.getElementById('drop-zone').classList.remove('dragover');
22    selectedFiles = Array.from(event.dataTransfer.files);
23    updateDropZone();
24}
25
26function updateDropZone() {
27    const dropZone = document.getElementById('drop-zone');
28    if (selectedFiles.length > 0) {
29        dropZone.textContent = `${selectedFiles.length} file(s) selected`;
30    } else {
31        dropZone.textContent = 'Drag & Drop Files Here';
32    }
33}
34
35function shareFiles() {
36    if (selectedFiles.length > 0) {
37        selectedFiles.forEach(file => {
38            // Logic to share files using WebRTC
39            console.log(`Sharing file: ${file.name}`);
40        });
41    } else {
42        alert('No files selected');
43    }
44}
45
46document.getElementById('file-input').addEventListener('change', handleFileSelect);
47document.getElementById('drop-zone').addEventListener('click', () => document.getElementById('file-input').click());
48
This JavaScript:
- Handles file selection via input and drag-and-drop.
- Updates the drop zone text to reflect the selected files.
- Implements a
shareFilesfunction to initiate file sharing (placeholder logic for now).
[d] Integrating WebRTC for File Sharing
Next, integrate WebRTC to handle the actual file transfers. Below is a simplified implementation of WebRTC for peer-to-peer connections and file sharing:
JavaScript
1// JavaScript: WebRTC integration for file sharing
2let peerConnection;
3const config = {
4    iceServers: [{ urls: 'stun:stun.l.google.com:19302' }]
5};
6
7function initializePeerConnection() {
8    peerConnection = new RTCPeerConnection(config);
9
10    peerConnection.onicecandidate = event => {
11        if (event.candidate) {
12            sendMessage({ type: 'candidate', candidate: event.candidate });
13        }
14    };
15
16    peerConnection.ondatachannel = event => {
17        const receiveChannel = event.channel;
18        receiveChannel.onmessage = handleReceiveMessage;
19    };
20
21    const dataChannel = peerConnection.createDataChannel('fileTransfer');
22    dataChannel.onopen = () => console.log('Data channel is open');
23    dataChannel.onclose = () => console.log('Data channel is closed');
24}
25
26function handleReceiveMessage(event) {
27    const receivedFile = event.data;
28    console.log('File received:', receivedFile);
29    // Handle the received file (e.g., save it, display it)
30}
31
32function sendMessage(message) {
33    // Implement your signaling server logic here to send messages to the other peer
34}
35
36function shareFiles() {
37    if (selectedFiles.length > 0) {
38        selectedFiles.forEach(file => {
39            const reader = new FileReader();
40            reader.onload = () => {
41                const arrayBuffer = reader.result;
42                const dataChannel = peerConnection.createDataChannel('fileTransfer');
43                dataChannel.onopen = () => {
44                    dataChannel.send(arrayBuffer);
45                    console.log(`File sent: ${file.name}`);
46                };
47            };
48            reader.readAsArrayBuffer(file);
49        });
50    } else {
51        alert('No files selected');
52    }
53}
54
55// Initialize peer connection
56initializePeerConnection();
57
This code:
- Initializes a WebRTC peer connection with STUN servers for NAT traversal.
- Creates a data channel for file transfer.
- Handles file reception and sending through the data channel.
To fully implement this, you would need to set up a signaling server to exchange WebRTC offer/answer and ICE candidates between peers. Here’s a basic example of signaling server setup using WebSocket:
JavaScript
1// server.js - Signaling server setup
2const express = require('express');
3const http = require('http');
4const WebSocket = require('ws');
5
6const app = express();
7const server = http.createServer(app);
8const wss = new WebSocket.Server({ server });
9
10app.use(express.static('public'));
11
12wss.on('connection', ws => {
13    ws.on('message', message => {
14        // Broadcast the message to all connected clients except the sender
15        wss.clients.forEach(client => {
16            if (client !== ws && client.readyState === WebSocket.OPEN) {
17                client.send(message);
18            }
19        });
20    });
21});
22
23const PORT = process.env.PORT || 3000;
24server.listen(PORT, () => {
25    console.log(`Server is listening on port ${PORT}`);
26});
27
This signaling server relays messages between peers to establish the WebRTC connection.
With these steps, you've implemented the controls for selecting and sharing files in your ShareDrop application, integrated WebRTC for peer-to-peer file transfers, and set up a basic signaling server to facilitate connections. In the next section, we'll focus on implementing the participant view to display active connections and participants in the room.
Step 5: Implementing Participant View
Implementing the participant view involves displaying the list of active participants in the room and managing real-time updates as participants join or leave. This step will enhance the user interface and improve the user experience by providing visibility into who is currently connected.
Implement Participant View
[a] Enhance the HTML for Participant List
First, update the HTML to include a section for displaying participants:
HTML
1<!-- HTML: participant-list section -->
2<section id="participant-list">
3    <h2>Participants</h2>
4    <ul id="participants"></ul>
5</section>
6
This HTML includes:
- A heading for the participant list.
- An unordered list to display the participants.
[b] Enhance CSS for Participant List
Next, add CSS to style the participant list:
CSS
1/* CSS: styles for participant-list section */
2#participant-list {
3    width: 100%;
4    margin-top: 20px;
5}
6
7#participants {
8    list-style: none;
9    padding: 0;
10    margin: 0;
11}
12
13#participants li {
14    padding: 10px;
15    border-bottom: 1px solid #ddd;
16}
17
18#participants li:last-child {
19    border-bottom: none;
20}
21
This CSS:
- Styles the participant list with padding and border.
- Ensures a clean separation between participant entries.
[c] JavaScript for Managing Participants
Implement the JavaScript to manage the participant list, including adding and removing participants as they join or leave the room:
JavaScript
1// JavaScript: participant-list functionality
2let participants = [];
3
4function addParticipant(participant) {
5    if (!participants.includes(participant)) {
6        participants.push(participant);
7        updateParticipantList();
8    }
9}
10
11function removeParticipant(participant) {
12    participants = participants.filter(p => p !== participant);
13    updateParticipantList();
14}
15
16function updateParticipantList() {
17    const participantList = document.getElementById('participants');
18    participantList.innerHTML = '';
19    participants.forEach(participant => {
20        const li = document.createElement('li');
21        li.textContent = participant;
22        participantList.appendChild(li);
23    });
24}
25
26// Simulate adding/removing participants for demonstration
27addParticipant('Alice');
28addParticipant('Bob');
29removeParticipant('Alice');
30
This JavaScript:
- Manages an array of participants.
- Updates the participant list UI whenever participants are added or removed.
[d] Integrating WebRTC with Participant View
Integrate the participant view with WebRTC to handle real-time updates when participants join or leave:
JavaScript
1// JavaScript: WebRTC integration for managing participants
2const signalingServerUrl = 'ws://localhost:3000';
3const socket = new WebSocket(signalingServerUrl);
4
5socket.onopen = () => {
6    console.log('Connected to the signaling server');
7};
8
9socket.onmessage = message => {
10    const data = JSON.parse(message.data);
11    switch (data.type) {
12        case 'new-participant':
13            addParticipant(data.name);
14            break;
15        case 'participant-left':
16            removeParticipant(data.name);
17            break;
18        default:
19            break;
20    }
21};
22
23function joinRoom(name) {
24    socket.send(JSON.stringify({ type: 'new-participant', name }));
25}
26
27function leaveRoom(name) {
28    socket.send(JSON.stringify({ type: 'participant-left', name }));
29}
30
31// Example usage
32joinRoom('Alice');
33leaveRoom('Alice');
34
This WebRTC integration:
- Establishes a WebSocket connection to the signaling server.
- Handles messages for adding and removing participants.
- Simulates joining and leaving a room for demonstration purposes.
[e] Signaling Server Update
Update the signaling server to handle participant join and leave messages:
JavaScript
1// server.js - Signaling server handling participants
2const express = require('express');
3const http = require('http');
4const WebSocket = require('ws');
5
6const app = express();
7const server = http.createServer(app);
8const wss = new WebSocket.Server({ server });
9
10app.use(express.static('public'));
11
12wss.on('connection', ws => {
13    ws.on('message', message => {
14        const data = JSON.parse(message);
15        // Broadcast the message to all connected clients except the sender
16        wss.clients.forEach(client => {
17            if (client !== ws && client.readyState === WebSocket.OPEN) {
18                client.send(JSON.stringify(data));
19            }
20        });
21    });
22});
23
24const PORT = process.env.PORT || 3000;
25server.listen(PORT, () => {
26    console.log(`Server is listening on port ${PORT}`);
27});
28
This server update:
- Relays participant join and leave messages to all connected clients.
With these steps, you've implemented the participant view for your ShareDrop application, allowing users to see real-time updates of who is connected to the room. This enhances the user experience by providing visibility into active participants. In the next section, we'll focus on running and testing your code to ensure everything works as expected.
Step 6: Running Your Code
With all the components of your ShareDrop application implemented, it's time to run and test your code. This step ensures that all functionalities are working as expected, from creating and joining rooms to file sharing and displaying participants.
Run Your Code Now
[a] Start the Development Server
Ensure that your development server is running. In your terminal, navigate to your project directory and start the server:
bash
1npm start
2
This command starts the server as defined in your
server.js file. By default, the server will run on http://localhost:3000. Open this URL in your web browser to access your ShareDrop application.[b] Test Room Creation and Joining
Open multiple browser tabs or windows to simulate different users. Test the following functionalities:
Creating a Room:
- Click the "Create Room" button.
- Verify that a room code is generated and displayed in the feedback message.
- Ensure that the participant list updates to include the user who created the room.
Joining a Room:
- Enter the room code in the "Enter room code" input field.
- Click the "Join Room" button.
- Verify that the participant list updates to include the new user in all tabs/windows.
[c] Test File Sharing
Select and share files between users:
Selecting Files:
- Click on the drop zone or the file input field to select files.
- Verify that the drop zone text updates to reflect the selected files.
Sharing Files:
- Click the "Share Files" button.
- Verify that the files are sent to all connected participants.
- Check the console logs to ensure that files are being sent and received correctly.
[d] Test Participant View
Verify that the participant list updates correctly as users join and leave:
Joining Participants:
- Open additional browser tabs/windows and join the same room.
- Ensure that all instances show the updated participant list with new users.
Leaving Participants:
- Close a browser tab/window to simulate a participant leaving.
- Verify that the participant list updates to remove the user who left.
Debugging Common Issues
If you encounter any issues while running your application, here are some common problems and their solutions:
WebSocket Connection Issues:
- Ensure that your signaling server is running and accessible at the correct URL.
- Check the console for any error messages related to WebSocket connections.
File Sharing Problems:
- Verify that the selected files are properly read and sent through the data channel.
- Check the console for any errors related to file reading or WebRTC data channels.
Participant List Not Updating:
- Ensure that participant join/leave messages are correctly handled by the WebSocket server and clients.
- Check that the
addParticipantandremoveParticipantfunctions are being called as expected.
By following these steps, you should be able to run and test your ShareDrop application, ensuring that all functionalities are working smoothly. In the next section, we'll conclude the article and provide in-depth FAQs to address common questions and concerns.
Conclusion
Congratulations! You've successfully built a ShareDrop application using WebRTC for seamless peer-to-peer file sharing. This article guided you through setting up the environment, creating the initial wireframe, implementing the join screen and controls, integrating WebRTC, managing participants, and finally running and testing your application. By leveraging WebRTC, you’ve created a powerful and efficient file-sharing tool that works across various devices and platforms.
Want to level-up your learning? Subscribe now
Subscribe to our newsletter for more tech based insights
FAQ