Introduction to OvenMediaEngine WebRTC
What is OvenMediaEngine WebRTC?
OvenMediaEngine (OME) is an open-source streaming server developed by AirenSoft, designed to handle real-time communication and streaming with sub-second latency. It supports various streaming protocols, including WebRTC, SRT, RTMP, RTSP, and MPEG2-TS over HTLS, making it a versatile solution for large-scale live streaming applications.
Understanding WebRTC Technology
WebRTC (Web Real-Time Communication) is a powerful technology that enables peer-to-peer communication through simple API calls. It is widely used for video conferencing, live streaming, and any application requiring real-time communication over the web. WebRTC's ability to establish direct connections between users reduces latency, ensuring a smooth and interactive streaming experience.
OvenMediaEngine and Its Integrated Technologies
OvenMediaEngine leverages a suite of advanced technologies to deliver high-quality streaming with minimal delay. These include:
- SRT (Secure Reliable Transport): A protocol designed for secure, low-latency streaming, ideal for unpredictable networks.
- RTMP (Real-Time Messaging Protocol): A widely used protocol for live streaming that facilitates real-time data transmission.
- RTSP (Real-Time Streaming Protocol): A protocol used for establishing and controlling media sessions between endpoints.
- MPEG2-TS over HTLS: A transport stream protocol for transmitting video, audio, and data over the internet, ensuring compatibility and reliability.
With these technologies, OvenMediaEngine is capable of handling diverse streaming needs, from simple broadcasts to complex, large-scale live streaming events. The combination of WebRTC and these protocols allows for seamless integration and robust performance, making OME a go-to solution for developers looking to implement real-time streaming applications.
Getting Started with the Code!
Create a New OvenMediaEngine App
To start building your streaming application with OvenMediaEngine, you first need to set up a new project. Here’s a step-by-step guide:
Prerequisites
- Ensure you have the necessary development environment, including a C/C++ compiler, Git, and a suitable IDE (like Visual Studio Code or CLion).
- Install Docker, as it simplifies the deployment process.
Cloning the Repository
bash
1   git clone https://github.com/AirenSoft/OvenMediaEngine.git
2   cd OvenMediaEngine
3
Setting Up the Environment
Navigate to the project directory and ensure all dependencies are installed. Follow the instructions provided in the repository’s README file to install any missing packages or libraries.
Install
The installation process involves setting up the OvenMediaEngine server on your local machine. Here’s how to do it:
[a] Build the Docker Image
bash
1   docker build -t ovenmediaengine .
2
[b] Run the Docker Container
bash
1   docker run -d --name ome -p 1935:1935 -p 3333:3333 -p 4000-4005:4000-4005/udp -p 8080:8080 ovenmediaengine
2
[c] Verify Installation
Open your browser and navigate to
http://localhost:8080. You should see the OvenMediaEngine dashboard, indicating that your installation is successful.Structure of the Project
Understanding the project structure is crucial for efficient development. Here’s a breakdown of the key components in the OvenMediaEngine project:
- src: Contains the source code for the server, including core functionalities and protocol implementations.
- conf: Holds configuration files for various modules such as WebRTC, RTMP, and SRT.
- build: Scripts and files necessary for building the project.
- docker: Docker-related files for containerization.
- web: Web interface files for the management dashboard.
Each directory is designed to keep the project organized and modular, making it easier to manage and extend.
App Architecture
- Input Module: Handles various input protocols (WebRTC, RTMP, SRT, etc.), capturing and processing incoming media streams.
- Transcoding Module: Optionally transcodes media streams to different formats or bitrates.
- Output Module: Delivers the processed streams to end-users through supported protocols.
- Management Interface: Provides a web-based dashboard for managing and monitoring the server.
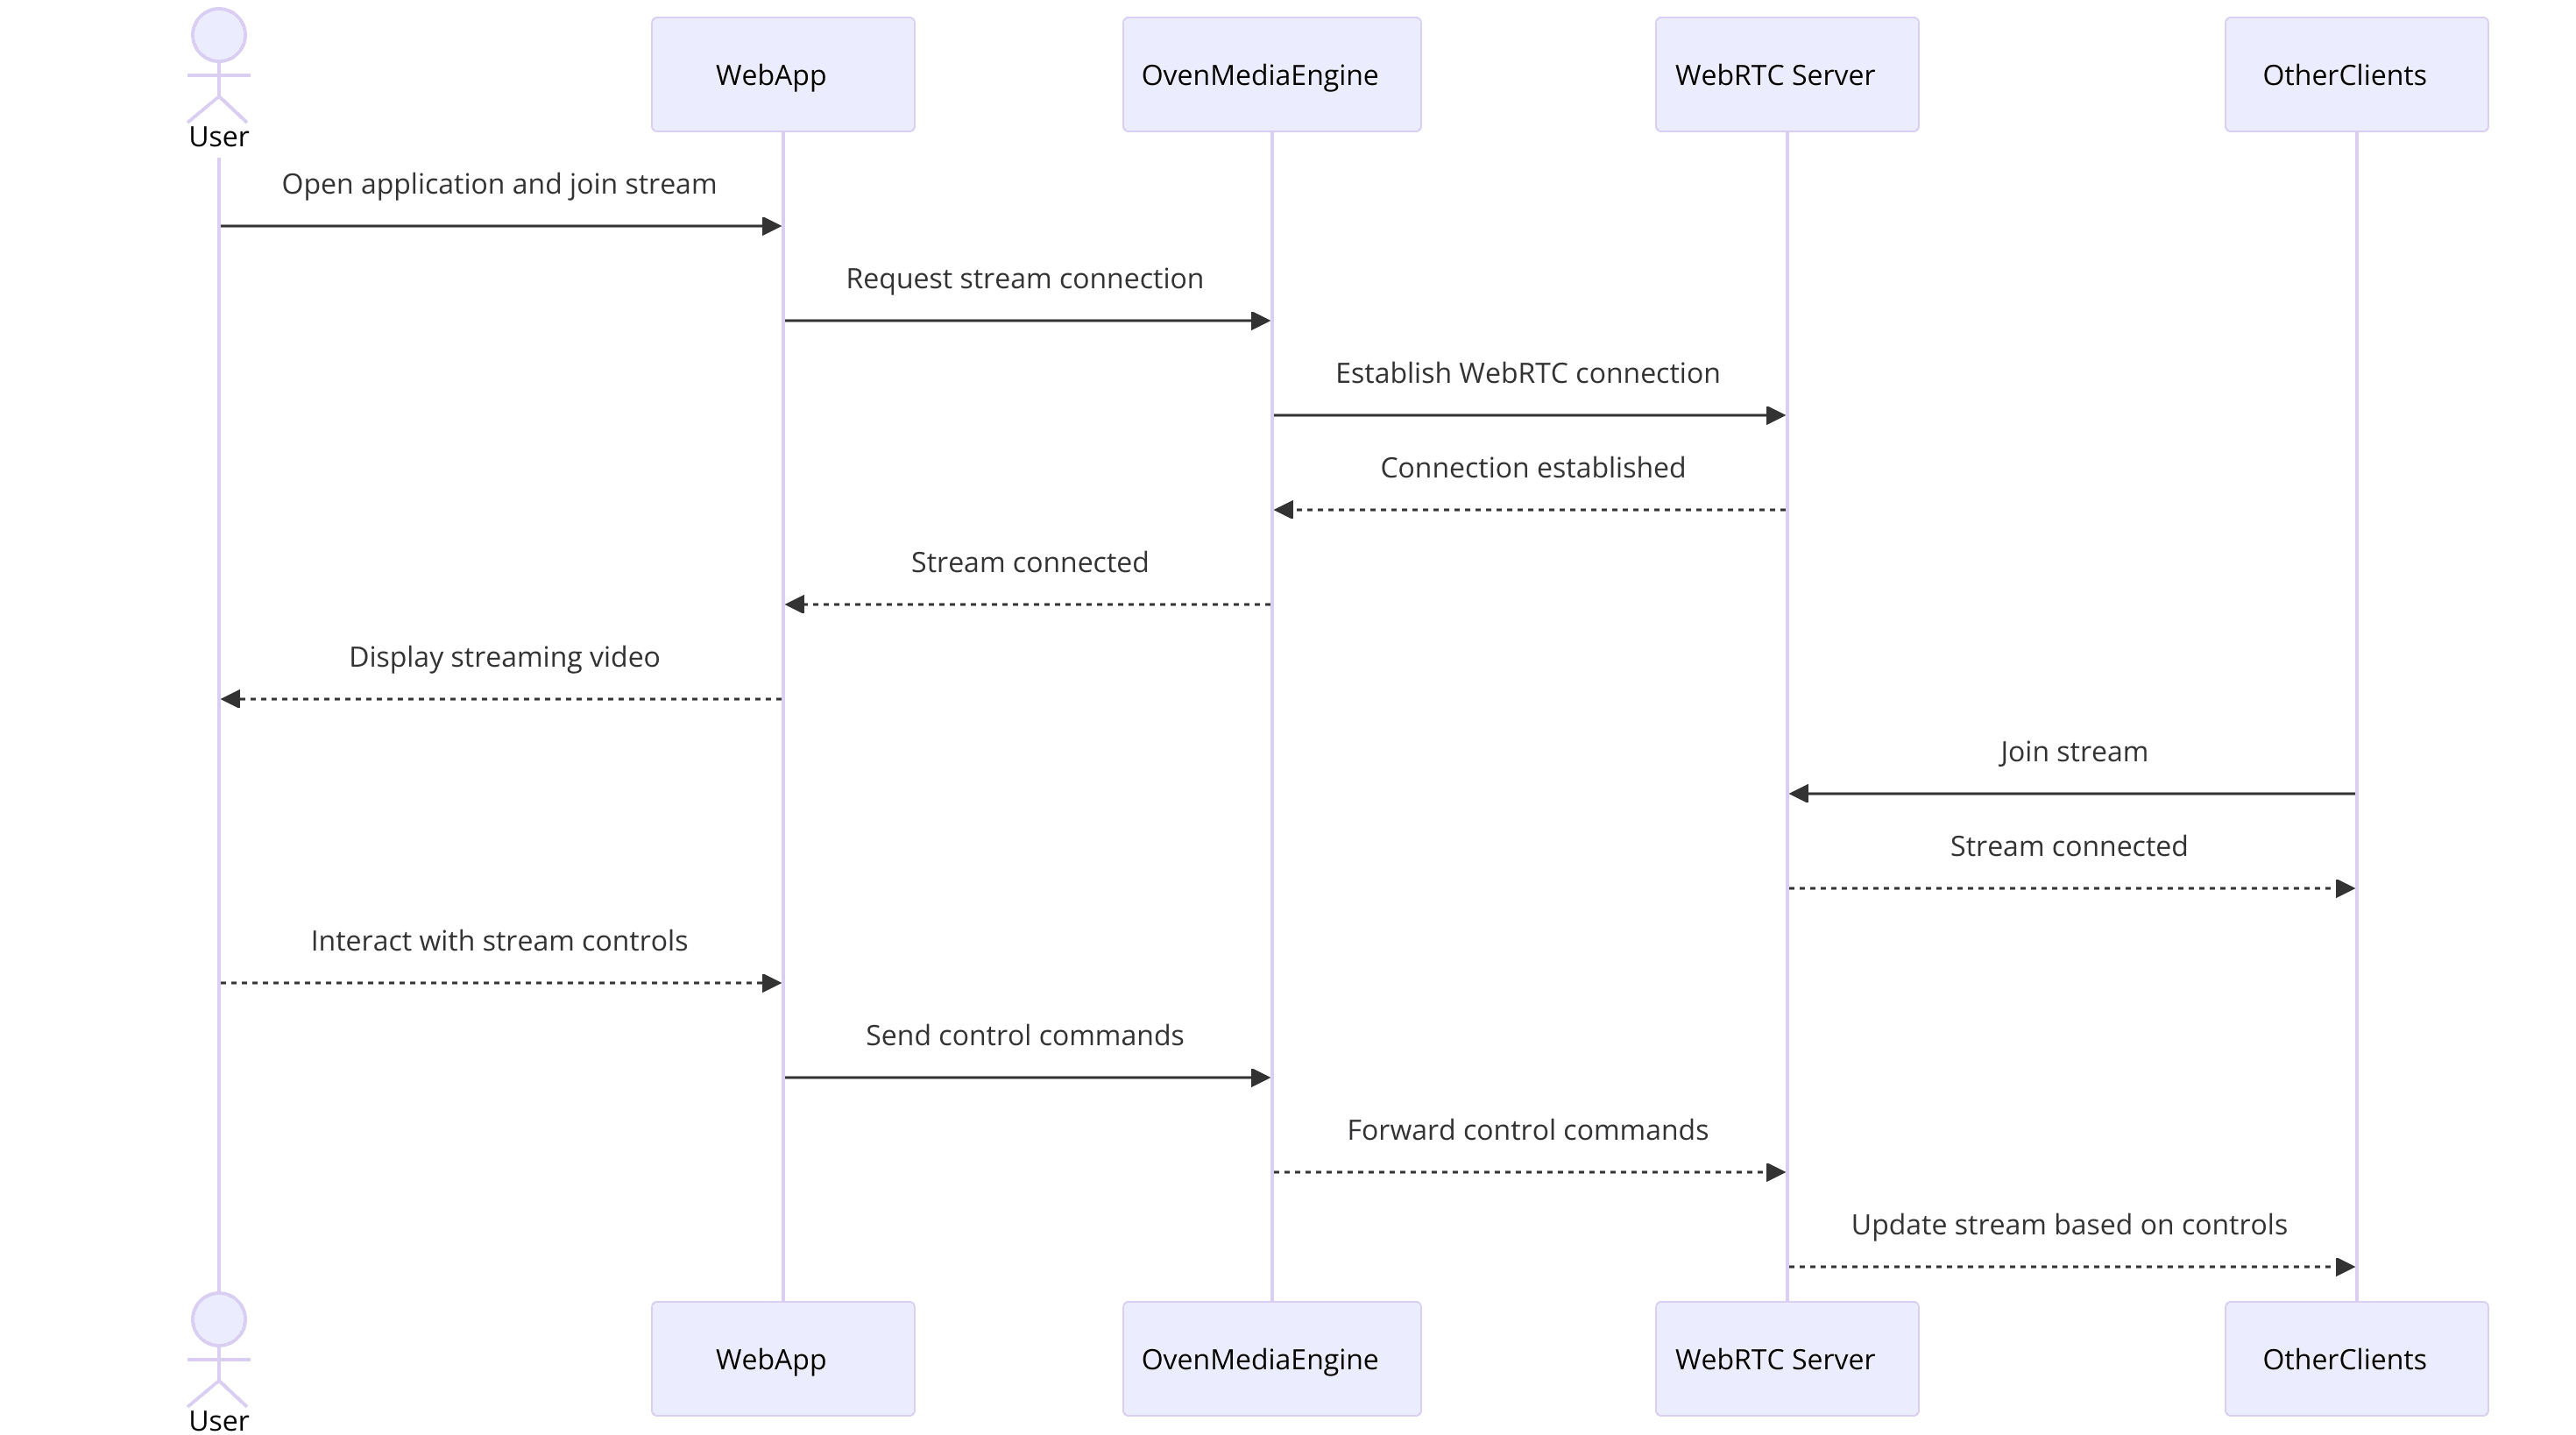
Example Architecture Flow
- Client: A user starts a stream using a WebRTC-compatible browser.
- OME Server: The server receives the stream via the WebRTC input module.
- Transcoding: If necessary, the server transcodes the stream.
- Delivery: The server delivers the stream to other users via WebRTC, RTMP, or any other supported protocol.
This architecture ensures scalability and flexibility, allowing developers to customize and optimize their streaming solutions based on specific needs.
By following these steps, you’ll have a solid foundation for developing a streaming application using OvenMediaEngine. The next sections will guide you through implementing specific features and functionalities.
Step 1: Get Started with Configuration Files
Setting Up Configuration
Before diving into the code, it’s essential to configure OvenMediaEngine (OME) to suit your streaming needs. Configuration files define how OME handles incoming and outgoing streams, manages resources, and interacts with various protocols. Here’s how to get started with the primary configuration files.
[a] Locate Configuration Files
The main configuration files are located in the
conf directory of your OME project. These files include settings for WebRTC, RTMP, and other protocols.[b] Modify Server.xml
Open
Server.xml to configure server-wide settings.Example configuration for a basic setup:
xml
1     <Server>
2         <Network>
3             <Address>0.0.0.0</Address>
4             <Port>3333</Port>
5         </Network>
6         <App>
7             <Name>live</Name>
8             <Source>
9                 <Protocol>rtmp</Protocol>
10             </Source>
11             <Stream>
12                 <Protocol>webrtc</Protocol>
13             </Stream>
14         </App>
15     </Server>
16
This setup allows OME to accept RTMP streams and deliver them via WebRTC.
[c] Configure WebRTC.xml
Open
WebRTC.xml to adjust WebRTC-specific settings.Example configuration:
xml
1     <WebRTC>
2         <Port>4000-4005</Port>
3         <Stun>
4             <Server>stun:stun.l.google.com:19302</Server>
5         </Stun>
6     </WebRTC>
7
This setting defines the ports WebRTC will use and specifies a STUN server for NAT traversal.
[d] Configure RTMP.xml
Open
RTMP.xml to set up RTMP streaming.Example configuration:
xml
1     <RTMP>
2         <Port>1935</Port>
3     </RTMP>
4
This configuration sets the RTMP port to 1935, the default port for RTMP streams.
[e] Review and Save
After modifying the configuration files, review your changes to ensure correctness.
Save the files and restart the OME server to apply the new settings:
bash
1     docker restart ome
2
By setting up these configuration files, you ensure that OvenMediaEngine is tailored to your specific streaming requirements. This initial setup lays the groundwork for a smooth streaming experience and prepares you for the next steps in implementing your application.
Step 2: Wireframe All the Components
Designing the Layout
Creating a wireframe for your OvenMediaEngine application is a crucial step in planning the overall structure and user interface. This blueprint will guide the development process, ensuring that all necessary components are accounted for and properly organized. Here’s how to wireframe your streaming application.
Identify Key Components
- Join Screen: The entry point for users to join the streaming session.
- Controls: Play, pause, volume, and other interactive controls for the media.
- Participant View: Displays all participants in the stream.
- Chat Interface: Optional component for text-based communication during the stream.
- Settings: Configuration options for adjusting stream quality and other preferences.
Create a Basic Layout
- Sketch a simple layout using a tool like Balsamiq, Figma, or even pen and paper. Focus on the placement of key components.
- Header: Title and navigation options.
- Main Content Area:
- Left Sidebar: List of participants.
- Main Video Area: Display the active stream.
- Right Sidebar: Chat interface (if included).
- Footer: Media controls and settings.
Detail Each Component
- Join Screen:
- Input fields for username and stream ID.
- Join button.
- Controls:
- Play/Pause button.
- Volume slider.
- Fullscreen toggle.
- Participant View:
- Grid layout to display multiple participants.
- Highlight speaker view.
User Flow
- Define how users will interact with each component.
- Example: User enters the stream ID on the join screen, joins the stream, interacts with media controls, and participates in the chat.
Iterate and Refine
- Review the wireframe with stakeholders or team members.
- Make necessary adjustments based on feedback to ensure the layout meets user needs.
By wireframing all components, you create a clear and organized structure for your streaming application. This visual guide helps streamline the development process, ensuring each part of the application is thoughtfully designed and implemented.
Step 3: Implement Join Screen
Building the Join Screen
The join screen is the entry point for users to access your streaming application. It should be user-friendly and efficient, enabling users to quickly join a stream with minimal effort. Here’s how to implement the join screen for your OvenMediaEngine application.
[a] HTML Structure
Create an HTML file to define the layout of the join screen. Include input fields for the stream ID and username, and a button to join the stream.
HTML
1   <!DOCTYPE html>
2   <html lang="en">
3   <head>
4       <meta charset="UTF-8">
5       <meta name="viewport" content="width=device-width, initial-scale=1.0">
6       <title>Join Stream</title>
7       <link rel="stylesheet" href="styles.css">
8   </head>
9   <body>
10       <div class="join-container">
11           <h1>Join Stream</h1>
12           <input type="text" id="username" placeholder="Enter your username">
13           <input type="text" id="stream-id" placeholder="Enter stream ID">
14           <button onclick="joinStream()">Join</button>
15       </div>
16       <script src="app.js"></script>
17   </body>
18   </html>
19
[b] CSS Styling
Create a CSS file to style the join screen. Ensure the design is clean and responsive.
CSS
1   body {
2       font-family: Arial, sans-serif;
3       display: flex;
4       justify-content: center;
5       align-items: center;
6       height: 100vh;
7       background-color: #f0f0f0;
8       margin: 0;
9   }
10   .join-container {
11       background: white;
12       padding: 20px;
13       border-radius: 5px;
14       box-shadow: 0 0 10px rgba(0, 0, 0, 0.1);
15       text-align: center;
16   }
17   .join-container input {
18       width: 100%;
19       padding: 10px;
20       margin: 10px 0;
21       border: 1px solid #ccc;
22       border-radius: 5px;
23   }
24   .join-container button {
25       padding: 10px 20px;
26       border: none;
27       border-radius: 5px;
28       background-color: #007bff;
29       color: white;
30       cursor: pointer;
31   }
32   .join-container button:hover {
33       background-color: #0056b3;
34   }
35
[c] JavaScript Functionality
Create a JavaScript file to handle the join action. This script will capture the input values and redirect the user to the streaming page.
JavaScript
1   function joinStream() {
2       const username = document.getElementById('username').value;
3       const streamId = document.getElementById('stream-id').value;
4
5       if (username && streamId) {
6           // Redirect to the streaming page with username and stream ID as query parameters
7           window.location.href = `stream.html?username=${username}&streamId=${streamId}`;
8       } else {
9           alert('Please enter both username and stream ID.');
10       }
11   }
12
[d] Testing the Join Screen
- Open the HTML file in a web browser and test the functionality.
- Ensure that the inputs are working correctly and the join button redirects to the appropriate page with the correct query parameters.
By implementing the join screen with this approach, you create a simple and effective entry point for users to access your streaming application. This step ensures that users can quickly and easily join a stream, enhancing their overall experience.
Step 4: Implement Controls
Adding Controls
In this step, you will implement the media controls for your streaming application. These controls will enable users to interact with the stream, providing functionalities like play, pause, volume adjustment, and fullscreen mode. Here’s how to add these controls to your application.
[a] HTML Structure for Controls
Add the control elements to your HTML file. This will typically include buttons for play/pause, volume control, and fullscreen toggle.
HTML
1   <!DOCTYPE html>
2   <html lang="en">
3   <head>
4       <meta charset="UTF-8">
5       <meta name="viewport" content="width=device-width, initial-scale=1.0">
6       <title>Stream</title>
7       <link rel="stylesheet" href="styles.css">
8   </head>
9   <body>
10       <div class="video-container">
11           <video id="stream-video" controls></video>
12           <div class="controls">
13               <button id="play-pause" onclick="togglePlayPause()">Play</button>
14               <input type="range" id="volume-control" min="0" max="1" step="0.1" onchange="setVolume(this.value)">
15               <button id="fullscreen" onclick="toggleFullscreen()">Fullscreen</button>
16           </div>
17       </div>
18       <script src="controls.js"></script>
19   </body>
20   </html>
21
[b] CSS Styling for Controls
Style the controls to make them user-friendly and visually appealing.
CSS
1   .video-container {
2       position: relative;
3       max-width: 100%;
4       margin: auto;
5   }
6   .controls {
7       position: absolute;
8       bottom: 10px;
9       left: 10px;
10       right: 10px;
11       display: flex;
12       justify-content: space-between;
13       align-items: center;
14       background: rgba(0, 0, 0, 0.5);
15       padding: 10px;
16       border-radius: 5px;
17   }
18   .controls button, .controls input {
19       margin: 0 5px;
20       padding: 10px;
21       background: white;
22       border: none;
23       border-radius: 5px;
24   }
25   .controls button:hover, .controls input:hover {
26       background: #ddd;
27   }
28
[c] JavaScript Functionality for Controls
Implement the functionality for each control in your JavaScript file.
JavaScript
1   const video = document.getElementById('stream-video');
2   const playPauseButton = document.getElementById('play-pause');
3   const volumeControl = document.getElementById('volume-control');
4
5   function togglePlayPause() {
6       if (video.paused || video.ended) {
7           video.play();
8           playPauseButton.textContent = 'Pause';
9       } else {
10           video.pause();
11           playPauseButton.textContent = 'Play';
12       }
13   }
14
15   function setVolume(value) {
16       video.volume = value;
17   }
18
19   function toggleFullscreen() {
20       if (!document.fullscreenElement) {
21           video.requestFullscreen().catch(err => {
22               alert(`Error attempting to enable full-screen mode: ${err.message} (${err.name})`);
23           });
24       } else {
25           document.exitFullscreen();
26       }
27   }
28
Testing the Controls
- Open the streaming page in a web browser and test the functionality of each control.
- Ensure that the play/pause button works correctly, the volume control adjusts the volume, and the fullscreen button toggles fullscreen mode.
By adding these controls, you enhance the user experience by providing essential functionalities for interacting with the stream. This step ensures that users have a smooth and intuitive way to manage their viewing experience.
Step 5: Implement Participant View
Participant View
The participant view is essential for displaying all participants in the streaming session. This view helps manage and present multiple video streams in an organized manner. Here’s how to implement the participant view for your OvenMediaEngine application.
[a] HTML Structure for Participant View
Modify the HTML to include a section for displaying participant video streams.
HTML
1   <!DOCTYPE html>
2   <html lang="en">
3   <head>
4       <meta charset="UTF-8">
5       <meta name="viewport" content="width=device-width, initial-scale=1.0">
6       <title>Stream</title>
7       <link rel="stylesheet" href="styles.css">
8   </head>
9   <body>
10       <div class="participant-container">
11           <div class="participant" id="participant-template" style="display:none;">
12               <video class="participant-video" autoplay></video>
13               <p class="participant-name"></p>
14           </div>
15       </div>
16       <script src="participants.js"></script>
17   </body>
18   </html>
19
[b] CSS Styling for Participant View
Style the participant view to ensure a clean and organized layout.
CSS
1   .participant-container {
2       display: flex;
3       flex-wrap: wrap;
4       gap: 10px;
5       justify-content: center;
6       padding: 20px;
7   }
8   .participant {
9       background: white;
10       padding: 10px;
11       border-radius: 5px;
12       box-shadow: 0 0 10px rgba(0, 0, 0, 0.1);
13       text-align: center;
14   }
15   .participant-video {
16       width: 200px;
17       height: 150px;
18       border-radius: 5px;
19   }
20   .participant-name {
21       margin-top: 10px;
22       font-weight: bold;
23   }
24
[c] JavaScript Functionality for Participant View
Implement the JavaScript to dynamically add participants to the view.
JavaScript
1   const participantsContainer = document.querySelector('.participant-container');
2   const participantTemplate = document.getElementById('participant-template');
3
4   function addParticipant(name, stream) {
5       const newParticipant = participantTemplate.cloneNode(true);
6       newParticipant.style.display = 'block';
7       newParticipant.querySelector('.participant-video').srcObject = stream;
8       newParticipant.querySelector('.participant-name').textContent = name;
9       participantsContainer.appendChild(newParticipant);
10   }
11
12   // Example usage with dummy data
13   navigator.mediaDevices.getUserMedia({ video: true, audio: true }).then(stream => {
14       addParticipant('Participant 1', stream);
15       addParticipant('Participant 2', stream);
16   });
17
[d] Testing the Participant View
- Test the participant view by simulating multiple participants.
- Ensure that each participant’s video stream is displayed correctly and that their names are shown.
By implementing the participant view, you enable the application to display multiple video streams simultaneously. This step ensures a more interactive and engaging streaming experience, especially for applications requiring collaboration or audience participation.
Step 6: Run Your Code Now
Testing and Running the Application
After setting up the join screen, controls, and participant view, it’s time to run and test your OvenMediaEngine application. This final step will ensure that all components are working seamlessly together.
[a] Starting the Server
Ensure that your OvenMediaEngine server is running. If you are using Docker, you can start the server with:
bash
1     docker start ome
2
[b] Launching the Application
Open your web browser and navigate to the join screen of your application, typically something like
http://localhost:8080/join.html.[c] Joining a Stream
- Enter a username and a stream ID to join a stream. This will take you to the main streaming interface where you can see the participant view and controls.
[d] Testing the Controls
- Use the play/pause button, volume control, and fullscreen toggle to ensure they work as expected.
- Verify that you can join a stream and see your video as well as other participants' videos.
[e] Simulating Multiple Participants
- Open multiple browser tabs or use different devices to join the same stream. This will help you test the participant view and ensure that it displays multiple streams correctly.
Troubleshooting
- If you encounter any issues, check the browser console for errors.
- Ensure that all necessary ports are open and not blocked by firewalls.
- Verify that your configuration files are correctly set up.
HTML
1<!DOCTYPE html>
2<html lang="en">
3<head>
4    <meta charset="UTF-8">
5    <meta name="viewport" content="width=device-width, initial-scale=1.0">
6    <title>OvenMediaEngine Stream</title>
7    <link rel="stylesheet" href="styles.css">
8</head>
9<body>
10    <div class="join-container">
11        <h1>Join Stream</h1>
12        <input type="text" id="username" placeholder="Enter your username">
13        <input type="text" id="stream-id" placeholder="Enter stream ID">
14        <button onclick="joinStream()">Join</button>
15    </div>
16    <div class="video-container">
17        <video id="stream-video" controls autoplay></video>
18        <div class="controls">
19            <button id="play-pause" onclick="togglePlayPause()">Play</button>
20            <input type="range" id="volume-control" min="0" max="1" step="0.1" onchange="setVolume(this.value)">
21            <button id="fullscreen" onclick="toggleFullscreen()">Fullscreen</button>
22        </div>
23    </div>
24    <div class="participant-container">
25        <div class="participant" id="participant-template" style="display:none;">
26            <video class="participant-video" autoplay></video>
27            <p class="participant-name"></p>
28        </div>
29    </div>
30    <script src="app.js"></script>
31    <script src="controls.js"></script>
32    <script src="participants.js"></script>
33</body>
34</html>
35
By following these steps, you will have a fully functional streaming application built with OvenMediaEngine. This comprehensive setup allows you to test and ensure that all features work harmoniously, providing a robust real-time streaming experience for your users.
Conclusion
In this article, we explored how to create a real-time streaming application using OvenMediaEngine and WebRTC. We covered the essential steps, from setting up the server and configuring files to implementing the join screen, adding media controls, and creating a participant view. By following this guide, you can build a robust and scalable streaming application tailored to your needs.
Want to level-up your learning? Subscribe now
Subscribe to our newsletter for more tech based insights
FAQ