How to Build Medooze WebRTC App with JavaScript?
Learn how to set up and implement Medooze WebRTC with our comprehensive guide. This article covers everything from initialization and configuration to implementing control features and participant views, ensuring you create a robust real-time communication application.
Introduction to Medooze WebRTC Technology
What is Medooze WebRTC?
Medooze WebRTC is a powerful and versatile media server designed for real-time communication applications. Built primarily with C++, Medooze integrates seamlessly with Node.js and Go, making it a robust solution for developers looking to implement high-performance video conferencing, live streaming, and other real-time communication services. This media server leverages WebRTC (Web Real-Time Communication), a technology standard that facilitates peer-to-peer communication via APIs, enabling audio, video, and data sharing across browsers and mobile platforms without the need for plugins.
Technology Stack
Medooze WebRTC stands out due to its multi-language support and comprehensive technology stack. The core of Medooze is written in C++, known for its performance and efficiency, particularly in handling high-throughput and low-latency operations essential for media processing. Additionally, Medooze offers integration with Node.js and Go, providing developers with the flexibility to utilize JavaScript and Go for building scalable and efficient server-side applications. This combination allows for a versatile development environment, accommodating a range of programming preferences and requirements.
Use Cases
Medooze WebRTC is widely used in various applications that demand real-time communication capabilities. Common use cases include:
- Video Conferencing: Enabling seamless video and audio communication between multiple participants, often used in corporate and educational settings.
- Live Streaming: Supporting the delivery of live video content to large audiences, crucial for events, webinars, and broadcasts.
- Interactive Broadcasting: Facilitating interactive sessions where participants can not only view but also interact with the broadcast content in real time.
- Telemedicine: Allowing healthcare professionals to conduct remote consultations and diagnoses, improving accessibility and convenience for patients.
In summary, Medooze WebRTC is a comprehensive and flexible media server solution designed to meet the demands of modern real-time communication applications. Its robust technology stack and broad range of use cases make it an ideal choice for developers aiming to create scalable and efficient media applications.
Getting Started with the Code
Create a New Medooze WebRTC App
To begin building your Medooze WebRTC application, start by setting up a new project. Ensure you have the necessary prerequisites installed, including a C++ compiler, Node.js, and Go. Here’s how to initialize your project:
bash
1mkdir medooze-webrtc-app
2cd medooze-webrtc-app
3npm init -y
4
Install Dependencies
Next, install the required dependencies for Medooze WebRTC. This includes the Medooze media server library and any other necessary packages:
bash
1npm install @medooze/media-server --save
2
Ensure you also have the C++ libraries and tools required to compile Medooze components.
Structure of the Project
Organizing your project directory is crucial for maintaining clarity and scalability. A typical Medooze WebRTC project might look like this:
1medooze-webrtc-app/
2├── src/
3│   ├── main.cpp
4│   ├── server.js
5│   └── config/
6│       └── settings.json
7├── build/
8├── package.json
9└── README.md
10
App Architecture
Sample Code Snippet to Initialize a New Project
Here’s a basic example of how to set up the main server file in Node.js:
JavaScript
1const MediaServer = require('@medooze/media-server');
2
3// Create the Medooze media server instance
4const mediaServer = MediaServer.createMediaServer();
5
6// Initialize the media server with configuration settings
7mediaServer.initialize({
8    logLevel: 'debug',
9    port: 3000
10});
11
12console.log('Medooze WebRTC Media Server is running on port 3000');
13
This snippet sets up a simple media server instance and initializes it with basic settings. Further configuration and enhancements will be added in subsequent steps.
In this part, you have learned how to set up a new Medooze WebRTC project, install necessary dependencies, organize your project structure, and understand the basic architecture of the application. Next, we will dive deeper into configuring and implementing various components of the Medooze WebRTC application.
Step 1: Get Started with main.cpp
Setting Up main.cpp
The
main.cpp file is the backbone of your Medooze WebRTC application. This file will handle the initialization and configuration of the Medooze media server. Below is a step-by-step guide to set up and configure main.cpp.Code Snippet to Initialize the Medooze WebRTC Media Server
Start by including the necessary headers and setting up the main function:
C++
1#include <iostream>
2#include <medooze/media-server.h>
3
4int main(int argc, char* argv[]) {
5    // Initialize the Medooze Media Server
6    Medooze::MediaServer mediaServer;
7
8    // Configure the media server
9    Medooze::MediaServer::Configuration config;
10    config.logLevel = "debug";
11    config.port = 3000;
12
13    // Initialize with the configuration
14    if (!mediaServer.initialize(config)) {
15        std::cerr << "Failed to initialize Medooze Media Server" << std::endl;
16        return -1;
17    }
18
19    std::cout << "Medooze WebRTC Media Server is running on port " << config.port << std::endl;
20
21    // Keep the server running
22    while (true) {
23        // Handle server operations
24        mediaServer.run();
25    }
26
27    return 0;
28}
29
Configuration
The
Configuration struct in the above example allows you to specify various settings for the Medooze media server. Here, we set the log level to debug and the port to 3000. Adjust these settings according to your requirements.Explanation of Configuration Settings
- Log Level: Setting this to
debugis useful during development as it provides detailed logs that can help identify issues. For production, consider usinginfoorwarn. - Port: This specifies the network port the server will use. Ensure this port is open and not in use by another application.
Code Explanation
- Include Headers: The necessary headers from the Medooze library are included.
- Initialize Media Server: An instance of
MediaServeris created and configured. - Configuration: The configuration struct is populated with log level and port settings.
- Initialization Check: The server is initialized with the given configuration, and an error message is displayed if initialization fails.
- Running the Server: The server runs in an infinite loop to handle operations continuously.
Common Issues and Solutions
- Port Conflicts: Ensure the specified port is free and not blocked by your firewall.
- Library Paths: Verify that the Medooze library paths are correctly set in your development environment.
- Permissions: Running on certain ports may require elevated permissions.
In this part, you have set up the main
main.cpp file, initialized the Medooze WebRTC media server, and configured it with essential settings. Next, we will move on to wireframing all the components required for your Medooze WebRTC application.Step 2: Wireframe All Components
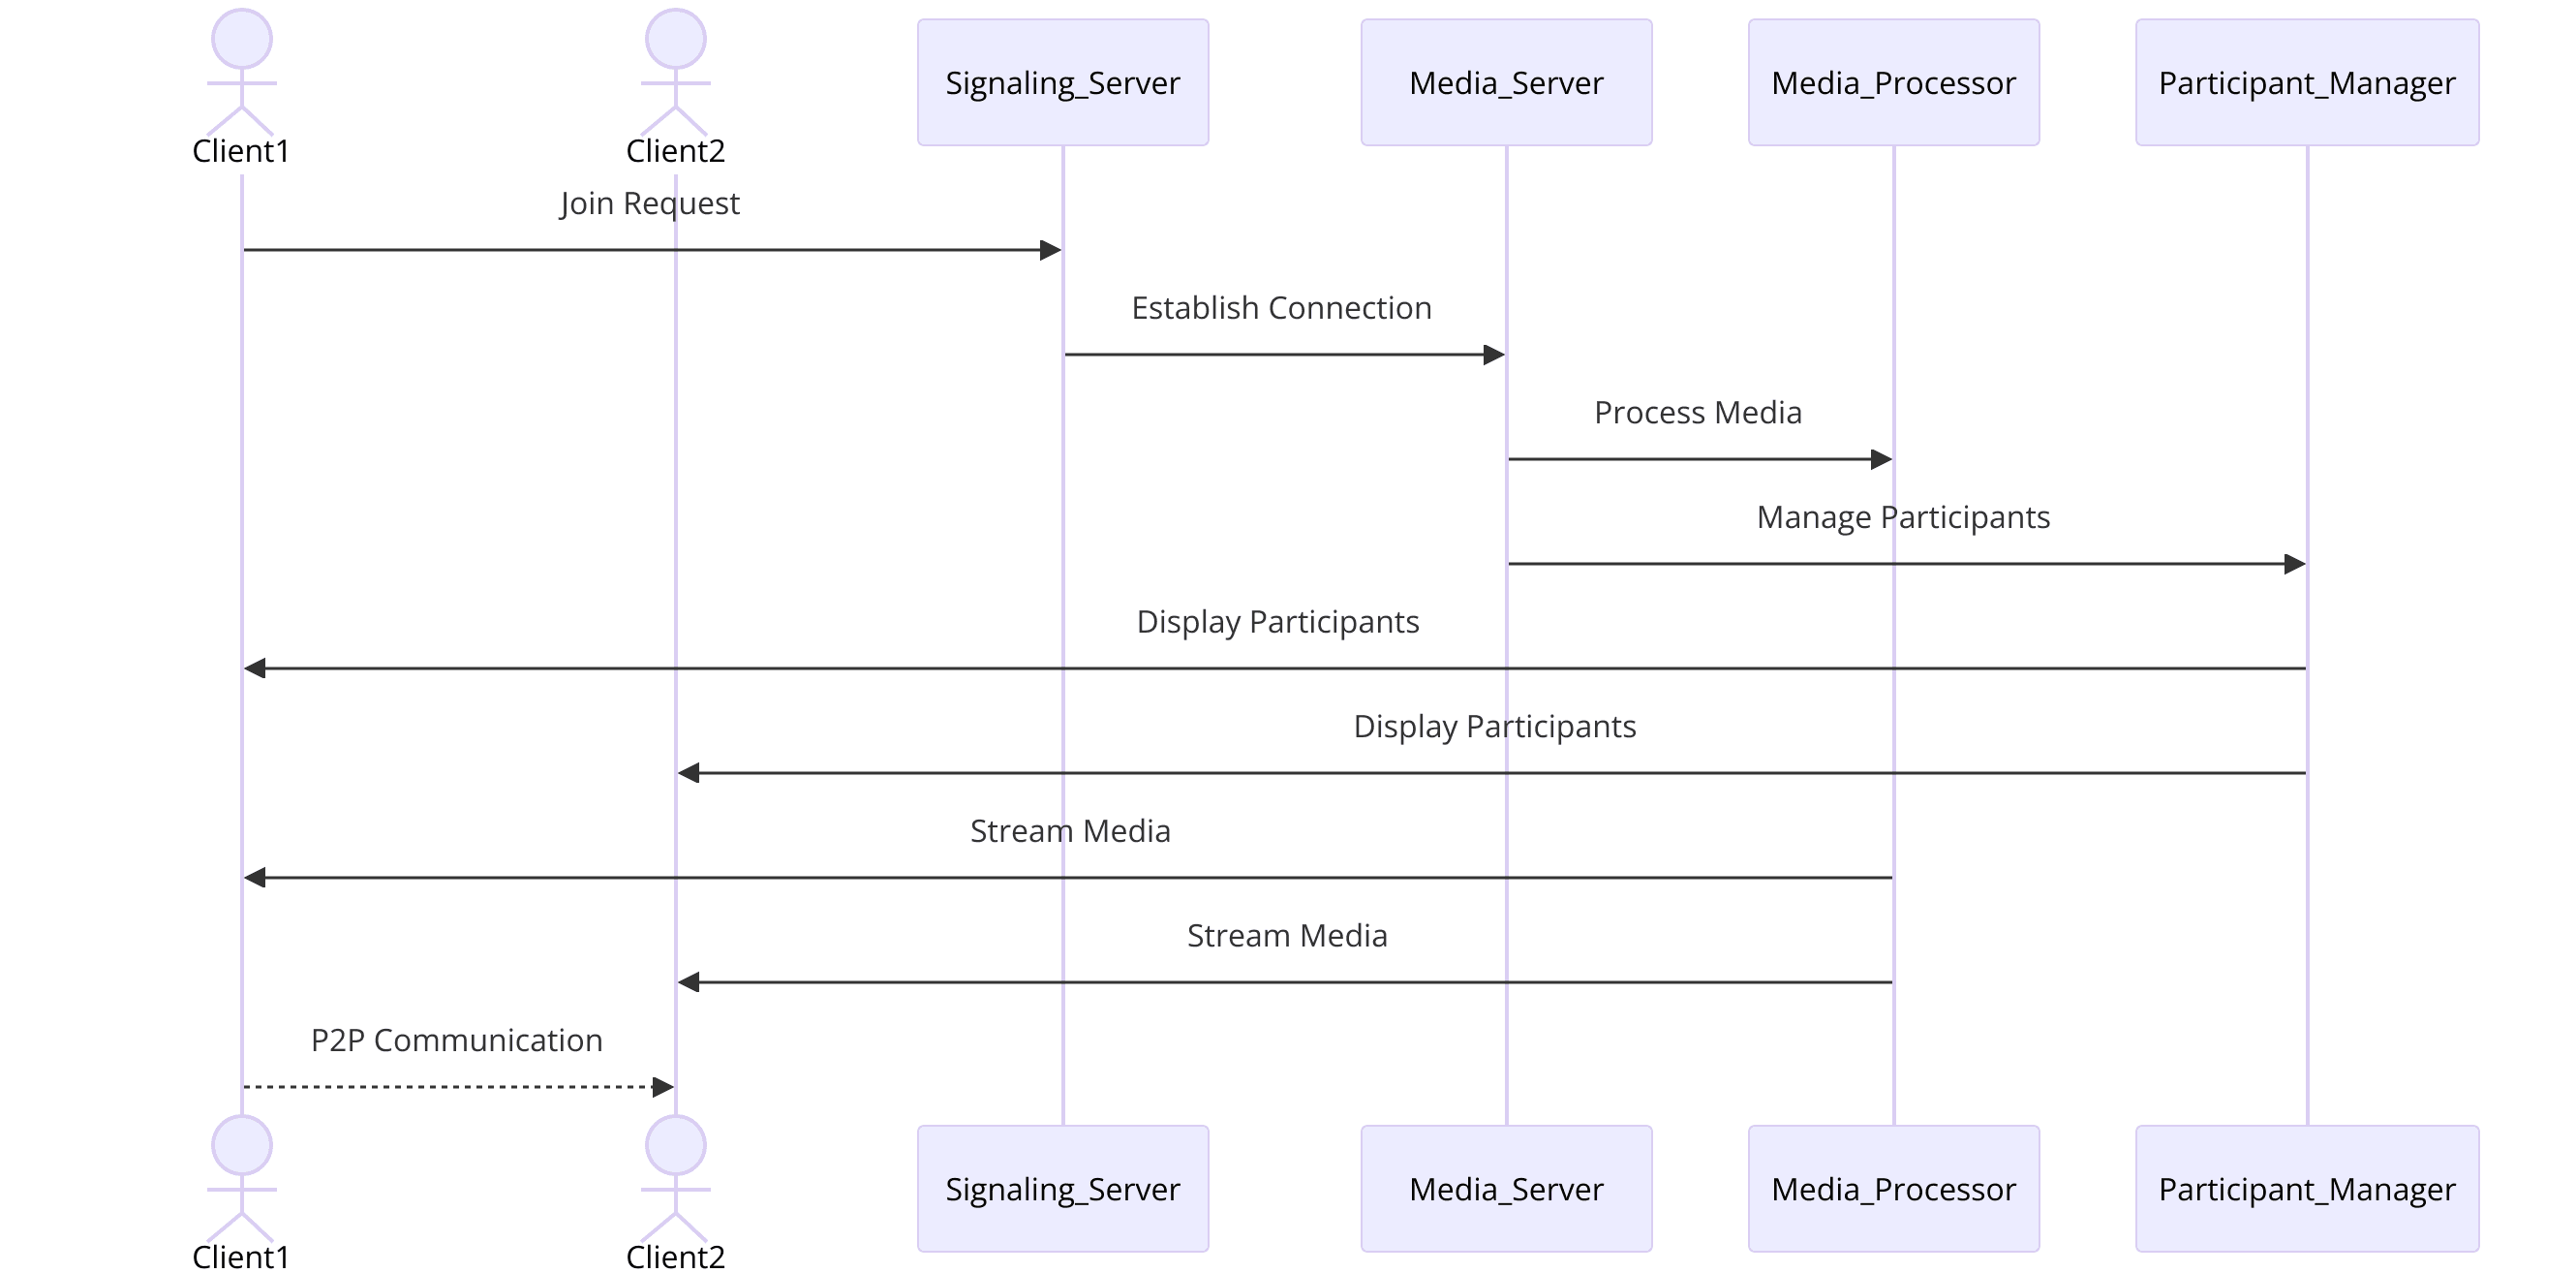
Component Overview
Before diving into the implementation, it’s essential to outline and wireframe all the components of your Medooze WebRTC application. This step helps in visualizing the overall structure and understanding the interaction between various parts of the application.
Key Components
- Media Server: Central component managing media streams.
- Signaling Server: Handles signaling messages for WebRTC connections.
- Client Interface: User interface for participants to join and interact.
- Media Processor: Processes audio and video streams.
- Control Mechanism: Manages user controls like mute, unmute, and camera on/off.
- Participant Manager: Handles participant data and views.
Wireframing Process
Step-by-Step Guide to Wireframe the Components
- Media Server Setup:
- Initialize and configure the Medooze media server.
- Handle media stream routing and processing.
- Signaling Server:
- Use Node.js to set up a signaling server.
- Facilitate WebRTC connections between clients.
- Client Interface:
- Design a user-friendly interface for participants.
- Implement join screen, controls, and participant view.
- Media Processor:
- Integrate media processing capabilities.
- Optimize for performance and quality.
- Control Mechanism:
- Provide controls for participants to manage their media streams.
- Ensure intuitive and responsive controls.
- Participant Manager:
- Manage participant data, including IDs, streams, and metadata.
- Display participant information dynamically.
Code Snippets for Defining Each Component
Media Server Initialization (C++)
C++
1// MediaServer initialization code
2Medooze::MediaServer mediaServer;
3Medooze::MediaServer::Configuration config;
4config.logLevel = "debug";
5config.port = 3000;
6
7if (!mediaServer.initialize(config)) {
8    std::cerr << "Failed to initialize Medooze Media Server" << std::endl;
9    return -1;
10}
11
Signaling Server Setup (Node.js)
JavaScript
1const io = require('socket.io')(3000);
2
3io.on('connection', (socket) => {
4    console.log('New client connected');
5
6    socket.on('signal', (data) => {
7        // Handle signaling messages
8        socket.broadcast.emit('signal', data);
9    });
10
11    socket.on('disconnect', () => {
12        console.log('Client disconnected');
13    });
14});
15
Description of Each Component's Role
- Media Server: Core component for handling and routing media streams.
- Signaling Server: Manages signaling messages to establish WebRTC connections.
- Client Interface: Frontend interface for user interactions.
- Media Processor: Enhances and processes media streams for better quality.
- Control Mechanism: Provides user controls for managing media settings.
- Participant Manager: Manages and displays participant information.
In this part, you have learned how to wireframe the key components of your Medooze WebRTC application. This structured approach will guide you in implementing each part systematically, ensuring a cohesive and functional application. Next, we will delve into implementing the join screen for participants.
Step 3: Implement Join Screen
Join Screen Basics
The join screen is the first interaction point for participants in your Medooze WebRTC application. It allows users to enter necessary information, such as their name or room ID, to join a session. A well-designed join screen enhances user experience by making the entry process intuitive and straightforward.
UI/UX Considerations:
- Simplicity: Keep the design clean and straightforward.
- Accessibility: Ensure the form is accessible to all users, including those with disabilities.
- Responsiveness: Design the screen to work seamlessly on various devices and screen sizes.
Implementation Steps
- HTML Structure:
- Create a basic HTML structure for the join screen.
- CSS Styling:
- Add CSS to style the join screen for a better user experience.
- JavaScript Functionality:
- Implement JavaScript to handle form submissions and user interactions.
Code Snippet for the Join Screen Functionality
HTML
1<!-- index.html -->
2<!DOCTYPE html>
3<html lang="en">
4<head>
5    <meta charset="UTF-8">
6    <meta name="viewport" content="width=device-width, initial-scale=1.0">
7    <title>Join Medooze WebRTC Session</title>
8    <link rel="stylesheet" href="styles.css">
9</head>
10<body>
11    <div class="join-container">
12        <h1>Join Session</h1>
13        <form id="join-form">
14            <input type="text" id="username" placeholder="Enter your name" required>
15            <input type="text" id="room" placeholder="Enter room ID" required>
16            <button type="submit">Join</button>
17        </form>
18    </div>
19    <script src="script.js"></script>
20</body>
21</html>
22
CSS Styling
CSS
1/* styles.css */
2body {
3    font-family: Arial, sans-serif;
4    display: flex;
5    justify-content: center;
6    align-items: center;
7    height: 100vh;
8    background-color: #f0f0f0;
9}
10
11.join-container {
12    background-color: #fff;
13    padding: 20px;
14    border-radius: 10px;
15    box-shadow: 0 0 10px rgba(0, 0, 0, 0.1);
16    text-align: center;
17}
18
19h1 {
20    margin-bottom: 20px;
21}
22
23form {
24    display: flex;
25    flex-direction: column;
26}
27
28input {
29    margin-bottom: 10px;
30    padding: 10px;
31    font-size: 16px;
32}
33
34button {
35    padding: 10px;
36    font-size: 16px;
37    background-color: #007bff;
38    color: #fff;
39    border: none;
40    border-radius: 5px;
41    cursor: pointer;
42}
43
44button:hover {
45    background-color: #0056b3;
46}
47
JavaScript for Form Submission
JavaScript
1// script.js
2document.getElementById('join-form').addEventListener('submit', function(event) {
3    event.preventDefault();
4
5    const username = document.getElementById('username').value;
6    const room = document.getElementById('room').value;
7
8    if (username && room) {
9        // Handle the form submission, e.g., navigate to the session or send data to the server
10        console.log('Joining as', username, 'in room', room);
11        // Redirect or handle the join process
12    } else {
13        alert('Please enter both your name and room ID.');
14    }
15});
16
Testing
To ensure the join screen works correctly, follow these testing steps:
- Open the HTML file in a browser: Ensure the form renders correctly.
- Submit the form with valid data: Verify that the form data is captured and logged as expected.
- Test on different devices: Ensure the screen is responsive and accessible on various devices and screen sizes.
Debugging Tips and Common Issues
- Form Not Submitting: Check the console for errors and ensure JavaScript is correctly linked.
- Responsive Issues: Adjust CSS styles and use media queries to handle different screen sizes.
- Accessibility: Use tools like Lighthouse to audit accessibility and make necessary improvements.
In this part, you have implemented the join screen for your Medooze WebRTC application. Next, we will move on to implementing the control mechanisms for managing media streams.
Step 4: Implement Controls
Control Features
Control features are essential for managing media streams in your Medooze WebRTC application. These controls allow users to mute/unmute their microphones, turn their cameras on/off, and perform other essential actions during a session. Implementing these features enhances user experience by providing intuitive and responsive media management capabilities.
Essential Control Features:
- Mute/Unmute Microphone
- Turn Camera On/Off
- Leave Session
- Share Screen
Implementation Guide
HTML Structure for Controls
Add control buttons to your existing HTML:
HTML
1<!-- index.html (extended) -->
2<!DOCTYPE html>
3<html lang="en">
4<head>
5    <meta charset="UTF-8">
6    <meta name="viewport" content="width=device-width, initial-scale=1.0">
7    <title>Medooze WebRTC Session</title>
8    <link rel="stylesheet" href="styles.css">
9</head>
10<body>
11    <div class="join-container">
12        <!-- Existing Join Screen Code -->
13    </div>
14    <div class="controls-container" id="controls" style="display:none;">
15        <button id="mute">Mute</button>
16        <button id="camera">Camera Off</button>
17        <button id="leave">Leave</button>
18        <button id="share-screen">Share Screen</button>
19    </div>
20    <script src="script.js"></script>
21</body>
22</html>
23
CSS Styling
CSS
1/* styles.css (extended) */
2.controls-container {
3    position: fixed;
4    bottom: 10px;
5    left: 50%;
6    transform: translateX(-50%);
7    display: flex;
8    gap: 10px;
9}
10
11.controls-container button {
12    padding: 10px;
13    font-size: 16px;
14    background-color: #007bff;
15    color: #fff;
16    border: none;
17    border-radius: 5px;
18    cursor: pointer;
19}
20
21.controls-container button:hover {
22    background-color: #0056b3;
23}
24
JavaScript for Control Functionality
Implement the control functionalities using JavaScript:
JavaScript
1// script.js (extended)
2document.getElementById('join-form').addEventListener('submit', function(event) {
3    event.preventDefault();
4
5    const username = document.getElementById('username').value;
6    const room = document.getElementById('room').value;
7
8    if (username && room) {
9        // Hide join screen and show controls
10        document.querySelector('.join-container').style.display = 'none';
11        document.getElementById('controls').style.display = 'flex';
12
13        // Initialize WebRTC connection and other functionalities here
14
15        // Example functions for control buttons
16        document.getElementById('mute').addEventListener('click', toggleMute);
17        document.getElementById('camera').addEventListener('click', toggleCamera);
18        document.getElementById('leave').addEventListener('click', leaveSession);
19        document.getElementById('share-screen').addEventListener('click', shareScreen);
20    } else {
21        alert('Please enter both your name and room ID.');
22    }
23});
24
25function toggleMute() {
26    const muteButton = document.getElementById('mute');
27    // Logic to mute/unmute the microphone
28    if (muteButton.textContent === 'Mute') {
29        muteButton.textContent = 'Unmute';
30        // Mute the microphone
31    } else {
32        muteButton.textContent = 'Mute';
33        // Unmute the microphone
34    }
35}
36
37function toggleCamera() {
38    const cameraButton = document.getElementById('camera');
39    // Logic to turn the camera on/off
40    if (cameraButton.textContent === 'Camera Off') {
41        cameraButton.textContent = 'Camera On';
42        // Turn off the camera
43    } else {
44        cameraButton.textContent = 'Camera Off';
45        // Turn on the camera
46    }
47}
48
49function leaveSession() {
50    // Logic to leave the session
51    alert('You have left the session.');
52    // Perform necessary cleanup
53}
54
55function shareScreen() {
56    // Logic to share the screen
57    alert('Screen sharing started.');
58    // Implement screen sharing functionality
59}
60
Integration
Integrate these controls with the existing components of your Medooze WebRTC application. Ensure the buttons trigger the appropriate WebRTC API calls to manage media streams effectively.
Example Integration Code
JavaScript
1// Example of integrating control functions with WebRTC
2function initializeWebRTC() {
3    // Initialize WebRTC connection
4    const localStream = await navigator.mediaDevices.getUserMedia({ video: true, audio: true });
5    const peerConnection = new RTCPeerConnection(configuration);
6
7    // Add local stream to the connection
8    localStream.getTracks().forEach(track => peerConnection.addTrack(track, localStream));
9
10    // Add event listeners for mute and camera controls
11    document.getElementById('mute').addEventListener('click', () => {
12        localStream.getAudioTracks()[0].enabled = !localStream.getAudioTracks()[0].enabled;
13    });
14
15    document.getElementById('camera').addEventListener('click', () => {
16        localStream.getVideoTracks()[0].enabled = !localStream.getVideoTracks()[0].enabled;
17    });
18}
19
In this part, you have implemented the control features for your Medooze WebRTC application. Next, we will move on to implementing the participant view, which will display information about all participants in the session.
Step 5: Implement Participant View
Participant View Overview
The participant view is a crucial component of your Medooze WebRTC application. It provides a visual representation of all participants in the session, allowing users to see who is in the meeting, their video feeds, and their status. Implementing an effective participant view enhances the user experience by making interactions more intuitive and engaging.
Key Elements to Display:
- Participant names
- Video streams
- Audio status (muted/unmuted)
- Active speaker indication
Implementation Steps
HTML Structure for Participant View
Add a section to display participants’ video streams:
HTML
1<!-- index.html (extended) -->
2<!DOCTYPE html>
3<html lang="en">
4<head>
5    <meta charset="UTF-8">
6    <meta name="viewport" content="width=device-width, initial-scale=1.0">
7    <title>Medooze WebRTC Session</title>
8    <link rel="stylesheet" href="styles.css">
9</head>
10<body>
11    <div class="join-container">
12        <!-- Existing Join Screen Code -->
13    </div>
14    <div class="controls-container" id="controls" style="display:none;">
15        <!-- Existing Controls Code -->
16    </div>
17    <div class="participants-container" id="participants" style="display:none;">
18        <!-- Participant views will be dynamically added here -->
19    </div>
20    <script src="script.js"></script>
21</body>
22</html>
23
CSS Styling
CSS
1/* styles.css (extended) */
2.participants-container {
3    display: flex;
4    flex-wrap: wrap;
5    gap: 10px;
6    margin-top: 20px;
7    justify-content: center;
8}
9
10.participant {
11    display: flex;
12    flex-direction: column;
13    align-items: center;
14    background-color: #fff;
15    border-radius: 10px;
16    padding: 10px;
17    box-shadow: 0 0 10px rgba(0, 0, 0, 0.1);
18}
19
20.participant video {
21    width: 150px;
22    height: 100px;
23    border-radius: 5px;
24    background-color: #000;
25}
26
27.participant .name {
28    margin-top: 5px;
29    font-size: 14px;
30    font-weight: bold;
31}
32
JavaScript for Rendering Participant Information
Implement JavaScript to dynamically add participant views:
JavaScript
1// script.js (extended)
2document.getElementById('join-form').addEventListener('submit', function(event) {
3    event.preventDefault();
4
5    const username = document.getElementById('username').value;
6    const room = document.getElementById('room').value;
7
8    if (username && room) {
9        // Hide join screen and show controls and participants container
10        document.querySelector('.join-container').style.display = 'none';
11        document.getElementById('controls').style.display = 'flex';
12        document.getElementById('participants').style.display = 'flex';
13
14        // Initialize WebRTC connection and other functionalities here
15        initializeWebRTC(username, room);
16    } else {
17        alert('Please enter both your name and room ID.');
18    }
19});
20
21function initializeWebRTC(username, room) {
22    // Initialize WebRTC connection
23    navigator.mediaDevices.getUserMedia({ video: true, audio: true })
24        .then(stream => {
25            // Display local video stream
26            addParticipantView(username, stream, true);
27
28            // Initialize signaling and peer connections (example)
29            const peerConnection = new RTCPeerConnection(configuration);
30            stream.getTracks().forEach(track => peerConnection.addTrack(track, stream));
31
32            // Handle remote streams (example)
33            peerConnection.ontrack = event => {
34                event.streams.forEach(stream => {
35                    addParticipantView('Remote Participant', stream, false);
36                });
37            };
38
39            // Connect to signaling server and join room logic here
40
41        }).catch(error => {
42            console.error('Error accessing media devices.', error);
43        });
44}
45
46function addParticipantView(name, stream, isLocal) {
47    const participantsContainer = document.getElementById('participants');
48    const participantDiv = document.createElement('div');
49    participantDiv.className = 'participant';
50
51    const video = document.createElement('video');
52    video.srcObject = stream;
53    video.autoplay = true;
54    if (isLocal) {
55        video.muted = true; // Mute local video to avoid feedback
56    }
57
58    const nameDiv = document.createElement('div');
59    nameDiv.className = 'name';
60    nameDiv.textContent = name;
61
62    participantDiv.appendChild(video);
63    participantDiv.appendChild(nameDiv);
64    participantsContainer.appendChild(participantDiv);
65}
66
Optimization
For optimizing the participant view:
- Efficient DOM Manipulation: Minimize reflows and repaints by batching DOM updates.
- Media Stream Handling: Ensure streams are efficiently managed to avoid memory leaks and performance degradation.
- Responsive Design: Use CSS media queries to ensure the participant view adapts to different screen sizes and orientations.
Example of Media Stream Handling Optimization
JavaScript
1function initializeWebRTC(username, room) {
2    const localStream = await navigator.mediaDevices.getUserMedia({ video: true, audio: true });
3    addParticipantView(username, localStream, true);
4
5    const peerConnection = new RTCPeerConnection(configuration);
6    localStream.getTracks().forEach(track => peerConnection.addTrack(track, localStream));
7
8    peerConnection.ontrack = event => {
9        event.streams.forEach(stream => {
10            addParticipantView('Remote Participant', stream, false);
11        });
12    };
13
14    // Cleanup event listener to avoid memory leaks
15    window.addEventListener('beforeunload', () => {
16        peerConnection.close();
17        localStream.getTracks().forEach(track => track.stop());
18    });
19}
20
Common Challenges and Solutions
- Stream Synchronization: Ensure audio and video streams are synchronized.
- Solution: Use WebRTC’s built-in synchronization features and handle tracks appropriately.
- Handling Multiple Streams: Efficiently manage multiple participant streams to prevent performance issues.
- Solution: Optimize the number of streams displayed at any time and use lower resolutions if necessary.
In this part, you have implemented the participant view for your Medooze WebRTC application, allowing you to display and manage participant information and streams dynamically. Next, we will move on to running your code and ensuring everything works together seamlessly.
Step 6: Run Your Code Now
Running the Application
Once you have implemented all the necessary components for your Medooze WebRTC application, it's time to run your code and test the entire setup. Follow these steps to ensure everything is working correctly.
- Final Steps to Run the Medooze WebRTC Application
Compile the C++ Code
Ensure your C++ code, especially
main.cpp, is compiled without errors.bash
1   g++ -o media-server main.cpp -lmedooze
2
Start the Signaling Server
Run your Node.js signaling server.
bash
1   node server.js
2
Open the HTML File
Open
index.html in your browser to load the client interface.Code Snippet for Running the Server
Make sure your server and client are properly linked and ready to communicate.
bash
1// Run the media server
2./media-server
3
4// Run the signaling server
5node server.js
6
Verification
To verify the application is working correctly, follow these steps:
- Open Multiple Browser Tabs:
Open
index.htmlin multiple tabs or different browsers to simulate multiple participants. - Join a Session: Use the join screen to enter a session with each participant.
- Test Controls: Verify that all control functionalities (mute, unmute, camera on/off) are working as expected.
- Check Participant View: Ensure all participants' video streams are displayed correctly.
Checklist of Key Functionalities to Test
- Join Session: Participants can join the session using the join screen.
- Stream Management: Video and audio streams are properly managed and displayed.
- Controls Functionality: Mute, unmute, and camera controls work seamlessly.
- Multiple Participants: The application handles multiple participants without issues.
Conclusion
In this article, we have walked through the process of setting up a Medooze WebRTC application from scratch. We've covered everything from initializing the project, installing dependencies, and setting up the main components, to implementing key features like the join screen, controls, and participant view. By following these steps, you can build a robust real-time communication application using Medooze WebRTC.
Want to level-up your learning? Subscribe now
Subscribe to our newsletter for more tech based insights
FAQ