Introduction to MediaSoup WebRTC
What is MediaSoup?
MediaSoup is an advanced and powerful media server designed specifically for
real-time communication
applications using WebRTC (Web Real-Time Communication). It acts as a Selective Forwarding Unit (SFU), which plays a crucial role in facilitating efficient and scalable video and audio communication. Unlike traditional peer-to-peer communication, where each participant sends media streams to all other participants, an SFU like MediaSoup optimizes the process by receiving media streams from all participants and forwarding only the necessary data to each one. This significantly reduces bandwidth usage and improves overall performance, especially in scenarios with multiple participants.Importance of WebRTC and SFU in Real-Time Communication
WebRTC is a cutting-edge technology that enables peer-to-peer audio, video, and data sharing directly between browsers without the need for plugins. It is widely used in various applications such as video conferencing,
live streaming
, and online gaming. However, as the number of participants in a communication session increases, peer-to-peer architecture can become inefficient due to the high bandwidth demand. This is where the role of an SFU like MediaSoup becomes indispensable.By leveraging MediaSoup, developers can build scalable and high-performance real-time communication solutions. MediaSoup handles the complexities of media routing, provides robust support for multiple participants, and ensures low latency and high-quality communication.
Key Features of MediaSoup
MediaSoup offers a wide range of features that make it a preferred choice for developers working on real-time communication projects:
- Scalability: Efficiently manages multiple participants by forwarding only relevant media streams.
- Flexibility: Supports a variety of codecs and allows customization to meet specific requirements.
- Interoperability: Works seamlessly with WebRTC-compliant browsers and devices.
- High Performance: Written in C++ and utilizing Node.js, MediaSoup ensures optimal performance and low latency.
- Extensive Documentation: Comprehensive documentation and examples to help developers get started quickly.
Getting Started with the Code
Create a New MediaSoup App
To begin developing with MediaSoup, you'll first need to set up your development environment. Ensure you have Node.js installed, as MediaSoup uses Node.js for its server-side logic. You can download Node.js from
here
.Initialize a New Project
[a] Create a Project Directory
bash
1   mkdir mediasoup-app
2   cd mediasoup-app
3
[b] Initialize a Node.js Project
bash
1   npm init -y
2
This command will generate a
package.json file, which will manage your project's dependencies.Install MediaSoup
Next, you'll need to install MediaSoup and its dependencies. MediaSoup requires certain system dependencies like
gcc, g++, make, and python (for building native modules).[a] Install Required Dependencies
bash
1   sudo apt-get install -y build-essential python
2
[b] Install MediaSoup
bash
1   npm install mediasoup
2
Additionally, you may need to install other dependencies required for your specific project needs, such as
express for setting up a server, and socket.io for real-time communication.[c] Install Other Dependencies
bash
1   npm install express socket.io
2
[d] Structure of the Project
Your project directory should be structured to keep the code organized and maintainable. Here's a suggested structure:
JavaScript
1mediasoup-app/
2├── public/
3│   └── index.html
4├── src/
5│   ├── server.js
6│   ├── mediasoup-config.js
7│   ├── rooms/
8│   │   └── roomManager.js
9│   └── peers/
10│       └── peerManager.js
11├── package.json
12└── README.md
13
Directory Layout
- public/: Contains static files like HTML, CSS, and client-side JavaScript.
- src/: Contains server-side code.
- server.js: Main server file to initialize and run the server.
- mediasoup-config.js: Configuration for MediaSoup.
- rooms/: Manages different rooms and their logic.
- peers/: Manages peer connections and their logic.
App Architecture
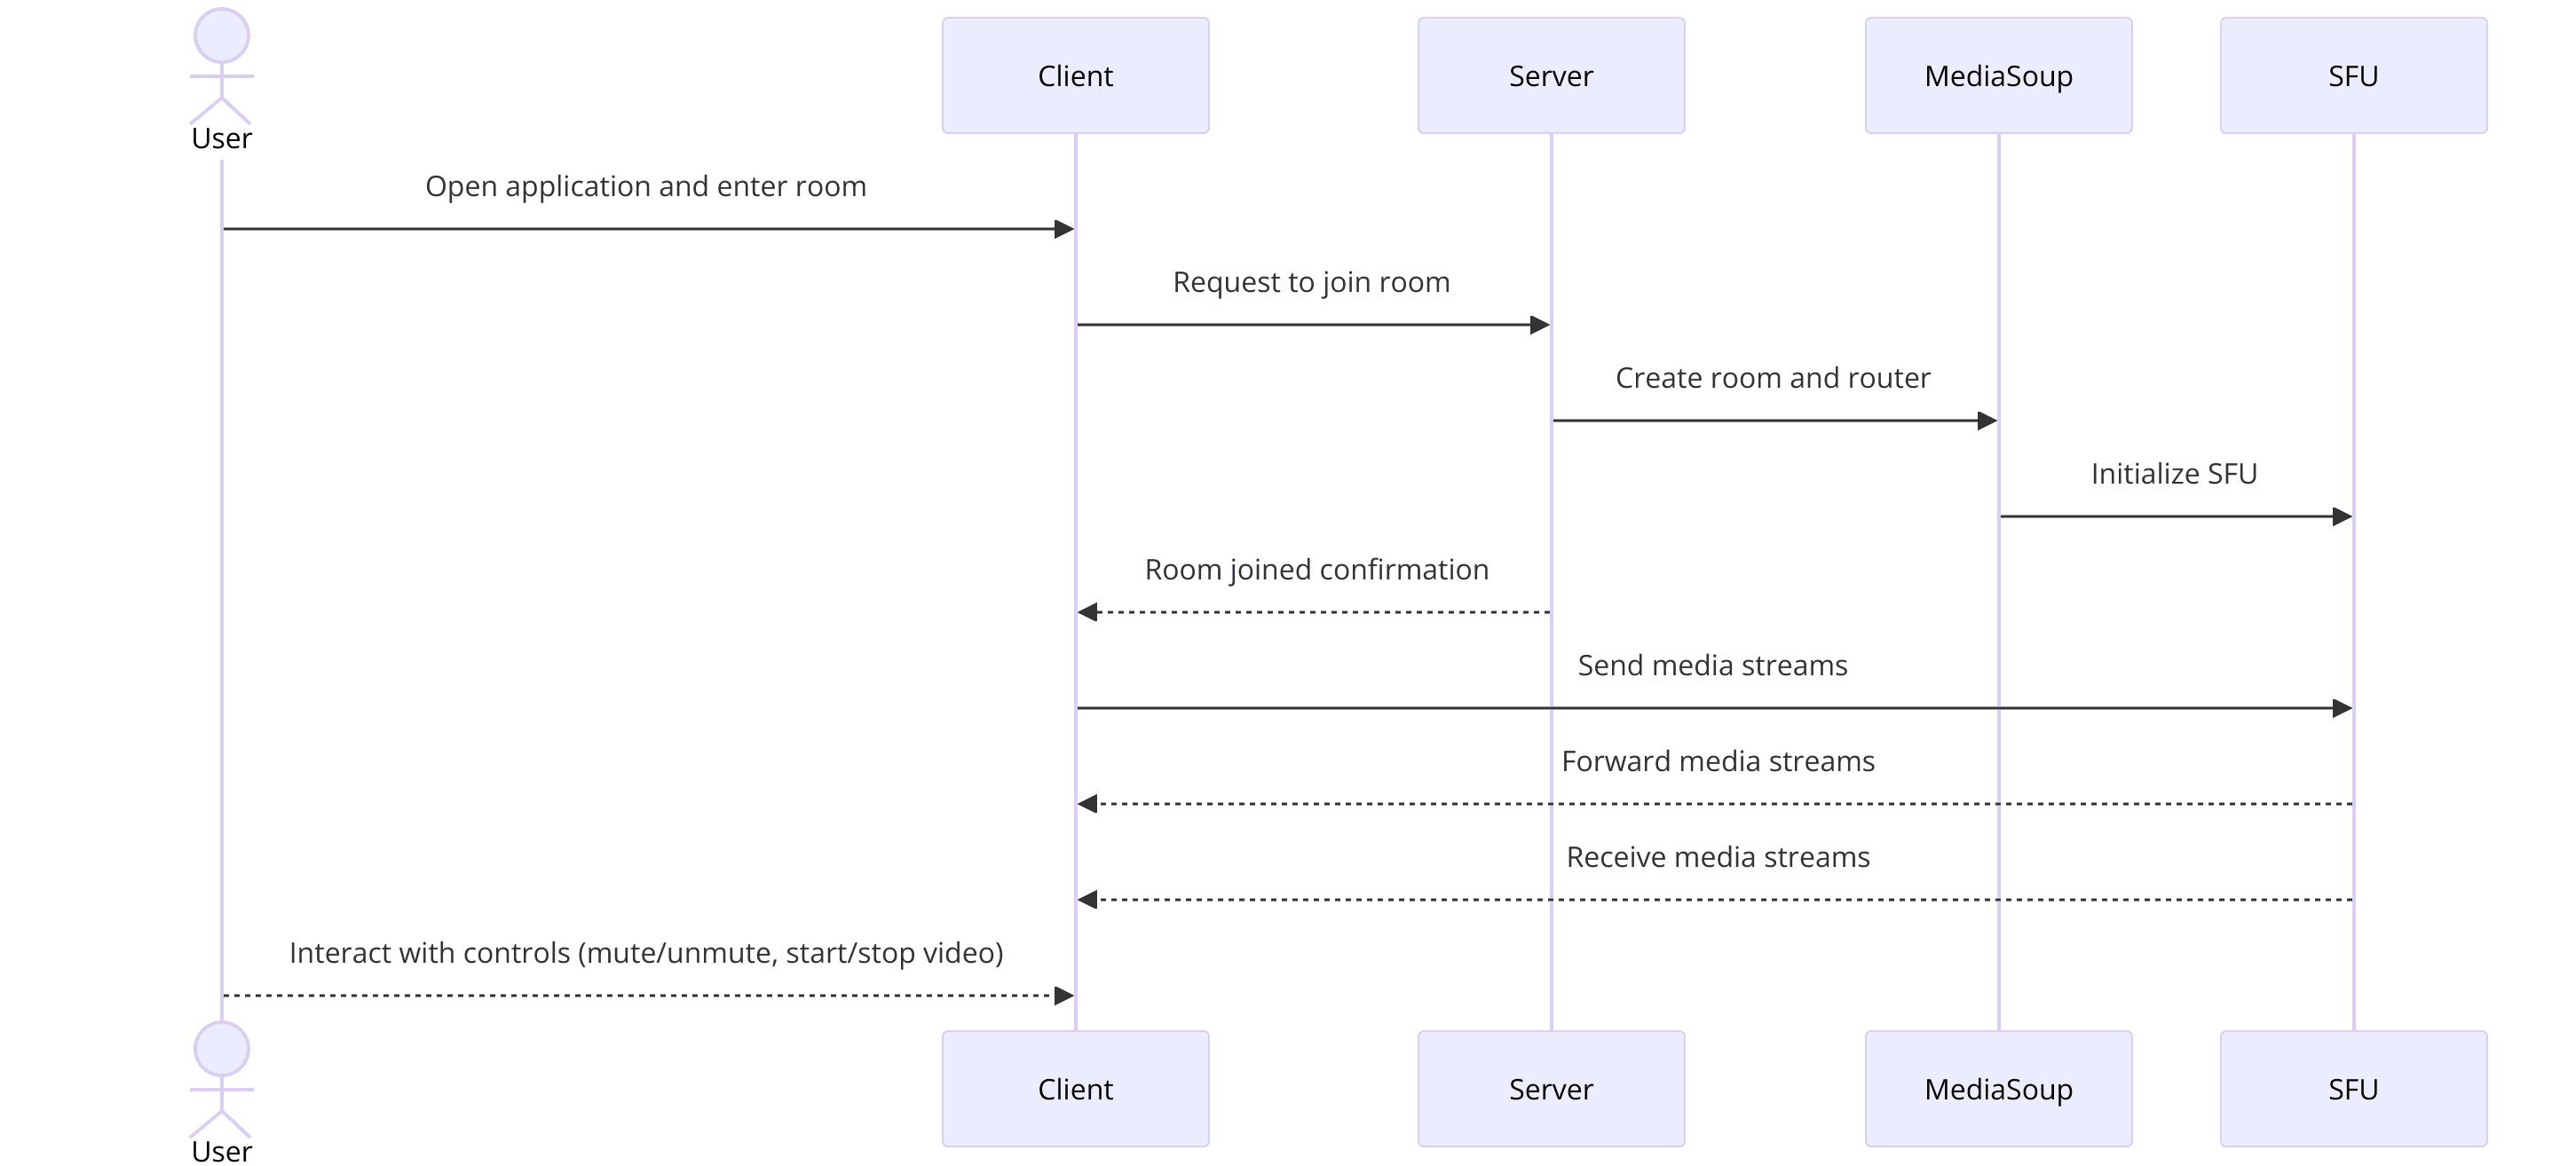
- Client-Server Interaction: Clients (browsers) connect to the server, which manages media streams using MediaSoup.
- Rooms and Peers: A room represents a communication session, and peers are the participants in the room.
- Media Routing: MediaSoup routes media streams between peers efficiently.
Overview of the Architecture
Client-Side
- Connects to the server using WebSockets.
- Sends and receives media streams via WebRTC.
- Handles user interface for media controls (mute, unmute, etc.).
Server-Side
- Manages WebSocket connections.
- Configures and initializes MediaSoup.
- Manages rooms and peers.
- Routes media streams between peers.
Here is a basic code snippet to set up the server and MediaSoup configuration:
JavaScript
1// src/server.js
2const express = require('express');
3const http = require('http');
4const socketIo = require('socket.io');
5const mediasoup = require('mediasoup');
6
7const app = express();
8const server = http.createServer(app);
9const io = socketIo(server);
10
11// MediaSoup server setup
12const mediasoupServer = require('./mediasoup-config');
13
14// Express server setup
15app.use(express.static('public'));
16
17io.on('connection', (socket) => {
18  console.log('New client connected');
19
20  // Handle client requests for MediaSoup
21  socket.on('joinRoom', (roomId, callback) => {
22    // Room joining logic here
23  });
24
25  socket.on('disconnect', () => {
26    console.log('Client disconnected');
27  });
28});
29
30server.listen(3000, () => {
31  console.log('Server is running on port 3000');
32});
33
This setup initializes an Express server and sets up Socket.io for handling real-time communication. It also prepares the ground for integrating MediaSoup, which will be configured in the next steps.
In the following sections, we will delve deeper into configuring MediaSoup, managing rooms and peers, and building the client-side interface to complete your MediaSoup WebRTC application.
Step 1: Get Started with Server Setup
Setup the Server
To build a MediaSoup application, the first step involves setting up the server. The server will manage media routing, room creation, and peer connections. This section will guide you through the server-side configuration.
Creating the Server Script
Begin by creating a file named
server.js in the src directory. This file will handle the server initialization and configuration.[a] Import Required Modules
JavaScript
1   // src/server.js
2   const express = require('express');
3   const http = require('http');
4   const socketIo = require('socket.io');
5   const mediasoup = require('mediasoup');
6
[b] Initialize Express and HTTP Server
JavaScript
1   const app = express();
2   const server = http.createServer(app);
3   const io = socketIo(server);
4
[c] Set Up Static Files
JavaScript
1   app.use(express.static('public'));
2
[d] Listen on Port 3000
JavaScript
1   server.listen(3000, () => {
2     console.log('Server is running on port 3000');
3   });
4
Configuration of MediaSoup
Next, you need to configure MediaSoup. Create a new file named
mediasoup-config.js in the src directory. This file will handle the MediaSoup server configuration.Basic Configuration
JavaScript
1   // src/mediasoup-config.js
2   const mediasoup = require('mediasoup');
3
4   const workerSettings = {
5     logLevel: 'warn',
6     rtcMinPort: 10000,
7     rtcMaxPort: 10100
8   };
9
10   const routerOptions = {
11     mediaCodecs: [
12       {
13         kind: 'audio',
14         mimeType: 'audio/opus',
15         clockRate: 48000,
16         channels: 2
17       },
18       {
19         kind: 'video',
20         mimeType: 'video/VP8',
21         clockRate: 90000
22       }
23     ]
24   };
25
26   let worker;
27   let router;
28
29   const createWorker = async () => {
30     worker = await mediasoup.createWorker(workerSettings);
31     worker.on('died', () => {
32       console.error('MediaSoup worker has died');
33     });
34
35     router = await worker.createRouter({ mediaCodecs: routerOptions });
36   };
37
38   module.exports = { createWorker, worker, router };
39
This script sets up the MediaSoup worker and router with basic configurations for audio and video codecs. The worker handles the media processing, and the router manages the media streams.
Server Components
Understanding the key server components is crucial for building a functional MediaSoup application. The primary components are:
- Worker: Manages media processing tasks.
- Router: Handles media routing and stream management.
- Transports: Manage the transport of media streams between the server and clients.
- Producers and Consumers: Represent the media streams being sent and received.
Basic Server Code Snippet
Now, let's integrate the MediaSoup configuration into the main server script (
server.js).[a] Import MediaSoup Configuration
JavaScript
1   const { createWorker } = require('./mediasoup-config');
2
[b] Initialize MediaSoup Worker and Router
JavaScript
1   (async () => {
2     await createWorker();
3   })();
4
[c] Handle Client Connections
JavaScript
1   io.on('connection', (socket) => {
2     console.log('New client connected');
3
4     socket.on('joinRoom', async (roomId, callback) => {
5       // Room joining logic
6       console.log(`Client joined room: ${roomId}`);
7
8       // Create a transport for the client
9       const transport = await createWebRtcTransport(router);
10       callback({ transportOptions: transport });
11
12       // Handle additional signaling events here
13     });
14
15     socket.on('disconnect', () => {
16       console.log('Client disconnected');
17     });
18   });
19
20   const createWebRtcTransport = async (router) => {
21     const transport = await router.createWebRtcTransport({
22       listenIps: [{ ip: '0.0.0.0', announcedIp: 'YOUR_SERVER_IP' }],
23       enableUdp: true,
24       enableTcp: true,
25       preferUdp: true,
26     });
27
28     transport.on('dtlsstatechange', dtlsState => {
29       if (dtlsState === 'closed') {
30         transport.close();
31       }
32     });
33
34     transport.on('close', () => {
35       console.log('Transport closed');
36     });
37
38     return transport;
39   };
40
In this snippet, we set up a WebRTC transport for each client that connects to the server. This transport will handle the media streams between the client and the server.
Step 2: Wireframe All the Components
Designing the Wireframe
Before diving into the implementation, it's crucial to plan out the application structure and interaction between components. This helps in maintaining a clear vision and ensuring all parts of the application work seamlessly together. The primary components for a MediaSoup WebRTC application include:
- Join Screen: Where users enter their names and join a room.
- Controls: Interface elements for muting, unmuting, turning the video on/off, etc.
- Participant View: Display of all participants in the room.
Creating Component Blueprints
Let's break down each component and their roles in the application.
Join Screen
- UI Elements: Input field for the username, room ID input, join button.
- User Flow: User enters their name and room ID, then clicks the join button to enter the room.
Controls
- UI Elements: Buttons for mute/unmute, start/stop video, leave room.
- User Flow: Users interact with these controls to manage their audio and video streams.
Participant View
- UI Elements: Video elements for each participant, names displayed.
- User Flow: Real-time display of participants' video streams and names.
Component Interaction Diagram
Creating a visual representation of how these components interact can help in understanding the flow of data and events within the application.
1+------------------+     +------------------+     +------------------+
2|  Join Screen     | --> |     Controls     | --> | Participant View |
3+------------------+     +------------------+     +------------------+
4
Explanation
- The Join Screen captures user input and initializes the connection to the room.
- The Controls manage the state of the user's media streams and handle user actions.
- The Participant View displays the video streams of all participants in the room, updating in real-time as participants join or leave.
Join Screen Implementation
[a] HTML Structure
Create an
index.html file in the public directory with the following structure:HTML
1   <!DOCTYPE html>
2   <html lang="en">
3   <head>
4     <meta charset="UTF-8">
5     <meta name="viewport" content="width=device-width, initial-scale=1.0">
6     <title>MediaSoup App</title>
7     <link rel="stylesheet" href="styles.css">
8   </head>
9   <body>
10     <div id="join-screen">
11       <h2>Join Room</h2>
12       <input type="text" id="username" placeholder="Enter your name">
13       <input type="text" id="room-id" placeholder="Enter room ID">
14       <button id="join-button">Join</button>
15     </div>
16     <div id="controls" style="display: none;">
17       <!-- Controls will be added here -->
18     </div>
19     <div id="participant-view" style="display: none;">
20       <!-- Participant view will be added here -->
21     </div>
22     <script src="/socket.io/socket.io.js"></script>
23     <script src="main.js"></script>
24   </body>
25   </html>
26
[b] CSS Styling
Create a
styles.css file in the public directory to style the join screen:CSS
1   body {
2     font-family: Arial, sans-serif;
3     display: flex;
4     justify-content: center;
5     align-items: center;
6     height: 100vh;
7     margin: 0;
8     background-color: #f0f0f0;
9   }
10
11   #join-screen {
12     background: #fff;
13     padding: 20px;
14     border-radius: 5px;
15     box-shadow: 0 0 10px rgba(0, 0, 0, 0.1);
16   }
17
18   #join-screen h2 {
19     margin-top: 0;
20   }
21
22   #join-screen input {
23     width: 100%;
24     padding: 10px;
25     margin: 10px 0;
26     border: 1px solid #ccc;
27     border-radius: 5px;
28   }
29
30   #join-button {
31     width: 100%;
32     padding: 10px;
33     background: #007bff;
34     border: none;
35     border-radius: 5px;
36     color: #fff;
37     font-size: 16px;
38     cursor: pointer;
39   }
40
[c] JavaScript Functionality
Create a
main.js file in the public directory to handle the join logic:JavaScript
1   document.getElementById('join-button').addEventListener('click', () => {
2     const username = document.getElementById('username').value;
3     const roomId = document.getElementById('room-id').value;
4
5     if (username && roomId) {
6       // Connect to the server and join the room
7       const socket = io();
8       socket.emit('joinRoom', { username, roomId });
9
10       // Hide join screen and show controls and participant view
11       document.getElementById('join-screen').style.display = 'none';
12       document.getElementById('controls').style.display = 'block';
13       document.getElementById('participant-view').style.display = 'block';
14
15       // Handle further interactions with the server
16       socket.on('connect', () => {
17         console.log('Connected to server');
18       });
19     } else {
20       alert('Please enter your name and room ID');
21     }
22   });
23
This basic setup handles the user input on the join screen and initiates the connection to the server. In the subsequent steps, we will build out the remaining components (Controls and Participant View) and integrate them with the server to create a fully functional MediaSoup WebRTC application.
Step 3: Implement Join Screen
UI Design for Join Screen
The join screen is the first interaction point for users. It should be simple and intuitive, enabling users to enter their names and room IDs to join a session. The join screen will consist of input fields for the user's name and the room ID, and a button to join the room.
Join Screen Code Snippet
Let's create a fully functional join screen that captures user input and connects to the MediaSoup server.
[a] HTML Structure
Ensure your
index.html file has the structure for the join screen as follows:HTML
1   <!DOCTYPE html>
2   <html lang="en">
3   <head>
4     <meta charset="UTF-8">
5     <meta name="viewport" content="width=device-width, initial-scale=1.0">
6     <title>MediaSoup App</title>
7     <link rel="stylesheet" href="styles.css">
8   </head>
9   <body>
10     <div id="join-screen">
11       <h2>Join Room</h2>
12       <input type="text" id="username" placeholder="Enter your name">
13       <input type="text" id="room-id" placeholder="Enter room ID">
14       <button id="join-button">Join</button>
15     </div>
16     <div id="controls" style="display: none;">
17       <!-- Controls will be added here -->
18     </div>
19     <div id="participant-view" style="display: none;">
20       <!-- Participant view will be added here -->
21     </div>
22     <script src="/socket.io/socket.io.js"></script>
23     <script src="main.js"></script>
24   </body>
25   </html>
26
[b] CSS Styling
Add the following styles in your
styles.css file to enhance the appearance of the join screen:CSS
1   body {
2     font-family: Arial, sans-serif;
3     display: flex;
4     justify-content: center;
5     align-items: center;
6     height: 100vh;
7     margin: 0;
8     background-color: #f0f0f0;
9   }
10
11   #join-screen {
12     background: #fff;
13     padding: 20px;
14     border-radius: 5px;
15     box-shadow: 0 0 10px rgba(0, 0, 0, 0.1);
16   }
17
18   #join-screen h2 {
19     margin-top: 0;
20   }
21
22   #join-screen input {
23     width: 100%;
24     padding: 10px;
25     margin: 10px 0;
26     border: 1px solid #ccc;
27     border-radius: 5px;
28   }
29
30   #join-button {
31     width: 100%;
32     padding: 10px;
33     background: #007bff;
34     border: none;
35     border-radius: 5px;
36     color: #fff;
37     font-size: 16px;
38     cursor: pointer;
39   }
40
[c] JavaScript Functionality
Create a
main.js file in the public directory to handle the join logic. This script will capture user input, establish a WebSocket connection to the server, and emit a join event.JavaScript
1   document.getElementById('join-button').addEventListener('click', () => {
2     const username = document.getElementById('username').value;
3     const roomId = document.getElementById('room-id').value;
4
5     if (username && roomId) {
6       // Connect to the server and join the room
7       const socket = io();
8       socket.emit('joinRoom', { username, roomId });
9
10       // Hide join screen and show controls and participant view
11       document.getElementById('join-screen').style.display = 'none';
12       document.getElementById('controls').style.display = 'block';
13       document.getElementById('participant-view').style.display = 'block';
14
15       // Handle further interactions with the server
16       socket.on('connect', () => {
17         console.log('Connected to server');
18       });
19
20       socket.on('roomJoined', (data) => {
21         console.log(`Joined room ${data.roomId} as ${data.username}`);
22         // Initialize media streams and UI updates here
23       });
24
25       socket.on('connect_error', (error) => {
26         console.error('Connection error:', error);
27         alert('Connection failed. Please try again.');
28       });
29     } else {
30       alert('Please enter your name and room ID');
31     }
32   });
33
Handling User Input
The
main.js file captures the username and room ID input by the user and establishes a connection to the server using Socket.io. The joinRoom event is emitted to the server with the user details, and the UI is updated to hide the join screen and display the controls and participant view sections.[a] Server-Side Handling
Ensure your server handles the
joinRoom event correctly. Update your server.js file to manage this event and initialize a room for the user.JavaScript
1   io.on('connection', (socket) => {
2     console.log('New client connected');
3
4     socket.on('joinRoom', async ({ username, roomId }) => {
5       console.log(`${username} is joining room: ${roomId}`);
6       // Create or join room logic
7       socket.join(roomId);
8       io.to(roomId).emit('roomJoined', { username, roomId });
9
10       // Further logic to handle room joining
11     });
12
13     socket.on('disconnect', () => {
14       console.log('Client disconnected');
15     });
16   });
17
This setup ensures that when a user joins a room, they are connected to the appropriate room on the server, and other participants are notified of the new joiner.
Step 4: Implement Controls
Designing the Controls
The controls interface is essential for managing the user's media streams, such as muting/unmuting audio, starting/stopping video, and leaving the room. These controls should be intuitive and responsive to ensure a smooth user experience.
Controls Code Snippet
Let's create the controls UI and implement the necessary JavaScript to handle user interactions.
[a] HTML Structure
Ensure your
index.html file includes a section for the controls:HTML
1<div id="controls" style="display: none;">
2  <button id="mute-button">Mute</button>
3  <button id="video-button">Stop Video</button>
4  <button id="leave-button">Leave Room</button>
5</div>
6
[b] CSS Styling
Add the following styles to your
styles.css file to enhance the appearance of the controls:CSS
1#controls {
2  position: fixed;
3  bottom: 20px;
4  left: 50%;
5  transform: translateX(-50%);
6  display: flex;
7  gap: 10px;
8}
9
10#controls button {
11  padding: 10px;
12  border: none;
13  border-radius: 5px;
14  background: #007bff;
15  color: #fff;
16  font-size: 16px;
17  cursor: pointer;
18}
19
20#controls button:hover {
21  background: #0056b3;
22}
23
[c] JavaScript Functionality
Update your
main.js file to handle the controls' logic:JavaScript
1document.getElementById('join-button').addEventListener('click', () => {
2  const username = document.getElementById('username').value;
3  const roomId = document.getElementById('room-id').value;
4
5  if (username && roomId) {
6    const socket = io();
7    socket.emit('joinRoom', { username, roomId });
8
9    document.getElementById('join-screen').style.display = 'none';
10    document.getElementById('controls').style.display = 'block';
11    document.getElementById('participant-view').style.display = 'block';
12
13    let localStream;
14    let audioEnabled = true;
15    let videoEnabled = true;
16
17    // Handle media stream setup
18    navigator.mediaDevices.getUserMedia({ audio: true, video: true })
19      .then(stream => {
20        localStream = stream;
21        // Add stream to participant view
22        const videoElement = document.createElement('video');
23        videoElement.srcObject = stream;
24        videoElement.autoplay = true;
25        document.getElementById('participant-view').appendChild(videoElement);
26      })
27      .catch(error => {
28        console.error('Error accessing media devices.', error);
29        alert('Could not access your camera and microphone. Please check your permissions.');
30      });
31
32    // Handle mute button click
33    document.getElementById('mute-button').addEventListener('click', () => {
34      audioEnabled = !audioEnabled;
35      localStream.getAudioTracks()[0].enabled = audioEnabled;
36      document.getElementById('mute-button').textContent = audioEnabled ? 'Mute' : 'Unmute';
37    });
38
39    // Handle video button click
40    document.getElementById('video-button').addEventListener('click', () => {
41      videoEnabled = !videoEnabled;
42      localStream.getVideoTracks()[0].enabled = videoEnabled;
43      document.getElementById('video-button').textContent = videoEnabled ? 'Stop Video' : 'Start Video';
44    });
45
46    // Handle leave button click
47    document.getElementById('leave-button').addEventListener('click', () => {
48      socket.emit('leaveRoom', { username, roomId });
49      localStream.getTracks().forEach(track => track.stop());
50      socket.disconnect();
51
52      // Reset UI
53      document.getElementById('join-screen').style.display = 'block';
54      document.getElementById('controls').style.display = 'none';
55      document.getElementById('participant-view').style.display = 'none';
56      document.getElementById('participant-view').innerHTML = '';
57    });
58
59    socket.on('roomJoined', (data) => {
60      console.log(`Joined room ${data.roomId} as ${data.username}`);
61    });
62
63    socket.on('connect_error', (error) => {
64      console.error('Connection error:', error);
65      alert('Connection failed. Please try again.');
66    });
67  } else {
68    alert('Please enter your name and room ID');
69  }
70});
71
Event Handling
The JavaScript code above sets up event listeners for the controls and manages the user's media streams. Here's a breakdown of what each button does:
Mute Button
- Toggles the audio track of the local media stream.
- Updates the button text to reflect the current state (Mute/Unmute).
Video Button
- Toggles the video track of the local media stream.
- Updates the button text to reflect the current state (Stop Video/Start Video).
Leave Button
- Emits a
leaveRoomevent to the server. - Stops all media tracks of the local stream.
- Resets the UI to show the join screen and hide the controls and participant view.
Step 5: Implement Participant View
Designing Participant View
The participant view is a crucial component of a MediaSoup WebRTC application, as it displays the video streams of all participants in the room. This section will guide you through creating a dynamic and responsive participant view that updates in real-time as participants join or leave the room.
Layout Considerations
The participant view should be designed to handle multiple video streams, ensuring that each participant's video is displayed clearly and the layout adjusts dynamically as participants join or leave. A grid layout is a good choice for this purpose.
Participant View Code Snippet
[a] HTML Structure
Ensure your
index.html file includes a section for the participant view:HTML
1<div id="participant-view" style="display: none;">
2  <!-- Participant video elements will be added here dynamically -->
3</div>
4
[b] CSS Styling
Add the following styles to your
styles.css file to enhance the appearance of the participant view:CSS
1#participant-view {
2  display: flex;
3  flex-wrap: wrap;
4  gap: 10px;
5  padding: 20px;
6  justify-content: center;
7}
8
9#participant-view video {
10  width: 200px;
11  height: 150px;
12  background: #000;
13  border-radius: 5px;
14}
15
[c] JavaScript Functionality
Update your
main.js file to handle the logic for adding and removing participant video elements dynamically:JavaScript
1document.getElementById('join-button').addEventListener('click', () => {
2  const username = document.getElementById('username').value;
3  const roomId = document.getElementById('room-id').value;
4
5  if (username && roomId) {
6    const socket = io();
7    socket.emit('joinRoom', { username, roomId });
8
9    document.getElementById('join-screen').style.display = 'none';
10    document.getElementById('controls').style.display = 'block';
11    document.getElementById('participant-view').style.display = 'block';
12
13    let localStream;
14    let audioEnabled = true;
15    let videoEnabled = true;
16
17    navigator.mediaDevices.getUserMedia({ audio: true, video: true })
18      .then(stream => {
19        localStream = stream;
20        addParticipantVideo('local', stream);
21
22        // Emit local stream to other participants
23        socket.emit('newParticipant', { id: 'local', stream });
24
25        // Listen for new participants
26        socket.on('newParticipant', ({ id, stream }) => {
27          addParticipantVideo(id, stream);
28        });
29
30        // Listen for participant leaving
31        socket.on('participantLeft', id => {
32          removeParticipantVideo(id);
33        });
34      })
35      .catch(error => {
36        console.error('Error accessing media devices.', error);
37        alert('Could not access your camera and microphone. Please check your permissions.');
38      });
39
40    document.getElementById('mute-button').addEventListener('click', () => {
41      audioEnabled = !audioEnabled;
42      localStream.getAudioTracks()[0].enabled = audioEnabled;
43      document.getElementById('mute-button').textContent = audioEnabled ? 'Mute' : 'Unmute';
44    });
45
46    document.getElementById('video-button').addEventListener('click', () => {
47      videoEnabled = !videoEnabled;
48      localStream.getVideoTracks()[0].enabled = videoEnabled;
49      document.getElementById('video-button').textContent = videoEnabled ? 'Stop Video' : 'Start Video';
50    });
51
52    document.getElementById('leave-button').addEventListener('click', () => {
53      socket.emit('leaveRoom', { username, roomId });
54      localStream.getTracks().forEach(track => track.stop());
55      socket.disconnect();
56
57      document.getElementById('join-screen').style.display = 'block';
58      document.getElementById('controls').style.display = 'none';
59      document.getElementById('participant-view').style.display = 'none';
60      document.getElementById('participant-view').innerHTML = '';
61    });
62
63    socket.on('roomJoined', (data) => {
64      console.log(`Joined room ${data.roomId} as ${data.username}`);
65    });
66
67    socket.on('connect_error', (error) => {
68      console.error('Connection error:', error);
69      alert('Connection failed. Please try again.');
70    });
71  } else {
72    alert('Please enter your name and room ID');
73  }
74});
75
76const addParticipantVideo = (id, stream) => {
77  const videoElement = document.createElement('video');
78  videoElement.id = id;
79  videoElement.srcObject = stream;
80  videoElement.autoplay = true;
81  document.getElementById('participant-view').appendChild(videoElement);
82};
83
84const removeParticipantVideo = (id) => {
85  const videoElement = document.getElementById(id);
86  if (videoElement) {
87    videoElement.srcObject.getTracks().forEach(track => track.stop());
88    videoElement.remove();
89  }
90};
91
Managing Participant Data
The JavaScript code above manages the participant view by dynamically adding and removing video elements as participants join or leave the room. Here is a breakdown of the key functions:
addParticipantVideo(id, stream)
- Creates a new video element for the participant.
- Sets the video element's
srcObjectto the participant's media stream. - Appends the video element to the participant view.
removeParticipantVideo(id)
- Stops all tracks of the participant's media stream.
- Removes the video element from the participant view.
Handling Server-Side Events
Ensure your server handles events for new participants joining and leaving the room. Update your
server.js file accordingly:JavaScript
1io.on('connection', (socket) => {
2  console.log('New client connected');
3
4  socket.on('joinRoom', async ({ username, roomId }) => {
5    console.log(`${username} is joining room: ${roomId}`);
6    socket.join(roomId);
7    io.to(roomId).emit('roomJoined', { username, roomId });
8
9    socket.on('newParticipant', ({ id, stream }) => {
10      socket.to(roomId).emit('newParticipant', { id, stream });
11    });
12
13    socket.on('leaveRoom', ({ username, roomId }) => {
14      socket.leave(roomId);
15      socket.to(roomId).emit('participantLeft', username);
16    });
17
18    socket.on('disconnect', () => {
19      console.log('Client disconnected');
20    });
21  });
22});
23
By following these steps, you have successfully implemented the participant view for your MediaSoup WebRTC application. This view dynamically updates to show video streams of all participants in the room, providing a comprehensive and interactive real-time communication experience. In the next section, we will focus on running and testing your code to ensure everything works seamlessly.
Step 6: Run Your Code Now
Running the Application
Now that you've set up your MediaSoup WebRTC application with a join screen, user controls, and a participant view, it's time to run and test the application. This section will guide you through the steps to start the server and connect clients to verify that everything is working as expected.
[a] Start the Server
Ensure your server is properly configured and all necessary dependencies are installed. In your terminal, navigate to the root directory of your project and start the server using the following command:
bash
1node src/server.js
2
You should see a message indicating that the server is running:
1Server is running on port 3000
2
[b] Open the Application in a Browser
Open your web browser and navigate to
http://localhost:3000. You should see the join screen where you can enter your name and room ID.[c] Join a Room
Enter a name and a room ID (e.g., "test-room") and click the "Join" button. This will connect you to the room and display the controls and participant view. If you have multiple devices or browsers, you can open the same URL on them, enter the same room ID, and see the video streams of all participants.
Testing the Application
To ensure your application is working correctly, perform the following tests:
Join Room
- Open the application in multiple browser tabs or devices.
- Join the same room with different names.
- Verify that the video streams of all participants are displayed correctly.
Mute and Unmute
- Use the mute button to mute and unmute your audio.
- Verify that the audio stream is toggled correctly.
Start and Stop Video
- Use the video button to start and stop your video stream.
- Verify that the video stream is toggled correctly.
Leave Room
- Use the leave button to leave the room.
- Verify that the participant's video is removed from the view and the local media tracks are stopped.
Error Handling
- Check for any errors in the browser console or server logs.
- Ensure that the application handles connection errors gracefully and provides appropriate feedback to the user.
Troubleshooting Common Issues
If you encounter any issues while running the application, here are some common problems and solutions:
Media Devices Not Accessible
- Ensure that your browser has permission to access the camera and microphone.
- Check your browser settings and operating system privacy settings.
Connection Errors
- Verify that the server is running and accessible from the client.
- Check for network issues or firewall settings that may be blocking the connection.
No Video or Audio
- Ensure that your media devices are working properly.
- Check the browser console for any errors related to media devices.
Participant View Not Updating
- Ensure that the server is emitting the correct events for participants joining and leaving.
- Check the client-side JavaScript for errors in handling these events.
Conclusion
In this tutorial, you have learned how to build a MediaSoup WebRTC application from scratch. You set up a server, created a join screen, implemented user controls, and designed a participant view to display video streams. By following these steps, you can now create a scalable and high-performance real-time communication application using MediaSoup.
Want to level-up your learning? Subscribe now
Subscribe to our newsletter for more tech based insights
FAQ