Introduction to Mattermost WebRTC Technology
What is Mattermost WebRTC?
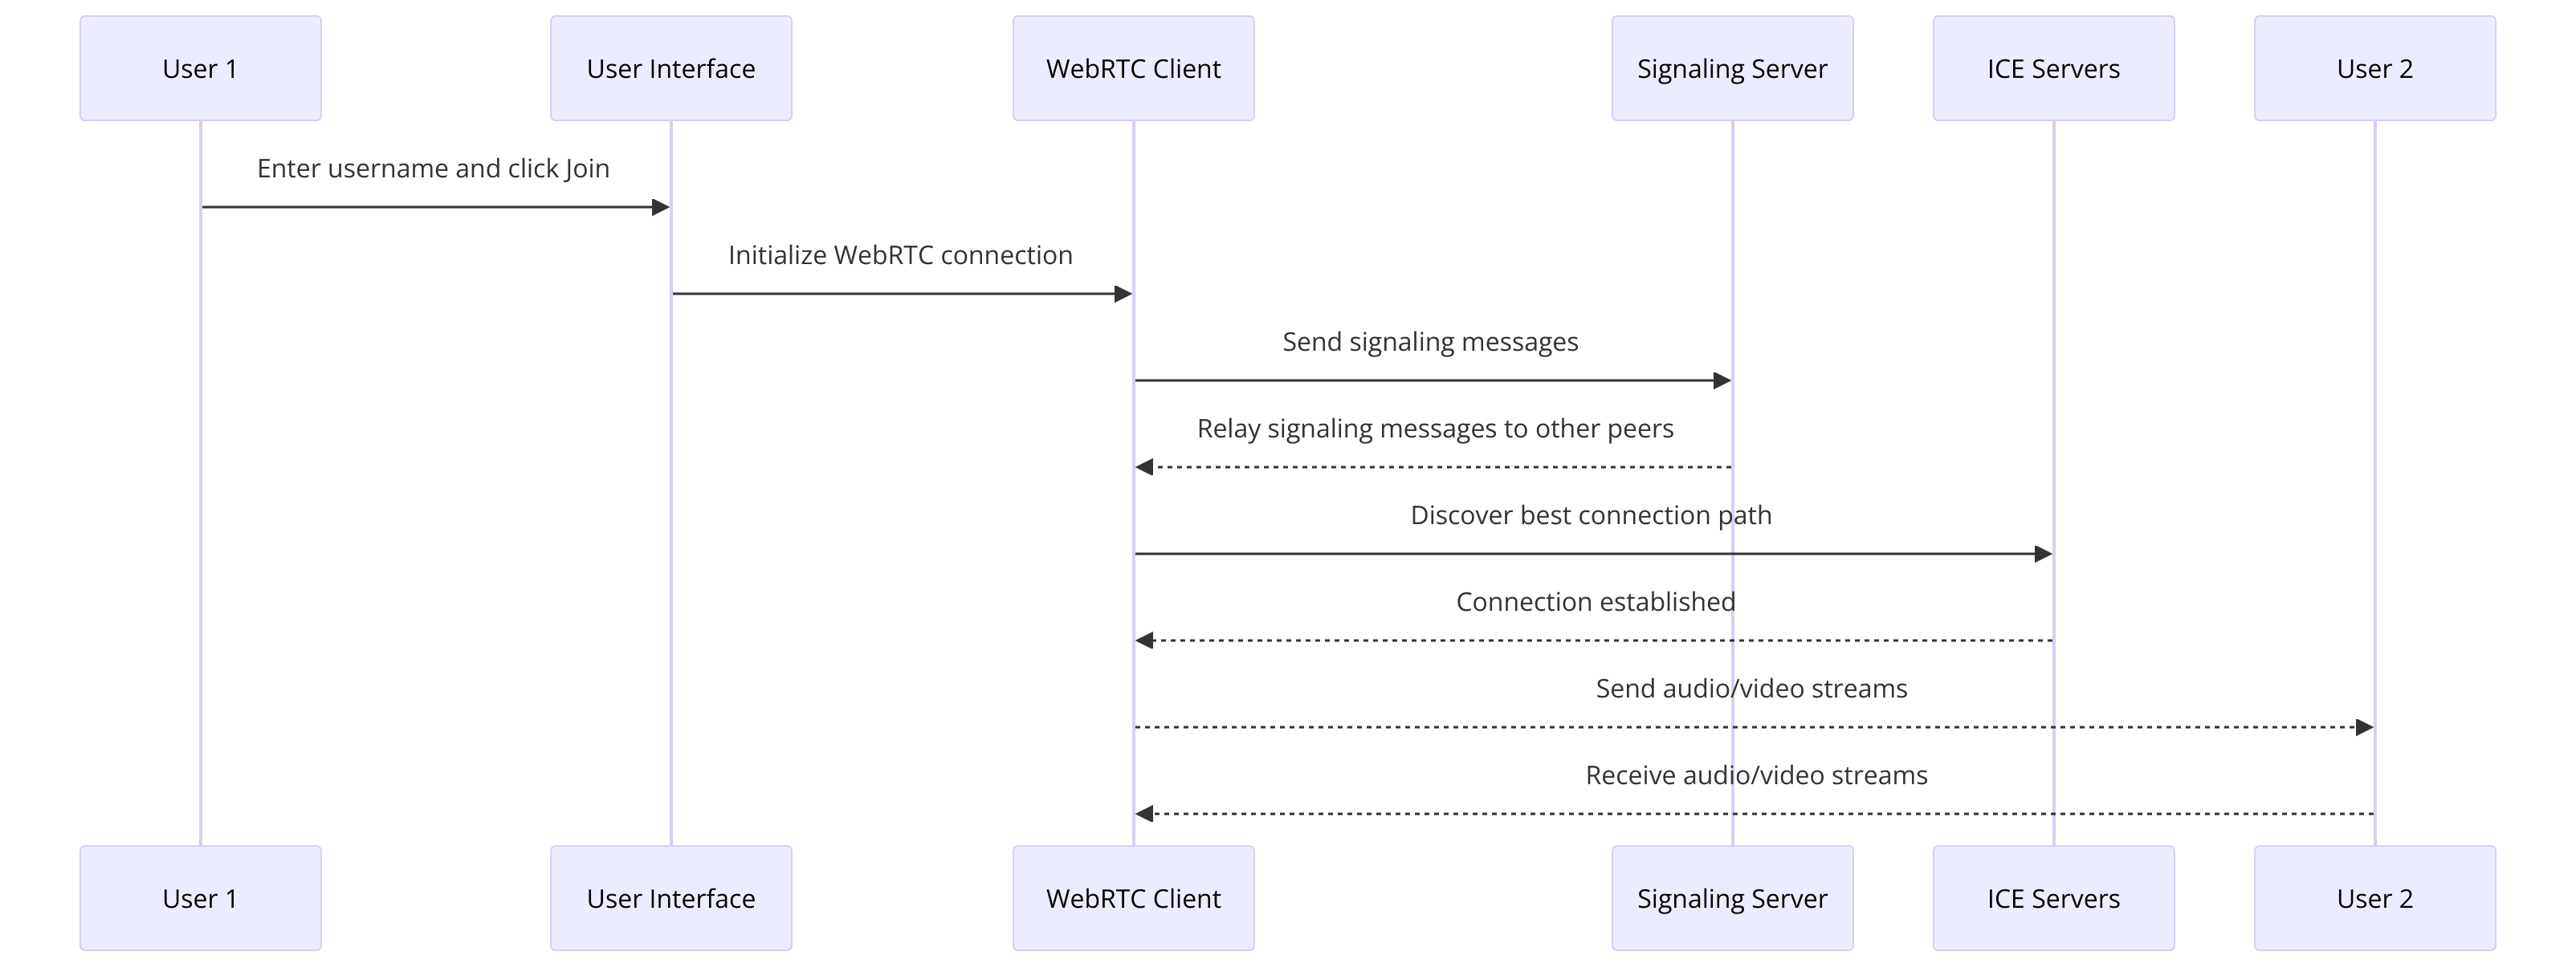
Mattermost WebRTC is a powerful extension of the Mattermost platform, leveraging the capabilities of Web Real-Time Communication (WebRTC) to provide robust, real-time video and audio communication features. Mattermost, a widely recognized open-source collaboration tool, facilitates team collaboration through various channels like messaging, file sharing, and integrations with other tools. By incorporating WebRTC, Mattermost enhances its communication suite, enabling users to engage in live video conferencing directly within the platform.
Why Use Mattermost WebRTC?
The integration of WebRTC into Mattermost offers numerous advantages for teams seeking efficient and secure communication solutions. Here are some key benefits:
High-Quality Video Conferencing
Mattermost WebRTC ensures high-definition video and audio quality, making virtual meetings more effective and engaging. It supports multiple participants, allowing teams to conduct seamless virtual meetings and brainstorming sessions.
Open-Source Flexibility
Being an open-source solution, Mattermost WebRTC allows developers to customize and extend the platform according to their specific needs. This flexibility ensures that organizations can tailor their communication tools to fit their unique workflows and requirements.
Enhanced Security
Security is a top priority for Mattermost. With WebRTC, all communications are encrypted, ensuring that sensitive information shared during video calls remains secure. This is particularly crucial for industries that handle confidential data, such as healthcare, finance, and legal sectors.
Seamless Integration
Mattermost WebRTC can be easily integrated with other tools and services used by teams. This integration capability enhances productivity by allowing teams to access all necessary tools within a single platform, reducing the need to switch between different applications.
Cost-Effective Solution
By utilizing open-source technologies, Mattermost WebRTC provides a cost-effective solution for organizations looking to implement high-quality video communication without the hefty price tag associated with proprietary software.
Getting Started with the Code
Create a New Mattermost WebRTC App
To begin developing a Mattermost WebRTC application, you'll need to set up your development environment and understand the project structure. Here’s how to get started:
Setting Up the Development Environment
[a] Install Go and Node.js
- Go to the
official Go website
and download the latest version of Go. - Similarly, download and install Node.js from the
Node.js website
.
[b] Clone the Mattermost Repository
Open your terminal and clone the Mattermost repository from GitHub using the following command:
bash
1     git clone https://github.com/mattermost/mattermost-server.git
2
Install Required Dependencies
After cloning the repository, navigate to the project directory and install the necessary dependencies.
[a] Navigate to the Project Directory
bash
1   cd mattermost-server
2
[b] Install Go Dependencies
Use Go modules to install dependencies:
bash
1     go mod tidy
2
[c] Install JavaScript Libraries
Navigate to the webapp directory and install npm packages:
bash
1     cd webapp
2     npm install
3
Structure of the Project
Understanding the directory layout and key files in the Mattermost project is essential for efficient development.
Directory Layout and Key Files
Main Directories:
server/: Contains the backend code, including the WebRTC server implementation.webapp/: Contains the frontend code for the Mattermost web application.
Important Files:
main.go: Entry point for the Go server.package.json: Manages JavaScript dependencies.config.json: Configuration file for Mattermost settings.
App Architecture
Overview of the App Architecture
- Backend (Go):
- Manages WebRTC signaling and server-side logic.
- Uses the Pion library for WebRTC functionalities.
- Frontend (JavaScript):
- Handles user interface and interactions.
- Communicates with the backend via WebSocket and REST APIs.
By following this setup, you’re now ready to dive deeper into the specific implementation details of Mattermost WebRTC. In the next steps, we will guide you through coding the main functionalities, starting with setting up the main Go file.
Step 1: Get Started with Main.go
In this step, we'll set up the main Go file (
main.go) to initialize the WebRTC server and handle the necessary imports. This file serves as the entry point for the backend part of our Mattermost WebRTC application.Setting Up the Main Go File
[a] Importing Necessary Packages
First, let's import the required packages. We'll use the Pion library, which is a popular Go library for WebRTC.
Go
1package main
2
3import (
4    "fmt"
5    "log"
6    "net/http"
7    "github.com/pion/webrtc/v3"
8)
9
[b] Initializing the WebRTC Server
Next, we'll set up the WebRTC server. This involves creating a new WebRTC configuration and setting up a simple HTTP server to serve our WebRTC signaling messages.
Go
1func main() {
2    fmt.Println("Starting WebRTC Server...")
3
4    // WebRTC configuration
5    config := webrtc.Configuration{
6        ICEServers: []webrtc.ICEServer{
7            {
8                URLs: []string{"stun:stun.l.google.com:19302"},
9            },
10        },
11    }
12
13    // Set up an HTTP server for signaling
14    http.HandleFunc("/signal", func(w http.ResponseWriter, r *http.Request) {
15        // Handle WebRTC signaling messages
16    })
17
18    // Start the HTTP server
19    log.Fatal(http.ListenAndServe(":8080", nil))
20}
21
Code Snippet Explanation
- Imports: We import essential packages, including
fmtfor printing messages,logfor logging errors,net/httpfor setting up the HTTP server, andgithub.com/pion/webrtc/v3for WebRTC functionalities. - WebRTC Configuration: We configure the WebRTC server with ICE (Interactive Connectivity Establishment) servers. In this example, we're using Google's public STUN server.
- HTTP Server for Signaling: We set up a simple HTTP server that listens on port 8080. The
/signalendpoint will handle the WebRTC signaling messages.
With the main Go file set up, we have a basic WebRTC server ready to handle signaling. In the next part, we’ll wireframe all the components, focusing on the frontend to complement our backend setup.
Step 2: Wireframe All the Components
In this step, we will design the user interface (UI) and user experience (UX) for the Mattermost WebRTC application. Wireframing is a crucial step in the development process as it helps visualize the layout and structure of the application before diving into the actual coding.
Designing the UI/UX
Main Components
The Mattermost WebRTC application will consist of three main components:
- Join Screen: The interface where users can enter their name and join the video call.
- Controls: Buttons and options to control the video call (e.g., mute/unmute, start/stop video).
- Participant View: The area where video streams of all participants will be displayed.
Tools for Wireframing
You can use various tools to create wireframes, such as Figma, Sketch, or even simple pen and paper. For this example, we'll outline the wireframe using HTML structure.
[a] HTML Structure for the Basic Layout
Let's start with the HTML structure that represents the basic layout of our application.
HTML
1<!DOCTYPE html>
2<html lang="en">
3<head>
4    <meta charset="UTF-8">
5    <meta name="viewport" content="width=device-width, initial-scale=1.0">
6    <title>Mattermost WebRTC</title>
7    <link rel="stylesheet" href="styles.css">
8</head>
9<body>
10    <!-- Join Screen -->
11    <div id="join-screen">
12        <input type="text" id="username" placeholder="Enter your name">
13        <button id="join-btn">Join</button>
14    </div>
15
16    <!-- Controls -->
17    <div id="controls" style="display:none;">
18        <button id="mute-btn">Mute</button>
19        <button id="video-btn">Stop Video</button>
20    </div>
21
22    <!-- Participant View -->
23    <div id="participant-view" style="display:none;"></div>
24
25    <script src="script.js"></script>
26</body>
27</html>
28
Explanation
- Join Screen: Contains an input field for the user to enter their name and a button to join the call.
- Controls: Contains buttons for muting/unmuting the microphone and starting/stopping the video. Initially hidden, will be shown once the user joins the call.
- Participant View: The area where video streams will be displayed. Initially hidden, will be shown once the user joins the call.
Wireframe Overview
By sketching out this basic structure, we ensure that we have a clear vision of how users will interact with our application. This layout provides a foundation upon which we can build and expand in the following steps. In the next part, we will implement the join screen functionality, allowing users to enter their name and join a video call.
Step 3: Implement Join Screen
In this step, we will implement the Join Screen, allowing users to enter their names and join the video call. This involves creating the necessary HTML, CSS, and JavaScript to handle user input and interaction.
Creating the Join Screen Interface
[a] HTML for the Join Screen
We have already outlined the basic HTML structure for the Join Screen in the previous part. Now, let’s add the necessary CSS and JavaScript to bring it to life.
HTML
1<!-- Join Screen HTML -->
2<div id="join-screen">
3    <input type="text" id="username" placeholder="Enter your name">
4    <button id="join-btn">Join</button>
5</div>
6
[b] CSS for the Join Screen
Add the following CSS to
styles.css to style the Join Screen:CSS
1/* styles.css */
2body {
3    font-family: Arial, sans-serif;
4    display: flex;
5    justify-content: center;
6    align-items: center;
7    height: 100vh;
8    background-color: #f0f0f0;
9}
10
11#join-screen {
12    display: flex;
13    flex-direction: column;
14    align-items: center;
15    background: #fff;
16    padding: 20px;
17    box-shadow: 0 0 10px rgba(0, 0, 0, 0.1);
18    border-radius: 8px;
19}
20
21#username {
22    margin-bottom: 10px;
23    padding: 10px;
24    width: 200px;
25    border: 1px solid #ccc;
26    border-radius: 4px;
27}
28
29#join-btn {
30    padding: 10px 20px;
31    background-color: #007bff;
32    color: #fff;
33    border: none;
34    border-radius: 4px;
35    cursor: pointer;
36}
37
38#join-btn:hover {
39    background-color: #0056b3;
40}
41
[c] JavaScript for User Interaction
Add the following JavaScript to
script.js to handle the join button click event:JavaScript
1// script.js
2document.getElementById('join-btn').addEventListener('click', () => {
3    const username = document.getElementById('username').value.trim();
4    if (username) {
5        // Proceed to join the video call
6        document.getElementById('join-screen').style.display = 'none';
7        document.getElementById('controls').style.display = 'block';
8        document.getElementById('participant-view').style.display = 'block';
9        // Initialize WebRTC connection here
10        console.log(`Joining as ${username}`);
11    } else {
12        alert('Please enter your name');
13    }
14});
15
Explanation
- HTML: The join screen consists of an input field for the username and a join button.
- CSS: Styles the join screen to be centered on the page with a clean, simple design.
- JavaScript: Handles the join button click event. It retrieves the username, hides the join screen, shows the controls and participant view, and logs the username.
With the Join Screen implemented, users can now enter their names and proceed to join the video call. In the next part, we will implement the controls to manage the video and audio functionalities during the call.
Step 4: Implement Controls
In this step, we will develop the controls for managing the video call, including functionalities like muting/unmuting the microphone and starting/stopping the video. These controls will enhance the user experience by providing essential features to manage their video and audio during the call.
Developing User Controls
[a] HTML for Controls
We have already outlined the basic HTML structure for the controls. Here’s a reminder of what it looks like:
HTML
1<!-- Controls HTML -->
2<div id="controls" style="display:none;">
3    <button id="mute-btn">Mute</button>
4    <button id="video-btn">Stop Video</button>
5</div>
6
[b] CSS for Controls
Add the following CSS to
styles.css to style the control buttons:CSS
1/* styles.css */
2#controls {
3    position: fixed;
4    bottom: 20px;
5    left: 50%;
6    transform: translateX(-50%);
7    display: flex;
8    gap: 10px;
9}
10
11#controls button {
12    padding: 10px 20px;
13    background-color: #007bff;
14    color: #fff;
15    border: none;
16    border-radius: 4px;
17    cursor: pointer;
18}
19
20#controls button:hover {
21    background-color: #0056b3;
22}
23
JavaScript for User Controls
Add the following JavaScript to
script.js to handle the mute/unmute and start/stop video functionalities:JavaScript
1// script.js
2let isMuted = false;
3let isVideoStopped = false;
4
5document.getElementById('mute-btn').addEventListener('click', () => {
6    isMuted = !isMuted;
7    if (isMuted) {
8        document.getElementById('mute-btn').innerText = 'Unmute';
9        // Code to mute the microphone
10    } else {
11        document.getElementById('mute-btn').innerText = 'Mute';
12        // Code to unmute the microphone
13    }
14    console.log(`Microphone ${isMuted ? 'muted' : 'unmuted'}`);
15});
16
17document.getElementById('video-btn').addEventListener('click', () => {
18    isVideoStopped = !isVideoStopped;
19    if (isVideoStopped) {
20        document.getElementById('video-btn').innerText = 'Start Video';
21        // Code to stop the video
22    } else {
23        document.getElementById('video-btn').innerText = 'Stop Video';
24        // Code to start the video
25    }
26    console.log(`Video ${isVideoStopped ? 'stopped' : 'started'}`);
27});
28
Explanation
- HTML: The controls section contains buttons for muting/unmuting the microphone and starting/stopping the video.
- CSS: Styles the control buttons to be fixed at the bottom of the screen with a visually appealing design.
- JavaScript: Handles the click events for the control buttons. It toggles the state of the microphone and video, updates the button text accordingly, and logs the current state.
With the controls implemented, users can now manage their audio and video during the call. In the next part, we will implement the participant view to display the video streams of all participants.
Step 5: Implement Participant View
In this step, we will implement the participant view, where video streams of all participants in the call will be displayed. This involves dynamically creating video elements and managing multiple video streams.
Displaying Participants
[a] HTML for Participant View
The basic HTML structure for the participant view has already been outlined. Here’s a reminder of what it looks like:
HTML
1<!-- Participant View HTML -->
2<div id="participant-view" style="display:none;"></div>
3
[b] CSS for Participant View
Add the following CSS to
styles.css to style the participant view:CSS
1/* styles.css */
2#participant-view {
3    display: flex;
4    flex-wrap: wrap;
5    gap: 10px;
6    justify-content: center;
7    margin-top: 20px;
8}
9
10#participant-view video {
11    width: 200px;
12    height: 150px;
13    background-color: #000;
14    border: 1px solid #ccc;
15    border-radius: 4px;
16}
17
[c] JavaScript for Adding Participants
Add the following JavaScript to
script.js to dynamically add video elements for participants:JavaScript
1// script.js
2
3// Function to add participant view
4function addParticipant(stream) {
5    const videoElement = document.createElement('video');
6    videoElement.srcObject = stream;
7    videoElement.autoplay = true;
8    videoElement.playsInline = true;
9    videoElement.controls = false;
10    document.getElementById('participant-view').appendChild(videoElement);
11}
12
13// Example of how to use addParticipant function
14// This would be called when a new participant joins the call
15const sampleStream = new MediaStream(); // Replace with actual MediaStream
16addParticipant(sampleStream);
17
Explanation
- HTML: The participant view section is a container where video elements will be dynamically added.
- CSS: Styles the video elements within the participant view to be visually appealing and uniform. Each video element is given a set size and styled to look like a video tile.
- JavaScript: The
addParticipantfunction creates a new video element for each participant's video stream. It sets the video source to the participant's media stream and appends the video element to the participant view container. The sample usage demonstrates how to call this function when a new participant joins the call.
With the participant view implemented, the application can now display video streams for all participants in the call. In the next part, we will cover the final step to run your code and ensure everything is working correctly.
Step 6: Run Your Code Now
In this final step, we will run the Mattermost WebRTC application to ensure that all components work together seamlessly. We’ll start the server and the client, test the video call functionality, and troubleshoot any issues that may arise.
Starting the Server
Navigate to the Project Directory
bash
1   cd mattermost-server
2
Run the Go Server
bash
1   go run main.go
2
Starting the Client
Navigate to the Webapp Directory
bash
1   cd webapp
2
Run the Web Application
bash
1   npm start
2
Testing and Debugging
- Open Your Browser:
- Open your web browser and navigate to
http://localhost:8080.
- Open your web browser and navigate to
- Join the Call:
- Enter your name in the Join Screen and click the "Join" button.
- Ensure the controls and participant view are displayed correctly.
- Test Video and Audio:
- Test the mute/unmute and start/stop video functionalities.
- Ensure video streams are correctly displayed in the participant view.
Troubleshooting Tips
Check Console for Errors: Open the browser's developer console to check for any error messages.
Verify Dependencies: Ensure all dependencies are installed correctly and versions are compatible.
Conclusion
Congratulations! You've successfully built a basic Mattermost WebRTC application. This guide walked you through setting up the development environment, creating the main components, and implementing essential functionalities such as the join screen, user controls, and participant view. By running your code, you now have a fully functional video conferencing tool integrated into the Mattermost platform. This setup can be further customized and scaled according to your specific requirements, making it a versatile solution for team collaboration and communication.
Want to level-up your learning? Subscribe now
Subscribe to our newsletter for more tech based insights
FAQ