What is Kurento WebRTC?
Kurento WebRTC is a powerful open-source media server technology designed to enable real-time communication and media processing. Developed with a focus on flexibility and performance, Kurento is written in C++ and offers robust solutions for media transmission, processing, recording, and playback. This technology supports a range of functionalities essential for modern communication applications, including
Selective Forwarding Unit
(SFU) andMultipoint Control Unit
(MCU) architectures.Key Features of Kurento WebRTC
Media Transmission and Processing
Kurento facilitates high-quality media streaming by handling the transmission of audio and video data between endpoints. Its advanced processing capabilities allow for tasks such as transcoding, mixing, and applying effects to media streams in real-time.
Recording and Playback
With Kurento, developers can easily implement media recording functionalities, enabling users to record live sessions for later playback. This feature is particularly useful for applications requiring archiving and reviewing of media content.
Computer Vision
One of the standout features of Kurento is its ability to integrate computer vision capabilities. This allows for the analysis and processing of video streams, enabling applications like object detection, face recognition, and augmented reality.
Why Choose Kurento for WebRTC?
Kurento stands out due to its comprehensive feature set and its ability to support complex media workflows. Its open-source nature means it is continually updated and improved by a community of developers, ensuring it remains at the forefront of
WebRTC
technology. Additionally, Kurento's modular architecture allows developers to extend and customize functionalities to suit specific application needs.By leveraging Kurento WebRTC, developers can build sophisticated, scalable, and high-performance communication applications that meet the demands of today's digital landscape. Whether you are developing a video conferencing tool, a live streaming platform, or an interactive multimedia application, Kurento provides the essential building blocks to bring your vision to life.
Getting Started with the Code
Build New Kurento WebRTC Application.
To start building with Kurento WebRTC, the first step is to set up a new Kurento project. This involves creating a new directory for your project and initializing it with the necessary configuration files and dependencies. Begin by creating a new directory and navigating into it:
bash
1mkdir kurento-webrtc-app
2cd kurento-webrtc-app
3
Install Kurento Media Server
Kurento Media Server (KMS) is the core component required for running your WebRTC application. Follow these steps to install KMS:
[a] Add the Kurento Repository
bash
1   sudo apt-key adv --keyserver keyserver.ubuntu.com --recv-keys 5AFA7A83
2   sudo tee /etc/apt/sources.list.d/kurento.list <<EOF
3   deb [arch=amd64] http://ubuntu.kurento.org/6.14.0 xenial kms6
4   EOF
5
[b] Update and Install
bash
1   sudo apt-get update
2   sudo apt-get install kurento-media-server
3
[c] Start Kurento Media Server
bash
1   sudo service kurento-media-server start
2
Structure of the Project
A well-organized project structure is essential for maintaining and scaling your application. Below is a typical structure for a Kurento WebRTC project:
1kurento-webrtc-app/
2├── src/
3│   ├── main.cpp
4│   ├── media_server.cpp
5│   └── media_server.h
6├── CMakeLists.txt
7├── README.md
8└── config/
9    └── kurento.conf.json
10- src/: Contains the main source files for the application.
- CMakeLists.txt: The build configuration file for compiling the project.
- config/: Contains configuration files for Kurento Media Server.
App Architecture
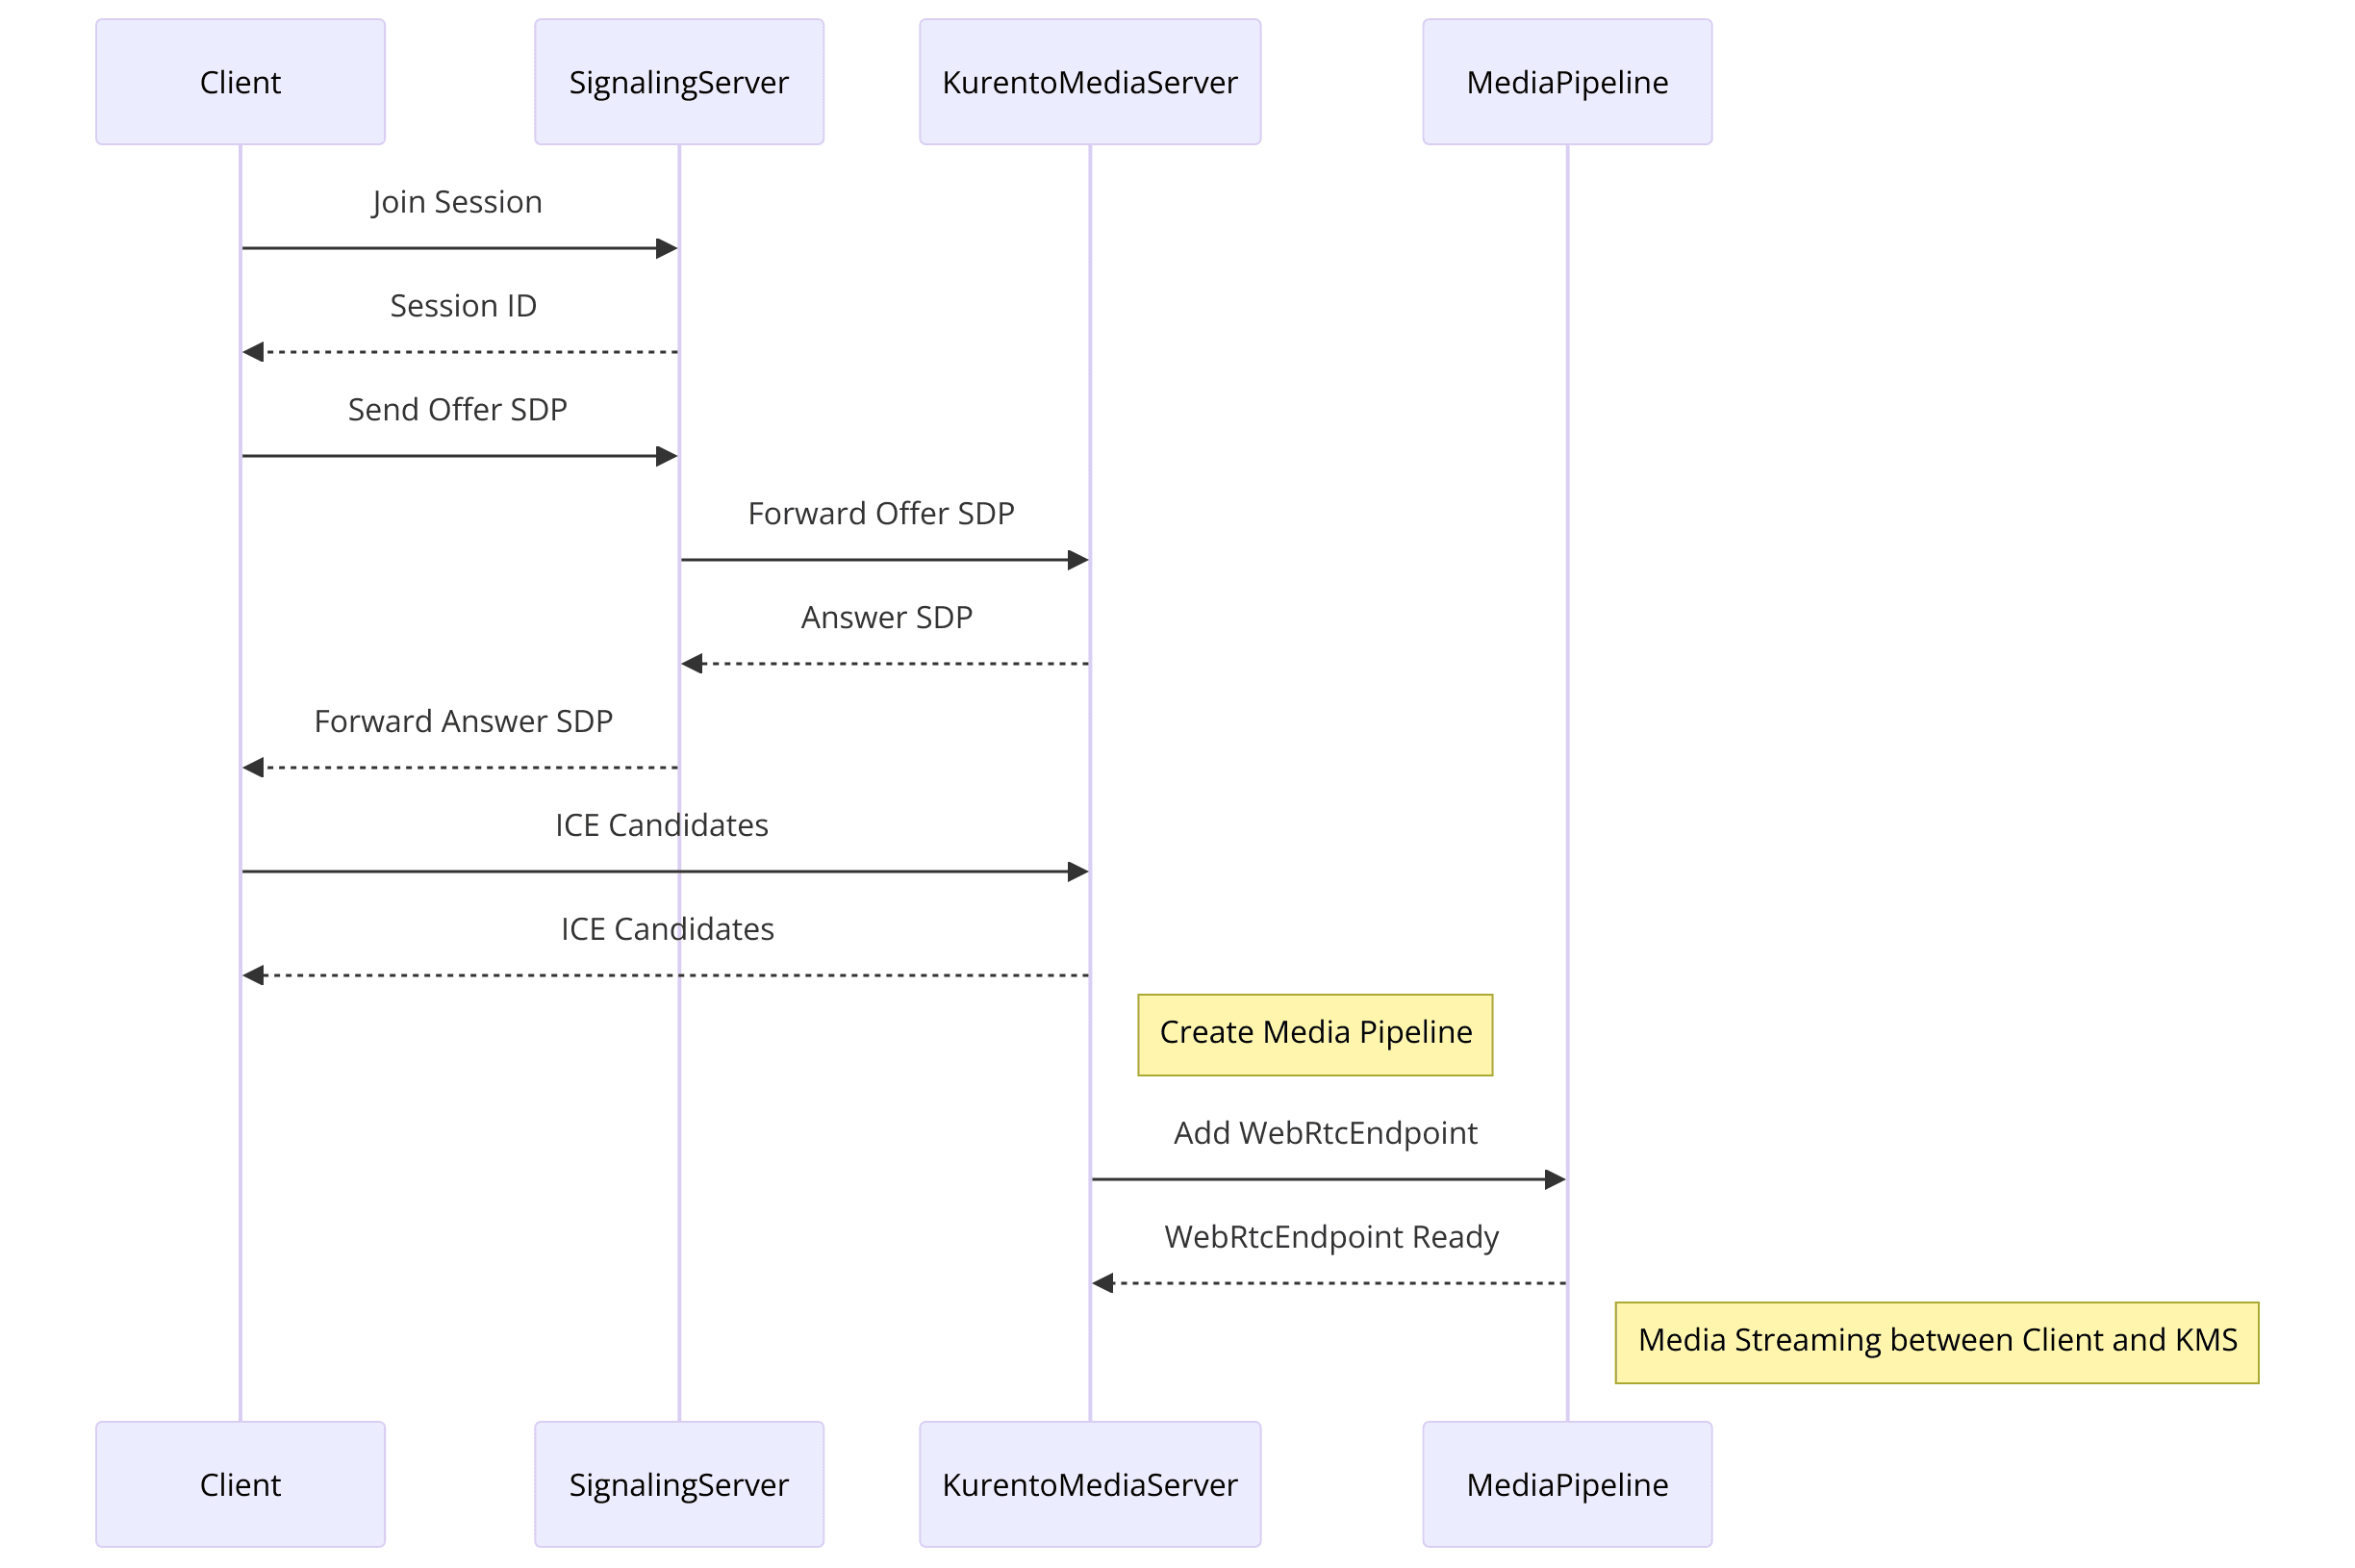
Media Pipelines
These are the core of Kurento's architecture, where media is received, processed, and sent to endpoints. A media pipeline can consist of multiple elements such as WebRtcEndpoint, RecorderEndpoint, and PlayerEndpoint.
Endpoints
Endpoints are interfaces through which media enters and leaves the Kurento Media Server. The most commonly used endpoints include WebRtcEndpoint for WebRTC clients, RecorderEndpoint for recording media, and PlayerEndpoint for playing media from a file or URL.
Example Code Snippet to Initialize a Kurento Server
Here is a simple example of initializing a Kurento Media Server and setting up a media pipeline:
C++
1#include <KurentoModule.h>
2#include <MediaPipeline.hpp>
3#include <WebRtcEndpoint.hpp>
4
5int main(int argc, char** argv) {
6    kurento::KurentoModuleInit();
7    std::shared_ptr<kurento::MediaPipeline> pipeline = kurento::MediaPipeline::create();
8
9    std::shared_ptr<kurento::WebRtcEndpoint> webRtcEndpoint = kurento::WebRtcEndpoint::create(pipeline);
10    webRtcEndpoint->connect(webRtcEndpoint);
11
12    // Further implementation of your application logic
13
14    return 0;
15}
16
This snippet demonstrates the basic setup required to create a media pipeline and a WebRTC endpoint using the Kurento framework. Further steps will build on this foundation to create a fully functional Kurento WebRTC application.
Step 1: Get Started with Main File
In this section, we'll dive into the initial setup of your Kurento WebRTC application by configuring the main file. This involves initializing the Kurento Media Server, setting up a basic configuration, and preparing the environment to handle media streams.
Initialize Kurento Server
The first step in creating your Kurento WebRTC application is to initialize the Kurento Media Server. This involves including the necessary headers and setting up the main function. Below is a step-by-step guide with a code snippet to help you get started:
[a] Include Necessary Headers
Ensure you include the necessary Kurento headers in your main file (
main.cpp):C++
1   #include <KurentoModule.h>
2   #include <MediaPipeline.hpp>
3   #include <WebRtcEndpoint.hpp>
4
[b] Setup Main Function
Initialize the Kurento Media Server and create a media pipeline within the
main function. This pipeline will serve as the foundation for managing media streams.C++
1   int main(int argc, char** argv) {
2       // Initialize Kurento Media Server
3       kurento::KurentoModuleInit();
4
5       // Create a media pipeline
6       std::shared_ptr<kurento::MediaPipeline> pipeline = kurento::MediaPipeline::create();
7
8       // Set up a WebRtcEndpoint
9       std::shared_ptr<kurento::WebRtcEndpoint> webRtcEndpoint = kurento::WebRtcEndpoint::create(pipeline);
10
11       // Further implementation of your application logic
12
13       return 0;
14   }
15
[c] Basic Configuration Settings
Configure the media server settings in a JSON file (
kurento.conf.json) located in the config directory. This configuration file will define parameters such as IP addresses, ports, and media codecs.JSON
1   {
2       "mediaServer": {
3           "net": {
4               "websocket": {
5                   "port": 8888
6               }
7           }
8       }
9   }
10
Make sure the path to the configuration file is correctly referenced in your project setup.
Handling Media Connections
Once the Kurento Media Server and media pipeline are initialized, you need to handle the connections between clients and the server. This involves setting up WebRTC endpoints to manage the communication between peers.
[a] Creating WebRtcEndpoint
The
WebRtcEndpoint is crucial for handling WebRTC streams. It manages the signaling and media exchange between the client and the server.C++
1   std::shared_ptr<kurento::WebRtcEndpoint> webRtcEndpoint = kurento::WebRtcEndpoint::create(pipeline);
2
3   // Additional setup for WebRtcEndpoint
4   webRtcEndpoint->connect(webRtcEndpoint);
5
[b] Signal Handling
Implement signal handling for various events such as connection, disconnection, and error handling. This ensures that the server can respond to client interactions and manage the media streams appropriately.
C++
1   // Example signal handler for WebRtcEndpoint
2   webRtcEndpoint->signalOnIceCandidate.connect([] (const std::string &candidate) {
3       // Handle ICE candidate
4       std::cout << "Received ICE candidate: " << candidate << std::endl;
5   });
6
At this stage, you have successfully initialized the Kurento Media Server and set up a basic media pipeline with a WebRtcEndpoint. This foundation allows you to handle WebRTC connections and manage media streams between clients and the server. In the subsequent sections, we will build upon this setup to create a fully functional Kurento WebRTC application, adding user interfaces, media controls, and participant views.
Step 2: Wireframe All the Components
In this section, we'll outline the components necessary for a Kurento WebRTC application and set up the basic structure for our media pipeline and endpoints. This step involves defining media pipelines and endpoints, and connecting them to handle media streams effectively.
Define Media Pipelines and Endpoints
A media pipeline in Kurento is a chain of media elements through which media flows. Endpoints are the interfaces through which media enters or leaves the Kurento Media Server. We will set up these components in our application.
[a] Create a Media Pipeline
A media pipeline is created to manage the flow of media elements. This serves as the backbone for handling media streams.
C++
1   std::shared_ptr<kurento::MediaPipeline> pipeline = kurento::MediaPipeline::create();
2
[b] Setup WebRtcEndpoint
The
WebRtcEndpoint handles the WebRTC connection and media exchange between the client and the server.C++
1   std::shared_ptr<kurento::WebRtcEndpoint> webRtcEndpoint = kurento::WebRtcEndpoint::create(pipeline);
2
[c] Connect Media Elements:
Once the endpoints are created, connect them within the media pipeline to enable media flow. For example, connecting a WebRtcEndpoint to itself can facilitate a loopback connection for testing purposes.
C++
1   webRtcEndpoint->connect(webRtcEndpoint);
2
Code Snippets
Below is the complete code snippet incorporating the steps mentioned above:
C++
1#include <KurentoModule.h>
2#include <MediaPipeline.hpp>
3#include <WebRtcEndpoint.hpp>
4
5int main(int argc, char** argv) {
6    // Initialize Kurento Media Server
7    kurento::KurentoModuleInit();
8
9    // Create a media pipeline
10    std::shared_ptr<kurento::MediaPipeline> pipeline = kurento::MediaPipeline::create();
11
12    // Create WebRtcEndpoint
13    std::shared_ptr<kurento::WebRtcEndpoint> webRtcEndpoint = kurento::WebRtcEndpoint::create(pipeline);
14
15    // Connect WebRtcEndpoint to itself for loopback (example)
16    webRtcEndpoint->connect(webRtcEndpoint);
17
18    // Example signal handler for ICE candidates
19    webRtcEndpoint->signalOnIceCandidate.connect([] (const std::string &candidate) {
20        // Handle ICE candidate
21        std::cout << "Received ICE candidate: " << candidate << std::endl;
22    });
23
24    // Further implementation of your application logic
25
26    return 0;
27}
28
Explanation of Key Components
- MediaPipeline: This is the core element that links different media elements together. It acts as the central hub for media flow.
- WebRtcEndpoint: This endpoint is responsible for handling WebRTC connections, including signaling, ICE candidate management, and media exchange.
- connect(): This function is used to link media elements. In the example, it connects the WebRtcEndpoint to itself to create a loopback for testing purposes.
Additional Elements
Depending on your application requirements, you may need to add more elements to the pipeline, such as:
- RecorderEndpoint: For recording media streams.
- PlayerEndpoint: For playing media from files or URLs.
- Filters: For applying effects or transformations to the media streams.
Each of these elements can be created and connected in a similar manner as the WebRtcEndpoint.
By defining and wiring together media pipelines and endpoints, you establish the foundation for your Kurento WebRTC application. This setup allows you to manage the flow of media through the server, enabling functionalities like streaming, recording, and playback. In the next steps, we will focus on implementing the user interface and controls to interact with these media elements.
Step 3: Implement Join Screen
In this section, we'll create a user interface for the join screen of our Kurento WebRTC application. The join screen allows users to initiate a session by entering necessary details and connecting to the media server.
User Interface for Joining a Session
The join screen serves as the entry point for users to start a WebRTC session. It typically includes fields for user identification and a button to connect to the session. We will use HTML, CSS, and JavaScript to build this interface.
HTML Structure
[a] Create the HTML File
Create an
index.html file in your project directory. This file will contain the structure of the join screen.HTML
1   <!DOCTYPE html>
2   <html lang="en">
3   <head>
4       <meta charset="UTF-8">
5       <meta name="viewport" content="width=device-width, initial-scale=1.0">
6       <title>Kurento WebRTC Join Screen</title>
7       <link rel="stylesheet" href="styles.css">
8   </head>
9   <body>
10       <div class="container">
11           <h1>Join WebRTC Session</h1>
12           <form id="joinForm">
13               <input type="text" id="username" placeholder="Enter your name" required>
14               <button type="submit">Join</button>
15           </form>
16       </div>
17       <script src="script.js"></script>
18   </body>
19   </html>
20
[b] Styling with CSS
Create a
styles.css file to style the join screen.CSS
1   body {
2       display: flex;
3       justify-content: center;
4       align-items: center;
5       height: 100vh;
6       background-color: #f0f0f0;
7       margin: 0;
8       font-family: Arial, sans-serif;
9   }
10
11   .container {
12       background-color: white;
13       padding: 20px;
14       border-radius: 10px;
15       box-shadow: 0 0 10px rgba(0, 0, 0, 0.1);
16       text-align: center;
17   }
18
19   input {
20       width: 80%;
21       padding: 10px;
22       margin: 10px 0;
23       border: 1px solid #ccc;
24       border-radius: 5px;
25   }
26
27   button {
28       padding: 10px 20px;
29       background-color: #28a745;
30       color: white;
31       border: none;
32       border-radius: 5px;
33       cursor: pointer;
34   }
35
36   button:hover {
37       background-color: #218838;
38   }
39
Handling User Inputs and Session Initiation
Next, we'll add JavaScript to handle user inputs and initiate the WebRTC session when the join button is clicked.
JavaScript for Form Handling
Create a
script.js file to manage the join form submission and initiate the WebRTC connection.JavaScript
1   document.getElementById('joinForm').addEventListener('submit', function(event) {
2       event.preventDefault();
3       const username = document.getElementById('username').value;
4       if (username) {
5           joinSession(username);
6       }
7   });
8
9   function joinSession(username) {
10       // This is where you would add your WebRTC connection logic
11       console.log(`Joining session as ${username}`);
12       // Example WebRTC connection logic:
13       // const webRtcPeer = new kurentoUtils.WebRtcPeer.WebRtcPeerSendrecv(options, function (error) {
14       //     if (error) return console.error(error);
15       //     this.generateOffer(onOffer);
16       // });
17
18       // function onOffer(error, offerSdp) {
19       //     if (error) return console.error(error);
20       //     // Send the offer to the server
21       // }
22   }
23
With the join screen in place, users can now enter their name and initiate a WebRTC session. This interface serves as the gateway to your Kurento WebRTC application, allowing users to connect to the media server and start interacting with other participants.
In the subsequent steps, we will build on this foundation by adding media controls, participant views, and other functionalities to create a fully-featured WebRTC application.
Step 4: Implement Controls
In this section, we will add media controls to our Kurento WebRTC application. These controls will allow users to interact with the media streams, including actions like play, pause, mute, and unmute. We'll enhance the user interface and implement the necessary JavaScript functions to handle these actions.
Adding Media Controls to the User Interface
First, we need to extend our HTML to include buttons for media controls.
[a] Update the HTML File
Modify the
index.html file to include media control buttons below the join form.HTML
1   <!DOCTYPE html>
2   <html lang="en">
3   <head>
4       <meta charset="UTF-8">
5       <meta name="viewport" content="width=device-width, initial-scale=1.0">
6       <title>Kurento WebRTC Join Screen</title>
7       <link rel="stylesheet" href="styles.css">
8   </head>
9   <body>
10       <div class="container">
11           <h1>Join WebRTC Session</h1>
12           <form id="joinForm">
13               <input type="text" id="username" placeholder="Enter your name" required>
14               <button type="submit">Join</button>
15           </form>
16           <div id="controls" class="hidden">
17               <button id="playPauseBtn">Play</button>
18               <button id="muteUnmuteBtn">Mute</button>
19               <button id="stopBtn">Stop</button>
20           </div>
21           <video id="videoElement" controls autoplay></video>
22       </div>
23       <script src="script.js"></script>
24   </body>
25   </html>
26
[b] Styling the Controls
Update the
styles.css file to style the new controls and hide them initially.CSS
1   body {
2       display: flex;
3       justify-content: center;
4       align-items: center;
5       height: 100vh;
6       background-color: #f0f0f0;
7       margin: 0;
8       font-family: Arial, sans-serif;
9   }
10
11   .container {
12       background-color: white;
13       padding: 20px;
14       border-radius: 10px;
15       box-shadow: 0 0 10px rgba(0, 0, 0, 0.1);
16       text-align: center;
17   }
18
19   input {
20       width: 80%;
21       padding: 10px;
22       margin: 10px 0;
23       border: 1px solid #ccc;
24       border-radius: 5px;
25   }
26
27   button {
28       padding: 10px 20px;
29       background-color: #28a745;
30       color: white;
31       border: none;
32       border-radius: 5px;
33       cursor: pointer;
34       margin: 5px;
35   }
36
37   button:hover {
38       background-color: #218838;
39   }
40
41   .hidden {
42       display: none;
43   }
44
45   video {
46       margin-top: 20px;
47       width: 100%;
48       max-width: 640px;
49   }
50
Implementing Media Control Logic
Next, we will add JavaScript to handle the functionality of these controls.
JavaScript for Media Controls
Update the
script.js file to manage the control buttons and their actions.JavaScript
1   document.getElementById('joinForm').addEventListener('submit', function(event) {
2       event.preventDefault();
3       const username = document.getElementById('username').value;
4       if (username) {
5           joinSession(username);
6       }
7   });
8
9   function joinSession(username) {
10       console.log(`Joining session as ${username}`);
11       document.getElementById('controls').classList.remove('hidden');
12
13       // Example WebRTC connection logic (to be replaced with actual implementation)
14       // const webRtcPeer = new kurentoUtils.WebRtcPeer.WebRtcPeerSendrecv(options, function (error) {
15       //     if (error) return console.error(error);
16       //     this.generateOffer(onOffer);
17       // });
18
19       // function onOffer(error, offerSdp) {
20       //     if (error) return console.error(error);
21       //     // Send the offer to the server
22       // }
23   }
24
25   document.getElementById('playPauseBtn').addEventListener('click', function() {
26       const videoElement = document.getElementById('videoElement');
27       if (videoElement.paused) {
28           videoElement.play();
29           this.textContent = 'Pause';
30       } else {
31           videoElement.pause();
32           this.textContent = 'Play';
33       }
34   });
35
36   document.getElementById('muteUnmuteBtn').addEventListener('click', function() {
37       const videoElement = document.getElementById('videoElement');
38       if (videoElement.muted) {
39           videoElement.muted = false;
40           this.textContent = 'Mute';
41       } else {
42           videoElement.muted = true;
43           this.textContent = 'Unmute';
44       }
45   });
46
47   document.getElementById('stopBtn').addEventListener('click', function() {
48       const videoElement = document.getElementById('videoElement');
49       videoElement.pause();
50       videoElement.srcObject = null;
51       document.getElementById('controls').classList.add('hidden');
52   });
53
Explanation of Key Components
- Join Form Handling: When the join form is submitted, the
joinSessionfunction is called, which logs the username and shows the media controls. - Play/Pause Button: Toggles the play and pause state of the video element and updates the button text accordingly.
- Mute/Unmute Button: Toggles the mute state of the video element and updates the button text accordingly.
- Stop Button: Stops the video playback, clears the video source, and hides the media controls.
With the media controls implemented, users can now interact with the media streams in your Kurento WebRTC application. These controls provide essential functionalities for managing the playback, audio, and session states. In the next steps, we will add functionality to display participant views and complete the application.
Step 5: Implement Participant View
In this section, we will implement the functionality to display participant video streams in our Kurento WebRTC application. This involves setting up the WebRTC connection, handling media streams, and dynamically managing the display of multiple participants.
Displaying Participants
To display video streams from multiple participants, we need to enhance our JavaScript to handle incoming media streams and update the HTML to accommodate multiple video elements.
HTML Structure for Participant Views
[a] Update the HTML File
Modify the
index.html file to include a container for participant video elements.HTML
1   <!DOCTYPE html>
2   <html lang="en">
3   <head>
4       <meta charset="UTF-8">
5       <meta name="viewport" content="width=device-width, initial-scale=1.0">
6       <title>Kurento WebRTC Join Screen</title>
7       <link rel="stylesheet" href="styles.css">
8   </head>
9   <body>
10       <div class="container">
11           <h1>Join WebRTC Session</h1>
12           <form id="joinForm">
13               <input type="text" id="username" placeholder="Enter your name" required>
14               <button type="submit">Join</button>
15           </form>
16           <div id="controls" class="hidden">
17               <button id="playPauseBtn">Play</button>
18               <button id="muteUnmuteBtn">Mute</button>
19               <button id="stopBtn">Stop</button>
20           </div>
21           <div id="participantContainer" class="hidden">
22               <!-- Video elements for participants will be added here dynamically -->
23           </div>
24       </div>
25       <script src="script.js"></script>
26   </body>
27   </html>
28
[b] Styling the Participant Container
Update the
styles.css file to style the container and participant video elements.CSS
1   body {
2       display: flex;
3       justify-content: center;
4       align-items: center;
5       height: 100vh;
6       background-color: #f0f0f0;
7       margin: 0;
8       font-family: Arial, sans-serif;
9   }
10
11   .container {
12       background-color: white;
13       padding: 20px;
14       border-radius: 10px;
15       box-shadow: 0 0 10px rgba(0, 0, 0, 0.1);
16       text-align: center;
17       width: 100%;
18       max-width: 640px;
19   }
20
21   input {
22       width: 80%;
23       padding: 10px;
24       margin: 10px 0;
25       border: 1px solid #ccc;
26       border-radius: 5px;
27   }
28
29   button {
30       padding: 10px 20px;
31       background-color: #28a745;
32       color: white;
33       border: none;
34       border-radius: 5px;
35       cursor: pointer;
36       margin: 5px;
37   }
38
39   button:hover {
40       background-color: #218838;
41   }
42
43   .hidden {
44       display: none;
45   }
46
47   video {
48       width: 100%;
49       max-width: 640px;
50       margin-top: 20px;
51   }
52
53   #participantContainer {
54       display: flex;
55       flex-wrap: wrap;
56       justify-content: center;
57       gap: 10px;
58       margin-top: 20px;
59   }
60
61   .participant {
62       flex: 1 1 calc(50% - 10px);
63       max-width: calc(50% - 10px);
64   }
65
66   .participant video {
67       width: 100%;
68       height: auto;
69       border: 1px solid #ccc;
70       border-radius: 5px;
71   }
72
Handling Media Streams
JavaScript for Managing Participants
Update the
script.js file to manage participant connections and display their video streams.JavaScript
1   document.getElementById('joinForm').addEventListener('submit', function(event) {
2       event.preventDefault();
3       const username = document.getElementById('username').value;
4       if (username) {
5           joinSession(username);
6       }
7   });
8
9   function joinSession(username) {
10       console.log(`Joining session as ${username}`);
11       document.getElementById('controls').classList.remove('hidden');
12       document.getElementById('participantContainer').classList.remove('hidden');
13
14       // Example WebRTC connection logic (to be replaced with actual implementation)
15       // const webRtcPeer = new kurentoUtils.WebRtcPeer.WebRtcPeerSendrecv(options, function (error) {
16       //     if (error) return console.error(error);
17       //     this.generateOffer(onOffer);
18       // });
19
20       // function onOffer(error, offerSdp) {
21       //     if (error) return console.error(error);
22       //     // Send the offer to the server
23       // }
24   }
25
26   document.getElementById('playPauseBtn').addEventListener('click', function() {
27       const videoElement = document.querySelector('.participant video');
28       if (videoElement.paused) {
29           videoElement.play();
30           this.textContent = 'Pause';
31       } else {
32           videoElement.pause();
33           this.textContent = 'Play';
34       }
35   });
36
37   document.getElementById('muteUnmuteBtn').addEventListener('click', function() {
38       const videoElement = document.querySelector('.participant video');
39       if (videoElement.muted) {
40           videoElement.muted = false;
41           this.textContent = 'Mute';
42       } else {
43           videoElement.muted = true;
44           this.textContent = 'Unmute';
45       }
46   });
47
48   document.getElementById('stopBtn').addEventListener('click', function() {
49       const videoElement = document.querySelector('.participant video');
50       videoElement.pause();
51       videoElement.srcObject = null;
52       document.getElementById('controls').classList.add('hidden');
53   });
54
55   // Function to add a participant video element
56   function addParticipant(name, stream) {
57       const participantContainer = document.getElementById('participantContainer');
58       const participantElement = document.createElement('div');
59       participantElement.className = 'participant';
60       participantElement.innerHTML = `
61           <h3>${name}</h3>
62           <video autoplay></video>
63       `;
64       participantContainer.appendChild(participantElement);
65
66       const videoElement = participantElement.querySelector('video');
67       videoElement.srcObject = stream;
68   }
69
70   // Example usage:
71   // addParticipant('User1', someMediaStream);
72
Explanation of Key Components
- joinSession Function: Initializes the session, reveals the controls, and prepares the application for participant management.
- addParticipant Function: Dynamically adds a new participant's video stream to the participant container.
- Event Listeners: Manage the play/pause, mute/unmute, and stop functionalities for the video elements.
Handling Multiple Participants
To manage multiple participants, you need to handle incoming streams dynamically. This involves updating the signaling mechanism to handle new participant connections and streams.
JavaScript
1// Example signaling mechanism to handle new participants
2// Assume signalingChannel is an established signaling mechanism (e.g., WebSocket)
3
4signalingChannel.onmessage = function(message) {
5    const parsedMessage = JSON.parse(message.data);
6
7    switch (parsedMessage.id) {
8        case 'newParticipant':
9            const newStream = getStreamFromMessage(parsedMessage); // Replace with actual stream extraction
10            addParticipant(parsedMessage.name, newStream);
11            break;
12        // Handle other message types as needed
13    }
14};
15
16// Function to simulate receiving a new participant stream
17function getStreamFromMessage(message) {
18    // Placeholder function to simulate receiving a media stream
19    // Replace this with actual WebRTC stream handling logic
20    const mediaStream = new MediaStream();
21    // Add tracks to the mediaStream
22    return mediaStream;
23}
24
With the participant view implemented, your Kurento WebRTC application can now display video streams from multiple participants dynamically. This feature is essential for creating a fully interactive video communication platform. In the next step, we will finalize the application by running and testing the code.
Step 6: Run Your Code Now
With all the components in place, it's time to run and test your Kurento WebRTC application. This step will guide you through compiling, running, and troubleshooting the application to ensure everything works as expected.
Testing and Running the Application
[a] Compile the Application
Ensure your development environment is set up to compile the C++ code. Use CMake to configure and build your project.
bash
1   mkdir build
2   cd build
3   cmake ..
4   make
5
This will generate the executable file for your Kurento application.
[b] Start Kurento Media Server
Before running your application, make sure the Kurento Media Server (KMS) is up and running.
bash
1   sudo service kurento-media-server start
2
[c] Run the Application
Execute the compiled application binary to start your Kurento WebRTC application.
bash
1   ./kurento-webrtc-app
2
[d] Open the Application in a Browser
Open your browser and navigate to the local server where your application is running (e.g.,
http://localhost:8000). You should see the join screen where you can enter your name and join a WebRTC session.Troubleshooting Common Issues
Here are some common issues you might encounter and how to resolve them:
Kurento Media Server Not Starting
- Ensure all dependencies are installed correctly.
- Check the KMS logs for any errors.
- Restart the server if necessary.
bash
1   sudo service kurento-media-server restart
2
WebRTC Connection Fails
- Verify the signaling server is working and correctly configured.
- Ensure ICE candidates are being exchanged correctly.
- Check network configurations and firewall settings.
No Video or Audio
- Ensure media permissions are granted in the browser.
- Check the media stream sources and tracks.
- Verify that the correct media codecs are being used.
Conclusion
Congratulations! You've successfully built a Kurento WebRTC application from scratch. Here's a recap of what we've covered:
- Introduction to Kurento WebRTC: Understanding the core functionalities and benefits of using Kurento for real-time communication.
- Setting Up the Environment: Installing Kurento Media Server and setting up the project structure.
- Implementing the Join Screen: Creating a user-friendly interface for users to join WebRTC sessions.
- Adding Media Controls: Providing users with control over media playback, mute, and session management.
- Displaying Participant Views: Handling and displaying video streams from multiple participants dynamically.
- Running and Testing the Application: Compiling, running, and troubleshooting your Kurento WebRTC application.
By following these steps, you have created a robust and interactive WebRTC application using Kurento. This application serves as a solid foundation for further development and customization to meet specific project requirements.
Want to level-up your learning? Subscribe now
Subscribe to our newsletter for more tech based insights
FAQ