Introduction to Ion WebRTC Technology
What is Ion WebRTC?
Ion WebRTC is an open-source project designed to simplify the development of real-time communication applications. Leveraging the power of WebRTC (Web Real-Time Communication), Ion WebRTC allows developers to build high-quality, scalable video and audio communication apps. This technology supports a wide range of use cases, from simple peer-to-peer video calls to complex multi-party conferencing systems.
Importance and Applications in Real-Time Communication
In today's digital age, real-time communication is crucial for various applications, including teleconferencing, online education, gaming, and remote work. Ion WebRTC stands out by providing a robust infrastructure for developing these applications, ensuring low latency and high performance.
Technology Stack
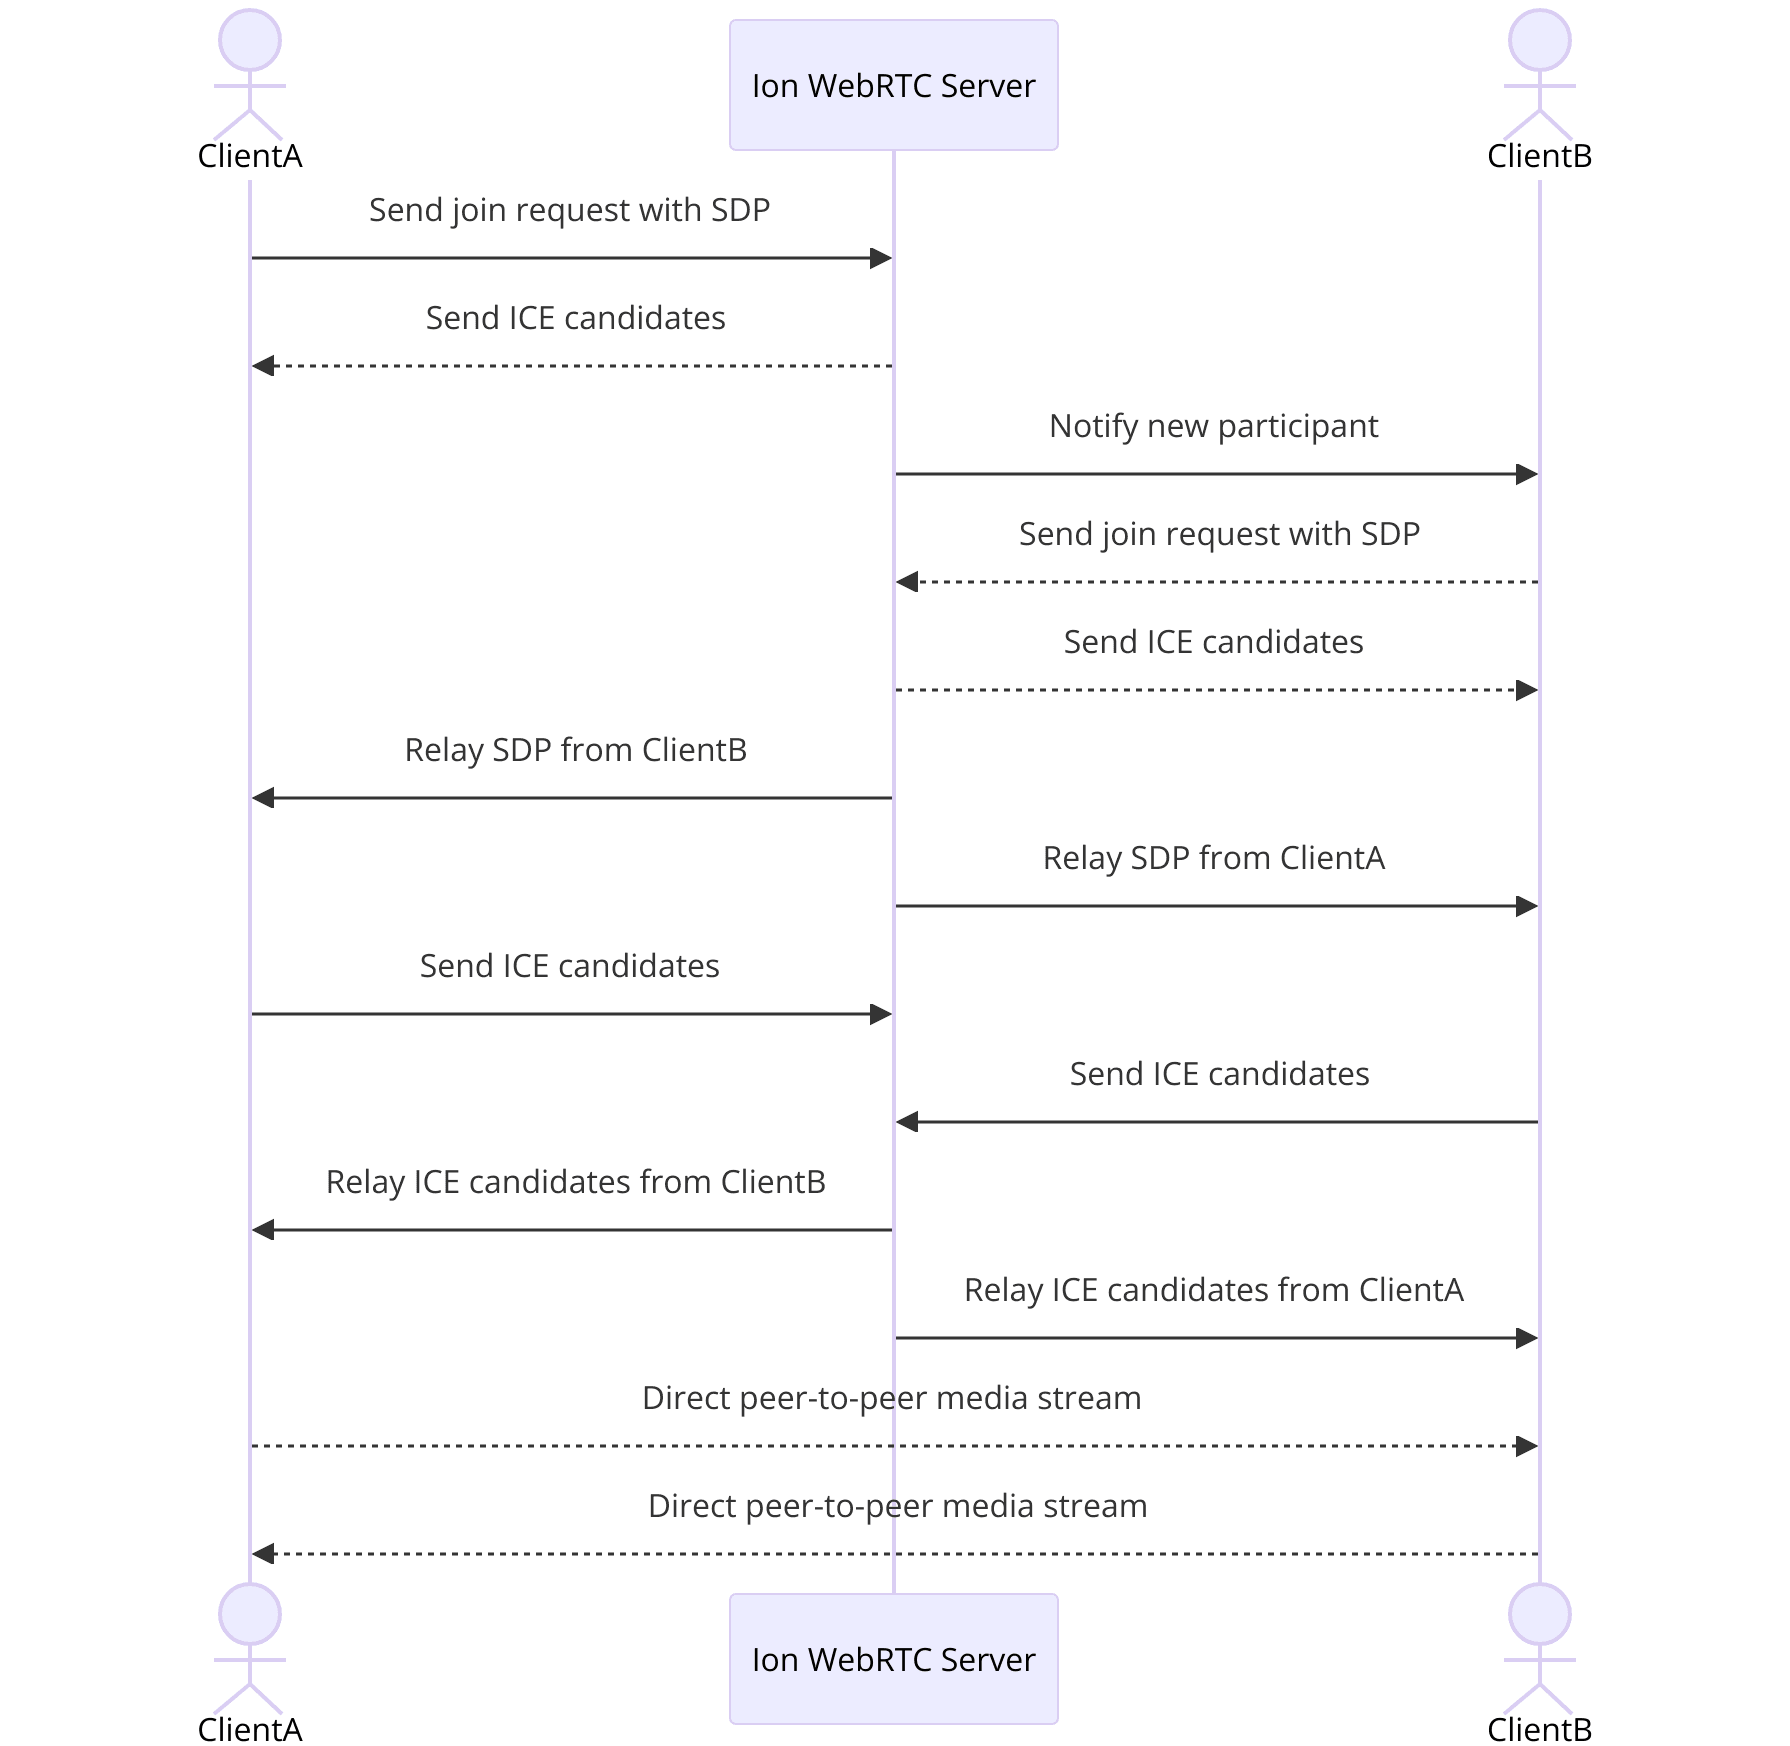
Ion WebRTC is built using the Go programming language, known for its concurrency capabilities and performance efficiency. The frontend can be developed using the Flutter framework, which allows for a seamless cross-platform user experience. The core of Ion WebRTC relies on an SFU (Selective Forwarding Unit) architecture, which optimizes media stream distribution, making it scalable for multiple users. Additionally, several SDKs are available to facilitate integration and development across different platforms.
Getting Started with the Code!
Create a New Ion WebRTC App
To begin building an application with Ion WebRTC, start by creating a new project. This involves setting up your development environment for both Go and Flutter, ensuring you have all necessary tools and dependencies installed.
Install Go
- Download and install Go from the
official site
. - Verify the installation by running
go versionin your terminal.
Install Flutter
- Follow the installation guide on the
Flutter documentation site
. - Verify the installation by running
flutter doctorin your terminal.
Install Ion WebRTC
- Clone the Ion WebRTC repository from GitHub:
git clone https://github.com/ionorg/ion - Navigate to the project directory:
cd ion - Install dependencies:
go mod download
Structure of the Project
The Ion WebRTC project is structured to separate backend and frontend components, providing a clean and organized development environment. The backend, written in Go, handles the core logic and real-time communication processes. The frontend, built with Flutter, manages the user interface and interactions.
App Architecture
By setting up your development environment and understanding the project structure, you're ready to dive into the specifics of building your Ion WebRTC application.
Step 1: Get Started with the Main File
Setting Up the Main File
To kickstart your Ion WebRTC application, you need to set up the main file. This file serves as the entry point for your application, initializing necessary components and configuring the initial settings.
[a] Initialize the Project
Navigate to the backend directory in your Ion WebRTC project. Create a new file named
main.go.[b] Main File Content
Open
main.go and add the following code:Go
1package main
2
3import (
4    "github.com/pion/webrtc/v3"
5    "log"
6    "net/http"
7    "github.com/ionorg/ion-sfu/pkg/sfu"
8)
9
10func main() {
11    // Configure SFU
12    s := sfu.NewSFU(sfu.Config{
13        WebRTC: sfu.WebRTCConfig{
14            ICEPortRange: []uint16{5000, 5100},
15            ICEAgents:    []string{"stun:stun.l.google.com:19302"},
16        },
17    })
18
19    // Create HTTP server
20    http.HandleFunc("/ws", func(w http.ResponseWriter, r *http.Request) {
21        s.ServeWebRTC(w, r)
22    })
23
24    // Start server
25    log.Println("Starting server on :8080")
26    if err := http.ListenAndServe(":8080", nil); err != nil {
27        log.Fatalf("failed to start server: %v", err)
28    }
29}
30
Explanation of Main Components
Package Imports
github.com/pion/webrtc/v3: A Go implementation of WebRTC.github.com/ionorg/ion-sfu/pkg/sfu: Provides SFU functionalities for managing media streams.
SFU Configuration
sfu.NewSFU: Initializes the SFU with WebRTC configurations, including ICE servers and port ranges.
HTTP Server:
http.HandleFunc("/ws", ...): Sets up an endpoint to handle WebRTC signaling.http.ListenAndServe(":8080", nil): Starts the HTTP server on port 8080.
By following these steps, you have set up the main file, which initializes the core components of your Ion WebRTC application. This file serves as the foundation upon which you will build the remaining functionalities.
Step 2: Wireframe All the Components
Creating the UI Layout
Now that the backend is set up, it’s time to design the user interface using Flutter. This involves creating a basic layout for your Ion WebRTC application, focusing on the core components that users will interact with.
[a] Set Up the Flutter Project
- Navigate to your Flutter project directory.
- If you haven’t already, create a new Flutter project using:
flutter create ion_app - Open the
lib/main.dartfile in your Flutter project.
[b] Basic UI Components
Modify
main.dart to include the basic structure of your application:Dart
1import 'package:flutter/material.dart';
2
3void main() => runApp(IonApp());
4
5class IonApp extends StatelessWidget {
6
7 Widget build(BuildContext context) {
8 return MaterialApp(
9 title: 'Ion WebRTC App',
10 theme: ThemeData(
11 primarySwatch: Colors.blue,
12 ),
13 home: HomeScreen(),
14 );
15 }
16}
17
18class HomeScreen extends StatelessWidget {
19
20 Widget build(BuildContext context) {
21 return Scaffold(
22 appBar: AppBar(
23 title: Text('Ion WebRTC'),
24 ),
25 body: Center(
26 child: Column(
27 mainAxisAlignment: MainAxisAlignment.center,
28 children: <Widget>[
29 ElevatedButton(
30 onPressed: () {
31 // Navigate to join screen
32 },
33 child: Text('Join Call'),
34 ),
35 ],
36 ),
37 ),
38 );
39 }
40}
41Explanation of UI Components
IonApp Class:
MaterialApp: Sets up the overall theme and routes for the application.HomeScreen: The main screen users see when they open the app.
HomeScreen Class:
AppBar: A top navigation bar with the title of the app.CenterandColumn: Layout widgets that center the content and arrange child widgets vertically.ElevatedButton: A button that will navigate users to the join screen.
This basic wireframe sets up the structure for the user interface, providing a clear layout that includes a button to join a call. As you proceed, you will add more functionality and refine the UI to ensure a seamless user experience.
Step 3: Implement Join Screen
Creating the Join Screen Functionality
The join screen is a critical part of your Ion WebRTC application, where users can enter the necessary details to join a call. This step involves setting up the user interface for the join screen and handling user input.
[a] Update the Navigation
Open
lib/main.dart and update the HomeScreen class to navigate to the join screen:Dart
1import 'package:flutter/material.dart';
2import 'join_screen.dart';
3
4void main() => runApp(IonApp());
5
6class IonApp extends StatelessWidget {
7
8 Widget build(BuildContext context) {
9 return MaterialApp(
10 title: 'Ion WebRTC App',
11 theme: ThemeData(
12 primarySwatch: Colors.blue,
13 ),
14 home: HomeScreen(),
15 );
16 }
17}
18
19class HomeScreen extends StatelessWidget {
20
21 Widget build(BuildContext context) {
22 return Scaffold(
23 appBar: AppBar(
24 title: Text('Ion WebRTC'),
25 ),
26 body: Center(
27 child: Column(
28 mainAxisAlignment: MainAxisAlignment.center,
29 children: <Widget>[
30 ElevatedButton(
31 onPressed: () {
32 Navigator.push(
33 context,
34 MaterialPageRoute(builder: (context) => JoinScreen()),
35 );
36 },
37 child: Text('Join Call'),
38 ),
39 ],
40 ),
41 ),
42 );
43 }
44}
45[b] Create JoinScreen
Create a new file named
join_screen.dart in the lib directory and add the following code:Dart
1import 'package:flutter/material.dart';
2
3class JoinScreen extends StatefulWidget {
4
5 _JoinScreenState createState() => _JoinScreenState();
6}
7
8class _JoinScreenState extends State<JoinScreen> {
9 final _formKey = GlobalKey<FormState>();
10 final _nameController = TextEditingController();
11 final _roomController = TextEditingController();
12
13
14 Widget build(BuildContext context) {
15 return Scaffold(
16 appBar: AppBar(
17 title: Text('Join Call'),
18 ),
19 body: Padding(
20 padding: EdgeInsets.all(16.0),
21 child: Form(
22 key: _formKey,
23 child: Column(
24 children: <Widget>[
25 TextFormField(
26 controller: _nameController,
27 decoration: InputDecoration(labelText: 'Name'),
28 validator: (value) {
29 if (value.isEmpty) {
30 return 'Please enter your name';
31 }
32 return null;
33 },
34 ),
35 TextFormField(
36 controller: _roomController,
37 decoration: InputDecoration(labelText: 'Room ID'),
38 validator: (value) {
39 if (value.isEmpty) {
40 return 'Please enter a room ID';
41 }
42 return null;
43 },
44 ),
45 SizedBox(height: 20),
46 ElevatedButton(
47 onPressed: () {
48 if (_formKey.currentState.validate()) {
49 // Handle joining call logic
50 }
51 },
52 child: Text('Join'),
53 ),
54 ],
55 ),
56 ),
57 ),
58 );
59 }
60}
61Explanation of Join Screen Components
Form Widgets:
TextFormField: Collects the user's name and room ID with validation.ElevatedButton: Triggers the form validation and handles the logic to join the call.
Form Validation:
Ensures that both fields are filled before proceeding.
By setting up the join screen, users can input their name and room ID to join a call. The next steps will focus on handling the logic to connect to a call using Ion WebRTC.
Step 4: Implement Controls
Adding Controls for the Application
Implementing controls in your Ion WebRTC application allows users to interact with the app during a call. This includes functionalities like mute, unmute, and disconnect, which are essential for a seamless user experience.
[a] Update the Join Screen
Open
join_screen.dart and modify the _JoinScreenState class to include navigation to the call screen upon successful validation:Dart
1import 'package:flutter/material.dart';
2import 'call_screen.dart';
3
4class JoinScreen extends StatefulWidget {
5
6 _JoinScreenState createState() => _JoinScreenState();
7}
8
9class _JoinScreenState extends State<JoinScreen> {
10 final _formKey = GlobalKey<FormState>();
11 final _nameController = TextEditingController();
12 final _roomController = TextEditingController();
13
14
15 Widget build(BuildContext context) {
16 return Scaffold(
17 appBar: AppBar(
18 title: Text('Join Call'),
19 ),
20 body: Padding(
21 padding: EdgeInsets.all(16.0),
22 child: Form(
23 key: _formKey,
24 child: Column(
25 children: <Widget>[
26 TextFormField(
27 controller: _nameController,
28 decoration: InputDecoration(labelText: 'Name'),
29 validator: (value) {
30 if (value.isEmpty) {
31 return 'Please enter your name';
32 }
33 return null;
34 },
35 ),
36 TextFormField(
37 controller: _roomController,
38 decoration: InputDecoration(labelText: 'Room ID'),
39 validator: (value) {
40 if (value.isEmpty) {
41 return 'Please enter a room ID';
42 }
43 return null;
44 },
45 ),
46 SizedBox(height: 20),
47 ElevatedButton(
48 onPressed: () {
49 if (_formKey.currentState.validate()) {
50 Navigator.push(
51 context,
52 MaterialPageRoute(
53 builder: (context) => CallScreen(
54 name: _nameController.text,
55 roomId: _roomController.text,
56 ),
57 ),
58 );
59 }
60 },
61 child: Text('Join'),
62 ),
63 ],
64 ),
65 ),
66 ),
67 );
68 }
69}
70[b] Create CallScreen
Create a new file named
call_screen.dart in the lib directory and add the following code:Dart
1import 'package:flutter/material.dart';
2
3class CallScreen extends StatelessWidget {
4 final String name;
5 final String roomId;
6
7 CallScreen({ this.name, this.roomId});
8
9
10 Widget build(BuildContext context) {
11 return Scaffold(
12 appBar: AppBar(
13 title: Text('Call with $name'),
14 actions: <Widget>[
15 IconButton(
16 icon: Icon(Icons.call_end),
17 onPressed: () {
18 // Handle call end logic
19 Navigator.pop(context);
20 },
21 ),
22 ],
23 ),
24 body: Center(
25 child: Column(
26 mainAxisAlignment: MainAxisAlignment.center,
27 children: <Widget>[
28 Text('Connected to Room: $roomId'),
29 SizedBox(height: 20),
30 Row(
31 mainAxisAlignment: MainAxisAlignment.center,
32 children: <Widget>[
33 IconButton(
34 icon: Icon(Icons.mic),
35 onPressed: () {
36 // Handle mute logic
37 },
38 ),
39 IconButton(
40 icon: Icon(Icons.mic_off),
41 onPressed: () {
42 // Handle unmute logic
43 },
44 ),
45 IconButton(
46 icon: Icon(Icons.call_end),
47 onPressed: () {
48 // Handle disconnect logic
49 Navigator.pop(context);
50 },
51 ),
52 ],
53 ),
54 ],
55 ),
56 ),
57 );
58 }
59}
60Explanation of Controls
CallScreen Class:
- Displays the current call details and provides control buttons.
IconButton Widgets:
mic: Mutes the microphone.mic_off: Unmutes the microphone.call_end: Ends the call and navigates back to the previous screen.
By implementing these controls, users can manage their call experience directly within the app, ensuring they have the necessary tools to interact effectively during their communication sessions.
Step 5: Implement Participant View
Displaying Participants in the Call
To enhance the user experience, it’s essential to display all participants in the call. This involves rendering participant views dynamically as users join and leave the call.
Update the CallScreen
Open
call_screen.dart and modify the CallScreen class to include a list of participants:Dart
1import 'package:flutter/material.dart';
2
3class CallScreen extends StatefulWidget {
4 final String name;
5 final String roomId;
6
7 CallScreen({ this.name, this.roomId});
8
9
10 _CallScreenState createState() => _CallScreenState();
11}
12
13class _CallScreenState extends State<CallScreen> {
14 List<String> participants = [];
15
16
17 void initState() {
18 super.initState();
19 // Mock participants
20 participants = ['Alice', 'Bob', 'Charlie'];
21 }
22
23
24 Widget build(BuildContext context) {
25 return Scaffold(
26 appBar: AppBar(
27 title: Text('Call with ${widget.name}'),
28 actions: <Widget>[
29 IconButton(
30 icon: Icon(Icons.call_end),
31 onPressed: () {
32 // Handle call end logic
33 Navigator.pop(context);
34 },
35 ),
36 ],
37 ),
38 body: Column(
39 children: <Widget>[
40 Expanded(
41 child: ListView.builder(
42 itemCount: participants.length,
43 itemBuilder: (context, index) {
44 return ListTile(
45 leading: Icon(Icons.person),
46 title: Text(participants[index]),
47 );
48 },
49 ),
50 ),
51 Row(
52 mainAxisAlignment: MainAxisAlignment.center,
53 children: <Widget>[
54 IconButton(
55 icon: Icon(Icons.mic),
56 onPressed: () {
57 // Handle mute logic
58 },
59 ),
60 IconButton(
61 icon: Icon(Icons.mic_off),
62 onPressed: () {
63 // Handle unmute logic
64 },
65 ),
66 IconButton(
67 icon: Icon(Icons.call_end),
68 onPressed: () {
69 // Handle disconnect logic
70 Navigator.pop(context);
71 },
72 ),
73 ],
74 ),
75 ],
76 ),
77 );
78 }
79}
80Explanation of Participant View
ListView.builder:
- Dynamically renders a list of participants in the call.
ListTile Widget:
- Displays each participant with an icon and their name.
Managing Participant States
The
participants list is currently mocked with sample data. In a real-world application, this list would be updated based on actual participants joining and leaving the call. Integration with Ion WebRTC would handle these events and update the UI accordingly.By implementing the participant view, users can see who is currently in the call, enhancing the collaborative experience. This dynamic rendering ensures that the participant list is always up-to-date, reflecting the real-time nature of the communication.
Step 6: Run Your Code Now
Running the Application
Now that you’ve set up your Ion WebRTC application, it’s time to run the code and test the functionality. Follow these steps to ensure everything is working as expected:
Start the Backend
- Navigate to your backend directory where
main.gois located. - Run the Go server with the command:
go run main.go - Ensure there are no errors and that the server starts successfully, listening on the specified port.
Run the Flutter Application
- Open your terminal and navigate to the Flutter project directory.
- Run the app using:
flutter run - This will compile the Flutter code and launch the application on your connected device or emulator.
Test the Functionality
- Open the app on your device or emulator.
- Navigate through the Join Screen and enter a name and room ID.
- Test joining a call, using the provided controls to mute, unmute, and disconnect.
- Verify that participants are displayed correctly as they join and leave the call.
Debugging Tips and Common Issues
Server Errors
- Check for any errors in the terminal where the Go server is running.
- Ensure all dependencies are installed and configured correctly.
UI Issues
- Verify that the Flutter app is running without errors.
- Ensure all necessary permissions are granted for the app to access the microphone and camera.
By following these steps, you can run your Ion WebRTC application and ensure all functionalities are working correctly.
Conclusion
Ion WebRTC offers a powerful and flexible solution for building real-time communication applications. By leveraging the strengths of Go and Flutter, developers can create scalable, high-performance video and audio communication tools. The SFU architecture ensures efficient media stream management, making Ion WebRTC ideal for a variety of use cases such as teleconferencing, online education, and remote work.
Want to level-up your learning? Subscribe now
Subscribe to our newsletter for more tech based insights
FAQ