How to Build FreeSwitch WebRTC App with JavaScript?
Learn how to integrate FreeSwitch with WebRTC to build powerful real-time communication applications. This guide covers installation, configuration, control implementation, and participant management, ensuring a seamless and scalable communication solution.
Introduction to FreeSwitch WebRTC Technology
What is FreeSwitch WebRTC?
FreeSwitch WebRTC is a powerful integration of FreeSwitch, a versatile open-source telephony platform, with WebRTC, an advanced technology that enables real-time communication directly in web browsers. This combination allows developers to create sophisticated and scalable communication solutions that can handle a variety of tasks, such as PBX (Private Branch Exchange), IVR (Interactive Voice Response), and conference systems, bridging the gap between traditional telephony and modern web-based communication.
Overview of FreeSwitch
FreeSwitch is a robust, scalable open-source telephony platform designed to route and interconnect communication protocols. It supports a wide range of telephony applications, including PBX, VoIP gateways, and conferencing. Written in C, FreeSwitch is known for its performance and flexibility, making it a preferred choice for businesses and developers looking to build advanced telephony solutions.
Introduction to WebRTC
WebRTC (Web Real-Time Communication) is a cutting-edge technology that facilitates peer-to-peer communication directly within web browsers without the need for additional plugins or software. By leveraging WebRTC, developers can implement high-quality audio, video, and data sharing capabilities in web applications, enhancing user experiences with seamless, real-time interactions.
Importance and Benefits of Integrating FreeSwitch with WebRTC
Integrating FreeSwitch with WebRTC combines the best of both worlds—robust telephony capabilities with modern, real-time web communication. This integration provides several key benefits:
- Enhanced Communication: By merging traditional telephony with web-based communication, users can seamlessly connect via voice, video, and messaging, regardless of their platform or device.
- Scalability: FreeSwitch's architecture supports large-scale deployments, making it suitable for enterprise-level applications that require high performance and reliability.
- Flexibility and Customization: Developers can tailor the solution to meet specific business needs, thanks to FreeSwitch's extensive configuration options and WebRTC's adaptable nature.
- Cost-Effective: Utilizing open-source technologies like FreeSwitch and WebRTC can significantly reduce costs compared to proprietary telephony systems, while still offering high-quality service.
By leveraging FreeSwitch and WebRTC, businesses can build advanced communication systems that are both efficient and scalable, providing a superior user experience and meeting the demands of modern telephony requirements.
Getting Started with FreeSwitch WebRTC
Create a New FreeSwitch WebRTC App
Starting a new FreeSwitch WebRTC application involves setting up your development environment and ensuring you have the necessary prerequisites. Here’s a step-by-step guide to help you get started:
Setting Up Your Development Environment
Before diving into the code, ensure your development environment is ready. You’ll need:
- A machine running a Unix-like operating system (Linux or macOS is recommended).
- A stable internet connection to download necessary packages and dependencies.
- Basic knowledge of C and web development (HTML, CSS, JavaScript).
Prerequisites for FreeSwitch and WebRTC
Ensure you have the following prerequisites installed on your system:
- Git: For cloning repositories.
- Build Tools: GCC, make, and other essential build tools.
- CMake: For managing the build process.
- OpenSSL: For secure communication.
- Node.js and npm: For managing JavaScript dependencies.
Install FreeSwitch
Installing FreeSwitch is a straightforward process. Follow these steps to get FreeSwitch up and running on your system:
[a] Clone the FreeSwitch Repository
sh
1   git clone https://github.com/signalwire/freeswitch.git
2   cd freeswitch
3
[b] Install Dependencies
sh
1   sudo apt-get update
2   sudo apt-get install -y build-essential pkg-config libjpeg-dev \
3   libncurses5-dev libssl-dev libpcre3-dev libcurl4-openssl-dev \
4   libldns-dev libedit-dev libsqlite3-dev libspeex-dev \
5   libspeexdsp-dev libavformat-dev libswscale-dev \
6   libavresample-dev libopus-dev libsndfile1-dev
7
[c] Build FreeSwitch
sh
1   ./bootstrap.sh
2   ./configure
3   make
4   sudo make install
5   sudo make all cd-sounds-install cd-moh-install
6
[d] Configure FreeSwitch for WebRTC
Enable necessary modules in the
modules.conf.xml file:xml
1     <load module="mod_verto"/>
2     <load module="mod_sofia"/>
3
[e] Start FreeSwitch
sh
1   sudo freeswitch -nc
2
Configuring FreeSwitch for WebRTC
To enable WebRTC support in FreeSwitch, some additional configuration is required. This includes setting up the
verto (WebRTC signaling protocol) module and ensuring secure WebSocket (WSS) communication.Configure verto
- Edit the
verto.conf.xmlfile to set up verto parameters, such as SSL settings and binding ports. - Ensure the
vertomodule is loaded in themodules.conf.xmlfile.
Secure Communication
- Generate SSL certificates and configure them in the
wsssection of thesofia.conf.xmlfile. - Example SSL configuration:
xml
1     <param name="wss-binding" value=":7443"/>
2     <param name="cert-file" value="/path/to/your/cert.pem"/>
3     <param name="key-file" value="/path/to/your/key.pem"/>
4
Structure of the Project
Understanding the structure of your FreeSwitch WebRTC project is crucial for effective development and maintenance. Here’s an overview of key directories and files:
- conf: Contains configuration files.
modules.conf.xml: Specifies which modules to load.sofia.conf.xml: Configuration for SIP profiles and WebRTC.verto.conf.xml: Configuration for the verto module.
- scripts: Contains script files for various tasks.
- htdocs: Holds static files such as HTML, CSS, and JavaScript for web-based interfaces.
- logs: Stores log files generated by FreeSwitch.
App Architecture
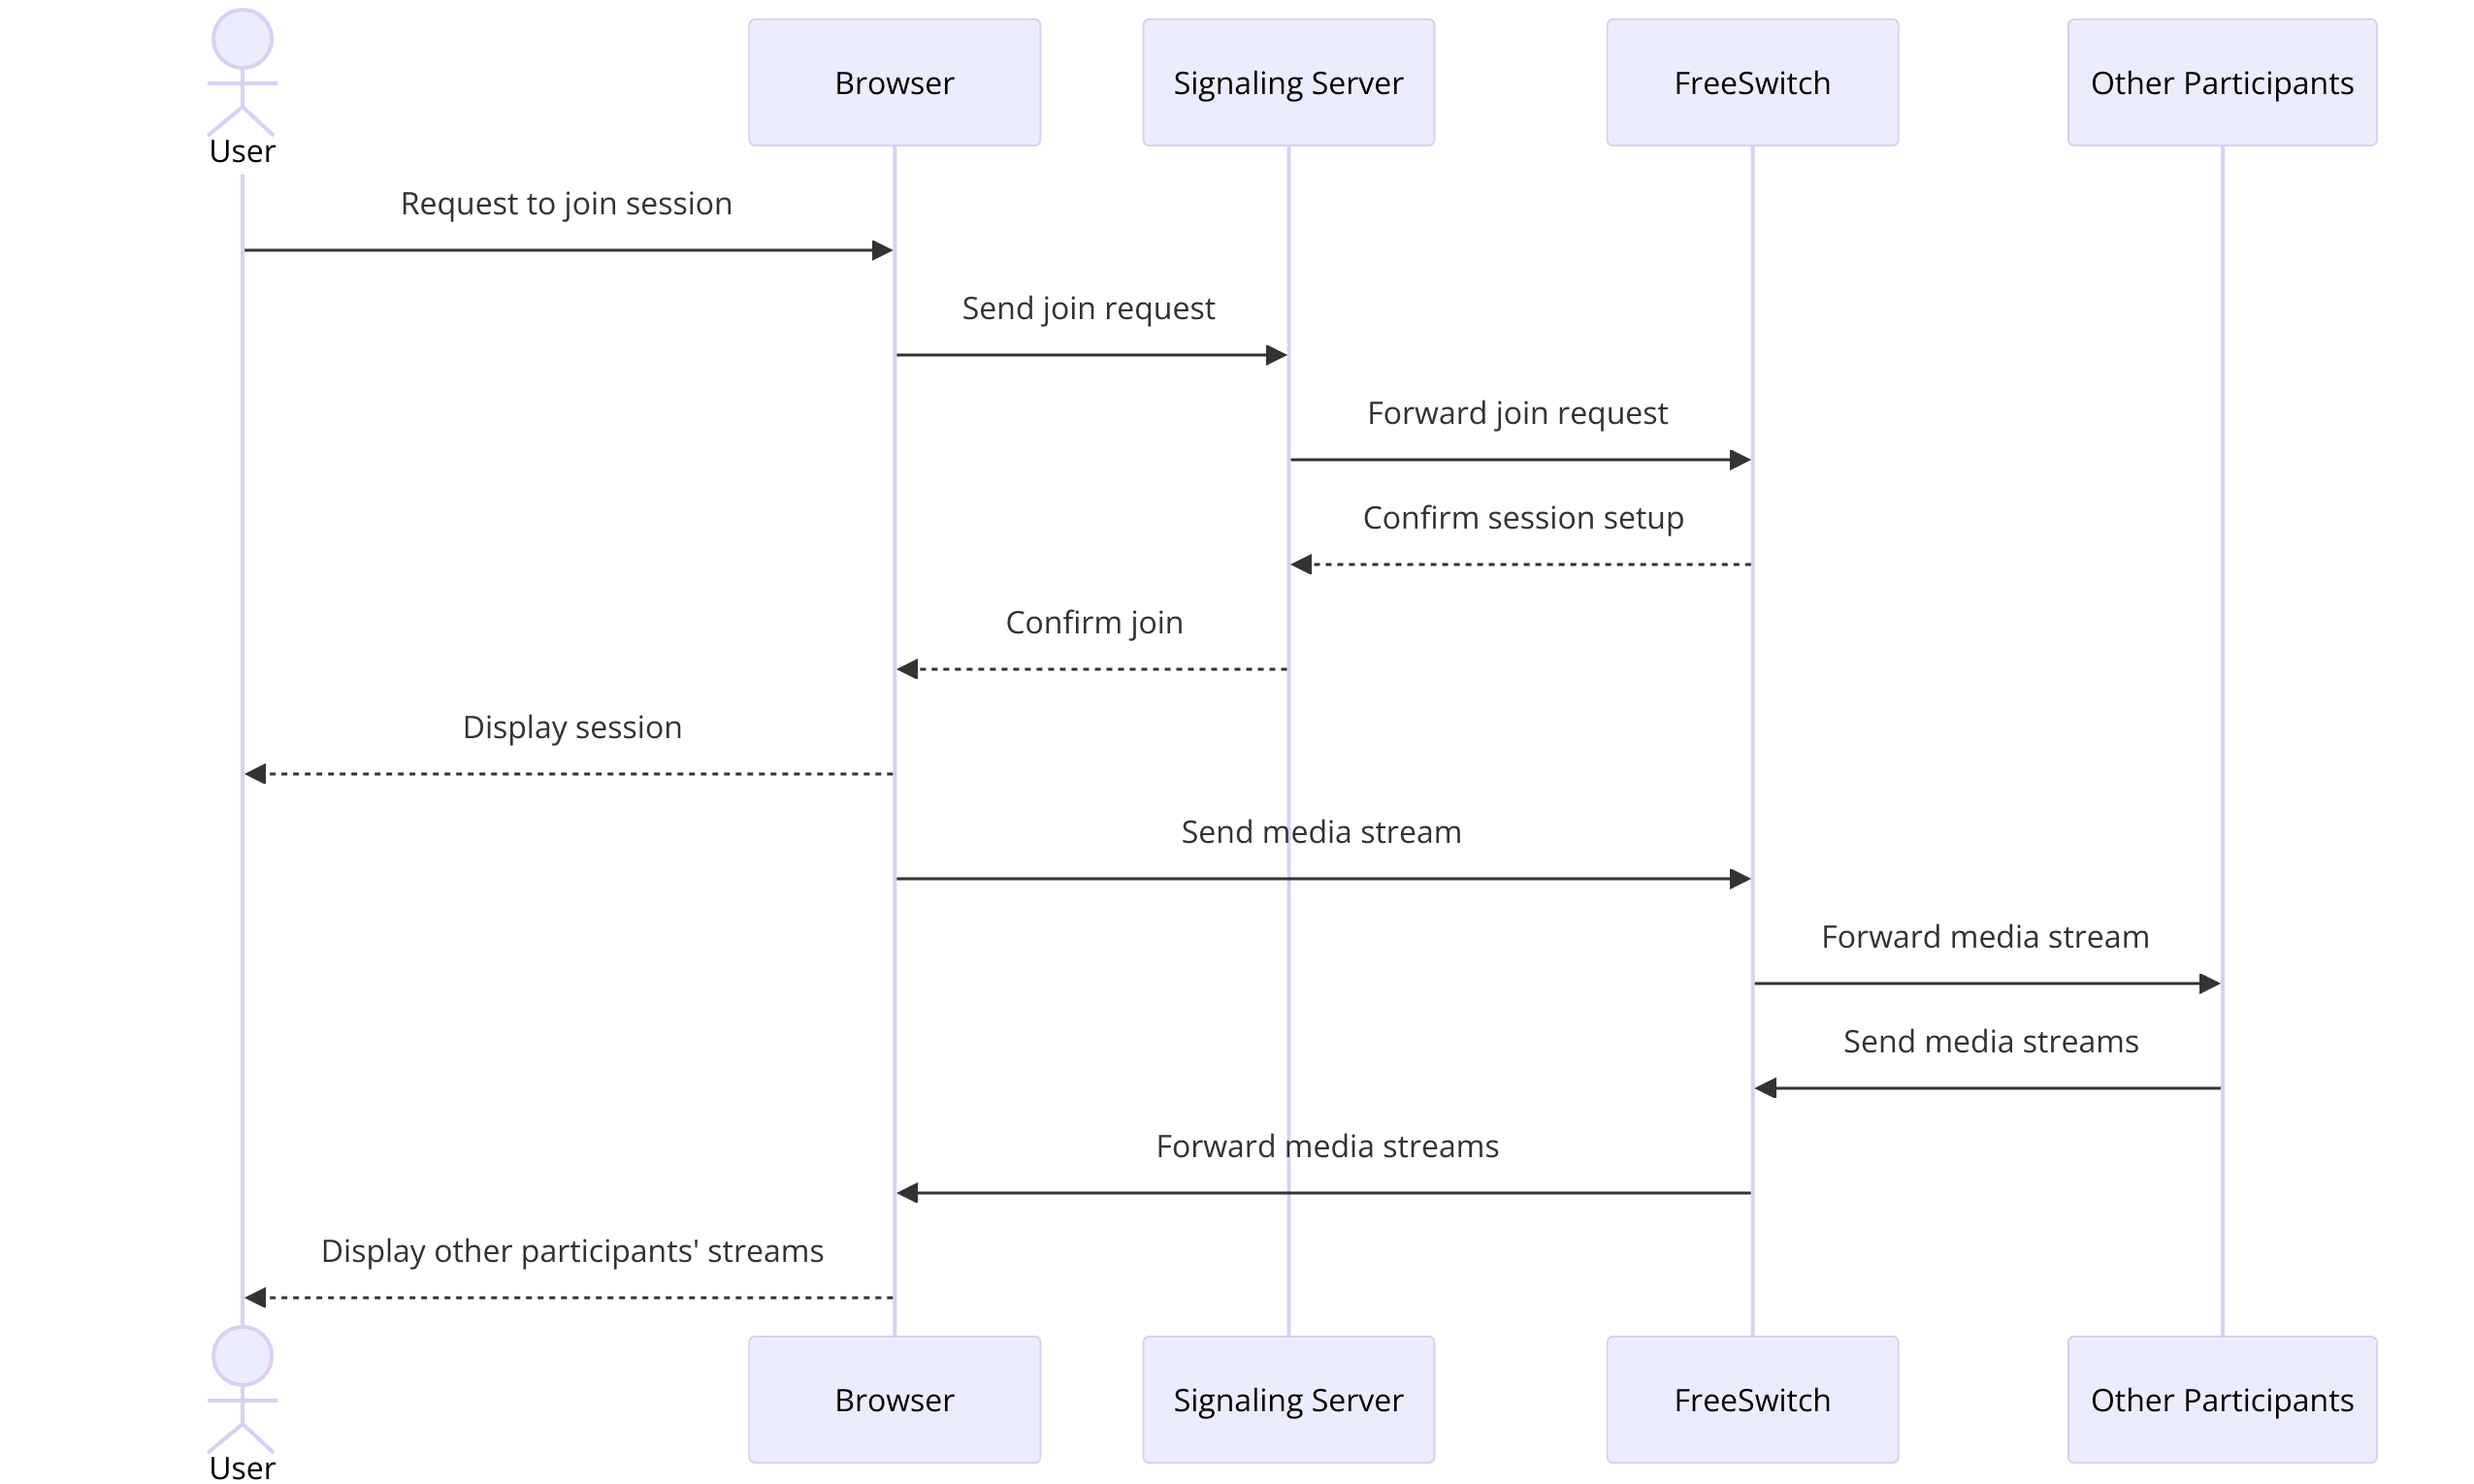
Client-Side (Browser)
- Uses WebRTC API for media capture and peer-to-peer communication.
- JavaScript handles signaling and user interactions.
Server-Side (FreeSwitch)
- Manages signaling using the verto module.
- Routes and processes media streams.
- Integrates with other telephony components (IVR, PBX).
By following this modular architecture, you can build scalable and maintainable FreeSwitch WebRTC applications that leverage the strengths of both FreeSwitch and WebRTC.
In the next part, we will delve into the detailed steps for configuring FreeSwitch to support WebRTC, starting with essential configuration files and parameters.
Step 1: Get Started with Configuration
Configuring FreeSwitch for WebRTC
To fully leverage the capabilities of FreeSwitch with WebRTC, proper configuration is essential. This section will guide you through the necessary steps to configure FreeSwitch for WebRTC, focusing on setting up the required modules and securing your configuration.
Setting Up Necessary Modules
FreeSwitch requires specific modules to handle WebRTC communication effectively. The key modules for WebRTC are
mod_verto and mod_sofia. These modules manage signaling and media processing for WebRTC connections.[a] Enable mod_verto and mod_sofia in modules.conf.xml
xml
1   <load module="mod_verto"/>
2   <load module="mod_sofia"/>
3
[b] Reload the Configuration
After editing the
modules.conf.xml, reload the FreeSwitch configuration:sh
1     fs_cli -x "reloadxml"
2
Configuration Files and Parameters
The following configuration files need to be modified to support WebRTC:
[a] verto.conf.xml
This file configures the verto module, which handles WebRTC signaling.
Example
verto.conf.xml configuration:xml
1     <settings>
2       <param name="http-port" value="8081"/>
3       <param name="ws-binding" value=":8082"/>
4       <param name="wss-binding" value=":8083"/>
5       <param name="tls-cert-dir" value="/usr/local/freeswitch/certs"/>
6     </settings>
7
sofia.conf.xml
This file configures SIP profiles, including settings for WebRTC.
Example
sofia.conf.xml configuration:xml
1     <profile name="external">
2       <param name="wss-binding" value=":7443"/>
3       <param name="cert-file" value="/usr/local/freeswitch/certs/server.pem"/>
4       <param name="key-file" value="/usr/local/freeswitch/certs/server.key"/>
5     </profile>
6
Securing the Configuration
Security is crucial when configuring FreeSwitch for WebRTC, especially when dealing with WebSocket Secure (WSS) connections. Ensure that all communications are encrypted using SSL/TLS.
[a] Generate SSL Certificates
Generate SSL certificates using a trusted Certificate Authority (CA) or create self-signed certificates for testing purposes.
Example command to generate a self-signed certificate:
sh
1     openssl req -new -newkey rsa:2048 -days 365 -nodes -x509 \
2     -keyout /usr/local/freeswitch/certs/server.key \
3     -out /usr/local/freeswitch/certs/server.pem
4
[b] Configure SSL in sofia.conf.xml
Add the paths to your SSL certificate and key files in the
sofia.conf.xml configuration:xml
1     <param name="wss-binding" value=":7443"/>
2     <param name="cert-file" value="/usr/local/freeswitch/certs/server.pem"/>
3     <param name="key-file" value="/usr/local/freeswitch/certs/server.key"/>
4
[c] Enable Secure WebSocket (WSS)
Ensure that the
wss-binding parameter is set correctly to bind WSS on the desired port.Example Configuration for Secure WebRTC
Here’s a consolidated example of what your configuration files might look like:
verto.conf.xml
xml
1<settings>
2  <param name="http-port" value="8081"/>
3  <param name="ws-binding" value=":8082"/>
4  <param name="wss-binding" value=":8083"/>
5  <param name="tls-cert-dir" value="/usr/local/freeswitch/certs"/>
6</settings>
7
sofia.conf.xml
xml
1<profile name="external">
2  <param name="wss-binding" value=":7443"/>
3  <param name="cert-file" value="/usr/local/freeswitch/certs/server.pem"/>
4  <param name="key-file" value="/usr/local/freeswitch/certs/server.key"/>
5</profile>
6
By following these configuration steps, you can ensure that FreeSwitch is properly set up to handle WebRTC connections securely and efficiently. In the next part, we will cover how to design the wireframe for all components, ensuring a well-organized and user-friendly interface for your FreeSwitch WebRTC application.
Step 2: Wireframe All the Components
Designing the Wireframe
Creating a wireframe for your FreeSwitch WebRTC application is a crucial step in the development process. It helps you visualize the layout, design the user interface, and ensure all necessary components are included. This section will guide you through designing a wireframe for the key components of your application.
Implementing the Wireframe
Once the wireframe is designed, you can start implementing it using HTML, CSS, and JavaScript. Here’s an example of how to create the join screen:
HTML
HTML
1<!DOCTYPE html>
2<html lang="en">
3<head>
4    <meta charset="UTF-8">
5    <meta name="viewport" content="width=device-width, initial-scale=1.0">
6    <title>FreeSwitch WebRTC Join Screen</title>
7    <link rel="stylesheet" href="styles.css">
8</head>
9<body>
10    <div class="join-screen">
11        <h1>FreeSwitch WebRTC</h1>
12        <form id="join-form">
13            <label for="username">Username:</label>
14            <input type="text" id="username" name="username" required>
15            <label for="room-id">Room ID:</label>
16            <input type="text" id="room-id" name="room-id" required>
17            <button type="submit">Join</button>
18        </form>
19    </div>
20</body>
21</html>
22
CSS
CSS
1body {
2    font-family: Arial, sans-serif;
3    display: flex;
4    justify-content: center;
5    align-items: center;
6    height: 100vh;
7    margin: 0;
8    background-color: #f0f0f0;
9}
10
11.join-screen {
12    background: white;
13    padding: 20px;
14    border-radius: 8px;
15    box-shadow: 0 0 10px rgba(0, 0, 0, 0.1);
16    text-align: center;
17}
18
19.join-screen h1 {
20    margin-bottom: 20px;
21}
22
23.join-screen form {
24    display: flex;
25    flex-direction: column;
26    gap: 10px;
27}
28
29.join-screen label {
30    text-align: left;
31}
32
33.join-screen input {
34    padding: 10px;
35    border: 1px solid #ccc;
36    border-radius: 4px;
37}
38
39.join-screen button {
40    padding: 10px;
41    border: none;
42    border-radius: 4px;
43    background-color: #007bff;
44    color: white;
45    cursor: pointer;
46}
47
48.join-screen button:hover {
49    background-color: #0056b3;
50}
51
This example sets up a simple join screen with HTML and CSS. The form captures the user's name and room ID, preparing them to join a WebRTC session.
In the next part, we will implement the join screen functionality, ensuring users can connect to their WebRTC sessions seamlessly.
Step 3: Implement Join Screen
Creating the Join Screen
The join screen is a crucial part of your FreeSwitch WebRTC application. It serves as the entry point for users to connect to the WebRTC session. In this section, we will implement the join screen functionality using HTML, CSS, and JavaScript.
HTML Structure for the Join Screen
We have already created a basic HTML structure for the join screen in the previous part. Here it is again for reference:
HTML
1<!DOCTYPE html>
2<html lang="en">
3<head>
4    <meta charset="UTF-8">
5    <meta name="viewport" content="width=device-width, initial-scale=1.0">
6    <title>FreeSwitch WebRTC Join Screen</title>
7    <link rel="stylesheet" href="styles.css">
8</head>
9<body>
10    <div class="join-screen">
11        <h1>FreeSwitch WebRTC</h1>
12        <form id="join-form">
13            <label for="username">Username:</label>
14            <input type="text" id="username" name="username" required>
15            <label for="room-id">Room ID:</label>
16            <input type="text" id="room-id" name="room-id" required>
17            <button type="submit">Join</button>
18        </form>
19    </div>
20    <script src="script.js"></script>
21</body>
22</html>
23
CSS for Styling the Join Screen
The CSS provided earlier styles the join screen with a clean and user-friendly interface. Here it is again for reference:
CSS
1body {
2    font-family: Arial, sans-serif;
3    display: flex;
4    justify-content: center;
5    align-items: center;
6    height: 100vh;
7    margin: 0;
8    background-color: #f0f0f0;
9}
10
11.join-screen {
12    background: white;
13    padding: 20px;
14    border-radius: 8px;
15    box-shadow: 0 0 10px rgba(0, 0, 0, 0.1);
16    text-align: center;
17}
18
19.join-screen h1 {
20    margin-bottom: 20px;
21}
22
23.join-screen form {
24    display: flex;
25    flex-direction: column;
26    gap: 10px;
27}
28
29.join-screen label {
30    text-align: left;
31}
32
33.join-screen input {
34    padding: 10px;
35    border: 1px solid #ccc;
36    border-radius: 4px;
37}
38
39.join-screen button {
40    padding: 10px;
41    border: none;
42    border-radius: 4px;
43    background-color: #007bff;
44    color: white;
45    cursor: pointer;
46}
47
48.join-screen button:hover {
49    background-color: #0056b3;
50}
51
JavaScript for Form Handling and WebRTC Connection
To make the join screen functional, we need to add JavaScript that handles form submission and initiates the WebRTC connection. We will use the Vert.x framework for handling WebRTC signaling.
JavaScript
1document.addEventListener("DOMContentLoaded", function () {
2    const joinForm = document.getElementById("join-form");
3
4    joinForm.addEventListener("submit", function (event) {
5        event.preventDefault();
6
7        const username = document.getElementById("username").value;
8        const roomId = document.getElementById("room-id").value;
9
10        // Validate input
11        if (!username || !roomId) {
12            alert("Please enter both username and room ID.");
13            return;
14        }
15
16        // Initiate WebRTC connection
17        joinRoom(username, roomId);
18    });
19
20    function joinRoom(username, roomId) {
21        // Replace with your actual WebRTC signaling server URL
22        const signalingServerUrl = "wss://your-signaling-server-url";
23        const ws = new WebSocket(signalingServerUrl);
24
25        ws.onopen = function () {
26            console.log("Connected to the signaling server");
27
28            // Send join message
29            const joinMessage = {
30                type: "join",
31                username: username,
32                roomId: roomId
33            };
34            ws.send(JSON.stringify(joinMessage));
35        };
36
37        ws.onmessage = function (message) {
38            console.log("Received message from server:", message.data);
39
40            const data = JSON.parse(message.data);
41            switch (data.type) {
42                case "joined":
43                    console.log(`${username} joined room ${roomId}`);
44                    // Proceed to the main communication interface
45                    loadMainInterface();
46                    break;
47                case "error":
48                    console.error("Error:", data.message);
49                    alert(data.message);
50                    break;
51                // Handle other message types as needed
52            }
53        };
54
55        ws.onerror = function (error) {
56            console.error("WebSocket error:", error);
57        };
58
59        ws.onclose = function () {
60            console.log("Disconnected from the signaling server");
61        };
62    }
63
64    function loadMainInterface() {
65        // Redirect or load the main communication interface
66        window.location.href = "main.html";
67    }
68});
69
Explanation of the JavaScript Code
Form Submission Handling
- The script listens for the form submission event and prevents the default form submission behavior.
- It retrieves the username and room ID from the input fields and validates them.
WebSocket Connection
- A WebSocket connection is established to the WebRTC signaling server.
- Upon connection, a join message is sent to the server with the user's details.
Handling Server Messages
- The script listens for messages from the signaling server.
- When a join confirmation is received, it proceeds to load the main communication interface.
- Errors from the server are handled and displayed to the user.
Loading the Main Interface
- The
loadMainInterfacefunction redirects the user to the main communication interface, where the WebRTC session will take place.
This completes the implementation of the join screen for your FreeSwitch WebRTC application. In the next part, we will move on to developing the control features for the main communication interface, ensuring users can manage their audio and video streams effectively.
Step 4: Implement Controls
Developing Control Features
Control features are essential for a user-friendly WebRTC application. They allow users to manage their audio and video streams, providing a more interactive and flexible communication experience. In this section, we will implement the core control features, including audio and video controls, mute/unmute functionality, and camera switch capabilities.
Audio and Video Controls
Implementing audio and video controls involves creating buttons that allow users to toggle their microphone and camera on or off. These controls will be integrated into the main communication interface.
First, add buttons for audio and video controls to your main communication interface HTML file:
HTML
HTML
1<!DOCTYPE html>
2<html lang="en">
3<head>
4    <meta charset="UTF-8">
5    <meta name="viewport" content="width=device-width, initial-scale=1.0">
6    <title>FreeSwitch WebRTC Main Interface</title>
7    <link rel="stylesheet" href="styles.css">
8</head>
9<body>
10    <div class="main-interface">
11        <div id="local-video-container">
12            <video id="local-video" autoplay muted></video>
13        </div>
14        <div id="remote-video-container">
15            <!-- Remote video elements will be added here dynamically -->
16        </div>
17        <div class="control-panel">
18            <button id="mute-audio">Mute Audio</button>
19            <button id="toggle-video">Stop Video</button>
20            <button id="switch-camera">Switch Camera</button>
21            <button id="end-call">End Call</button>
22        </div>
23    </div>
24    <script src="webrtc.js"></script>
25</body>
26</html>
27
CSS
Add styling for the control panel to your
styles.css file:CSS
1.main-interface {
2    display: flex;
3    flex-direction: column;
4    align-items: center;
5    justify-content: center;
6    height: 100vh;
7    background-color: #f0f0f0;
8}
9
10#local-video-container,
11#remote-video-container {
12    width: 100%;
13    max-width: 600px;
14    margin-bottom: 20px;
15    position: relative;
16}
17
18#local-video,
19.remote-video {
20    width: 100%;
21    border-radius: 8px;
22    box-shadow: 0 0 10px rgba(0, 0, 0, 0.1);
23}
24
25.control-panel {
26    display: flex;
27    gap: 10px;
28}
29
30.control-panel button {
31    padding: 10px 20px;
32    border: none;
33    border-radius: 4px;
34    background-color: #007bff;
35    color: white;
36    cursor: pointer;
37}
38
39.control-panel button:hover {
40    background-color: #0056b3;
41}
42
JavaScript for Implementing Controls
Next, we need to add JavaScript to handle the functionality of these controls.
JavaScript
1document.addEventListener("DOMContentLoaded", function () {
2    const muteAudioButton = document.getElementById("mute-audio");
3    const toggleVideoButton = document.getElementById("toggle-video");
4    const switchCameraButton = document.getElementById("switch-camera");
5    const endCallButton = document.getElementById("end-call");
6
7    let localStream;
8    let isAudioMuted = false;
9    let isVideoStopped = false;
10
11    // Get user media
12    navigator.mediaDevices.getUserMedia({ video: true, audio: true })
13        .then(stream => {
14            localStream = stream;
15            document.getElementById("local-video").srcObject = stream;
16        })
17        .catch(error => {
18            console.error("Error accessing media devices.", error);
19        });
20
21    // Mute/Unmute Audio
22    muteAudioButton.addEventListener("click", function () {
23        isAudioMuted = !isAudioMuted;
24        localStream.getAudioTracks()[0].enabled = !isAudioMuted;
25        muteAudioButton.textContent = isAudioMuted ? "Unmute Audio" : "Mute Audio";
26    });
27
28    // Start/Stop Video
29    toggleVideoButton.addEventListener("click", function () {
30        isVideoStopped = !isVideoStopped;
31        localStream.getVideoTracks()[0].enabled = !isVideoStopped;
32        toggleVideoButton.textContent = isVideoStopped ? "Start Video" : "Stop Video";
33    });
34
35    // Switch Camera
36    switchCameraButton.addEventListener("click", async function () {
37        if (localStream) {
38            const videoTrack = localStream.getVideoTracks()[0];
39            const currentConstraints = videoTrack.getConstraints();
40
41            const devices = await navigator.mediaDevices.enumerateDevices();
42            const videoDevices = devices.filter(device => device.kind === 'videoinput');
43
44            if (videoDevices.length > 1) {
45                const currentDeviceId = videoTrack.getSettings().deviceId;
46                const newDeviceId = videoDevices.find(device => device.deviceId !== currentDeviceId).deviceId;
47
48                const newConstraints = {
49                    video: {
50                        deviceId: { exact: newDeviceId }
51                    }
52                };
53
54                const newStream = await navigator.mediaDevices.getUserMedia(newConstraints);
55                const newVideoTrack = newStream.getVideoTracks()[0];
56                localStream.removeTrack(videoTrack);
57                localStream.addTrack(newVideoTrack);
58
59                document.getElementById("local-video").srcObject = localStream;
60            }
61        }
62    });
63
64    // End Call
65    endCallButton.addEventListener("click", function () {
66        if (localStream) {
67            localStream.getTracks().forEach(track => track.stop());
68        }
69        // Implement additional logic to handle call termination
70        window.location.href = "join.html";
71    });
72});
73
Explanation of the JavaScript Code
Get User Media
- The code requests access to the user's audio and video devices using
navigator.mediaDevices.getUserMedia. - The local video stream is displayed in the video element.
Mute/Unmute Audio
- The
muteAudioButtontoggles the audio track'senabledproperty. - The button text changes to reflect the current state.
Start/Stop Video
- The
toggleVideoButtontoggles the video track'senabledproperty. - The button text changes to indicate whether the video is active or stopped.
Switch Camera
- The
switchCameraButtonchecks for available video input devices. - If more than one device is available, it switches between them.
- The video stream is updated to reflect the new camera input.
End Call
- The
endCallButtonstops all tracks of the local stream. - It then redirects the user back to the join screen or performs other call termination logic.
This completes the implementation of the control features for your FreeSwitch WebRTC application. These controls will enable users to manage their audio and video streams effectively, providing a better communication experience. In the next part, we will focus on implementing the participant view, allowing users to see and interact with multiple participants in a session.
Step 5: Implement Participant View
Building the Participant View
The participant view is an essential component of your FreeSwitch WebRTC application. It allows users to see and interact with multiple participants in a session. In this section, we will implement the participant view, including the layout for displaying multiple video streams and managing participant streams and layouts.
Displaying Multiple Participants
To display multiple participants, we need to dynamically create video elements for each participant and add them to the participant view. The main interface HTML will have a container for remote video elements.
[a] HTML
Update your main communication interface HTML file to include a container for remote videos:
HTML
1<!DOCTYPE html>
2<html lang="en">
3<head>
4    <meta charset="UTF-8">
5    <meta name="viewport" content="width=device-width, initial-scale=1.0">
6    <title>FreeSwitch WebRTC Main Interface</title>
7    <link rel="stylesheet" href="styles.css">
8</head>
9<body>
10    <div class="main-interface">
11        <div id="local-video-container">
12            <video id="local-video" autoplay muted></video>
13        </div>
14        <div id="remote-video-container">
15            <!-- Remote video elements will be added here dynamically -->
16        </div>
17        <div class="control-panel">
18            <button id="mute-audio">Mute Audio</button>
19            <button id="toggle-video">Stop Video</button>
20            <button id="switch-camera">Switch Camera</button>
21            <button id="end-call">End Call</button>
22        </div>
23    </div>
24    <script src="webrtc.js"></script>
25</body>
26</html>
27
[b] CSS
Add styling for the remote video container to your
styles.css file:CSS
1#remote-video-container {
2    display: flex;
3    flex-wrap: wrap;
4    justify-content: center;
5    gap: 10px;
6}
7
8.remote-video {
9    width: 300px;
10    border-radius: 8px;
11    box-shadow: 0 0 10px rgba(0, 0, 0, 0.1);
12}
13
Managing Participant Streams and Layouts
We will now update the JavaScript to handle multiple participant streams and manage their layout dynamically.
[c] JavaScript (webrtc.js)
JavaScript
1document.addEventListener("DOMContentLoaded", function () {
2    const muteAudioButton = document.getElementById("mute-audio");
3    const toggleVideoButton = document.getElementById("toggle-video");
4    const switchCameraButton = document.getElementById("switch-camera");
5    const endCallButton = document.getElementById("end-call");
6
7    let localStream;
8    let remoteStreams = {};
9    let isAudioMuted = false;
10    let isVideoStopped = false;
11
12    // Get user media
13    navigator.mediaDevices.getUserMedia({ video: true, audio: true })
14        .then(stream => {
15            localStream = stream;
16            document.getElementById("local-video").srcObject = stream;
17            // Initialize connection to signaling server
18            initializeWebSocket();
19        })
20        .catch(error => {
21            console.error("Error accessing media devices.", error);
22        });
23
24    // WebSocket initialization and handling
25    function initializeWebSocket() {
26        // Replace with your actual WebSocket signaling server URL
27        const signalingServerUrl = "wss://your-signaling-server-url";
28        const ws = new WebSocket(signalingServerUrl);
29
30        ws.onopen = function () {
31            console.log("Connected to the signaling server");
32
33            // Send join message
34            const joinMessage = {
35                type: "join",
36                username: "user",
37                roomId: "room"
38            };
39            ws.send(JSON.stringify(joinMessage));
40        };
41
42        ws.onmessage = function (message) {
43            console.log("Received message from server:", message.data);
44
45            const data = JSON.parse(message.data);
46            switch (data.type) {
47                case "joined":
48                    console.log(`${data.username} joined room ${data.roomId}`);
49                    break;
50                case "new-participant":
51                    handleNewParticipant(data.participantId);
52                    break;
53                case "participant-left":
54                    handleParticipantLeft(data.participantId);
55                    break;
56                case "offer":
57                    handleOffer(data.offer, data.participantId);
58                    break;
59                case "answer":
60                    handleAnswer(data.answer, data.participantId);
61                    break;
62                case "ice-candidate":
63                    handleIceCandidate(data.candidate, data.participantId);
64                    break;
65                // Handle other message types as needed
66            }
67        };
68
69        ws.onerror = function (error) {
70            console.error("WebSocket error:", error);
71        };
72
73        ws.onclose = function () {
74            console.log("Disconnected from the signaling server");
75        };
76    }
77
78    function handleNewParticipant(participantId) {
79        // Create new video element for the participant
80        const remoteVideo = document.createElement("video");
81        remoteVideo.id = `remote-video-${participantId}`;
82        remoteVideo.classList.add("remote-video");
83        remoteVideo.autoplay = true;
84        document.getElementById("remote-video-container").appendChild(remoteVideo);
85
86        // Initialize a new RTCPeerConnection
87        const peerConnection = new RTCPeerConnection();
88
89        // Add local stream tracks to the peer connection
90        localStream.getTracks().forEach(track => peerConnection.addTrack(track, localStream));
91
92        // Handle incoming tracks
93        peerConnection.ontrack = function (event) {
94            if (remoteVideo.srcObject !== event.streams[0]) {
95                remoteVideo.srcObject = event.streams[0];
96                console.log("Received remote stream");
97            }
98        };
99
100        // Handle ICE candidates
101        peerConnection.onicecandidate = function (event) {
102            if (event.candidate) {
103                const candidateMessage = {
104                    type: "ice-candidate",
105                    candidate: event.candidate,
106                    participantId: participantId
107                };
108                ws.send(JSON.stringify(candidateMessage));
109            }
110        };
111
112        remoteStreams[participantId] = peerConnection;
113
114        // Create and send an offer
115        peerConnection.createOffer()
116            .then(offer => {
117                return peerConnection.setLocalDescription(offer);
118            })
119            .then(() => {
120                const offerMessage = {
121                    type: "offer",
122                    offer: peerConnection.localDescription,
123                    participantId: participantId
124                };
125                ws.send(JSON.stringify(offerMessage));
126            })
127            .catch(error => {
128                console.error("Error creating offer:", error);
129            });
130    }
131
132    function handleParticipantLeft(participantId) {
133        // Remove the video element for the participant
134        const remoteVideo = document.getElementById(`remote-video-${participantId}`);
135        if (remoteVideo) {
136            remoteVideo.remove();
137        }
138
139        // Close the peer connection
140        if (remoteStreams[participantId]) {
141            remoteStreams[participantId].close();
142            delete remoteStreams[participantId];
143        }
144    }
145
146    function handleOffer(offer, participantId) {
147        const peerConnection = new RTCPeerConnection();
148
149        // Add local stream tracks to the peer connection
150        localStream.getTracks().forEach(track => peerConnection.addTrack(track, localStream));
151
152        // Handle incoming tracks
153        peerConnection.ontrack = function (event) {
154            const remoteVideo = document.getElementById(`remote-video-${participantId}`);
155            if (remoteVideo.srcObject !== event.streams[0]) {
156                remoteVideo.srcObject = event.streams[0];
157                console.log("Received remote stream");
158            }
159        };
160
161        // Handle ICE candidates
162        peerConnection.onicecandidate = function (event) {
163            if (event.candidate) {
164                const candidateMessage = {
165                    type: "ice-candidate",
166                    candidate: event.candidate,
167                    participantId: participantId
168                };
169                ws.send(JSON.stringify(candidateMessage));
170            }
171        };
172
173        peerConnection.setRemoteDescription(new RTCSessionDescription(offer))
174            .then(() => {
175                return peerConnection.createAnswer();
176            })
177            .then(answer => {
178                return peerConnection.setLocalDescription(answer);
179            })
180            .then(() => {
181                const answerMessage = {
182                    type: "answer",
183                    answer: peerConnection.localDescription,
184                    participantId: participantId
185                };
186                ws.send(JSON.stringify(answerMessage));
187            })
188            .catch(error => {
189                console.error("Error handling offer:", error);
190            });
191
192        remoteStreams[participantId] = peerConnection;
193    }
194
195    function handleAnswer(answer, participantId) {
196        const peerConnection = remoteStreams[participantId];
197        peerConnection.setRemoteDescription(new RTCSessionDescription(answer))
198            .catch(error => {
199                console.error("Error setting remote description:", error);
200            });
201    }
202
203    function handleIceCandidate(candidate, participantId) {
204        const peerConnection = remoteStreams[participantId];
205        peerConnection.addIceCandidate(new RTCIceCandidate(candidate))
206            .catch(error => {
207                console.error("Error adding ICE candidate:", error);
208            });
209    }
210
211    // Mute/Unmute Audio
212    muteAudioButton.addEventListener("click", function () {
213        isAudioMuted = !isAudioMuted;
214        localStream.getAudioTracks()[0].enabled = !isAudioMuted;
215        muteAudioButton.textContent = isAudioMuted ? "Unmute Audio" : "Mute Audio";
216    });
217
218    // Start/Stop Video
219    toggleVideoButton.addEventListener("click", function () {
220        isVideoStopped = !isVideoStopped;
221        localStream.getVideoTracks()[0].enabled = !isVideoStopped;
222        toggleVideoButton.textContent = isVideoStopped ? "Start Video" : "Stop Video";
223    });
224
225    // Switch Camera
226    switchCameraButton.addEventListener("click", async function () {
227        if (localStream) {
228            const videoTrack =
229
230 localStream.getVideoTracks()[0];
231            const currentConstraints = videoTrack.getConstraints();
232
233            const devices = await navigator.mediaDevices.enumerateDevices();
234            const videoDevices = devices.filter(device => device.kind === 'videoinput');
235
236            if (videoDevices.length > 1) {
237                const currentDeviceId = videoTrack.getSettings().deviceId;
238                const newDeviceId = videoDevices.find(device => device.deviceId !== currentDeviceId).deviceId;
239
240                const newConstraints = {
241                    video: {
242                        deviceId: { exact: newDeviceId }
243                    }
244                };
245
246                const newStream = await navigator.mediaDevices.getUserMedia(newConstraints);
247                const newVideoTrack = newStream.getVideoTracks()[0];
248                localStream.removeTrack(videoTrack);
249                localStream.addTrack(newVideoTrack);
250
251                document.getElementById("local-video").srcObject = localStream;
252            }
253        }
254    });
255
256    // End Call
257    endCallButton.addEventListener("click", function () {
258        if (localStream) {
259            localStream.getTracks().forEach(track => track.stop());
260        }
261        // Implement additional logic to handle call termination
262        window.location.href = "join.html";
263    });
264});
265
Explanation of the JavaScript Code
WebSocket Initialization and Handling
- Establishes a WebSocket connection to the signaling server and handles incoming messages.
- Manages participant join, leave, offer, answer, and ICE candidate messages.
Handling New Participants
- Creates a new video element for each participant.
- Initializes a new RTCPeerConnection for each participant.
- Adds local stream tracks to the peer connection.
- Handles incoming tracks and ICE candidates.
- Creates and sends an offer to the new participant.
Handling Participant Left
- Removes the video element for the participant who left.
- Closes the peer connection and removes it from the
remoteStreamsobject.
Handling Offers and Answers
- Sets up the RTCPeerConnection for incoming offers and answers.
- Manages remote descriptions and ICE candidates.
Implementing Control Features
- Mute/unmute audio.
- Start/stop video.
- Switch camera.
- End call and redirect to the join screen.
This completes the implementation of the participant view for your FreeSwitch WebRTC application. Users can now see and interact with multiple participants in a session. In the next part, we will cover how to run your code and test the application to ensure everything works as expected.
Step 6: Run Your Code Now
Running the Application
Now that you have implemented all the core features of your FreeSwitch WebRTC application, it’s time to run and test your code. This section will guide you through the steps to ensure your application is up and running smoothly.
Steps to Run the FreeSwitch WebRTC App
Start FreeSwitch
- Ensure FreeSwitch is properly configured and running.
- Start FreeSwitch by running:
sh
1     sudo freeswitch -nc
2
Launch the Web Server
- Serve your HTML, CSS, and JavaScript files using a web server. You can use a simple HTTP server like
http-serverfor this purpose. - Install
http-serverif you haven't already:
sh
1     npm install -g http-server
2- Navigate to the directory containing your
index.htmlfile and start the server:sh
1http-server 2 - The server will start and provide you with a URL (e.g.,
http://localhost:8080).
Access the Application
- Open a web browser and navigate to the URL provided by your HTTP server (e.g.,
http://localhost:8080). - You should see the join screen of your FreeSwitch WebRTC application.
Testing and Debugging Tips
Test the Join Screen
- Enter a username and room ID, then click the "Join" button.
- Ensure the WebSocket connection to the signaling server is established and that you can join the session without errors.
Test Audio and Video Controls
- Verify that you can mute/unmute audio and start/stop video using the respective buttons.
- Check that switching the camera works if you have multiple video input devices.
Test Participant View
- Open multiple browser tabs or windows and join the same room from different tabs.
- Ensure that video streams from all participants are displayed correctly.
- Test the handling of participants joining and leaving the session.
Check Console Logs
- Open the browser's developer console (usually accessible with F12 or right-clicking the page and selecting "Inspect").
- Look for any error messages or warnings in the console log that might indicate issues with your WebRTC implementation.
Network Debugging
- Use the network tab in the browser's developer tools to monitor WebSocket communication and network traffic.
- Ensure that signaling messages (offer, answer, ICE candidates) are being sent and received correctly.
Troubleshooting Common Issues
WebSocket Connection Issues
- Ensure that the signaling server URL is correct and that the server is running.
- Check network connectivity and firewall settings that might block WebSocket connections.
Media Device Access Errors
- Verify that your browser has permission to access the microphone and camera.
- Check that the correct media devices are selected and available.
ICE Candidate Gathering Issues
- Ensure that ICE candidates are being gathered and sent correctly.
- Verify that STUN/TURN servers are configured if necessary.
Video/Audio Stream Issues
- Ensure that video and audio tracks are being added to the RTCPeerConnection.
- Check that the correct video and audio elements are being updated with the media streams.
Example Scenario: Testing a Two-Participant Session
Participant 1
- Open a browser window and navigate to
http://localhost:8080. - Enter a username (e.g., "User1") and a room ID (e.g., "TestRoom").
- Click "Join" to enter the session.
Participant 2
- Open another browser window or tab and navigate to
http://localhost:8080. - Enter a different username (e.g., "User2") and the same room ID (e.g., "TestRoom").
- Click "Join" to enter the session.
Verify Interaction
- Ensure that both participants can see each other's video streams.
- Test the audio and video controls for both participants.
- Verify that messages and streams are handled correctly by the signaling server.
Conclusion
Congratulations! You have successfully built a FreeSwitch WebRTC application that allows users to join sessions, control their audio and video, and interact with multiple participants. This guide covered the essential steps, from setting up FreeSwitch and configuring WebRTC to implementing the user interface and testing the application.
Want to level-up your learning? Subscribe now
Subscribe to our newsletter for more tech based insights
FAQ