


Interactive live streaming in React is a real-time, low-latency streaming experience where viewers can chat, react, vote, and even join the stage as active participants. VideoSDK provides this through its Interactive Live Streaming (ILS) mode, built on WebRTC with sub-second latency and role-based participant management. To build it, you set up the VideoSDK React SDK, generate meeting tokens server-side, configure host and viewer modes, and deploy with production-grade security. Start with the VideoSDK React quick-start guide to get your first stream running in minutes.
Sub-second latency is the difference between a live shopping viewer who buys and one who bounces. When a host flashes a limited-time offer, the audience needs to see it, react, and click before the timer expires. Traditional HLS streaming introduces 10 to 30 seconds of delay, which kills that interaction. Interactive live streaming closes the gap to under a second, making real-time Q&A, live auctions, and audience participation feel genuinely live.
This guide walks you through the full process to build an interactive live streaming React application using VideoSDK. You will plan the architecture, set up the development environment, handle token authentication, build the host and viewer experiences, add interactive features like chat and polls, and prepare everything for production deployment. By the end, you will have a clear blueprint for a functional streaming app that keeps audiences engaged.
What Is Interactive Live Streaming in React?
Interactive live streaming is defined as a streaming model where the audience can actively participate in real time rather than passively watching a delayed broadcast. Unlike traditional HLS, which pushes video through a CDN with a buffering window of 10 to 30 seconds, interactive live streaming uses WebRTC-based forwarding to keep latency under one second. This makes it suitable for scenarios where the audience needs to respond, vote, or join the conversation instantly.
VideoSDK provides interactive live streaming through its ILS mode, which is built on the same SDK surface as its video calling product. You switch to ILS by configuring the meeting mode when participants join. VideoSDK supports three role-based participant types: SENDANDRECV for hosts and co-hosts who publish media, RECVONLY for viewers who consume media and interact through data channels, and SIGNALLINGONLY for participants who need only the data channel without any media streams.
The key differentiator is that viewers in RECVONLY mode can be promoted to SENDAND_RECV at any time using the changeMode API. This means a viewer can raise their hand, get promoted to speaker, and join the live stage without leaving the room or reconnecting. That flexibility is what makes ILS fundamentally different from a one-way HLS broadcast.
Planning Your Application Architecture
A well-architected interactive streaming app separates concerns between media delivery, data channels, and audience scaling. Your core components include a host screen where the presenter broadcasts audio and video, a viewer screen where the audience watches and interacts, a real-time data channel for chat and reactions, and an HLS fallback path for massive audiences that exceed WebRTC capacity.
Scalability is the central architectural decision. WebRTC-based ILS handles interactive audiences efficiently up to a certain threshold, typically in the low thousands of concurrent viewers per room. Beyond that, you want to cascade viewers to an HLS stream that VideoSDK transcodes and delivers through a CDN. The host and any active participants stay on the low-latency WebRTC path, while passive viewers shift to HLS. This hybrid approach preserves interactivity where it matters and scales to unlimited audience sizes.
The diagram below shows how media flows from the host through VideoSDK's Selective Forwarding Unit (SFU) to viewers, with the HLS transcoding path branching off for CDN delivery.
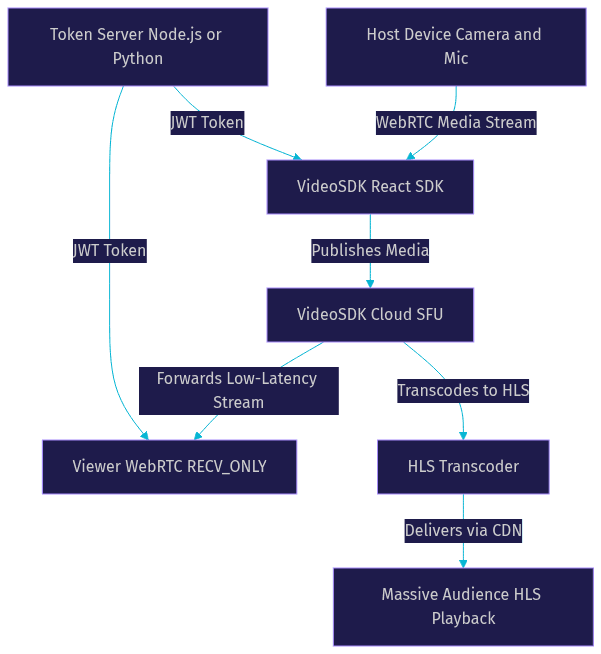
The top path represents your interactive viewers who get sub-second latency and full data channel access. The bottom path represents your scale viewers who watch through HLS with standard CDN latency but can still participate in chat through the data channel if they remain connected to the signaling layer. This dual-path architecture is what lets you serve both a 50-person interactive Q&A and a 10,000-person webinar from the same room.
Setting Up the Development Environment
Before you build, you need a working React project with the VideoSDK React SDK installed. Your prerequisites include Node.js version 18 or later, a React project scaffolded with Vite or Create React App, an active VideoSDK account with your API key and secret available from the dashboard, and the VideoSDK React SDK package.
To set up the environment, create a new React project using your preferred scaffolding tool. Once the project is ready, install the VideoSDK React SDK package from npm. The package provides the MeetingProvider component, hooks like useMeeting and usePubSub, and all the utilities you need for room management and media handling.
After installation, verify that your VideoSDK account is active and that you can access your API credentials from the VideoSDK dashboard. You will need both the API key and secret for server-side token generation, which is the next step. Do not embed the secret in your React project. It belongs on your backend server only.
One common setup mistake is mismatching SDK versions between the VideoSDK React SDK and any server-side SDK you use for token generation. Always check that both packages are compatible with each other by consulting the VideoSDK React SDK documentation before you start building.
Managing Authentication and Meeting Tokens
VideoSDK uses token-based authentication to secure access to rooms. Every participant, whether host or viewer, needs a valid JSON Web Token (JWT) to join a meeting. This token is generated server-side using your VideoSDK API key and secret, then passed to the MeetingProvider component on the frontend.
The authentication flow works in three steps. First, your backend server calls the VideoSDK REST API to create a room, which returns a unique room ID. Second, your server generates a JWT using your API key and secret, scoping the token to that room ID and setting an appropriate participant role. Third, the frontend receives both the room ID and token, then passes them to the MeetingProvider to initialize the meeting session.
Never expose your API secret on the client side. If someone extracts your secret from a frontend bundle, they can generate tokens for any room and impersonate any participant. Always run a lightweight backend service, even in development, to handle token generation. You can use Node.js, Python, or any server environment that can make HTTP requests to the VideoSDK REST API. The VideoSDK REST API reference documents every endpoint you need for room creation, token validation, and session management.
For production, set token expiration times appropriately. A token that expires mid-stream will disconnect the participant. A common pattern is to generate tokens with a 24-hour expiry for live events and implement a refresh mechanism for longer sessions. Also consider scoping tokens to specific roles so a viewer token cannot be reused to gain host privileges.
Building the Host Experience
The host experience is where your streaming application begins. The host needs a clear, reliable interface that shows a camera preview, microphone controls, and a Go Live button that starts the broadcast. When the host joins the meeting, they do so in SENDANDRECV mode, which allows them to publish their audio and video streams while also receiving streams from co-hosts or promoted viewers.
To initialize the host experience, wrap your host component in the MeetingProvider component and configure the meeting mode as SENDANDRECV. The MeetingProvider accepts the meeting ID, the token, and the participant mode as configuration. Once the provider is initialized, the useMeeting hook gives you access to meeting state, participant lists, and control methods.
When the host is ready to broadcast to a large audience, they trigger the HLS start method. This tells VideoSDK to begin transcoding the host's media stream into an HLS feed that can be distributed through a CDN. The HLS stream runs alongside the WebRTC path, so interactive viewers on WebRTC see the host with sub-second latency while scale viewers on HLS see the same content with standard CDN delay. This is a critical design decision: you are not choosing between ILS and HLS. You are running both simultaneously to serve different audience tiers.
Handling permission prompts and error states is essential for a smooth host experience. When the host first joins, the browser will prompt for camera and microphone access. If the host denies these permissions, your UI should display a clear message explaining that broadcasting requires media access, along with a retry button. For network loss scenarios, the VideoSDK React SDK automatically attempts reconnection, but you should also surface a connection status indicator so the host knows when they are offline. Common errors include invalid or expired tokens, room not found, and camera permission denied. Each should have a specific, user-friendly error message rather than a generic failure state.
Building the Viewer Experience
The viewer experience is where your audience spends their time, so it needs to be polished and responsive. Viewers join the meeting in RECV_ONLY mode, which means they consume the host's media stream and participate through the data channel but do not publish their own audio or video. This keeps bandwidth usage low and allows thousands of concurrent viewers to participate without overwhelming the SFU.
Your viewer UI should include a low-latency video player that renders the host's stream, a chat sidebar where viewers can send messages, and a reaction bar for emoji responses. The video player uses the media stream from the meeting, which the SDK makes available through participant hooks. For viewers who prefer or require CDN playback, such as those on very slow connections, you can also consume the playback HLS URL that VideoSDK generates when the host starts HLS. This gives you flexibility: interactive viewers stay on WebRTC for real-time engagement, while bandwidth-constrained viewers fall back to HLS.
The real-time data channel is what makes the viewer experience interactive rather than passive. VideoSDK provides this through its publish-subscribe mechanism, accessible via the usePubSub hook. Viewers can send chat messages, cast poll votes, and trigger emoji reactions, all of which propagate to the host and other viewers in real time. Because this data channel runs over the same WebRTC connection as the media, it benefits from the same sub-second latency.
One important UI consideration is the transition from viewer to active participant. When a viewer is promoted to speaker using the changeMode API, your UI should smoothly switch from the viewer layout to a speaker layout that shows their camera preview and mute controls. This transition should feel seamless, not like joining a new room. The VideoSDK interactive live streaming guide covers the specific configuration options for mode switching.
Adding Interactive Features
Interactive features are what separate an ILS app from a standard video player. The three most common features are real-time chat, polls and Q&A, and emoji reactions, all of which run through VideoSDK's publish-subscribe data channel.
Chat integration works through the usePubSub hook, which lets you subscribe to a named topic and publish messages to it. When a viewer sends a chat message, it publishes to the chat topic, and every participant subscribed to that topic receives the message instantly. You control the message format, so you can include the sender's name, a timestamp, and the message body. The host sees these messages in real time and can respond verbally or in text.
Polls and Q&A follow the same pattern but with structured data. A poll is a message published to a poll topic containing a question and multiple-choice options. Viewers respond by publishing their selected option back to the same topic. Your frontend aggregates responses and displays live results. For Q&A, viewers submit questions through the data channel, and the host can address them verbally or mark them as answered. This creates a structured interaction loop that scales to hundreds of participants without chaos.
Emoji reactions are lightweight messages published to a reaction topic. When a viewer taps a reaction button, your app publishes a short message containing the emoji type. Every participant receives it, and your UI renders a floating animation over the video player. Because the data channel is real-time, reactions appear almost instantly, creating the kind of collective energy that makes live shopping and gaming streams feel alive.
You can extend these features with custom video tracks for screen sharing and virtual backgrounds. The VideoSDK custom video track documentation explains how to send processed video alongside or instead of the camera feed, which is useful for hosts who want to share their screen during a product demo or presentation.
Production-Ready Considerations
Moving from localhost to production introduces a set of requirements that catch many developers off guard. The first is HTTPS. WebRTC requires a secure context, meaning your application must be served over HTTPS in production. Browsers will block camera and microphone access on insecure origins. If you are testing locally, localhost is treated as a secure context, but any deployed environment needs a valid TLS certificate.
TURN server fallback is the second critical consideration. When viewers or hosts are behind restrictive firewalls or NATs, the STUN server may not be sufficient for establishing peer connections. VideoSDK provides TURN server infrastructure, but you should verify that your network configuration allows UDP traffic on the expected ports. If your deployment environment blocks UDP, you may need to configure TCP fallback or use a cloud proxy. VideoSDK's geo-fencing feature lets you route traffic through specific regional servers, which improves latency for geographically concentrated audiences and helps with compliance requirements in regulated industries.
Role-based access control is essential for security. VideoSDK supports waiting rooms, breakout rooms, and participant-level permissions. Configure your tokens with the appropriate role so that only authorized users can join as hosts. For public events, consider using a waiting room where a moderator approves each viewer before they enter the main session.
Monitoring is where production maturity shows. VideoSDK provides session analytics through its dashboard and REST API, including participant counts, bandwidth usage, connection quality metrics, and recording status. Use these metrics to detect issues during live events and to optimize your configuration for future streams. The VideoSDK REST API reference includes endpoints for fetching session analytics programmatically.
For scaling, understand your audience tiers. Interactive WebRTC viewers are limited by SFU capacity, while HLS viewers scale through CDN infrastructure. Plan your room configuration to match your expected audience. VideoSDK's pricing includes a free tier with credits for testing, then moves to pay-as-you-go based on participant minutes.
Decision Matrix: ILS vs. Traditional HLS
Choosing between ILS and traditional HLS depends on your interactivity requirements and audience size. The table below compares the two approaches across the dimensions that matter most to developers building streaming applications.
| Dimension | Interactive Live Streaming (ILS) | Traditional HLS |
|---|---|---|
| Latency | Sub-second (under 1 second) | 10 to 30 seconds |
| Interactivity | Full real-time chat, polls, reactions, mode switching | Chat only through separate WebSocket layer |
| Audience size | Thousands per room (WebRTC), unlimited with HLS cascade | Unlimited via CDN |
| Infrastructure complexity | Managed by VideoSDK, minimal server setup | Requires separate transcoding and CDN setup |
| Best for | Live shopping, Q&A, auctions, gaming, webinars under 5,000 | One-way broadcasts, sports, large-scale conferences |
Use ILS when your audience needs to react in real time. Use traditional HLS when you are broadcasting to tens of thousands of passive viewers and latency does not matter. Use both together when you want an interactive core audience on WebRTC and a passive scale audience on HLS, which is exactly what VideoSDK's hybrid approach enables.
Quick Recap and Next Steps
You now have a complete blueprint for building an interactive live streaming React application with VideoSDK. The architecture uses a dual-path approach: WebRTC for interactive viewers who need sub-second latency, and HLS for scale viewers who need CDN delivery. Token-based authentication secures your rooms, role-based participants separate hosts from viewers, and the publish-subscribe data channel powers chat, polls, and reactions.
For your next step, head to the VideoSDK React quick-start guide to get a working meeting running in minutes. If you want to prototype even faster, try the VideoSDK Prebuilt UI Kit, which gives you a complete video calling interface with zero custom UI code. You can also explore the VideoSDK code samples for working examples of ILS implementations.
Ready to start building? Sign up for the VideoSDK free tier and get your first interactive live stream running today.
Definitions Glossary
Interactive Live Streaming (ILS): A streaming mode where viewers can interact in real time through chat, polls, and reactions, with sub-second latency enabled by WebRTC. VideoSDK provides ILS through its React SDK using role-based participant modes.
SENDANDRECV: A participant mode in VideoSDK where the participant publishes their own audio and video streams while also receiving streams from others. Used by hosts and co-hosts in an ILS session.
RECV_ONLY: A participant mode where the participant consumes media streams and interacts through the data channel but does not publish their own audio or video. Used by viewers in an ILS session.
MeetingProvider: A React context provider component in the VideoSDK React SDK that initializes a meeting session and makes meeting state and controls available to child components through hooks.
usePubSub: A VideoSDK React hook that provides access to the real-time publish-subscribe data channel, enabling chat messages, polls, reactions, and custom event broadcasting between participants.
changeMode: A VideoSDK API method that switches a participant's role between SENDANDRECV and RECV_ONLY, allowing viewers to be promoted to active speakers without leaving the room.
Selective Forwarding Unit (SFU): A media server architecture that receives media streams from publishers and forwards them to subscribers without mixing or transcoding. VideoSDK uses an SFU to route WebRTC media efficiently.
Key Takeaways
- Interactive live streaming uses WebRTC to deliver sub-second latency, making it suitable for live shopping, Q&A, and auctions where audience reaction time matters.
- VideoSDK's ILS mode supports three participant roles (SENDANDRECV, RECVONLY, SIGNALLINGONLY) and allows dynamic mode switching so viewers can become speakers mid-stream.
- A hybrid architecture that runs WebRTC for interactive viewers and HLS for scale viewers lets you serve both small engaged audiences and massive passive audiences from the same room.
- Token-based authentication with server-side JWT generation is mandatory for securing VideoSDK rooms, and your API secret must never be exposed on the frontend.
- The publish-subscribe data channel powers all interactive features including chat, polls, Q&A, and emoji reactions, all with the same sub-second latency as the media stream.
Conclusion
Building an interactive live streaming React application with VideoSDK comes down to understanding the dual-path architecture, configuring role-based participants correctly, and leveraging the real-time data channel for audience engagement. The VideoSDK React SDK handles the WebRTC complexity, SFU routing, and HLS transcoding so you can focus on building a great host and viewer experience. Production deployment requires HTTPS, TURN server fallback, role-based access control, and active monitoring through VideoSDK analytics, but none of these are blockers if you plan for them early. The free tier gives you enough credits to prototype and test before committing to paid usage. What are you building with VideoSDK? Drop a comment below, I would love to hear what kind of interactive live streaming use case you are working on.
Free $20 Balance for AI Voice Agents & Video Calls
FAQ