Introduction to WebRTC-Streamer Technology
What is WebRTC-Streamer?
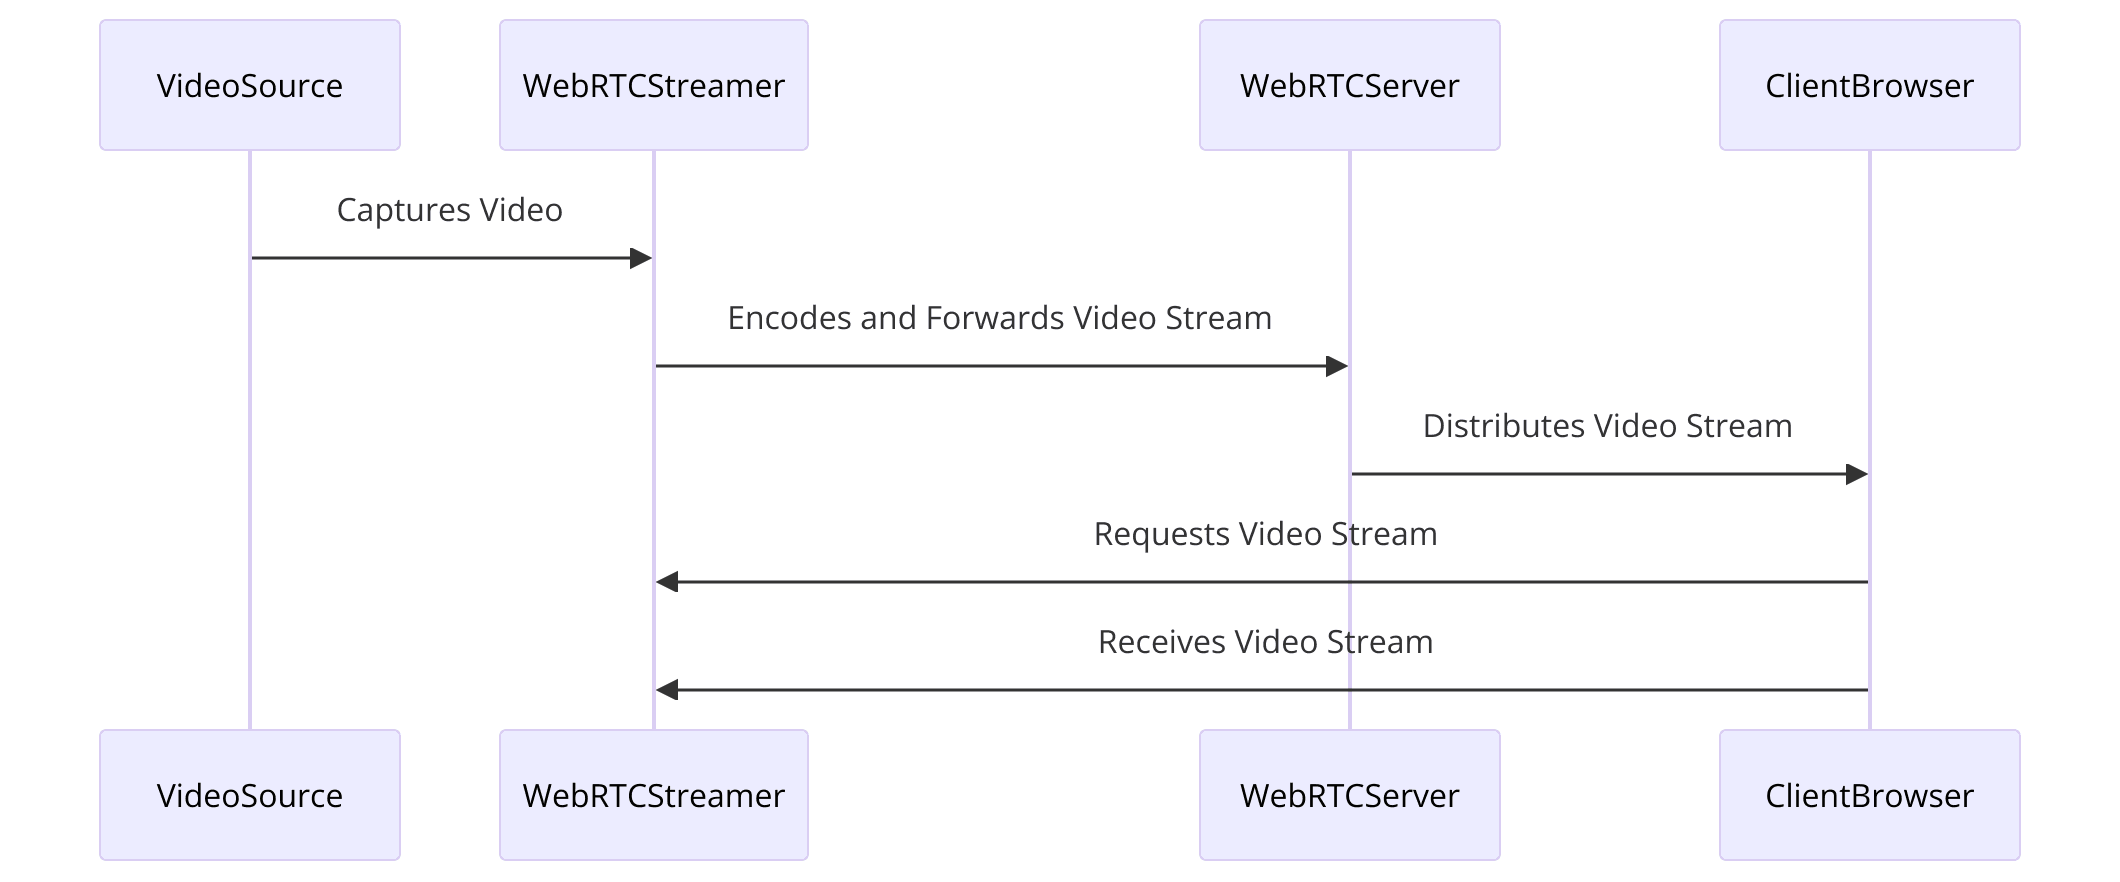
WebRTC-Streamer is an open-source project designed to facilitate real-time video streaming over the web. Leveraging the power of WebRTC (Web Real-Time Communication), this technology allows developers to stream video from various sources, such as V4L2 (Video for Linux 2) and RTSP (Real-Time Streaming Protocol), directly to web browsers and other WebRTC-compatible endpoints. The flexibility and robustness of WebRTC-Streamer make it an ideal choice for applications requiring high-quality, low-latency video communication.
Overview of WebRTC-Streamer Capabilities
WebRTC-Streamer excels in its ability to handle multiple video formats and seamlessly integrate with popular video conferencing platforms like Jitsi and Janus. This versatility is crucial for developers looking to build applications that need to support a wide range of video sources and destinations. By using WebRTC-Streamer, you can:
- Stream video from V4L2 devices such as webcams and capture cards.
- Convert RTSP streams to WebRTC, enabling browser-based viewing.
- Integrate with Jitsi and Janus for enhanced video conferencing capabilities.
- Support multiple concurrent streams, ensuring scalability for larger applications.
Supported Platforms and Integrations
One of the standout features of WebRTC-Streamer is its compatibility with various platforms and systems. It can be deployed on different operating systems, including Linux and Windows, making it a versatile tool for developers across different environments. Additionally, its ability to integrate with web-based platforms and other streaming technologies means you can create comprehensive video streaming solutions tailored to your specific needs.
For instance, integrating WebRTC-Streamer with Jitsi allows you to add real-time video communication features to your web applications without the need for complex server setups. Similarly, using Janus as a WebRTC server can provide additional functionalities such as media recording and broadcasting, further enhancing the capabilities of your video streaming applications.
In summary, WebRTC-Streamer is a powerful and flexible tool for real-time video streaming, offering broad compatibility and integration options to meet the diverse needs of modern video communication applications.
Getting Started with the Code!
In this section, we will guide you through setting up a new WebRTC-Streamer project, installing necessary dependencies, understanding the project structure, and grasping the overall app architecture. By the end of this section, you will have a solid foundation to build and run your WebRTC-Streamer application.
Create a New WebRTC-Streamer App
To get started with WebRTC-Streamer, you'll first need to set up a new project. Follow these steps to create your project environment:
[a] Clone the Repository
Open your terminal and clone the WebRTC-Streamer repository from GitHub.
sh
1   git clone https://github.com/mpromonet/webrtc-streamer.git
2
[b] Navigate to the Project Directory
sh
1   cd webrtc-streamer
2
[c] Initialize Your Project
Create a build directory and navigate into it.
sh
1   mkdir build && cd build
2
[d] Run CMake to Configure the Project
sh
1   cmake ..
2
[e] Build the Project
sh
1   make
2
By following these steps, you will have a working directory with all the necessary files and configurations to start developing your WebRTC-Streamer application.
Install Necessary Dependencies
WebRTC-Streamer requires several dependencies to function correctly. Here’s how to install them:
[a] Install C++ Compiler and Tools
Ensure you have
g++ and other essential build tools installed.sh
1   sudo apt-get install build-essential
2
[b] Install WebRTC
Download and install WebRTC libraries. This step might vary based on your operating system. For Debian-based systems:
sh
1   sudo apt-get install libwebrtc-dev
2
[c] Install V4L2 and RTSP Libraries
sh
1   sudo apt-get install libv4l-dev librtsp-dev
2
[d] Additional Dependencies
Depending on your setup, you might need other libraries such as
libssl-dev, libjsoncpp-dev, etc.sh
1   sudo apt-get install libssl-dev libjsoncpp-dev
2
By ensuring all these dependencies are installed, you can avoid common issues that might arise during the build and execution phases.
Structure of the Project
Understanding the structure of your WebRTC-Streamer project is crucial for efficient development. Here’s a breakdown of the key directories and files:
- src/: Contains the source code files.
- include/: Header files for the project.
- third_party/: Third-party libraries and dependencies.
- CMakeLists.txt: Configuration file for CMake to build the project.
- README.md: Provides an overview and instructions for the project.
Each directory and file serves a specific purpose, contributing to the overall functionality of the WebRTC-Streamer application.
App Architecture
- Main Application Logic: Handles the initialization and configuration of the streaming application.
- Streaming Pipeline: Manages the flow of video data from V4L2/RTSP sources to WebRTC endpoints.
- User Interface Components: Provides the interface for users to interact with the application, such as joining streams and controlling playback.
- Integration Modules: Facilitates integration with platforms like Jitsi and Janus, enabling enhanced communication features.
Understanding this architecture helps in extending the application with new features or troubleshooting issues effectively.
By following the steps outlined in this section, you will have a well-structured WebRTC-Streamer project with all necessary dependencies installed. You will also gain a clear understanding of the project structure and its architecture, setting a strong foundation for further development. Next, we will dive into the detailed implementation, starting with the main application logic in
main.cpp.Step 1: Get Started with main.cpp
In this section, we will focus on setting up the main application logic in
main.cpp. This file is the entry point of your WebRTC-Streamer application, where you'll configure and initialize the core functionalities required for streaming.Initialize Main Application Logic
The first step in developing your WebRTC-Streamer application is to set up the main application logic. This involves initializing the necessary components and configurations to enable video streaming.
Example Code
Here’s a basic example to get you started with
main.cpp:C++
1#include <iostream>
2#include "WebRTCStreamer.h"
3
4int main(int argc, char* argv[]) {
5    // Initialize WebRTC
6    webrtc::WebRTCStreamer streamer;
7    if (!streamer.Initialize()) {
8        std::cerr << "Failed to initialize WebRTC streamer" << std::endl;
9        return -1;
10    }
11
12    // Start the streaming process
13    if (!streamer.Start()) {
14        std::cerr << "Failed to start streaming" << std::endl;
15        return -1;
16    }
17
18    // Main loop
19    while (true) {
20        streamer.Process();
21    }
22
23    // Cleanup and shutdown
24    streamer.Shutdown();
25    return 0;
26}
27
In this example, we include the necessary headers and define the main function. We then create an instance of
WebRTCStreamer, initialize it, and start the streaming process. The main loop calls the Process method continuously to handle streaming tasks.Setting Up the Streaming Pipeline
To stream video using WebRTC-Streamer, you need to set up the streaming pipeline. This involves configuring the sources (e.g., V4L2, RTSP) and the WebRTC output.
Example Code
Here's how you can configure the streaming pipeline in
main.cpp:C++
1#include <iostream>
2#include "WebRTCStreamer.h"
3#include "RTSPCapture.h"
4#include "V4L2Capture.h"
5
6int main(int argc, char* argv[]) {
7    // Initialize WebRTC
8    webrtc::WebRTCStreamer streamer;
9    if (!streamer.Initialize()) {
10        std::cerr << "Failed to initialize WebRTC streamer" << std::endl;
11        return -1;
12    }
13
14    // Set up V4L2 capture
15    V4L2Capture v4l2Capture("/dev/video0", 640, 480);
16    if (!v4l2Capture.Initialize()) {
17        std::cerr << "Failed to initialize V4L2 capture" << std::endl;
18        return -1;
19    }
20
21    // Set up RTSP capture
22    RTSPCapture rtspCapture("rtsp://example.com/stream");
23    if (!rtspCapture.Initialize()) {
24        std::cerr << "Failed to initialize RTSP capture" << std::endl;
25        return -1;
26    }
27
28    // Add video sources to the streamer
29    streamer.AddVideoSource(&v4l2Capture);
30    streamer.AddVideoSource(&rtspCapture);
31
32    // Start the streaming process
33    if (!streamer.Start()) {
34        std::cerr << "Failed to start streaming" << std::endl;
35        return -1;
36    }
37
38    // Main loop
39    while (true) {
40        streamer.Process();
41    }
42
43    // Cleanup and shutdown
44    streamer.Shutdown();
45    return 0;
46}
47
In this code, we initialize both V4L2 and RTSP capture sources and add them to the
WebRTCStreamer instance. The Process method in the main loop handles the continuous streaming tasks.In this step, you have set up the main application logic in
main.cpp and configured the streaming pipeline to handle video inputs from V4L2 and RTSP sources. This foundational code will enable you to start building more advanced features and functionalities in your WebRTC-Streamer application. Next, we will move on to wireframing all components to design the application interface effectively.Step 2: Wireframe All Components
Wireframing is a crucial step in designing the user interface (UI) of your WebRTC-Streamer application. It helps you visualize the layout and functionality of each component before diving into the implementation. In this section, we'll guide you through wireframing the key components of your application.
Design the Application Interface
Creating a clear and intuitive interface is essential for a smooth user experience. The WebRTC-Streamer application involves several key components that need to be designed effectively.
Key Components to Include in the Wireframe:
Join Screen
- Description: The initial screen where users can join a streaming session.
- Elements:
- Text input for entering the streaming URL.
- Dropdown or radio buttons for selecting the video source (e.g., V4L2, RTSP).
- "Join" button to start the streaming session.
Streaming View
- Description: The main interface displaying the video stream.
- Elements:
- Video display area.
- Controls for play, pause, stop, and volume.
- Full-screen toggle button.
- Indicator showing the number of participants (if applicable).
Controls
- Description: User controls for interacting with the stream.
- Elements:
- Buttons for play, pause, stop.
- Volume slider or mute button.
- Full-screen toggle.
Participant View
- Description: Display area for multiple participants in the stream.
- Elements:
- Grid layout to show all participants.
- Dynamic resizing based on the number of participants.
- Highlight active speaker (if applicable).
Wireframing Tools:
You can use various tools to create wireframes, such as:
- Figma: A popular design tool for creating wireframes and prototypes.
- Balsamiq: A user-friendly tool specifically for wireframing.
- Sketch: Another powerful tool for designing interfaces.
Implementing the Wireframe
With the wireframe in hand, you can start implementing the UI components in your WebRTC-Streamer application. Use a combination of HTML, CSS, and JavaScript (or a framework like React) to create the visual and interactive elements.
HTML for Join Screen
HTML
1<!DOCTYPE html>
2<html>
3<head>
4    <title>WebRTC-Streamer</title>
5    <link rel="stylesheet" type="text/css" href="styles.css">
6</head>
7<body>
8    <div class="join-screen">
9        <h1>Join Streaming Session</h1>
10        <form id="joinForm">
11            <label for="url">URL:</label>
12            <input type="text" id="url" name="url">
13            <br>
14            <label for="source">Source:</label>
15            <input type="radio" id="v4l2" name="source" value="V4L2"> V4L2
16            <input type="radio" id="rtsp" name="source" value="RTSP"> RTSP
17            <br>
18            <button type="submit">Join</button>
19        </form>
20    </div>
21    <script src="script.js"></script>
22</body>
23</html>
24
CSS for Styling
CSS
1body {
2    font-family: Arial, sans-serif;
3    text-align: center;
4}
5
6.join-screen {
7    margin-top: 50px;
8}
9
10label {
11    display: inline-block;
12    margin: 10px 0;
13}
14
15input[type="text"] {
16    width: 300px;
17    padding: 5px;
18}
19
20button {
21    padding: 10px 20px;
22    background-color: #4CAF50;
23    color: white;
24    border: none;
25    cursor: pointer;
26}
27
28button:hover {
29    background-color: #45a049;
30}
31
In this step, you have designed the wireframe for the key components of your WebRTC-Streamer application. This wireframe serves as a blueprint for implementing the UI, ensuring a clear and organized layout. Next, we will move on to implementing the join screen, where users can start their streaming sessions.
Step 3: Implement Join Screen
In this section, we will implement the join screen for your WebRTC-Streamer application. The join screen is the initial interface where users can enter the streaming URL and select the video source. This setup will allow users to initiate their streaming sessions easily.
Creating the Join Screen Interface
The join screen involves creating an HTML form where users can input the URL and select the video source. We will use HTML, CSS, and JavaScript to build this interface.
HTML for Join Screen
Here is the HTML code to create the join screen interface:
HTML
1<!DOCTYPE html>
2<html>
3<head>
4    <title>WebRTC-Streamer</title>
5    <link rel="stylesheet" type="text/css" href="styles.css">
6</head>
7<body>
8    <div class="join-screen">
9        <h1>Join Streaming Session</h1>
10        <form id="joinForm">
11            <label for="url">URL:</label>
12            <input type="text" id="url" name="url" required>
13            <br>
14            <label for="source">Source:</label>
15            <input type="radio" id="v4l2" name="source" value="V4L2" required> V4L2
16            <input type="radio" id="rtsp" name="source" value="RTSP" required> RTSP
17            <br>
18            <button type="submit">Join</button>
19        </form>
20    </div>
21    <script src="script.js"></script>
22</body>
23</html>
24
CSS for Join Screen
To style the join screen, use the following CSS code:
CSS
1body {
2    font-family: Arial, sans-serif;
3    text-align: center;
4    background-color: #f4f4f4;
5}
6
7.join-screen {
8    margin-top: 50px;
9    background-color: white;
10    padding: 20px;
11    border-radius: 10px;
12    box-shadow: 0 0 10px rgba(0, 0, 0, 0.1);
13    display: inline-block;
14}
15
16label {
17    display: block;
18    margin: 10px 0 5px;
19}
20
21input[type="text"], input[type="radio"] {
22    margin: 5px;
23}
24
25button {
26    padding: 10px 20px;
27    background-color: #4CAF50;
28    color: white;
29    border: none;
30    cursor: pointer;
31    margin-top: 10px;
32}
33
34button:hover {
35    background-color: #45a049;
36}
37
Handling User Inputs
Next, we will add JavaScript to handle user inputs and initiate the streaming session when the form is submitted.
JavaScript for Join Screen
Here’s the JavaScript code to handle the form submission and start the streaming session:
JavaScript
1document.getElementById('joinForm').addEventListener('submit', function(event) {
2    event.preventDefault();
3
4    // Get the URL and source values
5    const url = document.getElementById('url').value;
6    const source = document.querySelector('input[name="source"]:checked').value;
7
8    // Validate the inputs
9    if (url && source) {
10        // Display a message or redirect to the streaming page
11        alert(`Joining session with URL: ${url} and Source: ${source}`);
12
13        // Here, you can add code to initialize the streaming session
14        // Example: initializeStreaming(url, source);
15    } else {
16        alert('Please enter a valid URL and select a source.');
17    }
18});
19
In this script, we attach an event listener to the form's submit event. When the form is submitted, the event listener prevents the default form submission, retrieves the URL and source values, and performs validation. If the inputs are valid, it displays an alert with the entered information. In a real application, you would replace the alert with code to initialize the streaming session.
Example Function to Initialize Streaming
JavaScript
1function initializeStreaming(url, source) {
2    // Logic to start streaming based on the provided URL and source
3    // This could involve setting up WebRTC connections, configuring the streaming pipeline, etc.
4    console.log(`Initializing streaming with URL: ${url} and Source: ${source}`);
5}
6
In this step, you have implemented the join screen for your WebRTC-Streamer application. This screen includes an HTML form for users to enter the streaming URL and select the video source, styled with CSS for a clean and user-friendly interface. The JavaScript handles form submissions and prepares the application to start the streaming session. Next, we will move on to implementing user controls for the streaming session, enhancing the user experience with features like play, pause, and volume control.
Step 4: Implement Controls
In this section, we will implement user controls for the WebRTC-Streamer application. These controls will allow users to interact with the video stream, providing functionalities such as play, pause, stop, and volume control. Enhancing user experience with intuitive controls is crucial for any streaming application.
Developing User Controls for Streaming
We will create a control panel that includes buttons for playing, pausing, and stopping the stream, as well as a volume slider. We will use HTML, CSS, and JavaScript to build these controls.
HTML for Controls
Here is the HTML code to add the control panel to your streaming view:
HTML
1<!DOCTYPE html>
2<html>
3<head>
4    <title>WebRTC-Streamer</title>
5    <link rel="stylesheet" type="text/css" href="styles.css">
6</head>
7<body>
8    <div class="streaming-view">
9        <h1>Streaming Session</h1>
10        <video id="video" width="640" height="480" controls autoplay></video>
11        <div class="controls">
12            <button id="playButton">Play</button>
13            <button id="pauseButton">Pause</button>
14            <button id="stopButton">Stop</button>
15            <label for="volumeControl">Volume:</label>
16            <input type="range" id="volumeControl" min="0" max="1" step="0.1">
17        </div>
18    </div>
19    <script src="script.js"></script>
20</body>
21</html>
22
CSS for Controls
To style the control panel, use the following CSS code:
CSS
1body {
2    font-family: Arial, sans-serif;
3    text-align: center;
4    background-color: #f4f4f4;
5}
6
7.streaming-view {
8    margin-top: 50px;
9    background-color: white;
10    padding: 20px;
11    border-radius: 10px;
12    box-shadow: 0 0 10px rgba(0, 0, 0, 0.1);
13    display: inline-block;
14}
15
16video {
17    display: block;
18    margin: 0 auto;
19}
20
21.controls {
22    margin-top: 20px;
23}
24
25button {
26    padding: 10px 20px;
27    margin: 5px;
28    background-color: #4CAF50;
29    color: white;
30    border: none;
31    cursor: pointer;
32}
33
34button:hover {
35    background-color: #45a049;
36}
37
38input[type="range"] {
39    margin-left: 10px;
40}
41
JavaScript for Control Functionality
Next, we will add JavaScript to handle the functionality of the play, pause, stop, and volume controls.
Here’s the JavaScript code to implement the control functionalities:
JavaScript
1document.addEventListener('DOMContentLoaded', (event) => {
2    const video = document.getElementById('video');
3    const playButton = document.getElementById('playButton');
4    const pauseButton = document.getElementById('pauseButton');
5    const stopButton = document.getElementById('stopButton');
6    const volumeControl = document.getElementById('volumeControl');
7
8    // Play the video
9    playButton.addEventListener('click', () => {
10        video.play();
11    });
12
13    // Pause the video
14    pauseButton.addEventListener('click', () => {
15        video.pause();
16    });
17
18    // Stop the video
19    stopButton.addEventListener('click', () => {
20        video.pause();
21        video.currentTime = 0;
22    });
23
24    // Adjust the volume
25    volumeControl.addEventListener('input', (event) => {
26        video.volume = event.target.value;
27    });
28
29    // Example: Set up the video source
30    // This should be replaced with actual streaming source setup
31    video.src = 'path/to/your/video/stream';
32});
33
In this script, we set up event listeners for the play, pause, and stop buttons to control the video playback. The volume control adjusts the video volume based on the slider input. The
video.src should be replaced with the actual video stream URL or WebRTC stream setup.Enhanced User Experience Features
To further enhance the user experience, consider adding the following features:
- Full-Screen Toggle: Allow users to view the video in full screen.
- Mute Button: Provide an option to mute the audio.
- Playback Speed Control: Enable users to adjust the playback speed.
Example Full-Screen Toggle
JavaScript
1const fullScreenButton = document.createElement('button');
2fullScreenButton.innerText = 'Full Screen';
3document.querySelector('.controls').appendChild(fullScreenButton);
4
5fullScreenButton.addEventListener('click', () => {
6    if (video.requestFullscreen) {
7        video.requestFullscreen();
8    } else if (video.mozRequestFullScreen) { // Firefox
9        video.mozRequestFullScreen();
10    } else if (video.webkitRequestFullscreen) { // Chrome, Safari, and Opera
11        video.webkitRequestFullscreen();
12    } else if (video.msRequestFullscreen) { // IE/Edge
13        video.msRequestFullscreen();
14    }
15});
16
In this step, you have implemented user controls for your WebRTC-Streamer application. These controls include play, pause, stop, and volume adjustments, enhancing the overall user experience. The provided HTML, CSS, and JavaScript code ensures that users can interact seamlessly with the video stream. Next, we will move on to implementing the participant view, which will handle displaying multiple participants in the stream.
Step 5: Implement Participant View
In this section, we will focus on implementing the participant view for your WebRTC-Streamer application. The participant view is crucial for applications that involve multiple participants in a streaming session, such as video conferencing or webinars. We will create a dynamic layout to display multiple video streams and ensure an optimal viewing experience.
Display Multiple Participants
To handle and display multiple participants, we need to dynamically create video elements for each participant and manage their layouts. We will use HTML, CSS, and JavaScript to achieve this.
HTML for Participant View
Here is the HTML code to set up the participant view:
HTML
1<!DOCTYPE html>
2<html>
3<head>
4    <title>WebRTC-Streamer</title>
5    <link rel="stylesheet" type="text/css" href="styles.css">
6</head>
7<body>
8    <div class="participant-view">
9        <h1>Participants</h1>
10        <div id="videoContainer" class="video-container"></div>
11    </div>
12    <script src="script.js"></script>
13</body>
14</html>
15
CSS for Participant View
To style the participant view and create a grid layout for multiple video streams, use the following CSS code:
CSS
1body {
2    font-family: Arial, sans-serif;
3    text-align: center;
4    background-color: #f4f4f4;
5}
6
7.participant-view {
8    margin-top: 50px;
9    background-color: white;
10    padding: 20px;
11    border-radius: 10px;
12    box-shadow: 0 0 10px rgba(0, 0, 0, 0.1);
13    display: inline-block;
14    width: 80%;
15}
16
17.video-container {
18    display: flex;
19    flex-wrap: wrap;
20    justify-content: center;
21    gap: 10px;
22}
23
24video {
25    width: 200px;
26    height: 150px;
27    background-color: black;
28}
29
JavaScript to Manage Participant Streams
Next, we will add JavaScript to dynamically create and manage video elements for each participant.
Here’s the JavaScript code to handle multiple participant streams:
JavaScript
1document.addEventListener('DOMContentLoaded', (event) => {
2    const videoContainer = document.getElementById('videoContainer');
3
4    // Example participant streams (replace with actual streams)
5    const participantStreams = [
6        'stream1.mp4',
7        'stream2.mp4',
8        'stream3.mp4'
9    ];
10
11    // Function to add a participant video element
12    function addParticipantStream(streamSrc) {
13        const videoElement = document.createElement('video');
14        videoElement.src = streamSrc;
15        videoElement.controls = true;
16        videoElement.autoplay = true;
17        videoContainer.appendChild(videoElement);
18    }
19
20    // Add all participant streams to the container
21    participantStreams.forEach(streamSrc => {
22        addParticipantStream(streamSrc);
23    });
24
25    // Example: Function to add a new participant dynamically
26    function addNewParticipant(streamSrc) {
27        addParticipantStream(streamSrc);
28    }
29
30    // Simulate adding a new participant after 5 seconds (for demo purposes)
31    setTimeout(() => {
32        addNewParticipant('stream4.mp4');
33    }, 5000);
34});
35
In this script, we first create a container for the video elements. We then define an array of participant streams (replace these with actual stream URLs or WebRTC stream sources). The
addParticipantStream function creates a video element for each stream and adds it to the container. The script also includes an example of dynamically adding a new participant after a delay, which can be useful in real-time applications where participants can join or leave at any time.Optimizing View Layout
To ensure an optimal viewing experience, especially when the number of participants changes dynamically, you might need to adjust the layout. Consider using CSS Grid or Flexbox for responsive design.
Responsive Layout Example
Modify the CSS to create a responsive grid layout:
CSS
1.video-container {
2    display: grid;
3    grid-template-columns: repeat(auto-fill, minmax(200px, 1fr));
4    gap: 10px;
5    justify-items: center;
6}
7
This CSS uses a grid layout that adjusts the number of columns based on the available width, ensuring that the video elements are evenly distributed and responsive to different screen sizes.
In this step, you have implemented the participant view for your WebRTC-Streamer application. This includes creating a dynamic layout to display multiple video streams, styling the layout for a better user experience, and managing participant streams with JavaScript. The participant view is essential for applications involving multiple users, providing a clear and organized way to view all participants in the stream. Next, we will finalize the application by running the code and ensuring everything works seamlessly.
Step 6: Run Your Code Now
In this final section, we will cover the steps to run your WebRTC-Streamer application, ensuring that everything is set up correctly and troubleshooting common issues that might arise. By the end of this section, your application should be ready for deployment.
Final Steps to Execute the Application
Now that we have implemented the key components of the WebRTC-Streamer application, it's time to run the code and see it in action.
[a] Ensure All Dependencies are Installed
Make sure that all necessary dependencies are installed as covered in Part 2. This includes the WebRTC libraries, V4L2, RTSP libraries, and other required packages.
[b] Build the Application
Navigate to your project directory and run the build command to compile your application:
sh
1   cd build
2   make
3
[c] Run the Application
Once the build process is complete, you can run the application with the following command:
sh
1   ./webrtc-streamer
2
[d] Access the Application in a Browser
Open your web browser and navigate to the URL where your application is hosted. If running locally, this will typically be:
1   http://localhost:8000
2
[e] Test the Join Screen
- Enter the streaming URL and select the video source (V4L2 or RTSP).
- Click the "Join" button to start the streaming session.
[f] Interact with the Controls
- Use the play, pause, stop, and volume controls to interact with the video stream.
- Check if the full-screen toggle works as expected.
[g] Verify the Participant View
- Ensure that multiple participant streams are displayed correctly.
- Check the layout responsiveness and the dynamic addition of new participants.
Troubleshooting Common Issues
Here are some common issues you might encounter and their possible solutions:
Application Fails to Start
- Check for Missing Dependencies: Ensure all required libraries are installed.
- Review Build Logs: Look for errors during the build process and resolve them.
Video Stream Not Displaying
- Check Stream URL: Verify that the URL entered in the join screen is correct.
- Network Issues: Ensure there are no network issues blocking the stream.
Controls Not Working
- JavaScript Errors: Check the browser console for JavaScript errors and resolve them.
- Incorrect Element References: Ensure that the HTML elements referenced in the JavaScript match the IDs in the code.
Layout Issues
- CSS Problems: Review the CSS to ensure proper styling and layout.
- Responsive Design: Test the application on different screen sizes to verify responsiveness.
Conclusion
In this comprehensive guide, we have walked through the process of creating a WebRTC-Streamer application using C++, V4L2, RTSP, and WebRTC technologies. Starting from the project setup and dependency installation, we moved through implementing the main application logic, designing the user interface, adding user controls, and handling multiple participants. Finally, we ran the application and provided troubleshooting tips for common issues.
By following this guide, you should now have a fully functional WebRTC-Streamer application that can handle real-time video streaming from various sources and provide a seamless user experience. We encourage you to explore further customization and additional features to enhance your application even more.
Want to level-up your learning? Subscribe now
Subscribe to our newsletter for more tech based insights
FAQ