What is MiroTalk SFU WebRTC?
MiroTalk SFU WebRTC is an advanced video conferencing solution designed to handle real-time communication efficiently. Leveraging the Selective Forwarding Unit (SFU) architecture, it optimizes media streaming by selectively forwarding media streams to participants, rather than mixing them, which significantly reduces latency and resource consumption.
Importance and Benefits of SFU in WebRTC
The SFU model stands out in WebRTC for its scalability and performance. Unlike the Multipoint Control Unit (MCU), which mixes all video streams into one, the SFU selectively forwards multiple streams, allowing for more efficient bandwidth usage and lower latency. This makes MiroTalk SFU ideal for large-scale video conferencing applications where performance and scalability are critical.
Underlying Technologies
MiroTalk SFU is built on robust technologies like C++ and Node.js, with MediaSoup as its core. MediaSoup is a powerful library for building multiparty video conferencing applications, providing the backbone for handling media streams efficiently. The combination of these technologies ensures that MiroTalk SFU delivers high performance and reliability for real-time communication needs.
Getting Started to Build MiroTalk SFU WebRTC Application
Create a New MiroTalk SFU App
To get started with MiroTalk SFU WebRTC, the first step is to set up a new project. Clone the MiroTalk SFU repository from GitHub and navigate to the project directory:
bash
1git clone https://github.com/miroslavpejic85/mirotalksfu
2cd mirotalksfu
3
Install Dependencies
MiroTalk SFU relies on several dependencies that need to be installed. Run the following command to install the necessary packages:
bash
1npm install
2
This command will install all required Node.js packages and dependencies listed in the
package.json file.Structure of the Project
Understanding the project structure is crucial for effective development. The main directories and files in the MiroTalk SFU project include:
src/: Contains the source code for the application.config/: Configuration files for the server and MediaSoup.public/: Static files served by the application, including HTML, CSS, and JavaScript.scripts/: Scripts for managing the project, such as startup and build scripts.
App Architecture
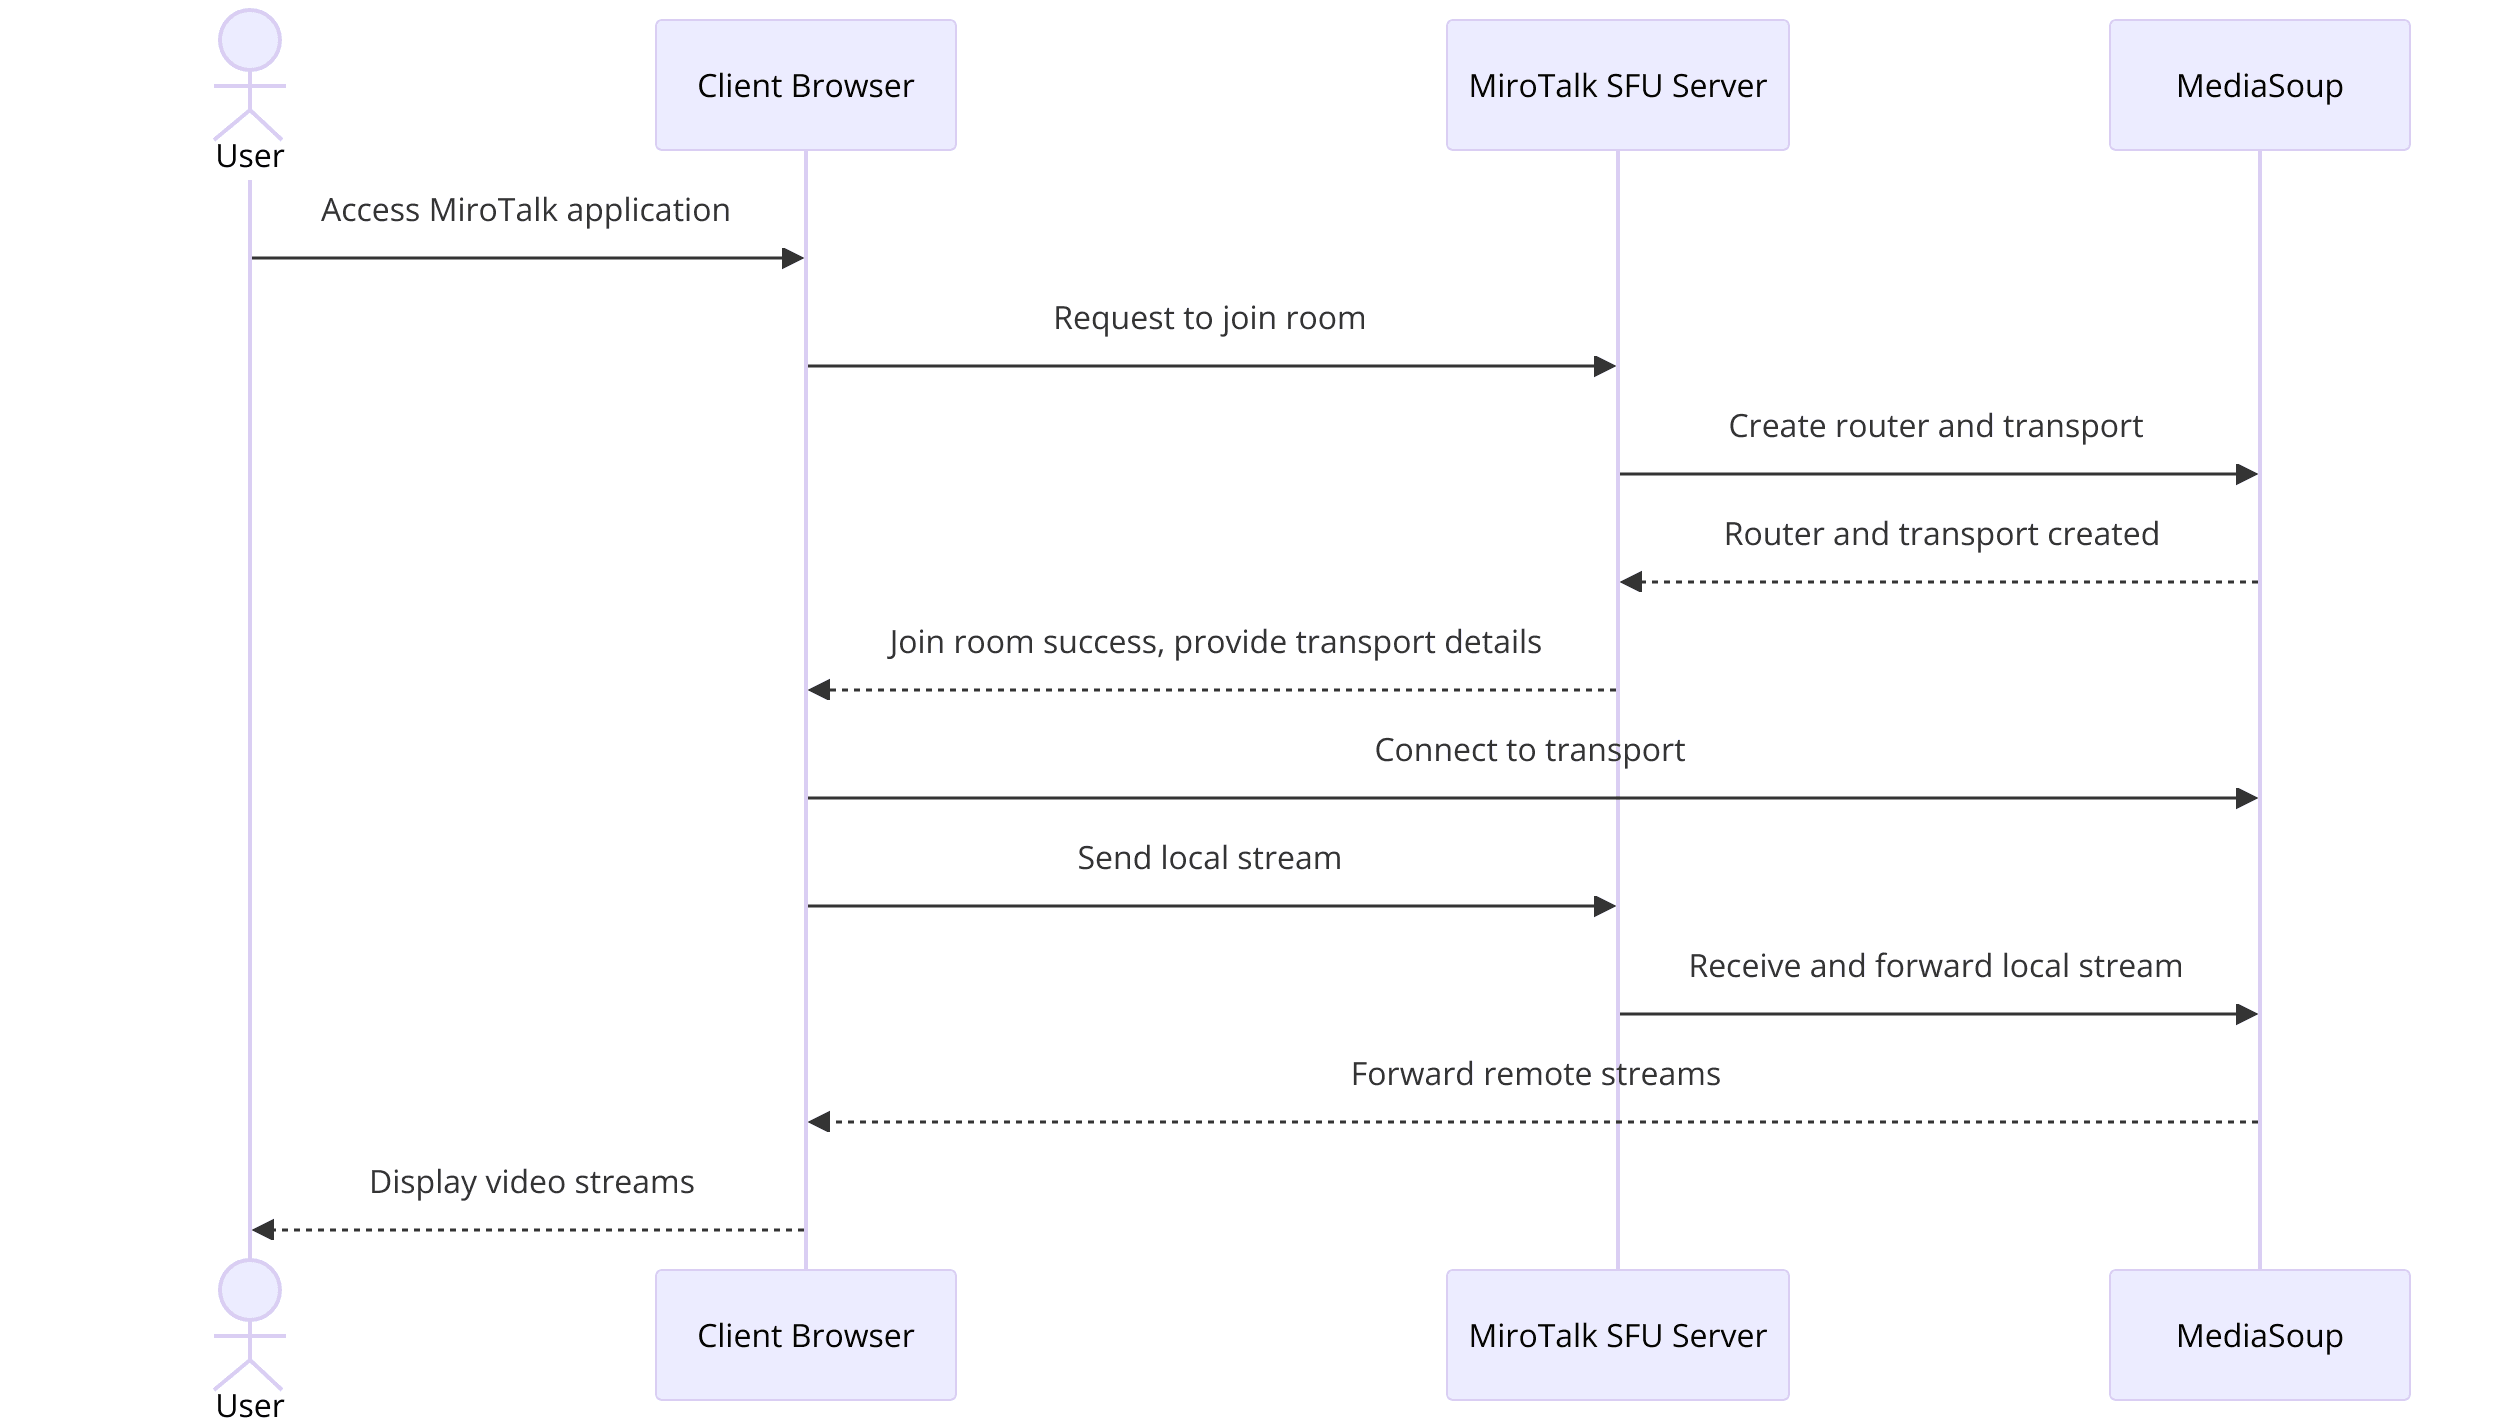
- Server: Built using Node.js, the server handles client connections, signaling, and MediaSoup integration.
- MediaSoup: Acts as the core media server, managing media streams between participants.
- Frontend: The user interface, built with HTML, CSS, and JavaScript, interacts with the backend to facilitate video conferencing.
By understanding and setting up the project structure and architecture, you are now ready to dive into the development and customization of your MiroTalk SFU WebRTC application.
Step 1: Get Started with Initial Setup
Configuration Files
The first step in setting up MiroTalk SFU is to configure the necessary files. This involves setting up environment variables and MediaSoup configurations to ensure the application runs smoothly. Create a
.env file in the root directory and add the following basic configuration:bash
1# .env file
2NODE_ENV=development
3LISTEN_PORT=3000
4MEDIASOUP_LISTEN_IP=0.0.0.0
5MEDIASOUP_ANNOUNCED_IP=<YOUR_PUBLIC_IP>
6
Replace
<YOUR_PUBLIC_IP> with the actual public IP address of your server. This configuration ensures that MediaSoup can correctly announce its IP address to participants.Environment Setup
Ensure your development environment is properly set up. You will need Node.js and npm (Node Package Manager) installed. Verify the installations with:
bash
1node -v
2npm -v
3
These commands should return the versions of Node.js and npm installed on your machine. If not, download and install them from the
official Node.js website
.Basic Server Setup
With your environment ready, you can now set up the basic server. Create a file named
server.js in the root directory and add the following code:JavaScript
1const express = require('express');
2const { Server } = require('socket.io');
3const http = require('http');
4const mediasoup = require('mediasoup');
5const app = express();
6const server = http.createServer(app);
7const io = new Server(server);
8
9// Basic server setup
10app.get('/', (req, res) => {
11  res.sendFile(__dirname + '/public/index.html');
12});
13
14server.listen(process.env.LISTEN_PORT, () => {
15  console.log(`Server is running on port ${process.env.LISTEN_PORT}`);
16});
17
This basic setup initializes an Express server and sets up Socket.IO for real-time communication. The server listens on the port specified in the
.env file.Running the Basic Server
To ensure everything is set up correctly, run the server with the following command:
bash
1npm start
2
You should see a message indicating that the server is running. Open a browser and navigate to
http://localhost:3000 (or the configured port) to see the initial setup in action.By completing this initial setup, you are now ready to proceed with building the core functionalities of your MiroTalk SFU WebRTC application.
Step 2: Wireframe All the Components
Component Breakdown
Before diving into the implementation, it's essential to break down the main components of the MiroTalk SFU WebRTC application. This will help in structuring the development process and ensuring that each part of the application is well-defined and manageable. The key components include:
- Join Screen: The initial screen where users enter their names and join the meeting.
- Control Panel: Interface elements for managing media controls like mute, unmute, video on/off, and screen sharing.
- Participant View: The main screen displaying video streams of all participants.
- Chat Interface: Optional component for text-based communication among participants.
Designing the Wireframe
Creating a visual wireframe is a crucial step in designing the user interface. This wireframe will serve as a blueprint for the layout and structure of the application. Here is a simple wireframe outline for MiroTalk SFU:
Join Screen
- Input field for username
- Join button
Control Panel
- Mute/Unmute button
- Video on/off button
- Screen share button
- Leave meeting button
Participant View
- Video grid displaying all participants
- Dynamic layout adjusting based on the number of participants
Chat Interface (Optional)
- Text input field
- Send button
- Chat history display
Tools for Wireframing
Using wireframing tools can simplify the design process. Tools like Figma, Sketch, or Adobe XD allow you to create interactive and detailed wireframes. For this guide, a basic wireframe can be sketched out on paper or using simple software like Microsoft PowerPoint or Google Slides.
Implementation Plan
With the wireframe in place, the next steps involve translating these designs into actual components using HTML, CSS, and JavaScript. The wireframe will guide the development process, ensuring a consistent and user-friendly interface. The focus should be on creating a responsive design that works seamlessly across different devices and screen sizes.
By defining and wireframing all the components, you have a clear roadmap for the development of your MiroTalk SFU WebRTC application. This structure will ensure that the implementation is systematic and efficient, leading to a robust and user-friendly video conferencing solution.
Step 3: Implement Join Screen on MiroTalk SFU WebRTC application
UI/UX Design
The join screen is the first interaction users have with your MiroTalk SFU WebRTC application, so it needs to be intuitive and welcoming. The design should be clean, with a focus on simplicity and ease of use. Key elements include an input field for the username and a join button.
Frontend Implementation
To implement the join screen, create an HTML file named
index.html in the public directory. Add the following code to set up the basic structure:HTML
1<!DOCTYPE html>
2<html lang="en">
3<head>
4    <meta charset="UTF-8">
5    <meta name="viewport" content="width=device-width, initial-scale=1.0">
6    <title>MiroTalk SFU WebRTC</title>
7    <link rel="stylesheet" href="styles.css">
8</head>
9<body>
10    <div id="join-screen">
11        <h1>Welcome to MiroTalk SFU</h1>
12        <input type="text" id="username" placeholder="Enter your name" />
13        <button id="join-button">Join</button>
14    </div>
15    <script src="scripts.js"></script>
16</body>
17</html>
18
Styling the Join Screen
Next, create a CSS file named
styles.css in the public directory to style the join screen:CSS
1body {
2    font-family: Arial, sans-serif;
3    display: flex;
4    justify-content: center;
5    align-items: center;
6    height: 100vh;
7    margin: 0;
8    background-color: #f0f0f0;
9}
10
11#join-screen {
12    text-align: center;
13    background: white;
14    padding: 20px;
15    border-radius: 8px;
16    box-shadow: 0 0 10px rgba(0, 0, 0, 0.1);
17}
18
19#username {
20    width: 80%;
21    padding: 10px;
22    margin-bottom: 10px;
23    border: 1px solid #ccc;
24    border-radius: 4px;
25}
26
27#join-button {
28    padding: 10px 20px;
29    background-color: #007bff;
30    color: white;
31    border: none;
32    border-radius: 4px;
33    cursor: pointer;
34}
35
36#join-button:hover {
37    background-color: #0056b3;
38}
39
Backend Integration
In the
scripts.js file, add the following JavaScript to handle the join button click and initiate the connection to the server:JavaScript
1document.getElementById('join-button').addEventListener('click', () => {
2    const username = document.getElementById('username').value;
3    if (username) {
4        // Redirect to the main conference room with the username as a query parameter
5        window.location.href = `/room?username=${username}`;
6    } else {
7        alert('Please enter your name');
8    }
9});
10
Server-side Routing
In your
server.js, add a route to handle the room page:JavaScript
1app.get('/room', (req, res) => {
2    const username = req.query.username;
3    if (username) {
4        res.sendFile(__dirname + '/public/room.html');
5    } else {
6        res.redirect('/');
7    }
8});
9
By implementing the join screen, you provide users with a seamless entry point into your MiroTalk SFU WebRTC application. This screen sets the stage for the user experience, ensuring a smooth start to their video conferencing journey.
Step 4: Implement Controls
Control Elements
Implementing control elements is essential for a user-friendly video conferencing experience. These controls typically include buttons for muting/unmuting audio, turning the video on/off, starting/stopping screen sharing, and leaving the meeting.
Adding Functionality
To start, create a basic layout for the control panel in the
room.html file. This file should be in the public directory and includes the following HTML:HTML
1<!DOCTYPE html>
2<html lang="en">
3<head>
4    <meta charset="UTF-8">
5    <meta name="viewport" content="width=device-width, initial-scale=1.0">
6    <title>MiroTalk SFU Room</title>
7    <link rel="stylesheet" href="styles.css">
8</head>
9<body>
10    <div id="video-grid"></div>
11    <div id="controls">
12        <button id="mute-button">Mute</button>
13        <button id="video-button">Video Off</button>
14        <button id="screen-share-button">Share Screen</button>
15        <button id="leave-button">Leave</button>
16    </div>
17    <script src="scripts.js"></script>
18</body>
19</html>
20
Real-Time Interaction on MiroTalk SFU WebRTC Application
Next, update the
styles.css file to style the control panel:CSS
1#controls {
2    position: fixed;
3    bottom: 10px;
4    left: 50%;
5    transform: translateX(-50%);
6    display: flex;
7    gap: 10px;
8}
9
10#controls button {
11    padding: 10px 20px;
12    background-color: #007bff;
13    color: white;
14    border: none;
15    border-radius: 4px;
16    cursor: pointer;
17}
18
19#controls button:hover {
20    background-color: #0056b3;
21}
22
Now, add functionality to the control buttons in
scripts.js:JavaScript
1const muteButton = document.getElementById('mute-button');
2const videoButton = document.getElementById('video-button');
3const screenShareButton = document.getElementById('screen-share-button');
4const leaveButton = document.getElementById('leave-button');
5
6muteButton.addEventListener('click', () => {
7    const enabled = localStream.getAudioTracks()[0].enabled;
8    if (enabled) {
9        localStream.getAudioTracks()[0].enabled = false;
10        muteButton.textContent = 'Unmute';
11    } else {
12        localStream.getAudioTracks()[0].enabled = true;
13        muteButton.textContent = 'Mute';
14    }
15});
16
17videoButton.addEventListener('click', () => {
18    const enabled = localStream.getVideoTracks()[0].enabled;
19    if (enabled) {
20        localStream.getVideoTracks()[0].enabled = false;
21        videoButton.textContent = 'Video On';
22    } else {
23        localStream.getVideoTracks()[0].enabled = true;
24        videoButton.textContent = 'Video Off';
25    }
26});
27
28screenShareButton.addEventListener('click', async () => {
29    try {
30        const displayStream = await navigator.mediaDevices.getDisplayMedia({ video: true });
31        const screenTrack = displayStream.getVideoTracks()[0];
32
33        screenTrack.onended = () => {
34            const videoTrack = localStream.getVideoTracks()[0];
35            const sender = currentPeerConnection.getSenders().find(s => s.track.kind === videoTrack.kind);
36            sender.replaceTrack(videoTrack);
37        };
38
39        const sender = currentPeerConnection.getSenders().find(s => s.track.kind === screenTrack.kind);
40        sender.replaceTrack(screenTrack);
41    } catch (err) {
42        console.error('Error sharing screen:', err);
43    }
44});
45
46leaveButton.addEventListener('click', () => {
47    window.location.href = '/';
48});
49
This code adds basic interactivity to the control elements. Users can mute/unmute their audio, turn their video on/off, share their screen, and leave the meeting.
By implementing these controls, you enhance the user experience, making the MiroTalk SFU WebRTC application more interactive and functional. These controls are crucial for effective real-time communication and collaboration.
Step 5: Implement Participant View
UI for Participant View
The participant view is the main interface where users can see the video streams of all participants. This involves setting up a video grid that dynamically adjusts based on the number of participants.
Streaming Setup
First, ensure your
room.html file has a designated area for the video grid. The #video-grid element will contain all the video elements for the participants:HTML
1<div id="video-grid"></div>
2
Update the
styles.css file to style the video grid:CSS
1#video-grid {
2    display: grid;
3    grid-template-columns: repeat(auto-fill, minmax(200px, 1fr));
4    gap: 10px;
5    padding: 10px;
6}
7
8#video-grid video {
9    width: 100%;
10    height: auto;
11    border-radius: 8px;
12    background: black;
13}
14
Managing Multiple Participants
Next, add JavaScript to manage video streams for multiple participants. Update the
scripts.js file to handle adding new video elements to the video grid:JavaScript
1const videoGrid = document.getElementById('video-grid');
2let localStream;
3let peerConnections = {};
4
5async function init() {
6    localStream = await navigator.mediaDevices.getUserMedia({ video: true, audio: true });
7    addVideoStream(localStream, 'local');
8
9    socket.on('user-connected', userId => {
10        connectToNewUser(userId, localStream);
11    });
12
13    socket.on('user-disconnected', userId => {
14        if (peerConnections[userId]) peerConnections[userId].close();
15        document.getElementById(userId).remove();
16    });
17}
18
19function addVideoStream(stream, id) {
20    const video = document.createElement('video');
21    video.srcObject = stream;
22    video.id = id;
23    video.addEventListener('loadedmetadata', () => {
24        video.play();
25    });
26    videoGrid.append(video);
27}
28
29function connectToNewUser(userId, stream) {
30    const call = peer.call(userId, stream);
31    const video = document.createElement('video');
32    call.on('stream', userVideoStream => {
33        addVideoStream(userVideoStream, userId);
34    });
35    call.on('close', () => {
36        video.remove();
37    });
38    peerConnections[userId] = call;
39}
40
41init();
42
This script initializes the local video stream, handles the addition of new participants, and removes participants who disconnect. The
addVideoStream function creates a video element for each participant and adds it to the video grid.Handling Video Streams
The
connectToNewUser function sets up a connection to new users using WebRTC's peer-to-peer connection. When a new user connects, their video stream is added to the video grid, and their disconnection removes the video element.By implementing the participant view, you create a dynamic and responsive interface where users can see and interact with all participants in the MiroTalk SFU WebRTC application. This setup ensures a smooth and engaging video conferencing experience.
Step 6: Run Your Code Now
Testing the Application
With all the components in place, it's time to test your MiroTalk SFU WebRTC application. Ensure your development environment is set up correctly and all necessary dependencies are installed. Start the server using the following command:
bash
1npm start
2
Open your browser and navigate to
http://localhost:3000. Enter a username on the join screen and click "Join" to enter the meeting room. Open another browser window or tab and repeat the process to simulate multiple participants joining the meeting.Debugging Common Issues
If you encounter any issues, here are a few common troubleshooting steps:
- Check Console for Errors: Open the browser's developer console to check for any JavaScript errors or warnings.
- Verify Configuration: Ensure your
.envfile is correctly set up with the proper IP addresses and ports. - Network Permissions: Make sure your browser has permissions to access the camera and microphone.
Optimization Tips
To enhance performance and scalability, consider the following optimization tips:
- Media Constraints: Adjust media constraints for video and audio to balance quality and bandwidth usage.
- Load Balancing: Implement load balancing techniques to distribute the load across multiple servers.
- Scalability: Use scalable infrastructure solutions like Kubernetes or Docker to manage and deploy your application efficiently.
Example Configuration for Media Constraints
You can adjust the media constraints in your
scripts.js file to improve performance:JavaScript
1const constraints = {
2    video: {
3        width: { ideal: 1280 },
4        height: { ideal: 720 }
5    },
6    audio: true
7};
8
9navigator.mediaDevices.getUserMedia(constraints)
10    .then(stream => {
11        // Your code to handle the stream
12    })
13    .catch(error => {
14        console.error('Error accessing media devices.', error);
15    });
16
By following these steps, you can run your MiroTalk SFU WebRTC application smoothly and efficiently. Testing the application thoroughly and applying optimization techniques will ensure a robust and scalable video conferencing solution.
Conclusion
In this guide, we've walked through the process of setting up and implementing a MiroTalk SFU WebRTC application using C++/Node.js and MediaSoup. From initial configuration and environment setup to designing the user interface and managing real-time video streams, each step has been carefully outlined to help you build a robust and scalable video conferencing solution. By following these steps, you can create an efficient SFU-based WebRTC application that meets modern communication needs.
Want to level-up your learning? Subscribe now
Subscribe to our newsletter for more tech based insights
FAQ