Introduction to Membrane WebRTC Technology
What is Membrane WebRTC?
Membrane WebRTC is an advanced multimedia processing framework designed to facilitate real-time communication over the internet. Built on the robust and scalable Elixir programming language, Membrane WebRTC stands out for its efficiency and flexibility in handling complex multimedia tasks such as streaming, transcoding, and selective forwarding. By leveraging the power of Elixir and integrating with C++, this framework offers developers a powerful tool to create high-performance applications for video conferencing, live broadcasting, and other real-time communication solutions.
Key Features of Membrane WebRTC
Membrane WebRTC offers a range of features that make it a preferred choice for developers looking to implement real-time communication capabilities. Some of the key features include:
- Scalability and Performance: Thanks to Elixir's concurrency model and the integration with C++, Membrane WebRTC can handle numerous simultaneous connections and data streams with low latency, making it ideal for large-scale applications.
- Modular Architecture: Membrane’s pipeline-based architecture allows for easy customization and extension, enabling developers to create tailored solutions by assembling various components.
- Advanced Processing Capabilities: The framework supports complex multimedia operations like transcoding and media format conversion, providing high flexibility in managing different types of media streams.
- Selective Forwarding Unit (SFU): Membrane WebRTC includes an SFU, which optimizes bandwidth usage by only forwarding the necessary media streams to each participant, significantly enhancing performance and reducing resource consumption.
Membrane WebRTC's combination of these features positions it as a leading solution for developers aiming to build robust and scalable real-time communication applications.
Getting Started with the Code!
Create a New Membrane WebRTC App
To get started with Membrane WebRTC, the first step is to create a new application. Begin by setting up a new Elixir project. Open your terminal and run the following commands:
bash
1mix new membrane_webrtc_app --module MembraneWebrtcApp
2cd membrane_webrtc_app
3
This will create a new directory for your project and initialize it with a basic Elixir application structure.
Install Necessary Dependencies
Next, you need to install the necessary dependencies for working with Membrane WebRTC. Add the following lines to your
mix.exs file within the defp deps do section:Elixir
1defp deps do
2  [
3    {:membrane_core, "~> 0.7.0"},
4    {:membrane_webrtc_plugin, "~> 0.6.0"},
5    {:membrane_element_file, "~> 0.5.0"}
6  ]
7end
8
After updating the
mix.exs file, run the following command to fetch and install the dependencies:bash
1mix deps.get
2
Structure of the Project
Understanding the structure of your project is crucial for efficient development. Here’s a brief overview of the key directories and files:
lib/: Contains the source code of your application.config/: Configuration files for your application.test/: Test files for your application.
Your main development work will be in the
lib/ directory, where you'll define modules and functions for your Membrane WebRTC application.App Architecture
- Pipelines: These are responsible for managing the flow of data through various elements.
- Elements: These are individual components that perform specific tasks, such as encoding, decoding, or forwarding media streams.
In Membrane, pipelines are constructed by connecting elements in a specific sequence to achieve the desired processing workflow. This modular approach allows for easy scalability and customization.
To give you a concrete example, your application might have a pipeline that receives media from a WebRTC source, processes it through a series of elements for tasks like encoding or mixing, and then sends it out to connected clients.
By understanding and setting up this basic architecture, you lay the groundwork for developing more complex and functional WebRTC applications with Membrane.
Step 1: Get Started with Configuration
Setting Up the Environment
Before diving into coding, it's essential to set up the environment correctly. This includes configuring your development tools and setting up necessary environment variables. Ensure you have Elixir and Erlang installed on your system. You can install Elixir by following the official installation guide:
Elixir Installation Guide
.After installing Elixir, navigate to your project directory and create a
.env file to store environment variables required for your application. Open the terminal and run:bash
1touch .env
2
Edit the
.env file to include any necessary configurations, such as database URLs or API keys. Here’s an example of what your .env file might look like:env
1DATABASE_URL=postgres://user:password@localhost/membrane_webrtc_db
2SECRET_KEY_BASE=your_secret_key_base
3
To load these variables into your application, add the
dotenv library to your project. Update your mix.exs file:Elixir
1defp deps do
2  [
3    {:dotenv, "~> 3.0"}
4  ]
5end
6
Then fetch the new dependency:
bash
1mix deps.get
2
And load the environment variables at the start of your application by adding this line to your
config/config.exs:Elixir
1Dotenv.load
2
Initializing the Project
With your environment set up, you can now initialize your Membrane WebRTC project. Start by creating a new module for your WebRTC pipeline. Create a new file
lib/membrane_webrtc_app/pipeline.ex:bash
1mkdir -p lib/membrane_webrtc_app
2touch lib/membrane_webrtc_app/pipeline.ex
3
Open
pipeline.ex and define a basic Membrane pipeline:Elixir
1defmodule MembraneWebrtcApp.Pipeline do
2  use Membrane.Pipeline
3
4  @impl true
5  def handle_init(_opts) do
6    spec = %Membrane.ParentSpec{
7      children: [
8        # Add children elements here
9      ]
10    }
11
12    {{:ok, spec}, %{}}
13  end
14end
15
Next, configure your application to start this pipeline. Open
lib/membrane_webrtc_app/application.ex and update it to start the pipeline:Ellixir
1defmodule MembraneWebrtcApp.Application do
2  use Application
3
4  @impl true
5  def start(_type, _args) do
6    children = [
7      MembraneWebrtcApp.Pipeline
8    ]
9
10    opts = [strategy: :one_for_one, name: MembraneWebrtcApp.Supervisor]
11    Supervisor.start_link(children, opts)
12  end
13end
14
In your
config/config.exs, add configuration for your pipeline:Elixir
1config :membrane_webrtc_app, MembraneWebrtcApp.Pipeline, [
2  # Add pipeline specific configurations here
3]
4
Now, your project is initialized with the basic setup to start building your Membrane WebRTC application. This configuration ensures your environment is ready and your application is set up to run the WebRTC pipeline as soon as you start it.
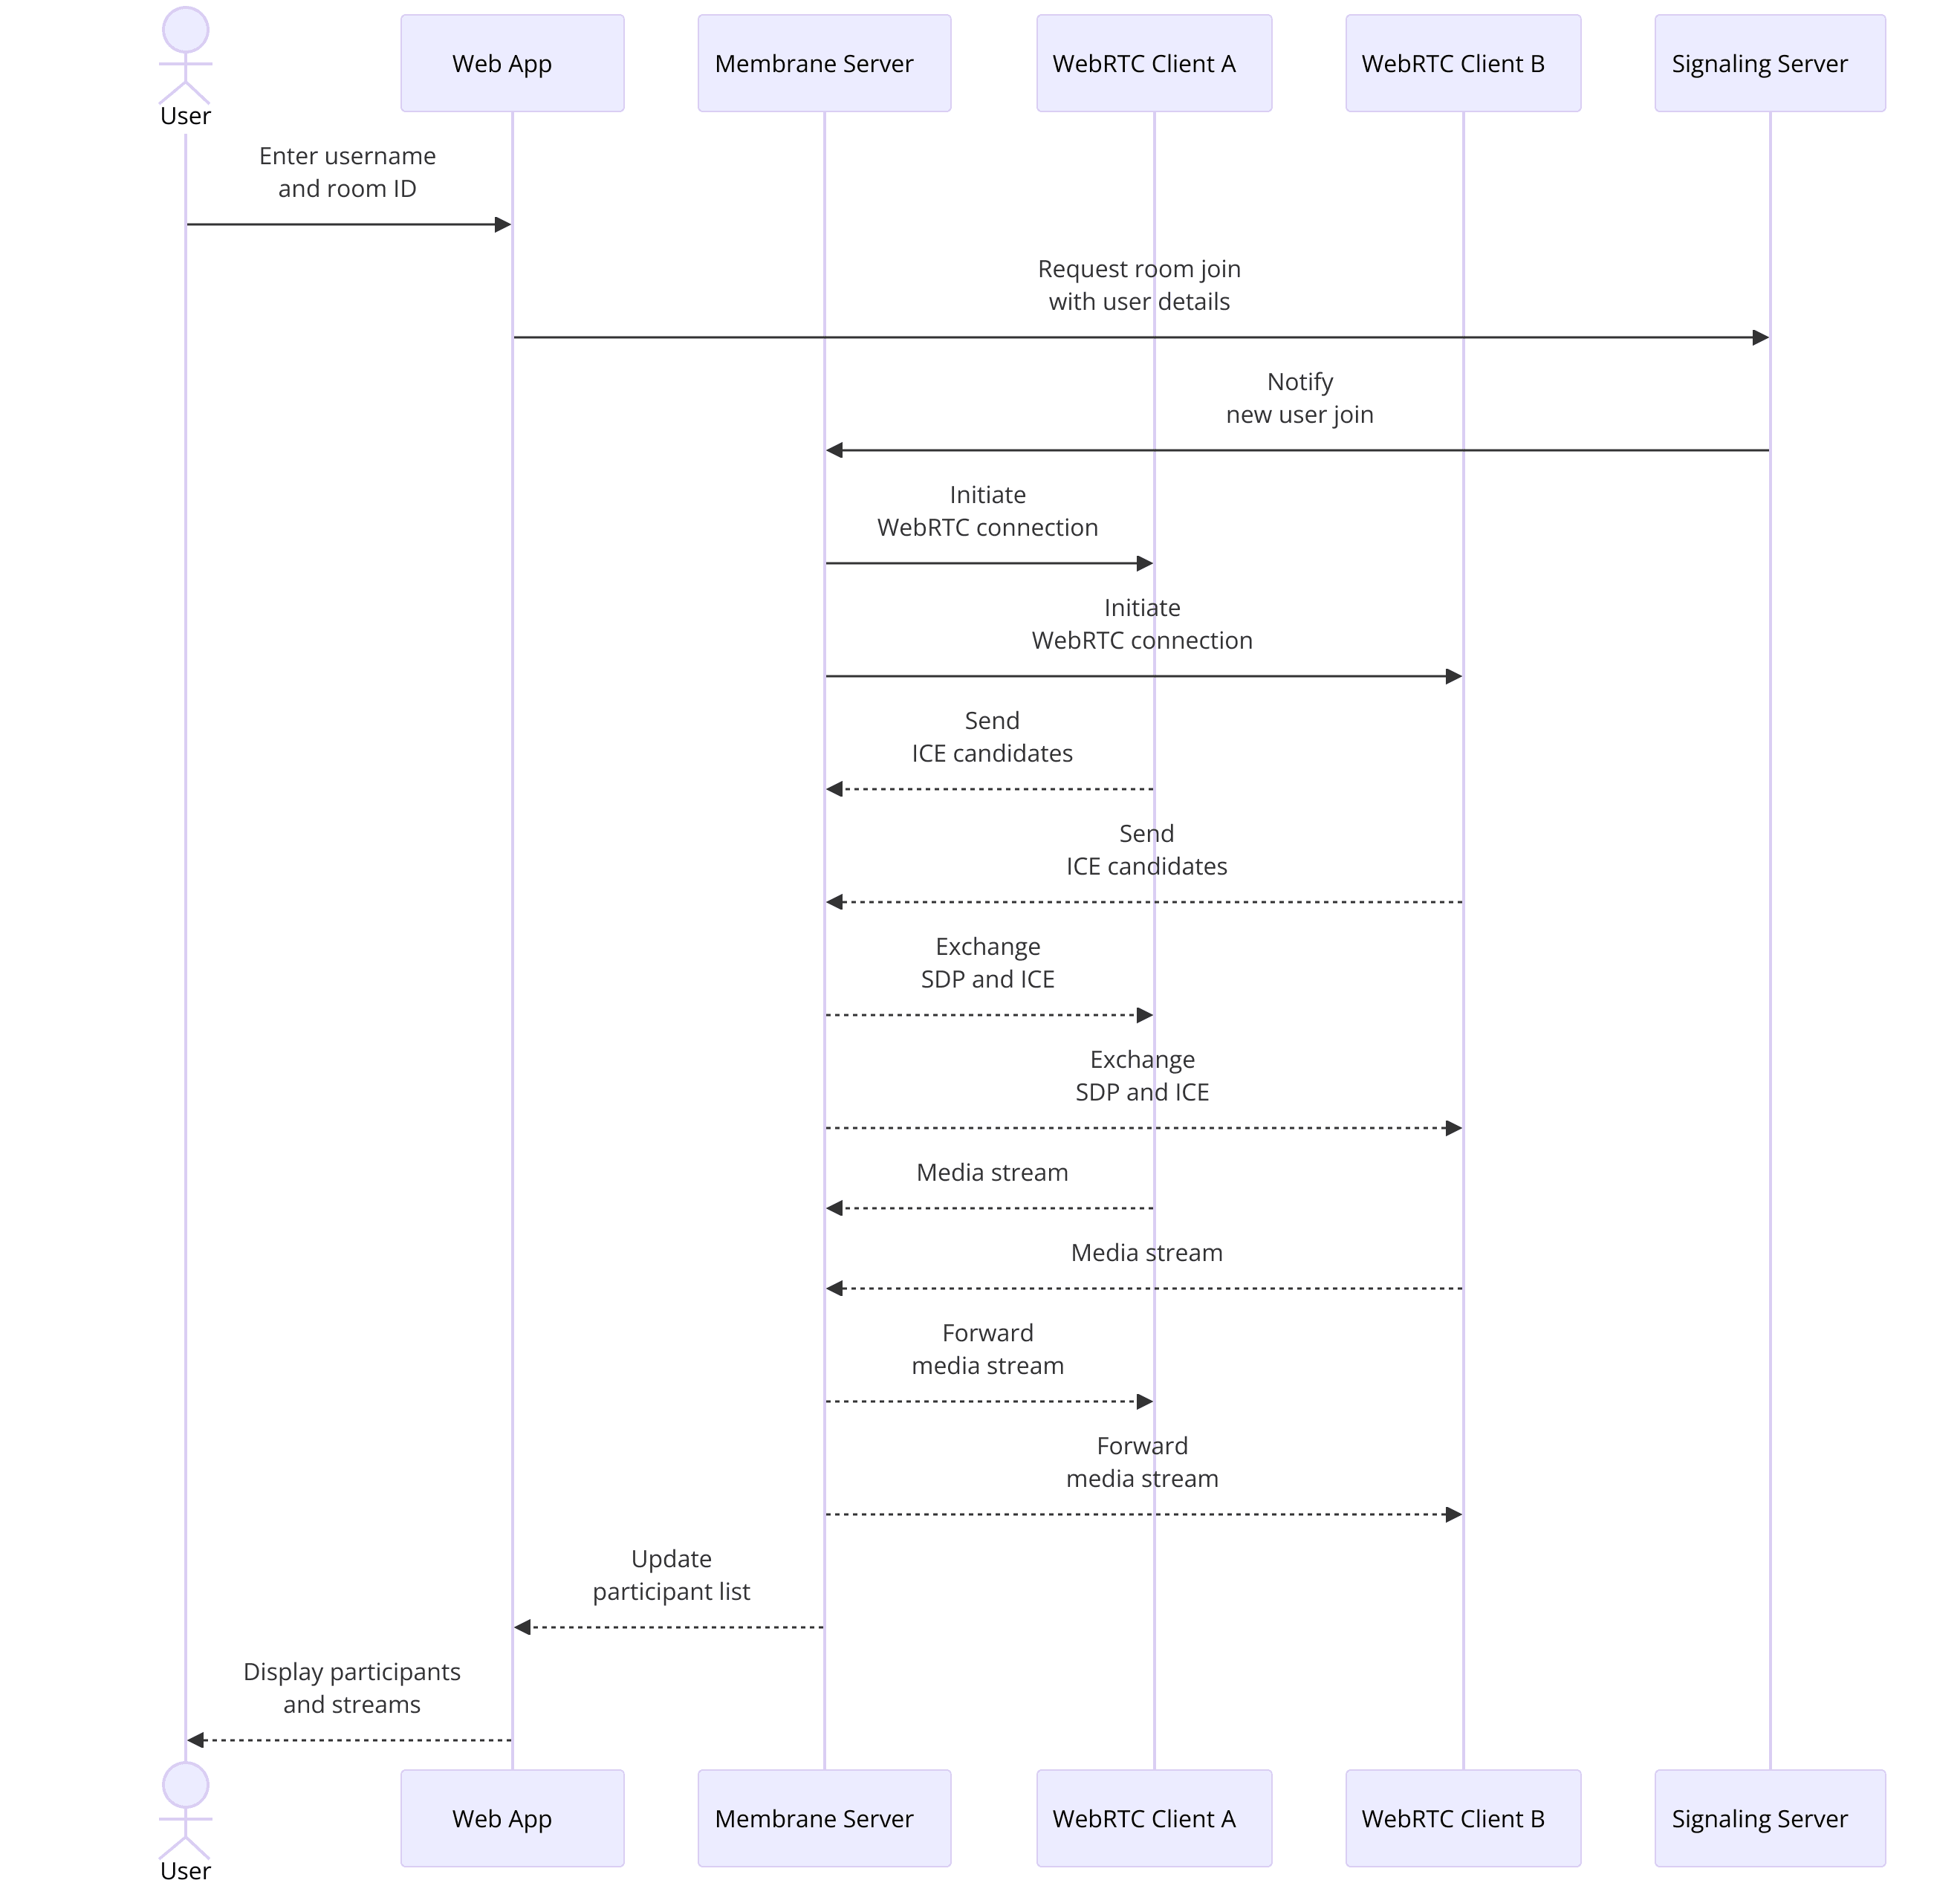
Step 2: Wireframe All the Components
Designing the Wireframe
Before diving into the implementation, it's crucial to have a clear wireframe of all the components your Membrane WebRTC application will have. A wireframe helps visualize the structure and interaction between different parts of the application. Here’s a simple wireframe for a basic WebRTC application:
Join Screen
- Input fields for username and room ID
- Join button
Main Screen
- Video display area for local and remote video streams
- Control buttons (mute/unmute, video on/off, hang up)
- List of participants
Backend Components
- WebRTC signaling server
- Media pipeline for processing audio and video streams
Implementing the Wireframe
With the wireframe in place, let's start implementing these components. We'll begin by setting up the join screen, which is the entry point for users to enter the application.
[a] Join Screen
Create a new file
lib/membrane_webrtc_app_web/live/join_live.ex and define a LiveView module to handle the join screen:Elixir
1defmodule MembraneWebrtcAppWeb.JoinLive do
2  use MembraneWebrtcAppWeb, :live_view
3
4  def mount(_params, _session, socket) do
5    {:ok, assign(socket, username: "", room_id: "")}
6  end
7
8  def handle_event("join", %{"username" => username, "room_id" => room_id}, socket) do
9    {:noreply, push_redirect(socket, to: Routes.live_path(socket, MembraneWebrtcAppWeb.RoomLive, room_id, username))}
10  end
11end
12
Create a corresponding template file
lib/membrane_webrtc_app_web/templates/live/join_live.html.leex for the join screen:HTML
1<div>
2  <h1>Join a Room</h1>
3  <form phx-submit="join">
4    <label for="username">Username:</label>
5    <input type="text" id="username" name="username" value="<%= @username %>"/>
6
7    <label for="room_id">Room ID:</label>
8    <input type="text" id="room_id" name="room_id" value="<%= @room_id %>"/>
9
10    <button type="submit">Join</button>
11  </form>
12</div>
13
This code sets up a basic join screen where users can input their username and room ID to join a WebRTC session.
[b] Main Screen
Next, let's create the main screen where the video and controls will be displayed. Create a new LiveView module
lib/membrane_webrtc_app_web/live/room_live.ex:Elixir
1defmodule MembraneWebrtcAppWeb.RoomLive do
2  use MembraneWebrtcAppWeb, :live_view
3
4  def mount(%{"room_id" => room_id, "username" => username}, _session, socket) do
5    {:ok, assign(socket, room_id: room_id, username: username, video_streams: [])}
6  end
7
8  def handle_event("mute", _params, socket) do
9    # Handle mute/unmute logic here
10    {:noreply, socket}
11  end
12
13  def handle_event("toggle_video", _params, socket) do
14    # Handle video on/off logic here
15    {:noreply, socket}
16  end
17end
18
Create a corresponding template file
lib/membrane_webrtc_app_web/templates/live/room_live.html.leex for the main screen:HTML
1<div>
2  <h1>Room: <%= @room_id %></h1>
3  <div id="video-streams">
4    <%= for stream <- @video_streams do %>
5      <video id="<%= stream.id %>" autoplay></video>
6    <% end %>
7  </div>
8  <div id="controls">
9    <button phx-click="mute">Mute/Unmute</button>
10    <button phx-click="toggle_video">Video On/Off</button>
11    <button phx-click="hang_up">Hang Up</button>
12  </div>
13  <div id="participants">
14    <h2>Participants</h2>
15    <!-- List participants here -->
16  </div>
17</div>
18
This main screen template includes areas for displaying video streams, control buttons for muting, toggling video, and hanging up, as well as a section for listing participants.
[c] Backend Components
Finally, set up the WebRTC signaling server and media pipeline. The signaling server will manage the communication between clients, while the media pipeline will handle the actual processing of audio and video streams.
For the signaling server, you might use Phoenix Channels. Add the following to your
lib/membrane_webrtc_app_web/channels/user_socket.ex:Elixir
1defmodule MembraneWebrtcAppWeb.UserSocket do
2  use Phoenix.Socket
3
4  ## Channels
5  channel "room:*", MembraneWebrtcAppWeb.RoomChannel
6
7  # Socket params are passed from the client and can
8  # be used to verify and authenticate a user. After
9  # verification, you can put default assigns into
10  # the socket that will be set for all channels, ie
11  # socket.assigns[:user_id]. To deny connection, return
12  # `:error`.
13  #
14  # See `Phoenix.Token` documentation for examples in
15  # performing token verification on connect.
16  @impl true
17  def connect(_params, socket, _connect_info) do
18    {:ok, socket}
19  end
20
21  @impl true
22  def id(_socket), do: nil
23end
24
And create the room channel in
lib/membrane_webrtc_app_web/channels/room_channel.ex:Elixir
1defmodule MembraneWebrtcAppWeb.RoomChannel do
2  use MembraneWebrtcAppWeb, :channel
3
4  def join("room:" <> _room_id, _payload, socket) do
5    {:ok, socket}
6  end
7
8  def handle_in("new_peer", %{"peer_id" => peer_id}, socket) do
9    # Handle new peer joining the room
10    {:reply, :ok, socket}
11  end
12end
13
This channel will manage the WebRTC signaling messages between clients.
Step 3: Implement Join Screen
User Interface for Join Screen
The join screen is the entry point for users to connect to your Membrane WebRTC application. It includes fields for the user to enter their username and room ID, as well as a button to join the room. We have already set up the basic structure in the wireframe. Now, let's enhance it with more details and functionality.
First, ensure that the
JoinLive module handles user input effectively. Update the join_live.ex file to include more user interaction handling:Elixir
1defmodule MembraneWebrtcAppWeb.JoinLive do
2  use MembraneWebrtcAppWeb, :live_view
3
4  def mount(_params, _session, socket) do
5    {:ok, assign(socket, username: "", room_id: "")}
6  end
7
8  def handle_event("validate", %{"join" => join_params}, socket) do
9    {:noreply, assign(socket, join_params)}
10  end
11
12  def handle_event("join", %{"join" => %{"username" => username, "room_id" => room_id}}, socket) do
13    if username != "" and room_id != "" do
14      {:noreply, push_redirect(socket, to: Routes.room_path(socket, :index, room_id, username))}
15    else
16      {:noreply, socket |> put_flash(:error, "Both fields are required.") |> assign(:username, username) |> assign(:room_id, room_id)}
17    end
18  end
19end
20
In this module, we added an event handler for
validate to dynamically update the state of the form fields. We also updated the join event handler to include validation logic, ensuring that both the username and room ID are provided before redirecting the user to the room.Next, update the corresponding template
join_live.html.leex to handle the new validation and display any error messages:HTML
1<div>
2  <h1>Join a Room</h1>
3  <%= if @flash[:error] do %>
4    <div class="alert alert-danger"><%= @flash[:error] %></div>
5  <% end %>
6  <form phx-change="validate" phx-submit="join">
7    <div>
8      <label for="username">Username:</label>
9      <input type="text" id="username" name="join[username]" value="<%= @username %>" required />
10    </div>
11    <div>
12      <label for="room_id">Room ID:</label>
13      <input type="text" id="room_id" name="join[room_id]" value="<%= @room_id %>" required />
14    </div>
15    <div>
16      <button type="submit">Join</button>
17    </div>
18  </form>
19</div>
20
This HTML template includes the form with
phx-change and phx-submit events bound to our LiveView module's event handlers. It also displays error messages when necessary.Backend Logic for Join Screen
The backend logic for the join screen involves setting up routing and handling the join requests effectively. Ensure that your router is configured to handle the join path and redirect to the room.
In your
router.ex file, update the routing to include paths for joining and rooms:Elixir
1defmodule MembraneWebrtcAppWeb.Router do
2  use MembraneWebrtcAppWeb, :router
3
4  pipeline :browser do
5    plug :accepts, ["html"]
6    plug :fetch_session
7    plug :fetch_flash
8    plug :protect_from_forgery
9    plug :put_secure_browser_headers
10  end
11
12  pipeline :api do
13    plug :accepts, ["json"]
14  end
15
16  scope "/", MembraneWebrtcAppWeb do
17    pipe_through :browser
18
19    live "/", JoinLive, :index
20    live "/room/:room_id/:username", RoomLive, :index
21  end
22
23  # Other scopes may use custom stacks.
24  # scope "/api", MembraneWebrtcAppWeb do
25  #   pipe_through :api
26  # end
27end
28
This routing configuration sets up the root path to display the join screen and dynamically handles the room and username parameters for the room path.
By implementing these steps, we now have a fully functional join screen that collects user input and validates it before allowing users to join a WebRTC room. This setup ensures a smooth user experience and robust backend handling for joining sessions.
Step 4: Implement Controls
Adding Control Features
Control features are essential for any WebRTC application, allowing users to manage their audio and video settings during a call. We will implement basic controls such as mute/unmute, video on/off, and hang up. These controls will interact with the WebRTC backend to manage the media streams.
First, let's enhance the
RoomLive module to include these controls. Open lib/membrane_webrtc_app_web/live/room_live.ex and update it with event handlers for the control actions:Elixir
1defmodule MembraneWebrtcAppWeb.RoomLive do
2  use MembraneWebrtcAppWeb, :live_view
3
4  def mount(%{"room_id" => room_id, "username" => username}, _session, socket) do
5    {:ok, assign(socket, room_id: room_id, username: username, muted: false, video_off: false, participants: [])}
6  end
7
8  def handle_event("mute", _params, socket) do
9    muted = !socket.assigns.muted
10    # Here you would add the logic to actually mute the audio stream
11    {:noreply, assign(socket, muted: muted)}
12  end
13
14  def handle_event("toggle_video", _params, socket) do
15    video_off = !socket.assigns.video_off
16    # Here you would add the logic to actually turn the video on/off
17    {:noreply, assign(socket, video_off: video_off)}
18  end
19
20  def handle_event("hang_up", _params, socket) do
21    # Here you would add the logic to disconnect from the WebRTC session
22    {:noreply, push_redirect(socket, to: Routes.page_path(socket, :index))}
23  end
24end
25
This module now includes handlers for muting the audio, toggling the video, and hanging up the call. These handlers update the socket's assigns and can be expanded to include the actual logic for interacting with the media streams.
Next, update the template for the main screen to include buttons for these controls. Open
lib/membrane_webrtc_app_web/templates/live/room_live.html.leex:HTML
1<div>
2  <h1>Room: <%= @room_id %></h1>
3  <div id="video-streams">
4    <%= for participant <- @participants do %>
5      <video id="<%= participant.id %>" autoplay></video>
6    <% end %>
7  </div>
8  <div id="controls">
9    <button phx-click="mute"><%= if @muted, do: "Unmute", else: "Mute" %></button>
10    <button phx-click="toggle_video"><%= if @video_off, do: "Video On", else: "Video Off" %></button>
11    <button phx-click="hang_up">Hang Up</button>
12  </div>
13  <div id="participants">
14    <h2>Participants</h2>
15    <ul>
16      <%= for participant <- @participants do %>
17        <li><%= participant.username %></li>
18      <% end %>
19    </ul>
20  </div>
21</div>
22
This template includes buttons that trigger the corresponding events defined in the
RoomLive module. The button labels dynamically change based on the current state (e.g., "Mute" changes to "Unmute" when the user is muted).Integrating Controls with Backend
To make these controls functional, you need to integrate them with the WebRTC backend. This involves managing media streams and signaling.
[a] Handling Media Streams
In your
RoomChannel module, you can handle the mute and video toggle actions by interacting with the WebRTC API. Update lib/membrane_webrtc_app_web/channels/room_channel.ex to include logic for these controls:Elixir
1defmodule MembraneWebrtcAppWeb.RoomChannel do
2  use MembraneWebrtcAppWeb, :channel
3
4  def join("room:" <> _room_id, _payload, socket) do
5    {:ok, socket}
6  end
7
8  def handle_in("mute", %{"peer_id" => peer_id}, socket) do
9    # Logic to mute the peer's audio stream
10    {:reply, :ok, socket}
11  end
12
13  def handle_in("toggle_video", %{"peer_id" => peer_id}, socket) do
14    # Logic to turn on/off the peer's video stream
15    {:reply, :ok, socket}
16  end
17
18  def handle_in("hang_up", %{"peer_id" => peer_id}, socket) do
19    # Logic to disconnect the peer
20    {:reply, :ok, socket}
21  end
22end
23
These handlers will manage the signaling for muting, toggling video, and hanging up. You will need to implement the actual logic to interact with the WebRTC API in your client-side JavaScript.
[b] Client-Side JavaScript
In your client-side code, handle the WebRTC actions using the appropriate WebRTC API calls. Create a new JavaScript file
assets/js/room.js and include logic to manage media streams:JavaScript
1let localStream;
2
3async function getUserMedia() {
4  localStream = await navigator.mediaDevices.getUserMedia({ video: true, audio: true });
5  document.querySelector('#localVideo').srcObject = localStream;
6}
7
8function toggleMute() {
9  localStream.getAudioTracks().forEach(track => track.enabled = !track.enabled);
10}
11
12function toggleVideo() {
13  localStream.getVideoTracks().forEach(track => track.enabled = !track.enabled);
14}
15
16document.querySelector('#muteButton').addEventListener('click', toggleMute);
17document.querySelector('#videoButton').addEventListener('click', toggleVideo);
18document.querySelector('#hangUpButton').addEventListener('click', () => {
19  localStream.getTracks().forEach(track => track.stop());
20  // Additional logic to leave the room and close connections
21});
22
23getUserMedia();
24
In your HTML template, include the video element and buttons for the controls:
HTML
1<video id="localVideo" autoplay></video>
2<button id="muteButton">Mute</button>
3<button id="videoButton">Video Off</button>
4<button id="hangUpButton">Hang Up</button>
5
This JavaScript code captures the local media stream and provides functions to toggle the audio and video tracks, implementing the mute and video toggle features. The hang-up button stops all media tracks and handles leaving the room.
By implementing these control features, users can effectively manage their audio and video settings during a WebRTC session, enhancing the overall user experience. In the next part, we'll focus on displaying and managing participants' views.
Step 5: Implement Participant View
Displaying Participants
Displaying participants in a WebRTC session is crucial for a collaborative and interactive experience. Each participant's video stream should be visible to others in the room. We will enhance our
RoomLive module and template to manage and display these streams effectively.First, update the
RoomLive module to handle participants joining and leaving, as well as managing their video streams. Open lib/membrane_webrtc_app_web/live/room_live.ex:Elixir
1defmodule MembraneWebrtcAppWeb.RoomLive do
2  use MembraneWebrtcAppWeb, :live_view
3
4  def mount(%{"room_id" => room_id, "username" => username}, _session, socket) do
5    if connected?(socket) do
6      MembraneWebrtcAppWeb.Endpoint.subscribe("room:#{room_id}")
7    end
8
9    {:ok, assign(socket, room_id: room_id, username: username, muted: false, video_off: false, participants: [])}
10  end
11
12  def handle_info(%{event: "new_peer", payload: %{peer_id: peer_id, username: username}}, socket) do
13    participants = [%{id: peer_id, username: username} | socket.assigns.participants]
14    {:noreply, assign(socket, participants: participants)}
15  end
16
17  def handle_info(%{event: "peer_left", payload: %{peer_id: peer_id}}, socket) do
18    participants = Enum.reject(socket.assigns.participants, fn p -> p.id == peer_id end)
19    {:noreply, assign(socket, participants: participants)}
20  end
21
22  # ... other handle_event functions for mute, toggle_video, hang_up
23
24end
25
Here, we subscribe to the
room:#{room_id} topic to receive notifications when new peers join or leave the room. The handle_info/2 functions manage the participants list accordingly.Next, update the
RoomChannel to broadcast these events. Open lib/membrane_webrtc_app_web/channels/room_channel.ex:Elixir
1defmodule MembraneWebrtcAppWeb.RoomChannel do
2  use MembraneWebrtcAppWeb, :channel
3
4  def join("room:" <> room_id, %{"username" => username}, socket) do
5    send(self(), {:after_join, %{room_id: room_id, username: username}})
6    {:ok, assign(socket, room_id: room_id, username: username)}
7  end
8
9  def handle_info({:after_join, %{room_id: room_id, username: username}}, socket) do
10    broadcast!(socket, "new_peer", %{peer_id: socket.id, username: username})
11    {:noreply, socket}
12  end
13
14  def handle_in("peer_left", %{"peer_id" => peer_id}, socket) do
15    broadcast!(socket, "peer_left", %{peer_id: peer_id})
16    {:reply, :ok, socket}
17  end
18
19  # ... other handle_in functions
20
21end
22
This code broadcasts a
new_peer event when a user joins and a peer_left event when they leave. The RoomLive module listens for these events and updates the participants list accordingly.Finally, update the
room_live.html.leex template to display the participants' video streams. Open lib/membrane_webrtc_app_web/templates/live/room_live.html.leex:HTML
1<div>
2  <h1>Room: <%= @room_id %></h1>
3  <div id="video-streams">
4    <%= for participant <- @participants do %>
5      <div class="participant">
6        <video id="video-<%= participant.id %>" autoplay></video>
7        <p><%= participant.username %></p>
8      </div>
9    <% end %>
10  </div>
11  <div id="controls">
12    <button phx-click="mute"><%= if @muted, do: "Unmute", else: "Mute" %></button>
13    <button phx-click="toggle_video"><%= if @video_off, do: "Video On", else: "Video Off" %></button>
14    <button phx-click="hang_up">Hang Up</button>
15  </div>
16</div>
17
This template includes a
for loop to iterate over the @participants list and display a video element for each participant.Managing Participant States
Managing the states of participants, such as handling active speakers or indicating who is muted, enhances the interaction quality in a WebRTC session. You can extend the
RoomLive module to update and display these states.Add state management in the
handle_event functions for mute and toggle video:Elixir
1def handle_event("mute", _params, socket) do
2  muted = !socket.assigns.muted
3  broadcast(socket, "mute", %{peer_id: socket.id, muted: muted})
4  {:noreply, assign(socket, muted: muted)}
5end
6
7def handle_event("toggle_video", _params, socket) do
8  video_off = !socket.assigns.video_off
9  broadcast(socket, "toggle_video", %{peer_id: socket.id, video_off: video_off})
10  {:noreply, assign(socket, video_off: video_off)}
11end
12
Update the
RoomChannel to handle these broadcasts:Elixir
1def handle_in("mute", %{"peer_id" => peer_id, "muted" => muted}, socket) do
2  broadcast!(socket, "mute", %{peer_id: peer_id, muted: muted})
3  {:reply, :ok, socket}
4end
5
6def handle_in("toggle_video", %{"peer_id" => peer_id, "video_off" => video_off}, socket) do
7  broadcast!(socket, "toggle_video", %{peer_id: peer_id, video_off: video_off})
8  {:reply, :ok, socket}
9end
10
And update the
RoomLive module to manage these events:Elixir
1def handle_info(%{event: "mute", payload: %{peer_id: peer_id, muted: muted}}, socket) do
2  participants = Enum.map(socket.assigns.participants, fn
3    p when p.id == peer_id -> %{p | muted: muted}
4    p -> p
5  end)
6  {:noreply, assign(socket, participants: participants)}
7end
8
9def handle_info(%{event: "toggle_video", payload: %{peer_id: peer_id, video_off: video_off}}, socket) do
10  participants = Enum.map(socket.assigns.participants, fn
11    p when p.id == peer_id -> %{p | video_off: video_off}
12    p -> p
13  end)
14  {:noreply, assign(socket, participants: participants)}
15end
16
This ensures that the state of each participant is updated in real-time and displayed correctly.
Step 6: Run Your Code Now
Running the Application
Now that all the components of your Membrane WebRTC application are implemented, it's time to run your code and see everything in action. Follow these steps to start your application:
[a] Compile the Project
Ensure that all dependencies are compiled and up to date. Run the following command in your terminal:
bash
1   mix deps.get
2   mix compile
3
[b] Start the Phoenix Server
Start the Phoenix development server to run your application locally:
bash
1   mix phx.server
2
Your application will be available at
http://localhost:4000.[c] Access the Application
Open a web browser and navigate to
http://localhost:4000. You should see the join screen where you can enter a username and room ID.[d] Join a Room
Enter a username and a room ID to join the room. Open the same URL in multiple browser tabs or different browsers to simulate multiple participants joining the room.
[e] Test the Controls
- Mute/Unmute: Test the mute button to ensure it mutes and unmutes the audio correctly.
- Video On/Off: Test the video toggle button to turn the video on and off.
- Hang Up: Test the hang-up button to leave the room and close the connection.
[f] Check the Participant View
Ensure that all participants' video streams are displayed correctly in each browser tab. Verify that the state updates (mute, video off) are reflected in real-time across all participants.
Testing and Debugging
Testing and debugging are crucial to ensure your application runs smoothly. Here are some tips to help you with this process:
[a] Console Logs
Use
IO.inspect/2 in Elixir and console.log in JavaScript to print useful information to the console. This can help you understand the flow of data and identify any issues.[b] Phoenix Live Dashboard
Phoenix Live Dashboard provides real-time performance monitoring and debugging tools for your Phoenix application. Add it to your project by updating your
mix.exs:Elixir
1   defp deps do
2     [
3       {:phoenix_live_dashboard, "~> 0.6"}
4     ]
5   end
6
Fetch the new dependency:
bash
1   mix deps.get
2
Add the dashboard route to your router:
Elixir
1   scope "/" do
2     pipe_through :browser
3     live_dashboard "/dashboard", metrics: MembraneWebrtcAppWeb.Telemetry
4   end
5
Access the dashboard at
http://localhost:4000/dashboard for real-time insights.[c] WebRTC Internals
Modern browsers provide a
chrome://webrtc-internals (in Chrome) page where you can inspect WebRTC connections. This tool is invaluable for debugging WebRTC-specific issues.[d] Unit Tests
Write unit tests for your Elixir code using ExUnit. Create test files in the
test directory and run your tests with:bash
1   mix test
2
[e] Network and Performance Testing:
Simulate different network conditions to ensure your application performs well under various scenarios. Tools like
Network Link Conditioner
(for macOS) can help.[f] Error Handling
Ensure that your application gracefully handles errors. For instance, if a user loses connection, display a helpful message and try to reconnect.
By following these steps and tips, you can run, test, and debug your Membrane WebRTC application effectively, ensuring a robust and user-friendly experience.
Conclusion
In this article, we have explored how to build a WebRTC application using the Membrane framework. We started with an introduction to Membrane WebRTC, highlighting its key features and advantages. We then walked through setting up the environment, creating a new Membrane WebRTC application, and configuring the necessary components. Following this, we designed and implemented the join screen, added essential control features, and managed participant views. Finally, we ran the application, tested it, and provided tips for debugging.
Membrane WebRTC, with its modular architecture and robust performance, offers a powerful solution for real-time communication applications. By following the steps outlined in this guide, you can create a scalable and efficient WebRTC application tailored to your specific needs.
Want to level-up your learning? Subscribe now
Subscribe to our newsletter for more tech based insights
FAQ