


A WebRTC leak test checks whether your browser exposes your real IP address through WebRTC ICE candidates, even when connected to a VPN or proxy. The test compares your HTTP-visible IP against IPs revealed by STUN server queries. Developers using VideoSDK for real-time communication should understand these leaks, as the same ICE gathering that enables video calls can expose user IPs.
When you connect to a VPN and visit a website, you expect your real IP address to stay hidden. But WebRTC, the browser technology that powers real-time video and audio calling, can punch right through that VPN tunnel and reveal your actual network identity. This happens through a process called ICE candidate gathering, where your browser queries STUN servers to discover its public IP address for establishing peer-to-peer connections.
For developers building applications with VideoSDK's React SDK or any WebRTC-based platform, understanding this leak vector matters on two fronts. First, your own browsing privacy is at risk. Second, the applications you build may inadvertently expose your users' IP addresses to other participants in a call. A WebRTC leak test is the diagnostic tool that reveals whether this exposure is happening, and this guide walks through how to run one, interpret the results, and apply effective mitigations.
What Is a WebRTC Leak Test?
A WebRTC leak test is defined as a diagnostic procedure that checks whether your browser's WebRTC implementation reveals your real IP address to websites, even when you are connected to a VPN, proxy, or other privacy-enhancing network tool. The test works by triggering the same ICE candidate gathering process that browsers use for real-time communication, then comparing the discovered IP addresses against the IP address visible through standard HTTP requests.
The key distinction between a WebRTC leak test and a DNS leak test lies in what they examine. A DNS leak test checks whether your DNS queries are being routed through your VPN tunnel or leaking through your ISP's default DNS servers. A WebRTC leak test, by contrast, examines whether the browser's peer-to-peer connection setup process bypasses your VPN entirely by querying STUN servers directly over UDP. According to the W3C WebRTC specification, the browser must gather ICE candidates to establish media sessions, and this gathering process is what creates the exposure surface.
VideoSDK and other real-time communication platforms rely on this same ICE gathering process to connect participants in video rooms. The difference is that VideoSDK's infrastructure manages candidate gathering through its cloud SFU, which gives developers more control over what information is exposed to other participants. But when a user visits a third-party website running a WebRTC leak test, their browser performs ICE gathering independently, outside of any application-level controls.
Core Concepts: WebRTC, ICE, STUN, and TURN
WebRTC is a browser API that enables real-time audio, video, and data communication without requiring plugins. For two browsers to connect directly, they need to know each other's network addresses. This is where ICE (Interactive Connectivity Establishment) comes in. ICE is the framework that gathers all possible network paths a browser can use to reach another peer.
STUN (Session Traversal Utilities for NAT) servers help browsers discover their public IP address by responding to UDP requests with the source IP they observe. TURN (Traversal Using Relays around NAT) servers act as relays when direct peer-to-peer connections fail, routing media through a server. The STUN query is where the leak occurs, because the browser sends UDP packets to the STUN server, and the response contains the browser's public IP address, which JavaScript on the page can then read through the WebRTC API.
Types of IPs Revealed
When a browser gathers ICE candidates, it collects several types of network addresses, each with different privacy implications.
Host candidates are the local IP addresses of your machine's network interfaces. These are your private LAN addresses, such as 192.168.x.x or 10.x.x.x. While not directly routable on the internet, they reveal your internal network topology and can be used for fingerprinting.
Server-reflexive candidates, labeled srflx in ICE candidate strings, are the public IP addresses that STUN servers report back to your browser. These are the most sensitive candidates because they expose your real public IP, even if you are connected to a VPN. If the srflx address differs from your VPN-assigned IP, you have a WebRTC leak.
Relay candidates, labeled relay, are addresses assigned by TURN servers. These do not reveal your real IP and are safe from a privacy perspective, though they indicate that direct peer-to-peer connection failed.
mDNS candidates are obfuscated local addresses that browsers like Chrome and Firefox generate using Multicast DNS. Instead of sending a raw local IP like 192.168.1.5, the browser sends a hostname like a generated .local string. This is a privacy improvement, but it is not foolproof, as discussed later in this guide.
IPv6 candidates expose your IPv6 address, which is globally unique and often permanent. Many VPN users focus on IPv4 protection and forget that IPv6 traffic can bypass the VPN tunnel entirely, exposing the user's real IPv6 address through WebRTC.
How WebRTC Bypasses VPNs and Proxies
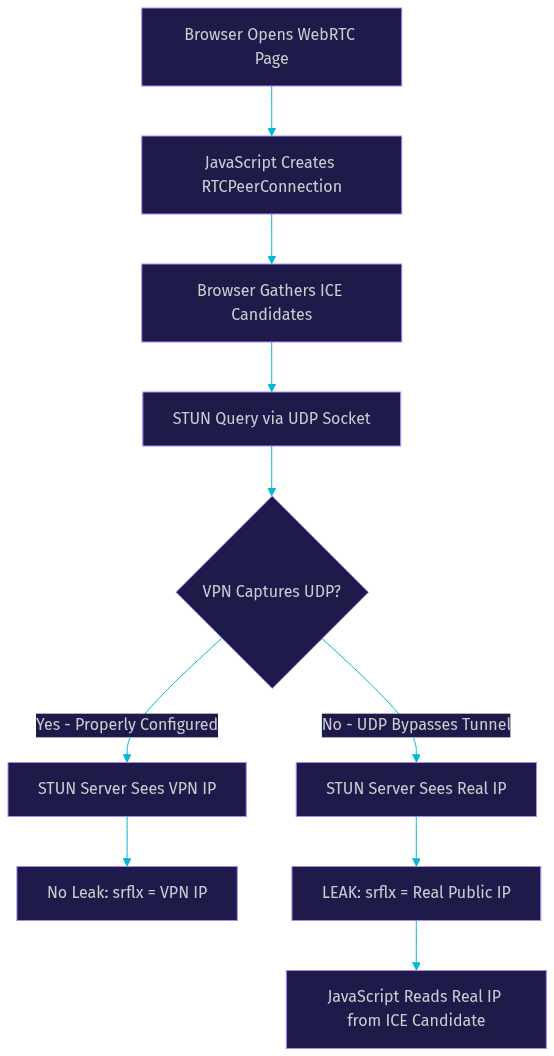
The core reason WebRTC leaks happen is that WebRTC uses UDP for STUN queries, and many VPN tunnels are configured to intercept TCP traffic but not UDP traffic. When your browser opens a UDP socket to send a STUN request, the operating system may route that packet through your physical network interface rather than the virtual VPN interface. The STUN server sees your real public IP and sends it back. JavaScript on the page reads that IP from the ICE candidate string, and your privacy is compromised.
This bypass happens at the socket level. VPNs typically create a virtual network interface (a TUN or TAP device) and modify routing tables to send traffic through that interface. But UDP socket binding behavior varies across operating systems and VPN implementations. Some VPNs bind sockets to the physical interface for performance reasons, which means STUN queries skip the tunnel entirely.
Proxy configurations add another layer of complexity. HTTP proxies only handle HTTP and HTTPS traffic. SOCKS proxies can handle UDP, but many browser proxy configurations do not route WebRTC UDP traffic through the SOCKS proxy. The result is that your browser sends STUN requests directly to the STUN server, bypassing both the VPN tunnel and the proxy.
For developers building real-time communication apps with VideoSDK's Prebuilt UI Kit, this bypass behavior is important to understand. VideoSDK's cloud infrastructure handles media routing through its SFU, which means participant-to-participant IP exposure is minimized. But the browser's own ICE gathering for third-party sites remains a client-side privacy concern that developers should educate their users about.
Running a WebRTC Leak Test: Step-by-Step Guide
Running a WebRTC leak test requires no software installation. The entire process happens in your browser and takes under a minute. Here is how to do it correctly.
First, connect to your VPN or proxy as you normally would. Make sure the connection is active and stable. If you are testing without a VPN, the test will still show you what IPs WebRTC exposes, but you will not be able to identify a leak since there is no VPN IP to compare against.
Second, open a WebRTC leak test website in your browser. Several free online tools perform this test. The test site will typically display your HTTP-visible IP address first, which is the IP address the web server sees when you load the page. This should match your VPN-assigned IP if your VPN is working correctly.
Third, the test site will trigger WebRTC ICE candidate gathering by creating a peer connection in JavaScript. The browser will query STUN servers and collect all ICE candidates. The test site then displays the IP addresses found in those candidates alongside the HTTP-visible IP.
Fourth, compare the two sets of IP addresses. If the WebRTC-revealed IPs include addresses that do not match your VPN IP, you have a leak. Pay attention to the candidate type labels. A srflx candidate showing your real public IP is a confirmed leak. A host candidate showing your local private IP is a local leak, which is less severe but still a fingerprinting risk.
Fifth, note whether any IPv6 addresses appear. If your ISP assigns you an IPv6 address and your VPN does not tunnel IPv6 traffic, WebRTC will expose your real IPv6 address. This is one of the most commonly missed leak types in routine testing.
Finally, record your results. Take note of the browser you used, the VPN provider, the candidate types that appeared, and which IPs were exposed. This baseline helps you verify whether mitigations work after you apply them.
Interpreting Test Results
When you run a WebRTC leak test, the results table will show several rows. Here is what each outcome means and the associated risk level.
No leak: The only IPs shown are your VPN-assigned IP address. Both the HTTP-visible IP and the WebRTC srflx candidate match. This is the desired outcome and indicates your VPN properly handles UDP traffic.
Local leak only: The test shows mDNS hostnames or local private IPs but no real public IP. Your VPN is protecting your public IP, but your internal network topology is visible. Risk level is low to moderate, primarily a fingerprinting concern.
Public IP leak: The srflx candidate shows your real public IP address, different from your VPN IP. This is a serious leak. Any website can discover your real IP through JavaScript, defeating the purpose of your VPN.
IPv6 leak: The test reveals an IPv6 address that belongs to your ISP rather than your VPN. This happens when the VPN tunnels IPv4 but not IPv6. Risk level is high because IPv6 addresses are often globally unique and persistent.
mDNS only: The browser returns obfuscated .local hostnames instead of raw IPs for host candidates. This is the best possible outcome for local candidate privacy, though it does not address srflx or IPv6 leaks.
Browser-Specific Leak Profiles
Different browsers handle WebRTC privacy differently, and the default behavior has changed significantly over the past few years. Here is how the major browsers compare as of 2026.
| Browser | mDNS Obfuscation | Default Leak Risk | Built-in WebRTC Toggle | Extension Support |
|---|---|---|---|---|
| Chrome | Yes (since m72) | Moderate (srflx leaks possible) | No native toggle | Yes |
| Edge | Yes (Chromium-based) | Moderate (same as Chrome) | No native toggle | Yes |
| Firefox | Yes (since v70) | Low (can disable in config) | Yes (media.peerconnection.enabled) | Yes |
| Safari | Partial | Moderate | No native toggle | Limited |
| Brave | Yes (enhanced) | Low (Shields block by default) | Yes (via Shields) | Yes |
| Opera | Yes (Chromium-based) | Moderate | No native toggle | Yes |
Chrome and Edge, both built on Chromium, share the same WebRTC implementation. They use mDNS obfuscation for host candidates by default, which prevents local IP exposure. However, they do not block srflx candidate gathering, meaning your public IP can still be exposed through STUN queries even with mDNS enabled.
Firefox offers the most granular control. In the browser's advanced configuration page, you can disable WebRTC entirely by toggling the media.peerconnection.enabled preference. Firefox also supports a policy that limits ICE candidate types, which can prevent srflx leaks without disabling WebRTC completely.
Brave browser takes the most aggressive approach. Its built-in Shields feature can block WebRTC IP leak detection by default, forcing ICE candidates through the browser's proxy or VPN connection. This makes Brave the strongest out-of-the-box option for privacy-conscious users who want protection without manual configuration.
Safari has partial mDNS support and no user-facing toggle for WebRTC privacy. Users concerned about leaks on Safari typically need to rely on network-level solutions rather than browser settings. Opera, being Chromium-based, mirrors Chrome's behavior with no additional privacy controls.
Mitigation Strategies
Protecting against WebRTC leaks requires a layered approach. No single solution covers every scenario, so combining browser-level controls, extension-based blockers, and VPN-level protection gives you the best defense.
Browser-Level Controls
The first tier of protection is configuring your browser to limit WebRTC exposure. In Firefox, you can access the advanced configuration page and set the media.peerconnection.enabled preference to false, which disables WebRTC entirely. If you need WebRTC for applications like VideoSDK video calls, you can instead use the media.peerconnection.ice.defaultrouteonly preference to restrict ICE candidates to the default route, which forces WebRTC traffic through your VPN interface.
Chrome and Edge do not offer a native WebRTC toggle in their settings pages. The only browser-level option on Chromium-based browsers is the mDNS obfuscation that is enabled by default. For more granular control, you need extensions or network-level solutions.
Extension-Based Blockers
The second tier involves browser extensions that intercept or block WebRTC traffic. Several extensions are specifically designed for this purpose.
uBlock Origin includes an option to prevent WebRTC from leaking local IP addresses. This setting is found in the extension's privacy section and works on Chromium-based browsers. It does not fully disable WebRTC but restricts the candidate types that can be gathered.
WebRTC Control is a dedicated extension that disables WebRTC entirely on all pages. This is effective but heavy-handed, as it breaks any website relying on WebRTC for real-time communication, including video calling apps built with VideoSDK.
WebRTC Slayer offers a middle ground, allowing you to disable WebRTC on specific sites while keeping it enabled on trusted domains. This is useful if you use VideoSDK for video calls but want protection on other sites you visit.
VPN-Level Solutions
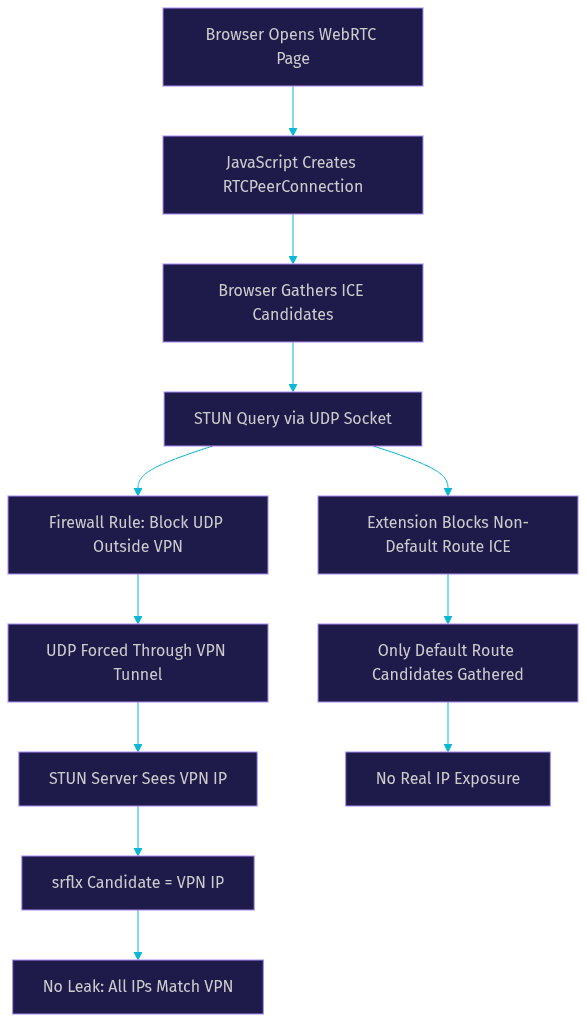
The third and most robust tier is using a VPN that properly handles WebRTC traffic. Some VPN providers intercept UDP traffic at the system level, ensuring that STUN queries go through the VPN tunnel rather than bypassing it. Look for VPN providers that explicitly advertise WebRTC leak protection as a feature.
If your VPN does not offer built-in WebRTC protection, you can configure your operating system's firewall to block UDP traffic on the STUN port (typically port 3478) outside of the VPN tunnel. This forces all STUN queries through the VPN interface, preventing the bypass that causes leaks.
Practical Tips for Developers
If you are building a real-time communication application using VideoSDK's REST APIs or any WebRTC-based SDK, you should be aware of how your application handles ICE candidates. VideoSDK's cloud SFU architecture means that participants do not connect directly to each other. Instead, each participant connects to the VideoSDK media server, which means participant IP addresses are not directly exposed to other participants in the room.
However, you should still consider the privacy implications of WebRTC on pages where users might be concerned about IP exposure. If your application has a landing page or marketing site that does not need real-time communication, avoid loading any WebRTC-related JavaScript on those pages. Reserve WebRTC initialization for the actual call or meeting pages where it is needed.
You can also implement a warning system that checks for WebRTC leak conditions before users join a call. If a user's browser is exposing their real IP through WebRTC, your application can display a privacy notice recommending they enable WebRTC protection or switch to a browser with better default privacy controls.
Advanced Monitoring and Continuous Testing
Running a single WebRTC leak test is a good starting point, but browser updates, VPN client updates, and operating system changes can all alter your WebRTC exposure profile. Continuous monitoring ensures that new leaks are caught before they become a problem.
For individual users, the practical approach is to re-run a WebRTC leak test after every browser update, after every VPN client update, and after any change to your network configuration. This takes less than a minute and catches regressions early before they expose your real IP across multiple browsing sessions.
For development teams building privacy-sensitive applications, consider integrating WebRTC leak detection into your testing pipeline. You can automate browser-based tests that check for ICE candidate leaks across different browser and VPN combinations. The conceptual approach involves launching a headless browser, connecting through a VPN, and verifying that no ICE candidates expose real IP addresses. Teams using VideoSDK for real-time communication can leverage the platform's Python SDK to build automated testing pipelines that verify media routing does not expose participant IPs.
Frequently Overlooked Issues
Several WebRTC leak scenarios are commonly missed even by privacy-conscious users and experienced developers.
IPv6 leaks are the most frequently overlooked issue. Many VPN providers tunnel IPv4 traffic but either ignore IPv6 entirely or block it. If your ISP assigns you an IPv6 address and your browser supports IPv6, which all modern browsers do, WebRTC will gather IPv6 ICE candidates that bypass the VPN. A proper WebRTC leak test must check for IPv6 candidates, not just IPv4.
mDNS obfuscation has limits. While Chrome and Firefox replace local IPs with .local hostnames, this only protects host candidates. Server-reflexive candidates still expose your public IP. Additionally, mDNS hostnames are persistent within a browser session and can be used for cross-site fingerprinting even without revealing a raw IP address.
Proxy configurations can create a false sense of security. If you configure an HTTP proxy in your browser settings, WebRTC UDP traffic typically does not go through that proxy. Even SOCKS5 proxies may not capture WebRTC UDP traffic depending on the browser's implementation. Always test with a WebRTC leak test after configuring a proxy rather than assuming it provides protection.
Summary and Action Checklist
Here is a concise checklist to follow for WebRTC leak protection:
- Run a WebRTC leak test on a free online testing tool while connected to your VPN
- Compare the HTTP-visible IP with the WebRTC-revealed IPs, paying attention to srflx candidates
- Check for IPv6 candidates separately, as many tests highlight them in a different section
- Apply the appropriate mitigation for your browser (Firefox config toggle, Chrome extension, or VPN-level UDP blocking)
- Re-run the test to confirm the leak is resolved
- Set a reminder to re-test after every browser or VPN update
- For developers, audit your application's WebRTC usage and avoid loading WebRTC JavaScript on pages that do not need real-time communication
Further Reading
For developers interested in building secure real-time communication applications, the VideoSDK documentation provides comprehensive guides for embedding video calling with proper security controls. The W3C WebRTC specification is the authoritative reference for understanding ICE candidate behavior. For network-level privacy research, the IETF RFC 8445 covers ICE in detail, and webrtcstats.com offers real-world data on WebRTC connection quality across different network conditions.
Definitions Glossary
ICE Candidate: A network address discovered by the browser during the Interactive Connectivity Establishment process, used to establish WebRTC peer connections. VideoSDK's SFU architecture manages ICE candidates server-side, reducing direct participant-to-participant IP exposure.
STUN Server: A server that helps browsers discover their public IP address by responding to UDP requests with the observed source IP. STUN queries are the primary mechanism behind WebRTC IP leaks.
TURN Server: A relay server that routes WebRTC media traffic when direct peer-to-peer connections fail. TURN candidates do not reveal the user's real IP address, making them safe from a privacy perspective.
mDNS Obfuscation: A browser technique that replaces local IP addresses in ICE candidates with .local hostnames using Multicast DNS. This prevents raw local IP exposure but does not protect against server-reflexive candidate leaks.
Server-Reflexive Candidate (srflx): The public IP address that a STUN server reports back to the browser. If this address differs from your VPN-assigned IP, you have a confirmed WebRTC leak.
Key Takeaways
- A WebRTC leak test compares your HTTP-visible IP against the IPs revealed through ICE candidate gathering, flagging any mismatch as a privacy leak.
- Server-reflexive candidates are the most dangerous leak type because they expose your real public IP even when a VPN is active.
- IPv6 leaks are frequently overlooked and require separate verification since many VPNs do not tunnel IPv6 traffic.
- Browser-level mitigations vary significantly, with Firefox offering the most granular controls and Brave providing the strongest out-of-the-box protection.
- Developers using VideoSDK benefit from its cloud SFU architecture, which minimizes participant IP exposure compared to raw WebRTC peer-to-peer connections.
- Continuous testing after browser and VPN updates is essential because WebRTC behavior can change with each software update.
Conclusion
WebRTC leak tests are a critical diagnostic tool for anyone who relies on VPNs or proxies for privacy. The same technology that powers real-time video calling through platforms like VideoSDK can also expose your real IP address through STUN queries that bypass VPN tunnels. By running a WebRTC leak test, interpreting the results correctly, and applying the right combination of browser controls, extensions, and VPN-level protections, you can close this privacy gap effectively. For developers building real-time communication apps, VideoSDK's cloud SFU architecture offers a safer alternative to raw peer-to-peer WebRTC by managing ICE candidates server-side. Start by running a free WebRTC leak test today, then explore VideoSDK's documentation to learn how to build secure video calling experiences. What are you building with WebRTC? Drop a comment below, I'd love to hear about your real-time communication use case and any privacy challenges you've encountered.
Free $20 Balance for AI Voice Agents & Video Calls
FAQ